The construction of any house always ends with surface finishing: plastering, painting, laying tiles or flooring.
Finishing may also be necessary in an old building if you want to make renovations.
Any finishing always involves the application of finishing materials. And it is at this stage that difficulties may arise, because not every surface provides acceptable adhesion to finishing materials: plaster, paint.
In old buildings, there may be surfaces that have already been painted or tiled previously, and if this finish holds up well and does not peel off, it is permissible to apply a layer of fresh finishing materials to it. But such surfaces are smooth and do not adhere well to plaster and new paint; finishing materials will slide off them.
In order to prevent possible problems, primers are used, which are applied to surfaces to give them the ability to firmly adhere to finishing materials.
Composition of concrete contact
The primer contains:
- styrene-acrylic dispersion as a binder;
- quartz sand fractions from 0.3 (for putty) to 0.6 (for plaster);
- Portland cement;
- fillers.
The primer is a viscous liquid suspension, usually pink (sometimes blue or purple) without a distinct odor. The dye is added to the composition to make it convenient to control the application and not leave bald spots.
Concrete contact mixes with water, but after drying it becomes water insoluble.
The primer is non-toxic and does not require the use of protective equipment when working with it; but it is advisable to wear protective gloves and ventilate the room.
Important!
When frozen, concrete contact loses its qualities. There are types of primers that can withstand several cycles of freezing and thawing without loss of properties.
What not to do?
When doing construction work yourself, it is not recommended to make the following mistakes:
- Dilute the mixture with more water than recommended on the packaging, because... the material will not provide the required bonding strength to the surface and may crack.
- The primer composition is not applied to a frozen base.
- Do not spread the mixture on an uncleaned surface; cleaning, degreasing, and dust removal are required.
- The surface must be dry; do not spray the mixture onto a wet surface.
- During operation, it is necessary to stir the composition regularly, because granules or grains of sand may sink to the bottom of the container.
- Do not continue surface treatment until the primer dries; the mixture must be wet.
- It is not recommended to carry out work at temperatures below +5°C.
- It is unacceptable for dust to get on the coating; the adhesive ability of the primer may be reduced.
- Mixtures that have expired or are frozen should not be used.
- There is no need to add water to the prepared composition.
What surfaces can be treated
Betonkontakt is intended primarily for treating concrete and brick walls for the application of gypsum plaster.
Hardened concrete, like brick, has a fairly smooth and low-porosity surface with low adhesion. Concrete contact does not penetrate deep into the base, but forms a thin film on its surface. Thanks to the addition of quartz sand, this film has a rough surface to which any finishing materials adhere well.
In addition to a concrete or brick base, the following surfaces can be treated with concrete contact:
- tree;
- metal;
- ceramics;
- drywall;
- asbestos cement.
In addition, surfaces with an already applied layer of paint or old tiles are treated with a primer. If these finishing materials hold tightly, a new coating can be applied over them. Neither paint, nor tiles, nor plaster will stick to a smooth painted or ceramic tiled surface, but if you first treat it with a concrete contact primer, adhesion will increase and it will be possible to apply new finishing materials.
Thanks to the use of concrete contact, it is possible not to use a mesh under the plaster and not to prime the surface with PVA glue; The plaster will hold up just fine. Thus, the use of concrete contact significantly reduces the labor intensity of plastering work and the time spent on it.
Important!
It is not recommended to apply cement plaster to concrete contact. It can tear the primer layer and peel off.
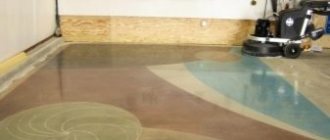
Betonkontakt is also used to prime the surface of a concrete screed in order to bind residual dust before laying the floor covering.
Peculiarities
Betonkontakt cement mixtures are intended for priming surfaces. The composition penetrates deeply into the fibers of the material, creating a rough coating on which finishing work is carried out. Special polymer compounds ensure reliable adhesion of the coating to the base.
The peculiarity of the building mixture is its versatility of use, since the composition is suitable for different types of surfaces (wall panels, ceilings, floors, arches, niches).
When using the material, it is necessary to prepare a clean surface free of dust and oil stains. It must have a temperature above minus. Concrete slabs, wood, metal, tiles, glass and other painted surfaces can be used as a base for the coating.
The products are used for interior and exterior finishing works. Without the mixture, it will not be possible to create the required degree of adhesion between different covering building materials. The primer allows decorative coatings to remain in place at sub-zero temperatures in the autumn-winter period.
How to apply concrete contact
In order for the primer to perform its functions, you must adhere to the rules for its application.
Important!
There are always instructions for use on the packaging. You must read it carefully and adhere to these rules. The properties and methods of applying primers of different types from different manufacturers may differ, for example, some types of concrete contact can only be applied with a brush, while others are designed specifically for application by roller. These nuances must be taken into account.
Preparatory work
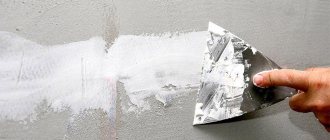
Before applying the primer, it is necessary to remove debris and excess dust; if there is old paint or plaster that does not adhere well, it must be knocked down and cleaned with metal brushes; Wash dirty surfaces with soapy water or soda solution and dry thoroughly.
When storing the material, sand settles to the bottom, so before work it is necessary to thoroughly stir the primer so that the sand is distributed evenly.
Important!
It is the sand that is part of the concrete contact that makes it possible to give the surfaces a roughness that ensures adhesion.
Applying primer
There are two main ways to apply primer:
- with a brush or roller;
- spray gun.
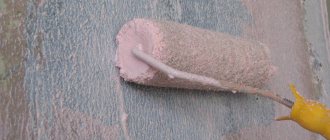
Applying concrete contact with a brush or roller is a rather slow and labor-intensive process.
It is necessary to apply it so that the sand is distributed evenly over the surface of the base.
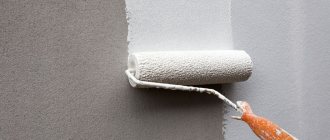
It is much more productive to apply the primer with a spray gun. In this case, the air flow beats the residual dust and distributes the sand evenly over the surface.
In addition, the spray gun allows you to significantly save time.
Sometimes it is recommended to apply concrete contact using a roller, which is certainly faster and more convenient than applying it with a brush.
To do this, the primer will have to be diluted with water, but adding water will weaken the adhesive composition. As a result, the sand will not adhere well, which is noticeable even when applying the primer: the sand crumbles directly onto your hands. In addition, the fleecy surface of the roller absorbs large amounts of sand. The primed surface acquires an uneven, bald, crumbling texture.
Important!
There are types of concrete contact that are designed specifically to be applied with a roller. Such primers have a more liquid consistency, which allows you to use material more economically, while they provide surfaces with increased adhesion.
Concrete contact is applied to the base in one or two layers. After drying, a durable film appears on the surface of the base, resembling sandpaper to the touch. It is this structure that allows you to reliably hold finishing materials.
Important!
After working with the primer, the instrument must be immediately thoroughly washed with water, since the composition dries quickly, and after that it can only be washed off with a solvent.
Features of applying concrete contact for outdoor work
Concrete contact can be used at ambient temperatures from +5 to +25°C. When performing finishing work in the cold season, you need to use special frost-resistant types of primer intended for outdoor work.
Why is it needed?
When deciding what concrete contact is, it is necessary to take into account the scope and objectives of the finishing material.
The task of the building mixture is to ensure reliable adhesion between the 2 materials and strengthen the base. It is necessary to increase the adhesion rate on the ceiling, wall panels, and when installing ceiling screeds.
The mixture is used for cement-sand and concrete screed. As a result of the work, the coating becomes solid and durable, because scattered layers are aligned.
On wall slabs with a smooth surface and poor water absorption, the solution must be applied before plastering and painting. Without a primer, the materials will not stick, they may crack and crumble, and the wallpaper will not last long.
The mixture allows you to reduce labor costs and the cost of preparatory work for cleaning surfaces of old materials and leveling. After use, the surface acquires the qualities of a waterproofing layer.
Concrete contact consumption. Is it possible to reduce it
Considering that concrete contact is more expensive than other primers (concrete contact is one of the most expensive types of primers), the desire to save material is understandable. For this purpose, it is sometimes diluted with water, which leads to a significant decrease in the quality of the coating.
The standard consumption of concrete contact applied in one layer is from 0.1 to 0.5 kg per 1 square meter of surface.
What determines such a large scatter?
Depending on the ability of the base to absorb moisture, the primer consumption will differ.
For example, for monolithic concrete, concrete slabs it will be 0.2-0.35 kg, for tiles - 0.1-0.2 kg per 1 square meter. On average, smooth surfaces will require 150 g of primer per square, and porous surfaces with a cellular structure - up to 500 g for the same area.
How to tell if a surface is smooth or porous:
- Smooth surfaces include painted, metal, and ceramic surfaces.
- Surfaces made of facing bricks or concrete slabs are considered medium-porous.
- Concrete, brick, and cellular surfaces are called highly porous.
The following factors also influence primer consumption:
- Fraction of quartz sand included in the composition of concrete contact. The larger the particles, the greater their surface area, which means that more base adhesive is needed to cover these grains of sand. A primer with coarse sand is applied in a thicker layer, as a result its consumption is greater than that of concrete contact, which contains fine sand.
- Method of applying primer. When applied manually (brush, roller), the concrete contact layer is thicker. The spray gun applies the primer thinner and more evenly, reducing its consumption.
- Temperature and humidity in the room. The higher the ambient temperature and the lower the humidity, the greater the primer consumption.
And, of course, material consumption increases when applied in two layers.
Recommendations for surgery
In order to do the job flawlessly on the first try, it is better to listen (heed?) to the advice that masters share with beginners.
Purchase and preparation of the composition
- Buying a quality product that has many positive reviews is the only way to protect yourself from all kinds of counterfeits. Checking the packaging (expiration date) and quality certificate “without leaving the checkout” will give you a chance to purchase a fresh and efficiently working product.
- If you are not sure which primer is needed for a particular surface, then it is better to get all the information from sales consultants. They will lay out all the necessary information - about the manufacturer, about the concrete contact: consumption, features of the types available for sale.
- After opening the package, the primer, which is similar in consistency to paint, is also thoroughly mixed, for example, with a mixer attachment. An obstacle to applying concrete contact is a high level of humidity (more than 75%). It will not allow the material to dry “correctly”.
The homogeneity of the mixture is the first sign of a quality product. Any lumps in a freshly opened container indicate the opposite.
Surfaces and work
Betonokontakt does not like greasy stains on the paint, so problem areas are washed (wipe) with a sponge, then degreased. The use of a regular primer will allow you to slightly reduce consumption, since it will do its job - it will fill all the cracks in the base. Large and small debris, dirt, unevenness or suspicious areas that threaten to soon crumble are the obstacles that will have to be gotten rid of. A necessary condition for work is a clean but completely dry base. Surfaces that absorb liquid well are a sufficient reason to apply two layers of concrete contact. If the base has serious defects or unusual relief, then re-processing of this problematic surface is also required. The tool is selected based on convenience and surface area. It can be a roller, brush, spray gun
In the latter case, it is important that the size of the nozzle does not interfere with the exit of the mixture components. Wide brushes are ideal
Rollers, on the contrary, increase consumption by absorbing a large amount of the composition. Mandatory drying of each layer, regardless of their number, is a rule that applies to almost all construction work. However, you should not hesitate to fix the finishing material onto the last dried layer. Otherwise, enough dust will settle on it, and it will reduce the contact strength. Protection of the base from it is necessary. If 48 hours have passed after applying the concrete contact, then a new surface treatment will be required: this time with ordinary deep penetration soil.
If not all of the concrete contact is used, then the packaging is stored at room temperature. Sending it to “winter” on an open balcony is prohibited: since after freezing the primer loses its unique properties. The shelf life of the material is from 6 to 12 months.
What properties does concrete contact give to surfaces?
Applying concrete contact provides many advantages:
- Strengthening surfaces.
- Giving surfaces waterproofing properties. (In addition to concrete contact, there are other waterproofing impregnations. If subsequent plastering with cement mortar is planned, it is advisable to use other impregnations rather than concrete contact).
- Formation of an adhesive film that allows high-quality application of finishing materials to the surface.
- The concrete contact coating does not interfere with gas exchange (primed walls “breathe”).
- The surface is protected from mold and mildew.
- Preventing the absorption of water from the plaster mixture, which reduces the strength of the plaster layer, by the base material.
Advantages of concrete contact:
- availability;
- easy application;
- added dye to control the uniformity of application;
- quick drying and the ability to continue finishing work without wasting time;
- safety, absence of harmful effects on the human body;
- ease of use (convenient consistency, concrete contact primer is supplied ready for use and does not require dilution with water);
- fire and explosion safety;
- durability.
"Betokontakt" and oil paint
Some professionals use primer on painted substrates. But still, most people advise removing the paint. This can be explained simply - with a primer, and without it, a layer of plaster from the pressure of weight may well separate from the paint.
But if the paint is not removed, then the following actions are recommended:
- Thoroughly degrease the surface to be treated;
- Get rid of the smooth surface effect, for example, using sandpaper or a wire brush;
- Make notches with an axe;
- Remove dust thoroughly (in any way);
- Apply the first coat of primer;
- Allow the surface to dry;
- Apply a second coat of primer;
- Allow to dry again;
- Then carry out the planned finishing work.
This is another clear example of how Betokontakt works, but here you can be content with notches: if the area is sufficient, then the plaster and tiles will stick, apply the desired mixture to chips on the surface, and after drying, continue finishing.
Those who have used this primer agree that it holds up better. Without a doubt this is true. But provided that all instructions are followed. Particular attention should be paid to the surface drying process. Follow the recommendations strictly, observe the specified time, drying up to four hours, and a cheaper analog – up to a day.
How to choose concrete contact correctly
The question arises: how not to make mistakes when buying?
Choose a primer produced by well-known companies that are sensitive to their reputation. If you see an expensive brand of concrete contact at a too low price, this is a reason to be wary.
You can evaluate the quality of the primer visually. High-quality material always has a pink, blue or purple color to control the evenness of the coating. If the primer is almost white, this is a sign that it may have been heavily diluted with water.
Video: Primer: types, mistakes, how to deceive? Secrets of materials and advice from a professional
Concrete contact is one of the types of primers that cannot be avoided when carrying out finishing work. In addition to adhesion, it gives surfaces additional characteristics: strength, waterproofing properties, resistance to mold and mildew, and also provides dust removal from concrete surfaces. The use of concrete contact allows finishing work not only on new surfaces, but also on those that have already been previously painted or tiled. To obtain a reliable and durable coating, it is important to use high-quality material and not try to save money by diluting it with water.
Preparing concrete walls for plastering
The process of preparing interior concrete walls for plastering consists of the following steps:
- The old coating in the form of fragile plaster, whitewash, paint is removed (in which cases it is possible to apply plaster over old paint, we recommend reading here);
- Defects in concrete walls are determined. If there are nodules, they are cut down using a hammer and chisel. Massive chips and deep cavities are sealed with cement-sand mortar in a ratio of 1:3; if necessary, steel mesh is used for reinforcement;
- On smooth walls, notches are made using a hammer and chisel, the maximum notch spacing is 10 cm;
- If it is necessary to install hidden wiring, grooves are made for the wires;
- The concrete surface is cleaned. A brush and water are used to remove dust and dirt. The wall can be treated using compressed air or a strong jet of water, which will significantly speed up the cleaning process;
- A primer is applied to the wall surface.
Notches on a concrete wall
We'll talk more about the types of primers for concrete walls below.
Priming concrete walls before plastering
Priming of concrete walls is necessary for the following purposes:
- Reducing the absorption of water from the solution into the concrete base;
- Protecting a concrete wall from the formation of fungus and mold;
- Increasing the strength of the protective (surface) layer of concrete;
- Dust removal from the concrete surface. The primer binds dust particles and makes the base clean;
- Improving the adhesion of plaster mortar to a concrete base.
Applying primer to a concrete wall
Next, we will look at how to prime concrete walls before plastering:
- For smooth concrete surfaces, concrete contact primers are ideal. After application, the composition fills the pores in the concrete, and a rough layer with high adhesion is formed on the surface, facilitating good adhesion to future plaster. We recommend compositions from the following manufacturers: Feidel Betokontakt, Knauf Betokontakt, Prospector Beton-Kontakt.
- Old concrete surfaces can be strengthened using a deep penetration primer designed specifically for impregnating weak substrates. Such soil impregnates the top layer of concrete, thereby strengthening it and giving it the necessary strength. Among the manufacturers we recommend: Prospectors “Deep Penetration”, AquaNova “Nova”, Acrylic Optimist “Deep Penetration”.
Primer Prospectors "Deep Penetration"
To prepare porous concrete surfaces (aerated concrete, foam concrete), primers are needed that reduce the absorbency of the base, thereby preventing uneven setting of the solution. The following primers are perfect: Knauf Mittelgrund, Knauf Rotband Grund (for gypsum plasters), Ceresit ST 17, Toiler TR10.
When applying primer to the substrate, be sure to follow the manufacturer's instructions. As a rule, the primer must be shaken before application, and the application process itself must be carried out in several layers.
Installation of beacons and reinforcing mesh
If the old wall has differences of more than 10 mm, then it is necessary to install beacons before applying plaster. Beacons are needed for even application of plaster with an equal layer of thickness. It is better to use metal profiles as beacons.
Lighthouses on a concrete wall
If the thickness of the planned plaster is more than 20 mm, then it is necessary to additionally install a reinforcing mesh. The mesh is fastened to the wall using dowel nails.
Next, you need to prepare the solution in accordance with the manufacturer's instructions. To avoid the formation of lumps, add water to the dry mixture, and not vice versa.
Preparing drywall for tiles
Surface primer
Do I need to prime drywall before laying tiles? Here the opinions of professionals converge. Primer applied to the wall contributes to:
- reducing the level of moisture absorption
- fiber strengthening
- preventing the formation of pathogenic microflora on the gypsum board wall.
The hardened primer for drywall under tiles creates a protective polymer layer that prevents the penetration of moisture contained in the tile adhesive.
What primer is best for drywall under tiles? It is recommended to treat the surface with an acrylic primer. It is non-toxic, dries quickly, lays evenly on the plane and has high performance characteristics.
It is recommended to prime the surface as follows:
- The wall must be thoroughly cleaned of dust and debris. To do this, you will have to wipe the base with a damp sponge;
- When preparing plasterboard walls for tiles, the primer should be poured into a container or tray and, dipping the roller, begin to process the walls;
- The primer must be distributed evenly. To treat hard-to-reach areas, you need to use a thin brush, and apply the solution to the surface with a roller;
- Once the tile drywall primer has hardened, a second coat needs to be applied.
Do I need to prime drywall before laying tile? Of course, this stage in preparing walls for tiles is very important; the reliability of the finishing coating will depend on it.
After the preparatory activities, you can begin to putty.
Seam reinforcement
It is necessary to reinforce the seam-joint spaces in order to obtain the most durable and seamless surface. It is the joining seams that are the most vulnerable places in a plasterboard structure; they can provoke the formation of cracks and cause destruction of the facing layer, so the plasterboard must be reinforced before the tiles.
To prepare the wall for putty, the seams are filled with appropriate compounds, which are selected according to their purpose:
- starting (leveling) composition is suitable for hiding various defects
- the finishing putty is necessary to create a smooth base
- a special type of putty is used to seal joints between slabs
When choosing putty to fill joints under tiles, pay attention to its composition. This can be gypsum, cement and polymers
Gypsum-based plaster is not recommended for use in rooms with high humidity levels. Plasterboard putty under tiles in the bathroom should be done with a mixture of either cement or polymer based. The latter option is distinguished by its versatility of use, high cost and high performance.
It is necessary to reinforce the joints between the sheets using a special tape - serpyanka. It is better to use synthetic tape (construction bandage). This technique will significantly reduce the likelihood of microcracks forming and strengthen the surface intended for laying tiles. During the process of sealing joints, drywall putty under the tiles is first applied to the problem area, after which the tape is pasted, and again everything is tightened with the mixture. It is necessary to reinforce the joints by carefully pressing the tape into the solution.
Plasterboard putty
Having found out whether it is necessary to plaster the drywall under the tiles, you can begin processing the walls.
First of all, the corners are plastered using plastic protective corners. The working mixture is applied on both sides of the corner, and the corner is inserted; the layer thickness should not be more than 2 mm. When pressing on the edge of the corner, there is no need to overdo it; the excess is removed with transverse movements of the spatula.
It is necessary to plaster the wall evenly, and after the finishing layer has dried, go over it with sandpaper. The tiles are laid on putty plasterboard using crosses and a special adhesive composition.
How to plaster concrete walls
The general word “plaster” hides a great variety of different materials. To make it easier to navigate this diversity, it is customary to classify plaster compositions by type of base, place of application, additional functions, etc.
By purpose (in relation to a concrete base):
- conventional (used for rough leveling of concrete walls, sealing holes, cracks, joints, cracks);
- decorative;
- special (X-ray protective, noise-reducing, sanitizing, etc.).
By place of application: façade, universal and interior.
Since concrete can be different, for example, gas and foam concrete structures are often found in private homes, not all plaster mixtures are suitable for plastering. To solve the question of how to plaster concrete structures, you need to get acquainted with the main types of compositions.
Cement-sand mixture
More often than others, cement-sand mixture (CSM) is chosen as plaster on concrete for exterior work. Cement is a binder that, when the solution hardens, forms a high-strength artificial stone that is resistant to frost. Sand filler does not reduce the strength of this stone, but it can significantly reduce the amount of cement used. The size of sand grains affects the workability of the mixture and the texture of the cement coating.
In addition to these two components, the cement mixture contains additives that give the solution the necessary qualities. They are used to increase the plasticity of the solution, increase frost resistance, water resistance, as well as other parameters of the working mixture and finishing coating. For some coatings, white cement is used.
Main advantages:
- strength (depends on the brand of cement used, the ratio of components);
- durability;
- frost resistance;
- waterproof;
- versatility (used outdoors and in various types of premises);
- ease of preparation and application of the solution;
- maintainability;
- availability, low price of components;
- manual or mechanical application possible;
- fire resistance;
- good adhesion.
The cement composition is not suitable for use in areas with seismic activity, as well as for houses located close to railway lines. Mineral plasters do not withstand vibration loads and building shrinkage. Therefore, for new buildings it is more rational to choose mixtures based on polymer bases.
DSPs are not suitable for plastering cellular concrete - aerated concrete, foam concrete blocks due to their high dead weight. But this composition is especially good for plastering concrete walls in monolithic houses.
Mixing sand and cement for plaster is often done independently. This significantly reduces the cost of plastering work. The proportions of the main components depend on the design brand of coating, the brand of cement, and the presence of other binders in the plaster mixture.
Cement plaster is sold in the form of a dry mixture packaged in kraft bags (hereinafter referred to as SS). The shelf life of SS and cement powder does not exceed a year.
Gypsum plaster
The gypsum base is known to be water-resistant, so gypsum plasters (with rare exceptions) are used for interior work. Here he is the leader.
The main advantages that gypsum mixtures “boast” are:
- rapid strength gain;
- low weight of the coating;
- vapor permeability;
- environmental friendliness;
- ease of formation of a smooth surface;
- versatility (in relation to the base material);
- ease of repair;
- easy formation when creating relief surfaces;
- non-shrinkage of the mixture during hardening;
- fire safety;
- water retention (the solution does not release moisture to porous substrates);
- low thermal conductivity;
- high adhesion.
Disadvantages of gypsum coatings:
- rather low frost resistance;
- setting too quickly;
- instability to biological damage.
Leading manufacturers of plaster mixtures have learned to cope with almost all the shortcomings of gypsum.
Other options for plastering materials
In addition to the materials mentioned, gypsum-lime, acrylic, polymer-cement, lime, silicate, and polymer compositions are used for finishing concrete bases. They differ in their qualities, price and possibility of application to the base material. For example, silicate compounds are a good plaster for cellular concrete on the street side. Acrylic mixtures are applied in a thin layer, so they are not used for leveling.