The construction industry has undergone significant changes recently. New materials and advanced technologies have appeared. This equally affected the execution of floor installation work. Since 2000, such technology as dry floor screed from the German company Knauf came to the market of the CIS countries. It is now widely used in residential high-rise buildings, cottage-type houses and in various office establishments. The main advantage of dry floor screed GVL is the speed of installation. It can be installed in one day and is immediately ready for use, unlike cement screed, which requires 28 days to fully harden. Also important is the complete absence of water during installation and fairly low dust formation.
Types of floor screeds and their features
During construction or renovation, an important element is the installation of a durable rough screed covering, on which a decorative covering such as laminate, parquet, linoleum or ceramic floor tiles will then be laid. Today there are several types of screeds. This is a classic cement or concrete screed, it is applied wet. There is also a semi-dry screed using a minimal amount of water. There is a so-called self-leveling floor, which serves to level the surface of the subfloor. And finally, a type such as a dry screed, which is installed from gypsum fiber boards over a layer of expanded clay backfill without the use of water.
Tools and materials
To perform high-quality work on installing a bulk floor made of expanded clay and gypsum plaster sheets, you will need the necessary set of tools:
- tape measure and marker;
- laser level;
- usual high-quality construction level;
- perforator;
- screwdriver with attachments;
- jigsaw;
- drywall knife;
- square or metal ruler;
- roughing plane for edges;
- construction stapler;
- guides for beacons made of aluminum or galvanized profiles;
- rule or leveling rod;
- bucket and shovel;
- vacuum cleaner;
To install a dry gypsum fiber floor, you will need materials that must be purchased in advance and delivered to the site. For the screed you will need:
- 80 micron thick polyethylene film for vapor barrier;
- edge tape 100 mm wide;
- PVA glue;
- self-tapping screws for drywall 19 mm long;
- expanded clay backfill Compevit with granule sizes of 1-4 mm;
- sheets of dry Knauf screed;
- putty Knauf
The amount of material required is calculated based on the floor area of the room and the thickness of the backfill. Anyone can easily perform all these calculations for their apartment themselves, knowing the length and width of the rooms and the corridor. It is worth noting that the material must be purchased with a small margin, based on the fact that during the installation process there will necessarily be cuttings of slabs and the thickness of the screed at different points may differ.
What is gypsum fiber sheet?
By gypsum fiber sheet (gypsum fiber sheet) we mean a special material that has a completely different structure than plasterboard, although it closely resembles it in appearance.
GVL consists of two components - 80% gypsum and 20% cellulose fiber. In production, these two components are mixed well, and then pressed and dried. There is no coating on the top layer, but the strength of the slab is unique. GVL can be standard and moisture resistant. Standard is used for simple rooms where there is no risk of condensation. Moisture-resistant slabs are laid:
- In bathroom;
- in the kitchen;
- on the balcony.
Dry screed technology
The technology for laying Knauf loose flooring is quite simple, but even it requires sufficient experience and skills. Therefore, in order to get the job done quickly, efficiently and not spoil expensive material, it is better to contact qualified specialists. The contact details of such craftsmen can always be found in construction supermarkets or on specialized websites, and customer reviews can also be found there.
The entire process of installing a dry screed can be divided into several stages:
- preparatory stage;
- marking;
- vapor barrier device;
- expanded clay backfill device;
- installation of sheets of dry Knauf screed.
Let's take a closer look at each stage separately.
Preparatory stage of work
Before starting work on the screed, it is necessary to dismantle the old existing floor covering - it can be parquet, wooden flooring, old tiles. If this is an overlap, it is necessary to repair large dents and holes with mortar or putty. After the solution has dried, it is necessary to vacuum the floor surface, remove all construction debris, and in some cases it is necessary to prime the surface. By this time, all materials must be purchased and delivered to the site. After this, you can begin installing a vapor barrier.
Preparing the base
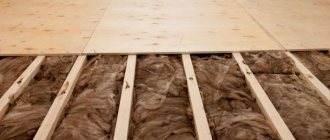
Laying fiberboard boards to level the base
In the case where gypsum fiber sheets will be laid on a wooden floor, careful preliminary preparation of the base is necessary. Similar preparation is carried out when laying any sheet materials (chipboard, CBPB, etc.).
First, the condition of the floor is assessed. To do this, you need to remove the boards and inspect the entire structure.
Most often, GVLV are affected by rot. Regardless of the type of rot, the affected areas become softer. You can check the condition of the wood as follows: drive an awl into a place that differs in structure or color. If the instrument enters easily, the area is affected. Small fragments are removed; in case of significant damage, the structural element is completely replaced. Next, all wooden parts must be treated with an antiseptic composition.
Leveling the surface of the floor boards is carried out in the same way as when laying fiberboard. First, you need to deepen all protruding heads of nails or screws. Then the surface is checked with a level, and all bulges are removed with a plane or grinder. The cracks and chips are sealed with putty. Fine expanded clay can be poured into depressions more than 2 cm deep.
Marking
Before installing a bulk screed, you first need to measure all the rooms using a laser level and apply horizontal plane marks to all the walls of the rooms. In this case, it will be easy to determine the difference in base levels in different rooms. Usually it does not exceed two or three cm. However, if a significant difference in elevation is detected, then this must be taken into account when filling in a layer of expanded clay sand insulation. After measuring all the rooms, you can finally determine the thickness of the backfill and, therefore, its quantity in each room or room.
Checking the height using a laser level in different places in the room
Do I need to level it?
Bulk
Leveling the floor in the case of bulk material is necessary for uneven surfaces. Smooth floors may also require attention, as the dry coating may be unevenly distributed over the surface. Installed beacons can interfere with installation if they are placed incorrectly on the surface.
For leveling, you can use a laser or water level. It must be installed before and after backfilling. This is necessary to double-check the evenness of the backfill surface.
Without backfill
Without backfilling, you need to take a more thorough and careful approach to the process of leveling the floor. The crooked the base and the worse the preliminary work on preparing the surface was done, the more attention needs to be paid to the evenness of the GVP when laying.
Advice
Leveling is also done by measuring the room and setting parallel points with a laser level, which are then connected and serve as a measure of the evenness of the floor.
Installation of expanded clay insulation
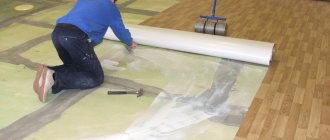
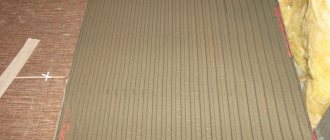
After completing all the preparatory operations, they begin to install a vapor barrier made of polyethylene film. For this purpose, a film with a thickness of 80 microns is used. Lay it in such a way that the film extends 10 cm onto the walls. When using a film smaller than the area of the room, it is laid with an overlap of 150 mm and all joints are taped. The vapor barrier will not allow moisture to penetrate through the ceiling and damage the structure of the dry screed. All work must be carried out at a temperature not lower than 10 degrees Celsius and a base humidity of not more than 65%. After installing a vapor barrier around the perimeter of the room, an edge strip 100 mm wide is attached to the walls. It can be secured with a construction stapler.
The next stage is the installation of expanded clay insulation. The best example for this purpose is the dry backfill for prefabricated floors Compevit, which has been certified by Knauf. Until recently, this was the only backfill that met all the requirements. However, now other backfills have begun to be produced, including backfill from the Knauf company. Expanded clay insulation Compavit is characterized by high quality granulation composition, as well as the absence of dust, which is a very important indicator when working in residential premises. The thickness of the insulation layer can be from 20 to 100 mm. Usually this is determined at the very beginning and the volume of purchased material is calculated based on this thickness and area.
After installing a vapor barrier and installing an edge strip, they begin backfilling dry expanded clay for prefabricated floors, and roughly determine how much needs to be poured into a particular room. Next, it is necessary to compact and level the surface of the insulation, ensuring the required thickness.
Specifications
GVP sheets have standard technical characteristics:
- 2500 mm in length;
- 1200 mm wide;
- humidity - no more than 1%;
- bending or fracture strength - not less than 5.5 MPa;
- hardness - not less than 22 MPa;
- thermal conductivity - from 0.22 to 0.35 W/m×0С.
Sheets can be produced in standard or small format. The latter have dimensions of 1200×600 and 1500×500 mm. Standard gypsum boards are similar in appearance to plasterboard sheets. According to GOST R 51829–2001, their dimensions must correspond to strictly established parameters - 1200–1500 mm.
Standard sheets are suitable for creating interior partitions. Small-format ones are just used for laying the base. These are 2 sheets of folding system glued together.
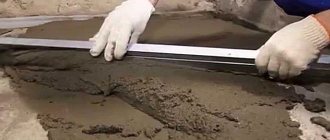
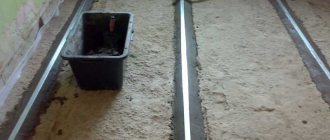
Leveling the insulation surface
Surface leveling is carried out using two beacon guides and one leveling rod. The guides are placed parallel to each other at the width of the leveling rail. The guides are installed on a layer of expanded clay, and the installation level is checked along the entire length using a laser level. In this case, the installation accuracy should be as high as possible. After the guides are set, expanded clay backfill is poured between them. Using a leveling rod or rule, the level of expanded clay is leveled to the level of the guides. At the same time, if necessary, add the missing or remove excess expanded clay. After the strip between the guides is aligned, they are rearranged further and the process is repeated. The result should be a smooth surface of the insulation.
How can I level it under laminate?
If the backfill is done under the laminate, then the leveling process must be approached very responsibly. Laminate is afraid of moisture. Moisture should either not get on this surface at all, or a good waterproofing layer should be placed under the layer of material. GVL for laying under laminate is taken with waterproofing qualities.
Waterproofing is laid together with sound insulation, which is also a plus.
How to level:
- the prepared surface is covered with dry mixtures (expanded clay, sand or perlite);
- the resulting depressions are filled with cement-sand mortar;
- a polyethylene film is spread on the surface;
- sheets are laid on top of it;
- lay the sheets in two layers, fastening them with self-tapping screws.
Installation of GVL slabs from Knauf
The next stage is the actual laying of the dry screed slabs. The sizes of gypsum board sheets for dry floors are: 1500x800x12.5 mm; 1200x600x20 mm; 2500x1200x12 mm, other sizes available. Typically, gypsum fiber boards are made by gluing two gypsum fiber boards together. Installation of slabs usually begins from the doorway from left to right. In the first slab adjacent to the wall, cut out the outermost joining quarter with a jigsaw. The second plate is laid on the first after coating the joint quarter with PVA glue. The third and fourth are laid in the same way. All sides that are adjacent to the walls are cut off from the connecting quarters. The last slab in the first row is cut to the remaining size. The second row begins with the cut tiles remaining from the first row. In this way, maximum savings are achieved and the seams of adjacent rows are shifted by at least 250 mm. After laying three rows, all connecting joints are fastened with self-tapping screws using a screwdriver with a pitch of about 300 mm.
The self-tapping screws are screwed strictly vertically with a slight recess of the head by about 1 mm. If the screw goes in at an angle, you must unscrew it and screw in a new one next to it.
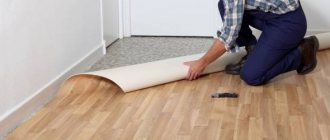
After all the slabs are laid and secured with self-tapping screws, remove dust and debris using a vacuum cleaner. Depending on the type of finishing decorative coating, such as linoleum or carpet, all joints and recesses from self-tapping screws are sealed with Knauf putty. After this, it is advisable to let the screed dry for about a day and you can begin to finish the floor. You can use a knife to cut off the protruding edges of the plastic film and edging tape around the perimeter of the room.
Laying tiles on gypsum fiber
To lay tiles, you need to prepare the necessary materials and tools in advance. The general procedure is as follows:
- The premises are being marked out. To do this, lines are drawn from corner to corner and between the center of adjacent walls. This will allow you to stick the products with the pattern adjusted.
- The base is treated with two layers of primer to ensure good impregnation and dried.
- The starting point of installation is determined and a diagram of the arrangement of elements is created. Pre-layout is often required.
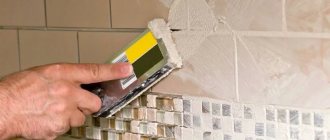
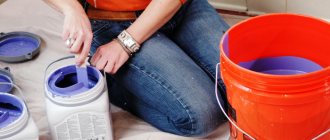
- Glue is applied to the surface. You can mix it yourself or purchase a ready-made mixture. The mixture is spread over the base using a notched trowel.
- The parts need to be glued in a clear sequence; to do this, the element is pressed and, if necessary, tapped with a mallet and adjusted to the level.
- The parts are placed at intervals, the joints are formed using plastic crosses or a tile leveling system (SVP).
- The outermost fragments are trimmed taking into account the gap from the walls.
- The coating is left until it dries, after which it is necessary to rub the seams with a special mixture of the desired shade. The composition is applied to the joints and spread with a rubber spatula, the excess is removed.
When working with GVLV, the tiles are laid using regular tile adhesive.
If you do not violate the process technology, the surface will last a long time.
Positive and negative qualities of dry screed
Dry screed Knauf has become very popular due to its obvious advantages, which include the following:
- laying the screed is carried out without water in a completely dry way, which allows it to be carried out in residential buildings without fear of leakage to the lower floors;
- the speed of installation of a Knauf bulk floor is the highest compared to other types of screeds;
- after installing the dry screed, you can begin laying the decorative floor covering almost immediately;
- the weight of a dry gypsum plasterboard floor screed is significantly less than a similar cement screed;
- work on installing a dry gypsum plasterboard floor can be carried out at any time of the year;
- Knauf bulk floor has high thermal insulation and sound insulation characteristics;
- the design of the dry screed allows you to hide various utilities and underfloor heating elements;
- Considering that laying a Knauf loose floor does not require special qualifications, all work can be performed by anyone who knows how to use power tools.
Despite the large number of advantages, Knauf loose flooring has disadvantages that can be found among customer reviews:
- dry prefabricated Knauf floors do not like humidity very much, and can become deformed in case of flooding, this applies to the corridor next to the bathroom;
- It is not recommended to install such a floor in damp rooms, bathrooms, toilets;
- a high-quality gypsum board is expensive, so such a screed cannot be called cheap;
- if the screed is installed in low rooms, then structurally it steals up to 100 mm from the height of the room.
When is it possible to use?
The material is used during construction work in rooms with normal and low humidity levels. You can even use it in attic renovations, but only if there is sufficient air circulation. In the kitchen, bathrooms and other rooms with high humidity, moisture-resistant building material - GVLV - is used.
The material is frost-resistant, which makes it possible to decorate unheated premises, for example, garages, sheds and other outbuildings. For wooden buildings, the use of gypsum fiber board provides fire protection.
Like any building material, this one also has its advantages and disadvantages.
Positive characteristics:
- Since gypsum fiber sheet contains only gypsum and paper, it is an environmentally friendly material. When working with it, no toxic substances are released, and there is no risk of respiratory diseases when sawing sheets. It does not contain synthetic resins or polymer inclusions; it can be safely used for interior decoration of residential premises.
- Resistant to temperature changes, so can be used in unheated rooms.
- Has high noise insulation characteristics. Can suppress noise of 30-45 dB.
- GVL tolerates moisture well. Therefore, it is used in finishing kitchens and bathrooms.
- High fire resistance makes it possible to sheathe wooden floors, beams, and walls.
- It has low thermal conductivity and is used for wall insulation.
- The high viscosity of the material allows nails to be driven into it and screws to be screwed in, and they will be securely fastened inside the sheet. This factor also influences the fact that gypsum fiber board practically does not crack and does not become painted. It can be easily cut to size using the same tools as drywall and plywood.
- Lightweight, so inexpensive profiles and frames can be used for installation.
- The material is easy to process, with minimal waste during installation.
- Thanks to the use of cellulose fiber, the sheet is more flexible than gypsum board. Its bending strength ranges from 5 to 6 MPa, which is significantly higher than plasterboard. Therefore, it is easier to make complex decorative structures from gypsum plasterboard - arches, curved surfaces.
- Gypsum fiber sheet can withstand up to 20 freezing cycles without loss of characteristics, which makes it possible to use it for finishing periodically heated or unheated rooms.
Despite the huge number of advantages, the use of GVL also has some disadvantages:
- heavy weight, one plate – about 18 kg;
- the price of gypsum board is higher than that of drywall;
- absorbs moisture well, this limits the use of the material or requires treatment with special water-repellent substances.
There is a large selection of products on the market. Typically, the best manufacturer is considered to be the brand that first produced the product. At the moment, Knauf is considered the best in all of Europe, although it is the most expensive. There are also products from domestic manufacturers on the market, but the technical characteristics of the material may be slightly worse.
For walls
Gypsum fiber sheets are used for walls to level the surface, for sound insulation and thermal insulation.
This material can be mounted in two ways: frameless and using a frame. The frameless method is used if the unevenness of the walls is not too large. Special gypsum glue is applied and pressed against the wall. With this method, it is better to take sheets of small parameters.
If the unevenness of the walls is large, up to 3-4 cm, the sheets are glued with a special glue, applied along the perimeter and in the center, every 30 cm. If you plan to hang any shelves and cabinets on the wall, then the entire surface of the sheet is smeared with glue. Before installation, the material is brought into the room 2-3 days in advance so that it adapts to the temperature and humidity conditions.
With the frame method, the gypsum plasterboard is attached using self-tapping screws with double-row threads to a frame made of durable galvanized profiles. You can put material inside for insulation and sound insulation. Profiles must be selected so that they can withstand heavy weight. Installation is carried out from the bottom up, starting from the corner of the room.
For floor
Mark the floor level. Lay a vapor barrier. The use of GVL makes it possible to use so-called heated floors. Expanded clay is poured onto the prepared surface and leveled. The sheets are coated with glue and fastened with self-tapping screws. The joints are puttied.
You can lay laminate or tile on this floor.
Such a wonderful material as gypsum fiber sheet is widely used in construction and repair work. This is a reliable building material for interior decoration. It justifies its high cost, which is higher than conventional plasterboard sheets, with a number of characteristic advantages.
Cost of dry screed Knauf
The cost of a Knauf loose floor is determined by calculating the number of materials taking into account their price, and adding the cost of labor. The price of a screed with a thickness of about 80 mm will be approximately $15-16 per square meter. Of these, $9-10 is the cost of materials, the rest is the wages of hired workers. Nowadays, to calculate the cost of materials, websites have built-in calculators that make it easy to determine the total cost of the entire screed. Approximate price for materials:
- the cost of GVL slabs is about 3.3-3.5 $/m2;
- bag of expanded clay backfill $14.5 with bag weight 24 kg;
- polyethylene film $0.2 per lin. m;
- edge tape $1.9 per roll 20 m;
- self-tapping screws $1.8 per pack.
In the event that all work is carried out independently, the cost of the screed is determined only by the cost of materials.