Where is cement-lime plaster used?
Cement and lime based mortar can be called a universal material for starting finishing. It is well suited for external and internal work, used in residential and industrial premises, warehouses, garages and outbuildings. Plaster of this type can be used for repairing building facades, balconies and loggias, and with the introduction of special water-repellent additives - even for cladding bathrooms.
Without enhancing moisture resistance, cement-lime mortar for plastering walls is not recommended for use in basements or other damp rooms.
According to SNiP, lime plaster in its pure form or mixed with gypsum is not suitable for places where the air humidity exceeds 65%.
Types of plaster according to SNIP
People show practicality in any matter. It will also be needed in the difficult plastering process, which requires time, for example, to dry each layer. Also, it is irrational to perform finishing of the same level for plastering a garage and rooms of a hotel complex, since these are multi-level objects.
Therefore, ordinary (not decorative or special) plaster is performed according to different levels.
According to SNIP, the following finishing is used:
- simple;
- improved;
- high quality
These plasters are distinguished, first of all, by the thoroughness of their execution - the degree to which the geometric characteristics of the plastered object are close to ideal. Simple plastering is sufficient for garages, basements, bathhouses, utility rooms, warehouses, etc. To create a simple coating, only two plaster layers are applied “under the falcon”: the first is spray, the second is primer with a maximum total thickness of 12 mm. This is enough to create a monolithic protective coating without frills.
Improved plaster allows you to create a finishing surface that meets high and medium requirements. The application of the solution and leveling is carried out according to the rules.
The coating consists of spray, soil and covering layers, totaling 15 mm. On top of the improved coating, finishing is carried out, which does not require a particularly smooth surface of the base - wallpapering, tiling or decorative plastering.
High-quality wall plaster is created “as a rule” according to the beacons. The geometry of the walls is close to ideal. The main difference from the improved one is the presence of at least two soil layers and a smooth surface. At the same time, the total thickness (due to the additional layer of soil) increases.
The main differences between improved plaster
In addition to the type of objects for which it is intended, improved plaster also has the following main differences:
- Unlike simple, it is intended (like high-quality) for leveling the surface.
- The number of main technological different layers is 3.
- As mentioned earlier, the total thickness of improved wall plaster is allowed up to 15 mm, that is, less than a four-layer high-quality plaster (20 mm), more than a two-layer simple one.
- Alignment is performed according to the “rule”, as opposed to simple.
- According to SNiP and Gesn (elemental estimate state standards), beacons can be used for plastering, with the help of which it is possible to achieve alignment of walls of a given level of quality, however, their use is not necessary, unlike what is required by high-quality plaster.
- The amount of surface deviation from the design shape is less than that of simple coatings and greater than that of high-quality coatings. For example, the vertical maximum deviations per 1 m are 0.5 mm (high quality finish) and 3 mm (simple), and the permissible deviation for an improved finish is 2 mm (details of tolerances are provided below).
- During the execution process, the geometric characteristics of the coating are regularly checked.
- Material consumption is more than for simple plastering, less than for high-quality plaster. Similarly, there are differences in price, time, and labor intensity.
- Implementation of improved finishing (as more expensive) must be indicated in the state registration document.
Variety of compositions
Not only lime and cement, but also clay, gypsum, and a number of artificial additives can be added to plasters as binders. The specific material used determines the properties of the solution, its strength, ductility and other technical characteristics. Sand is also added to most compositions, which prevents the plaster from becoming cracked after drying.
Lime plaster mortar
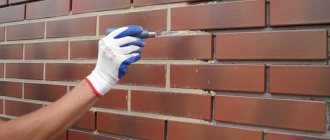
Lime plaster is widely used for leveling walls and ceilings in rooms with low and normal humidity. It is ideal for finishing brickwork, which absorbs water well: the mortar on the bricks dries quickly. When applied to wooden surfaces, on the contrary, inconveniences arise: the work is quite complicated, the mass does not apply well and takes a long time to dry.
Without the introduction of additional substances, lime plaster has low strength. The prepared mixture can be stored for up to three days, but its plasticity gradually decreases. When applied, plaster based on lime and sand has a grayish color, but after drying it becomes white, so it is suitable for wallpaper or painting.
Lime-gypsum plaster
This building mixture is suitable only for interior work when applied to stone, wood, fiberboard, brick and cement bases. It is important that there is normal humidity in the premises: gypsum absorbs water strongly, and the composition based on it will not last long if it is not dry.
If the specified conditions are met, the plaster has the following properties:
- high strength;
- quick drying;
- elasticity.
Gypsum seriously reduces the drying time of the mixture, so you need to dilute it in small portions and work as quickly as possible. Gypsum is added in small volumes to ready-made plaster, which is then used for 10-15 minutes.
If the solution has become too thick, it is better to throw it away and start a new batch, since the elasticity of the mass drops significantly and the finished coating will quickly crack. Introducing water into a mixture that has already begun to set is erroneous, as the plaster will lose its strength.
Lime-clay plaster
Clay-lime mortar is used mainly in dry rooms. It is well suited for leveling brick, stone, and wooden walls. It is usually used in private homes, dachas, and for finishing outbuildings and industrial buildings. The advantages are the environmental friendliness and low price of the solution, as well as the ease of working with it.
Lime plasters with the addition of clay are not very durable, so it is recommended to add sand, cement, and gypsum to increase the durability of the finished coating. The disadvantage is that it is difficult to mix the solution, because the clay requires pre-soaking for a day or more.
After soaking, the mass must be thoroughly kneaded, water added until a creamy consistency is obtained, and rubbed through a sieve so that there are no lumps, plant residues, or solid inclusions. Afterwards, sand and lime should be added to the clay, which increase the strength and plasticity of the solution. If you add a sufficient amount of cement to such plaster, it will be moisture resistant and suitable for outdoor work.
Lime-cement plaster
This material is the most durable and is considered universal. It can be used for facade finishing, plinth cladding, walls in rooms with high humidity. The composition sets within 1-2 hours, so even a beginner can work with it.
Thanks to lime, it has increased elasticity compared to a conventional cement-sand mixture, has excellent adhesion, and adheres reliably to the base. The coating will be resistant to various types of damage, the material is easy to apply, and it is suitable for any base, including concrete walls or brickwork.
Additional Additives
You can add other components to any of the above solutions that change the operating parameters for the better:
- quartz sand - increases decorative properties and resistance to chemicals;
- marble chips - enhances strength and makes the coating elegant in appearance;
- metal dust, shavings - increases impact resistance;
- mica - reflects ultraviolet radiation;
- expanded polystyrene granules - provide thermal insulation properties.
Features and comparisons
Lime plaster mortar is used mainly indoors; it is much cheaper than ready-made store-bought mixtures, is not inferior to them in strength, and is easy to work with. The only negative that arises during the work process is how much lime to add to the plaster solution. To do this, we have given you several recipes for different types of finishing.
Properly prepared mixture for plaster is the key to quality and durability of repairs
The finished mixture retains its properties for 6 hours, which should be taken into account when preparing the required volume. The consumption of lime mortar per 1 m2 of plaster is approximately 10-12 kg, with a layer thickness of 10 mm. The solution can be applied in a thickness of 0.5-30 mm; a thicker layer will lead to peeling and cracks.
Advantages and disadvantages of the mixture
The advantages of cement-lime plaster are obvious:
- Grip. The material is excellent for construction and repair, as it lays flat on most substrates used and is characterized by a high degree of adhesion to them.
- Plasticity and elasticity. Thanks to these properties, the plaster is easy to apply, quickly leveled, and after hardening it does not crack and withstands the shrinkage of buildings and structures.
- Vapor permeability. The ability of plaster to “breathe” allows it to maintain a normal microclimate in the room, eliminating the accumulation of moisture and the proliferation of fungus and mold.
- Price. Most brands of ready-made building mixtures have a low price. If you make the solution yourself, you can save even more.
Cement-lime plaster also has disadvantages. After completing the work and drying, you can notice that the coating has acquired small irregularities. To prevent this from happening, you should make a multi-layer cladding, wait until the previous layer dries and only then apply the next one. Usually 1-2 hours is enough, but if the humidity in the room is high, this period can be up to 24 hours.
Lime-based plasters, especially with a small proportion of cement, may seem insufficiently hard. It must be remembered that the strength of the coating increases over time, and wait the required period before driving in nails or other mechanical operations.
Repair or construction costs.
The project estimate is a headache not only for the designer, but also for the customer. The price of materials creates a dead end, from which it is difficult to find a way out. Payment per m2 of coverage varies depending on many factors.
The most important of these is region. It affects the cost of delivery of plaster, and the lime-sand plaster itself in the east or north of the country differs from the capital in its quality, as well as in its costs.
It is much easier to buy building materials in the city than in the outback, but some of them can be obtained literally under your feet, for example, sand. Craftsmen can be ordered, but their prices are per square meter. m. of laid plaster vary, and not only in comparison with competitors. Within one company there are different prices per square meter according to the price list or price list.
Elaborate work done during the construction season will be more expensive than the same processes done in a hurry, or when the company has very few orders.
But in this case, you will have to abandon the idea of making cement-lime plaster on the walls with your own hands. data-matched-content-ui-type=”image_stacked” data-matched-content-rows-num=”2″ data-matched-content-columns-num=”3″ data-ad-format=”autorelaxed”>
Proportions of cement-lime mortar for plaster
To ensure that the result of plastering work does not cause any complaints, it is necessary to use high quality components. It is better to purchase M-400 cement for this purpose, which does not have lumps and is crumbly. As for the proportions, for 1 part of cement they usually take 0.2-0.4 parts of lime and 3-4 parts of sand.
The exact amount of components depends on the required density, strength and ductility (indicators are regulated by the norm of sand, cement and lime, respectively). Another option for preparing plaster is to mix 1 part cement, 1 part lime milk and 6 parts sand.
Preparation of cement-lime mortars
After combining the dry components in the required proportions, the composition is diluted. To do this, pour water into a clean container and gradually introduce the powder mixture (approximately 4.75-5.25 liters of water per 25 kg of weight). Mix the product with a construction mixer or a drill with a special attachment. After obtaining a homogeneous mass, leave it for 5 minutes to infuse, then knead again.
Preparation of finished plaster
Do not add all the water to the mixture at once.
For best mixing, it is better to use a drill with a mixer attachment. The dry mixture must be poured into a clean container, add a small amount of liquid and stir constantly until the solution of the desired consistency is obtained.
If you add a large amount of water at once, the composition may turn out to be too liquid. To avoid the appearance of lumps in the finished solution, its mixing time should be at least 5 minutes.
After mixing, check the viscosity of the solution using a narrow spatula. The finished composition should have the consistency of sour cream. Use a spatula to scoop out the mixture and turn it over.
If the solution is too liquid, it will not stay on the surface and will fall off, in which case you will need to add more dry mixture. If the solution, on the contrary, is too thick, add a small amount of liquid and check again.
Preparing the surface for processing
Before applying plaster to the wall, you need to carefully prepare it. The process involves removing the old decorative coating. Also, be sure to tap the existing layer of rough plaster to immediately remove any falling off pieces.
If the plaster is peeling off a lot, it will have to be completely cleaned off. Afterwards, the base is cleaned of dust and contaminants and primed with a deep-penetrating compound. When it is necessary to strengthen the wall, a special metal or fiberglass mesh is applied (for example, in old houses or on load-bearing structures).
Installation of plaster beacons
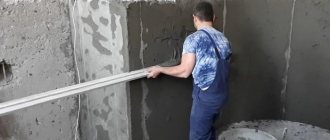
Plaster beacons are needed to simplify the process of leveling walls. These are perforated metal strips of different thicknesses that are easily installed on walls. Installation begins from the edge of the wall (approximately 30 cm from the corner). Using a level, draw a vertical line, apply several portions of the mixture along it and place the first beacon.
They act in a similar way at the other end of the wall. The beacons are screwed into the beacons from top and bottom using self-tapping screws, and nylon threads are pulled between them. Below them, the remaining beacons are placed on the solution every 1-1.5 meters.
Rules for applying lime compounds
In order to perform plastering work efficiently, you need to follow the sequence of actions at each stage.
First step
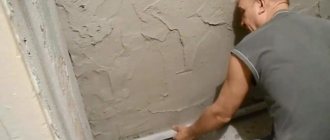
The first layer of plaster is called spray. It is needed to fill all pores as much as possible, pre-treat the base and improve the adhesion of the plaster to the wall. The solution should not be too thick. It is thrown onto the wall surface with a trowel and carelessly rubbed so that the layer thickness is 3-4 mm.
Second step
The second layer is called primer, it is the main one and has a thickness of up to 5 cm, but not less than 1.5 cm. The plaster for it is made quite thick. It is applied after the first layer has dried with a trowel or trowel, the excess is removed with a metal spatula. Afterwards the layer is leveled, but left slightly rough. At the same time, check the evenness using a level or plumb line.
Third step
The third layer is needed to eliminate small chips and other defects and to finally level the surface. The consistency of the mixture should be the same as when sprayed. The mass is applied to a slightly moistened base, the layer thickness is 2-3 mm. Afterwards the surface is rubbed with a construction trowel.
Lime: properties and applications
The positive properties of lime are strength and high adhesive ability. One of its main advantages is its rather low cost, which will ultimately affect the overall construction budget.
Lime added to the plaster solution has antiseptic properties, preventing the formation of mold and mildew on the surface of the walls.
The most important property of lime is its plasticity, which binds all the components of the batch into a homogeneous mass. The finest particles of calcium hydroxide are able to hold water on a rough surface, which reduces friction between the components, creating a so-called “lubricant”. Lime is added to the batch instead of synthetic plasticizers.
There are several basic recipes for preparing the mixture. But before using them, you need to figure out how to extinguish lime.
Lime slaking before mixing
To prepare various types of emulsions, slaked (hydrant) lime - calcium hydroxide - is used. First, it should be extinguished with water. To do this, take a container of a suitable size, for example, a barrel or trough. The container must be rust-free metal, wood or plastic.
Slaking lime in metal containers Source orchardo.ru
Considering that the mass after slaking will increase significantly, the container is taken three times larger than the original volume of quicklime. To slak large quantities of lime, a hole is prepared in the ground. Lumps of lime or ground powder are placed in the container and filled with a sufficient amount of water.
Attention ! When combined with water, a chemical reaction immediately begins - the lime begins to boil rapidly, so you need to be careful not to get burned. Safety measures include special protective clothing, rubber or silicone gloves, and safety glasses.
During the hydration process, cold water is used in the following proportions:
- Extinguishing the fluff – 1 liter of water per 1 kg of lime;
- Slaking of the “dough” - 0.5 liters of water per 1 kg of lime.
Vigorous boiling continues for 36-48 hours, the mass is thoroughly mixed several times. Once hydrated, let sit for two weeks before passing through a sieve to remove any lumps. The hydrant mixture is ready for use.
Lime slaking Source infourok.ru