Sequence of repair actions
When you have the necessary tools and materials, you can begin to work.
Next, we’ll look at how to repair the door leaf if you’ve punched a hole in a fiberboard door. We offer you a sequential algorithm of action:
- Before filling a hole in a fiberboard door, remove it from its hinges and place it on a horizontal, flat and stable surface.
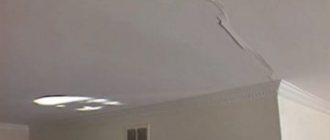
- Armed with a construction knife, we make a hole. To do this, you need to retreat some distance from the edge and make a cut with a confident and strong movement.
- Now you need to place paper, newspapers, sections of fiberboard, chipboard, wood, and shavings inside the door leaf. This manipulation will allow the structure to gain strength. In addition, filling the space can reduce the consumption of polyurethane foam.
- Construction foam should be laid on top of the filling materials.
- When the mounting compound has completely dried and hardened, its excess should be removed by cutting off with a knife. If there are many traces of foam on the surface of the door that are impossible or impractical to remove with a sharp object, use a solvent.
- The next step in repairing a hole in a fiberboard door is to coat the area where the hole was with epoxy resin. When performing this manipulation, be sure to wear gloves. This substance coats the foam, forming a dense protective crust on its surface. If resin gets on your skin, remove it with a solvent as quickly as possible.
- After hardening, the surface of the door is covered with putty. The required amount of material is collected onto the tool, after which it is evenly distributed into the cracks.
- When the putty has dried, you need to walk over the area to be treated with fine sandpaper to clean and level the surface.
- We complete the repair of the fiberboard door by applying three layers of primer to the surface. When it dries, you can finally coat the door with varnish or paint.
Bonding technology
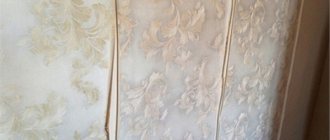
Painting fiberglass canvas is glued to glass wallpaper adhesive
It is important that the glue is good, but it does not have to be expensive. The gluing technology is very similar to wallpapering:
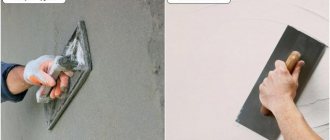
- The glue is applied to the wall or ceiling with a roller or brush. The glue layer is thick, but it needs to be distributed evenly.
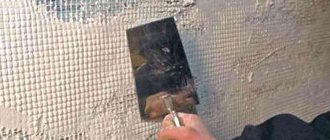
- A cobweb is rolled out onto the greased wall, it is well saturated with glue and lays down easily. The canvas must be straightened evenly, without folds or “accordions”.
- Use a plastic spatula or a large stainless steel spatula to remove air bubbles. It’s easier to do this by moving it from the middle to the edges.
- Again, take a roller or brush and apply glue on top of the fiberglass.
- Using a spatula, rub the glue, filling the pores. If there is not enough glue, add more, the excess remains on the spatula.
- The second canvas is glued overlapping with the first. The canvas extends about 2 cm. The sequence is the same: apply glue to the wall, roll out the canvas, and push out the bubbles. Then we take a ruler or a large spatula, a stationery knife with a sharp blade. We apply a ruler/spatula to the junction of the two canvases, cut through both canvases.
The main thing is to make the junction of the two canvases invisible
You shouldn't press too hard - you can scratch the putty and there will be a groove left that will be visible. The task is to cut through both sheets, but not to cut the putty. It's easier to do this with a sharp knife. We remove the excess strips, coat the wall under the joint with additional glue (with a brush), connect and press with a spatula.
Apply glue on top of the second canvas and fill the pores with a spatula. Glue the next strip.
As you can see, nothing complicated. Only all operations must be carried out carefully, achieving the best result that you are capable of.
There are several nuances regarding working conditions. There should be no drafts in the room, the temperature should not be lower than +15°C, humidity should be within normal limits. Keep doors and windows closed until the glue dries. If the sun is hot, it is better to curtain the windows. That's all, actually.
Types of primer
To do all the work better, you also need to understand the materials used. Construction stores have a wide selection of primers, varying by brand, quality, type and form of use.
Let's look in more detail at which primer is suitable for sealing cracks in the ceiling.
Primer types:
- Acrylic - used for surfaces such as concrete, wood, brick, cement, chipboard and fiberboard, fiberglass, plaster. This primer is ideal for priming cracks from the inside.
- Water-based primer - used for final surface treatment. In our case, this primer option is suitable for diluting water-based paint when finishing painting the ceiling.
- Alkyd primer is one of the most durable types. Used on tiles, fiberglass, glass and galvanized steel.
- Mineral-based primer - used when working with brick, concrete, gas silicate and expanded clay concrete blocks. It is made on the basis of lime, cement and gypsum.
The primer is also divided into types based on the purpose of its use:
- Primer paint – made from drying oils and resins, used for painting highly absorbent surfaces: wood, metal.
- Moisture-resistant primer - used on surfaces that are susceptible to moisture penetration.
- Anti-corrosion primer – used on metal surfaces to protect against corrosion.
- Deep penetration primer - used in cases where it is necessary to strengthen the base, suitable in our case for sealing cracks. It also penetrates deeply into the material, so it is also great for filling holes.
- A primer with antiseptic properties - it contains special additives to combat and prevent mold and mildew.
- Quartz primer - used for decorative purposes, it contains sand, which after application creates an ideal beautiful rough layer on the surface.
The primer can be used in combination with various additives. For example, some people mix it with PVA glue, which is just one way to seal cracks in the ceiling. And also later they add it to the paint and paint the ceiling. Based on this, the primer can still be classified as follows:
- under enamel;
- under water paints;
- universal;
- special.
Primers for enamel and water-based paints are used specifically before applying enamel or paint to them. Due to the special composition, the applied material adheres more reliably to the primer.
Universal primers are used for almost any ceilings and materials. With its help, you can achieve reliable and durable repairs, and its universal consumption will help you save money.
Special primers include:
- emulsion primers with acrylic copolymer. It is used when priming old, loose surfaces.
- Latex strengthening primers are also good to use on old porous surfaces. It combines well with cement. It is also used for further tiling.
Repairing cracks on walls
This article will describe the main reasons why putty cracks on walls after they are leveled using putty mixtures.
In addition, the reader will be presented with some tips and recommendations, which will tell you what to do if the putty is cracked, as well as various solutions to prevent and eliminate this unpleasant phenomenon.
Cracks on the putty surface.
Causes of cracks
To successfully combat undesirable manifestations of any process, it is first of all necessary to find out and eliminate the cause of their occurrence.
Multiple cracks on walls, the surface of which was covered with putty, in most cases can occur for the following three reasons:
- Incorrect adherence to proportions or technology for preparing puttying solution.
- Insufficient preparation of the wall surface before applying the solution.
- Incorrect adherence to the technology for applying the putty solution.
Next, tips and recommendations will be presented aimed at eliminating the described errors, the observance of which in the future will help to avoid such unpleasant situations.
The photo shows the surface of an old wall that requires complete cleaning before puttying.
Preparation of putty solution
In order to never have to think about the question in the future: why putty cracks, you should forever understand one simple rule, the observance of which will be useful not only when making putty mortar.
The packaging of any type of product, especially semi-finished products, always contains detailed instructions for use.
Therefore, for the correct preparation of any solution, it is imperative to perform all actions in full accordance with the instructions indicated.
- In addition, it must be remembered that any container for preparing the working mixture must be clean and free of residues of other solutions.
- For mixing, use clean drinking or industrial water without foreign impurities.
- When using an electric mixer or a drill attachment, mix at medium speeds of the working tool, avoiding foaming of the mixture.
- The normal viscosity of the finished solution should resemble thick sour cream in consistency.
If it is not possible to prepare a working solution from a semi-finished product, you can buy a ready-made putty mixture, which is suitable for use without additional processing. However, it should be remembered that its price can be significantly higher than the cost of the semi-finished product.
Preparation of the solution using an electric mixer.
Advice! A prerequisite for preparing a solution from a semi-finished product with your own hands is that the dry powder must be poured into water, and in no case vice versa.
Surface preparation
One of the most important conditions for high-quality and durable application of any finishing materials is proper preparation of the working surface. In some cases, this may seem like a tedious and useless task, especially in old premises, but the final result of the entire apartment renovation depends on how well this work is done.
Primer is required
If a master does not prime the walls, arguing that moisture will be poorly absorbed, he simply does not know about the existence of different types of primer materials and the rules for selecting them for surfaces.
Be sure to prime:
- aerated concrete;
- ceramics;
- sand-lime brick;
- foam ceramics.
These surfaces are hygroscopic, that is, they can absorb moisture, it penetrates into microscopic porosities, and the plaster dries out, the adhesion of the materials is disrupted, resulting in cracks.
Types of surfaces that require a primer with improved adhesive properties:
- concrete;
- cement;
- expanded polystyrene.
It is also not recommended to use the old method of preparing walls - pre-wetting. Yes, this saturates certain types of surfaces with moisture and protects wet plaster from drying out, but this is not a universal remedy.
Usage
Fiberglass is used in many types of construction and finishing work:
- reinforcement of walls for a higher quality finish;
- preventing the formation of cracks in the finish coating and masking existing cracks;
- preparing walls for applying a decorative coating - when using fiberglass, you don’t have to putty the surfaces with finishing putty;
- leveling walls;
- creating original effects on the surface of the finishing coating (for example, marble effect);
- use in roofing work as a basis for bitumen mastic (special types of material are used that improve the adhesion of the roof and mastic);
- pipeline protection;
- waterproofing work - fiberglass is used to strengthen and protect polyethylene sheets;
- organization of drainage systems.
The material is suitable for application to any surface - concrete, plasterboard and can even be glued over a layer of old paint (it is better to scratch grooves on it to improve adhesion).
The use of “web” is recommended especially for those surfaces that are subject to constant mechanical stress. Wallpaper, paint and other materials fixed on top of fiberglass will last you longer without changing the original attractive appearance, even if the structure shrinks.
The glued fiberglass dries quickly, and the application of subsequent finishing will be more efficient. This way you will save time and effort on repairs.
It is ideal for application under ceilings as it will provide a flawless finish. Fiberglass glued to the outer corners will help you quickly and beautifully paste wallpaper in this area.
Checking the apartment
What should be in the apartment is written in the DDU. Look for the item “Characteristics of the object” in your contract - usually at the very beginning, in the section “Subject of the contract”.
1.3. The apartment is transferred to the Shared Construction Participant with partial finishing and the following types of finishing work: finishing the walls with plaster; floor covering - cement screed; installation of plastic windows and balcony doors; glazing of the loggia; installation of a metal inter-apartment (entrance) door. Installation of an electric stove, as well as horizontal wiring of the water supply system are not included in the price of the contract and are carried out by the Participant in shared construction independently and at his own expense.
If you have something in the preschool education system, but in fact it is not there, write everything down in the defect report. The first leaders of Moscow are large-scale people. They treat with contempt the cheap low-rise construction proposed by deputy Alexander Lebedev, believing that the panacea for solving the problems of affordable housing is the construction of concrete high-rise buildings. As Moscow Mayor Yuri Luzhkov stated in one of his recent interviews, the modern urban development trend is super-tall buildings made of glass and concrete. The mayor ignored the well-known fact that up to 70% of the population of developed countries live in low-rise cottages. Following the tastes of the mayor, in Moscow they build and sell at exorbitant prices outdated boxes made of concrete lined with marble for the rich, and concrete decorated with cheap brick-like tiles or simply painted for the common people. However, it turns out that this housing may be downright dangerous.
Advantages and disadvantages
Like any building material, fiberglass has advantages and disadvantages.
Let's note the advantages.
- It is resistant to temperature changes. You can prepare the surface for painting in a mode from -40 to +60 degrees. This will not affect the quality of foundation preparation.
- Fiberglass is breathable and hygienic. Its use eliminates the formation of condensation and an environment for the appearance of fungus and mold.
- The material is not electrified as it is antistatic. For this reason, it does not accumulate dust.
- The use of the material does not have a negative impact on the health of household members. This is due to the environmental friendliness of fiberglass.
- It is hypoallergenic. This nuance is especially important for allergy sufferers.
- Fire resistance is one of the most significant advantages. This material is appreciated by every experienced craftsman.
- The price of fiberglass is affordable for every buyer, which allows for inexpensive and high-quality repairs. It can be bought at construction stores.
- Fiberglass is highly wear-resistant. It doesn't deteriorate over time, so you won't have to make repairs often.
- This material can be painted. Its uniqueness is the fact that painting can be done multiple times.
Having studied the positive characteristics, we will note the disadvantages, because they are not so harmless.
It is necessary to work with fiberglass with extreme caution. This is due to the fact that during the process of leveling the base, small glass fragments may break off from the canvas.
Digging into the skin, they can cause significant harm to health, getting on the skin of the hands, body, and sometimes into the eyes and respiratory organs. In some cases, skin itching is possible; if it gets into the eyes, you will have to consult a doctor.
Putty
This technique is used in cases where there is a small crack or chip on the tree.
It is important to note that sealing cracks using putty gives a cosmetic rather than a practical effect. Moreover, even such sealing of cracks will allow you to perform any operations on the tree again, without fear of damaging it even more (for example, you can safely saw it). Also, it is strongly recommended to putty before painting the material.
To eliminate defects, you must first prepare a mixture purchased at the store. The resulting substance is applied to the damaged surface using a staple so as to fill all the cavities. You will definitely need to wait for the mixture to dry (this will take 15-20 minutes), after which you can begin secondary processing.
Also, it is strongly recommended to putty before painting the material. To eliminate defects, you must first prepare a mixture purchased at the store. The resulting substance is applied to the damaged surface using a staple so as to fill all the cavities. You will definitely need to wait for the mixture to dry (this will take 15-20 minutes), after which you can begin secondary processing.
We suggest you read: Paper beacons are a myth, they don’t exist
Putty is applied in a thin layer
People who are new to puttying often press the spatula too hard and apply too thin a layer of mortar. The ideal thickness should be at least a millimeter. It is better to carry out the work in several stages. Each layer is applied after waiting for the previous one to dry. It is advisable to use reinforcing tape. Finishing may be carried out in a thicker layer. But if you overdo it, bubbles may form. The maximum thickness of the solution is usually indicated in the instructions on the packaging. These recommendations should not be ignored.
DIY ceiling repair
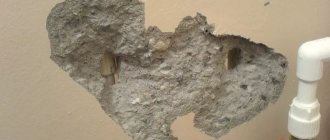
To correctly assess the upcoming work, take a close look at the original ceiling. You will cover small cracks - up to 3-4 centimeters - with gypsum or cement mortar; the battle with large holes will be protracted; you will have to plaster the entire area of the ceiling. Repair of ceiling rusts begins with surface preparation.
Uneven sealing of rusts will harm further repairs, work carefully
How to prepare the surface
Ruthlessly remove the former beauty. The easiest way to fight whitewash is to heartily “shoot” it with water from a spray bottle, then remove it with a spatula. The paint usually does not want to voluntarily leave its usual place and is difficult to scrape off. It can be removed perfectly by the slow movements of your hands armed with a sander.
Tricky plaster sticks worse than other materials. To save your own energy and nerves, let’s remember the initial inspection of the ceiling. If the furrows are small, we get rid of only those layers that come off easily. If there are huge curves, you need to clear the entire surface of the plaster. Take a hammer and a chisel as your assistant; beating off unnecessary layers is easier with these tools.
The more thoroughly you clean the rustics before sealing, the smoother the future ceiling will be
How to repair rust on the ceiling
Before repairs, buy construction supplies from the store:
- polyurethane foam in cylinders;
- serpyanka - preferably 200 mm wide;
- polymer primer;
- cement;
- plaster.
Prepare the tools: chisel, knife, spatula.
And now we are confidently moving with big steps towards the updated ceiling.
Look at the short photo instructions for sealing rusts
Work order
Step one: forming the perfect rustication
A section in the shape of a triangle, the base of which is equal to half a meter - this is how the furrow will look like as a result of your activity. To do this, we deepen and widen it (that’s why we need a chisel), then we rake out all the debris and sweep away the dust.
Step two: polish the channel
Carefully treat the recess with a primer. Wait for it to dry completely, then wipe the hole with a damp cloth.
Step three: treat with foam
We carefully fill the entire rust with polyurethane foam. After its final hardening, approximately a day later, we cut off the foam residues along with the ceiling - artificial growths on the surface are unacceptable.
After treatment with polyurethane foam, there should be no voids left in the rustication
Step four: putty
The stage requires concentration and physical strength. Fill the crack tightly with the cement mortar. Once the mixture has completely set, take a strip of sickleweed. Separate flaps of this material cannot be used; the canvas must be whole. Your task is to glue the serpyanka evenly to the ceiling, aligning the middle of the cut with the middle of the rustication.
The cement mortar hardens instantly, so putty work must be done quickly
Last step: finishing the ceiling
Congratulations, you have achieved a complete victory in the fight against small holes. Ahead is the long-awaited planned ceiling update. Large lesions will disappear only under a thick layer of plaster. You have to re-plaster the ceiling and then admire the smooth results of your work.
What to do with peeling wallpaper
If you notice that the canvases are starting to come off, you need to solve the problem as quickly as possible. Wallpaper that comes apart at the joints is simply glued back on. To do this, pry up the edges with a spatula and remove all debris.
Then apply wallpaper glue to the wall and canvas with a brush, and press the edge with a rubber roller. Excess glue is removed with a dry cloth.
If the wallpaper has come off in the area of the floor or ceiling, they are treated with glue diluted with water. Afterwards the strip is glued again.
In the event that an entire strip has come off, it is necessary to close all windows and doors. Then remove all debris from the canvas and wall. Then reapply glue to the wall and wallpaper.
After 5 minutes, press the strip against the wall. Particular attention should be paid to the joints. Treat them additionally with glue. Flatten the canvas with a roller or rag.
To glue the canvases, you can use special PVA wallpaper glue. It is less concentrated than its brother and does not leave stains. It is often used for gluing corners.
If the canvas has been deformed by an animal or the corner of a cabinet, then the damaged area is covered with a patch. It is applied to old canvases and cut out with a knife. A patch is glued to the freed area.
Have you ever had to restore peeled canvases? How did such a minor repair end up?
Source
What is the best way to seal rust?
In order to fill seams, cracks or gaps, use the most suitable material with which the ceiling will adhere well. Therefore, at the beginning of the planned work on arranging surface joints, it is worth consulting with a specialist.
The materials used must have good quality characteristics, guarantees and certificates from manufacturers, and be:
- good composition;
- withstand loads;
- elastic;
- not prone to shrinkage;
- have waterproofing properties.
Experts consider the following materials to be the most popular for working with seams:
- Sand-cement composition. A standard type solution is used, but with the addition of plasticizers and agents that promote faster drying. Suitable for all surfaces. It can serve as a basis for further sealing, or it itself is an excellent filler for gaps and rusts before plastering.
- Sealants. They are sold in finished form (cylinders, liquid mixture in a bucket) or dry, and require dilution with a special adhesive.
- Foam insulation. It is applied to the surface through the spray of a special bottle, dries quickly and leaves a securely sealed ceiling.
- Mastic. A paste-like viscous substance made from natural resins. It has good water-repellent and bonding properties, completely fills the cracks and pores of any seam. Reliably adheres waterproofing insulators and insulating harness tapes to the surface.
- Polyurethane foam. Sold in cylinders of different capacities. Despite the small size of the package, it increases in size when sprayed, so it requires compliance with a certain sequence of actions.
Gypsum solutions, putty tapes and plaits with waterproofing properties, as well as tubular seals are also used as sealing materials. When installing or sealing joints, several types of materials can be used simultaneously (complex method).
Incorrect putty chosen
Be sure to pay attention to the quality and shelf life of the putty. Almost any type of wallpaper is suitable. A finishing coat is required for painting, but it is applied to a primed surface.
Types of putty:
- Plaster. Considered a starter species. Suitable for wallpaper and other decorative finishes. Evens out even deep cracks and does not settle when dry.
- With polymers. Sold in liquid form at the desired consistency. The structure is fine-grained, this type can be used under paint. This coating is very elastic and is not afraid of dampness.
- Cement. Coarse-grained, it is not suitable for finishing walls before painting, as it will bleed through the paint layer and highlight all the imperfections.
To avoid lumps in the solution, it must be mixed using a special tool - a mixer or whisk.
By following all the rules, you can level the walls to perfect condition and make high-quality repairs at home yourself.
Order of Operations
Regardless of the chosen embedding option, you need to perform several preparatory operations with the subject of work in order to be able to continue.
First you need to clean and expand the existing rustications. This is done with a chisel, a hammer drill with an attachment and continues until various construction debris stops falling out of the resulting crack. The rust needs to be expanded to approximately 3–5 centimeters. Small rusts can simply be cleaned with a spatula and the edges treated.
- Next, you need to carefully prime the interior of the rustication and the surface of the ceiling next to it. The primer will provide better adhesion to the materials that will be used for sealing.
- After the soil dries, the surface inside the crack is moistened with water and filled with foam. The foam level should not reach the ceiling plane about 5 millimeters. After the foam has dried, it can be trimmed to the desired level.
The recess formed as a result of previous operations is re-primed and filled with putty. You need to apply it fairly tightly and without gaps.
When the putty has dried, a painting mesh or sickle tape is glued along the entire length of the seam. Final plastering is carried out on it, after which the finished surface is sanded.
The final stage is the application of the finishing decorative coating. This could be painting or wallpapering.
In the version using beacons, the operations will be identical to those that need to be performed when the ceiling is completely leveled. In this case, rusts are processed in the same way as all large defects during such leveling. The technology of work is no different from drawing a plane using beacons on the walls.
It should be noted that no matter which method is used, repairing rust on the ceiling is a very painstaking and difficult job. It is best to invite a specialist with sufficient experience in such work to perform such operations. Especially if you plan to align the plane with beacons.
If the differences in height or unevenness are more than 10 millimeters, experts recommend installing suspended or suspended ceilings. This option will be less expensive in most cases when the existing irregularities are large enough. And the installation of suspended ceilings will allow you not to repair any cracks at all and solve the problem in a minimum period of time, using the installers of the company from which the tension covering will be ordered.
How to smoothly putty walls: a detailed path to the result and advice from experts
How to get a smooth surface?
To make a flat surface yourself, you need to properly prepare the base for finishing work. Proper priming and puttying is required. Puttying is a simple step. It is important to follow the sequence of actions and handle construction tools correctly. In this article we will tell you the secrets of correct puttying of walls.
Types of mixtures
The variety of compositions on the building materials market makes the choice difficult for non-professionals. The material differs in composition, grain size, form of implementation, and other parameters.
- The types of putty according to their intended purpose are:
- starting (leveling);
- universal.
finishing (decorative);
The difference between all types of putty is the grain size of the material.
- The starter ones have high strength, excellent strength and adhesion. They are needed to level the base with visible defects up to 10–15 mm; they are applied in a layer of 3 mm to 2 cm. They can be used as an independent leveling agent.
To achieve a good result, apply the starting putty in several layers.
- a dry mixture that requires dilution with water in certain proportions;
- ready mixture.
- Dry compounds are the most popular, as they are inexpensive and have a long shelf life.
- Ready-made formulations can be purchased in small jars or buckets. The shelf life is shorter than that of the dry semi-finished product, the price is much higher.
- cement base;
- plaster;
- polymer (acrylic, latex, polymer-cement compositions).
- Cement ones are distinguished by high strength, moisture resistance, low price, and resistance to low temperatures.
- Gypsum is suitable for painting walls. An ideal surface is ensured when using it.
- Polymer ones give ideal results, but the price is very high.
How to make a choice?
Any composition is suitable for puttying. In bedrooms, hallways, living rooms, offices and other rooms with a normal level of humidity, you can use gypsum. If the work will take place in the bathroom, then cement or acrylic.
Calculation and necessary materials
Material consumption depends on:
- on the condition of the walls (are there any cracks and how deep are they, roughness, curvature);
- further processing (gluing, painting, whitewashing);
- Does the master have experience?
The optimal consumption rates for putty mixtures can be read on the manufacturer's label. Usually they are specified based on a layer thickness of 1 cm for the starting ones and 1 mm for the finishing ones.
To make the calculation, you need to evaluate the quality of the base and estimate the required layer thickness. Think about whether you will putty the defects or the whole thing. If the wall is smooth, 1 mm of starting putty and 0.5 mm of finishing putty will be sufficient.
If the layers are greater than the recommended values, the coating may crack or peel off.
For example, there is a flat wall 2.6×3 = 7.8 m2 with some defects and small cracks. The approximate layer of starting putty is 3 mm (3 kg per m2). Calculation of the amount of dry material: 7.8 × 3 = 23.4 kg. The finisher needs about 8 kg.
Tools
Minimum set of tools for puttying:
- Mixer (drill with attachment). Mandatory for dry mixtures, not ready-made mixtures.
- Set of spatulas. Spatulas of any size can be useful - both small and large, 40–50 cm. Having one wide spatula will make it difficult to putty behind pipes, radiators, etc.
- Rollers, brushes for priming. To improve adhesion, you need to pre-prime the base. You can do this very quickly with a roller.
- Rule. To putty a thick layer or level the walls, you will need a long metal rule. You can use it to level the layer to get an even base.
- Level or plumb line for installing beacons (starting putty). To level the base with the starting composition, take this tool.
- Sandpaper for grouting after drying. The finer it is, the more beautiful the surface will be. Fine sandpaper is for grouting the finishing mixture, coarse and coarse sandpaper is for the starting sandpaper.
- Manual skinner. A handle and a clamp with a plane on which the sandpaper is attached.
- Container for stirring the solution.
Instructions for applying putty
If the work is internal, then the room should be dry, temperature - from +5 to +25 0.
Surface preparation
Clean the walls with a spatula. Carefully treat corners, areas adjacent to the floor and ceiling. The plane must be level.
Prime the base: any concentrated deep impregnation primer will do. Dilute it according to the instructions, pour it into a bath or bucket. Using a roller or brush, saturate the walls, adjacent areas, and all corners. Wait about a day until the surface dries completely.
Dilute the putty according to the instructions. Mix with a mixer until smooth. If the resulting mass flows off the spatula, add the dry mixture, and vice versa. You cannot make a very thick solution; elasticity is needed. After the first stirring, wait 3-4 minutes and stir again. The consistency of the solution should resemble thick sour cream.
Starting layer
The starting solution is applied to the plastered surface without defects. The thickness of each layer should not be more than 10 mm, the total thickness should not be more than 30 mm.
To obtain maximum quality of putty surfaces, you can install a painting mesh and distribute the solution over it. The walls will be stronger and smoother.
- Use a spatula to scoop up a lot of solution and apply in broad strokes;
- you need to act confidently and quickly;
- when applying, the tool is pressed firmly against the base at an angle;
- spread the sagging with an empty spatula or remove it.
Lighthouse method
A lighthouse is a strip made of wood, plaster or metal, which is placed vertically, checking the verticality with a level. Beacons are attached to a gypsum mortar, which dries quickly.
Aligned horizontally as well. This is where the rule comes in handy. This method is used much less frequently, because it is more expensive.
The contents of the bucket are laid out in the span between the beacons and pulled together from the bottom up. Air bubbles will be visible on the surface. They need to be removed (broken with a spatula, and then leveled with a rule). When you reach the ceiling, you should not leave defects, making allowances for the fact that they will overlap.
30–40 minutes after leveling, carry out the rule from top to bottom. This action puts the beacons in place.
Finishing
After completing the initial puttying, finishing work begins. After them, the surface will become perfectly smooth, as the smallest pores or cracks will be eliminated. Apply the solution in a very thin layer.
If the previous finishing stages are performed poorly, a good result will not be achieved.
Sealing cracks
To hide cracks, gypsum mixtures are used. A more elastic material is santegypsum, but it takes much longer to harden. To increase the roughness, scratch the surface along its entire length with a knife or other sharp object, treat it with a primer, and then putty.
Leveling for painting
The leveling process is labor-intensive work. If the surface has an ideal structure, then it will be easy to paint in the future. To level the base dry, frame structures and drywall are used.
To secure them, you need to prepare:
- drywall;
- galvanized profile;
- screws;
- dowels;
- screwdriver;
- knife for cutting drywall.
At the final stage you will need putty. For the raw method (putty, plaster) you need:
- beacon profiles;
- primer;
- mesh for reinforcement;
- screws;
- plaster;
- trowel for processing internal corners;
- putty.
How to level the base:
- determine the alignment method;
- if it is drywall, choose the method of fastening the sheet: frame or glue;
- when choosing the wet method, clean everything from old materials, install beacons, apply plaster in 2 layers, smooth out irregularities and seams, treat the base;
- After all stages, the surfaces will become smooth, then paint can be applied.
Expert advice
To smoothly putty the walls, you need to adhere to the following expert advice:
- remove old finishes;
- prime the surface and let it dry;
- work with two spatulas: narrow and wide (putty with the second, put the mixture on the spatula first);
- keep the spatula at an angle to the surface;
- the uniformity of the layer should be maximum;
To avoid streaks, apply the mixture in a thin layer; move the spatula not only in one direction, but also make semicircular movements.
To achieve an ideal result, you need to follow the recommendations given in the article. By choosing the right type of mixture, preparing the surface well for work and following the instructions, your walls will be the smoothest.
Useful video
The video below shows and explains how to putty walls correctly and evenly.
When is repair and reconstruction needed?
A visual inspection may reveal some problems:
- nature of crack propagation;
- exposure of reinforcement;
- determine the location of cracks relative to the load-bearing columns;
- make photographic records of all defects.
Thanks to such work, it is possible to draw up an action plan and determine whether the slab requires repair or whether this procedure can be postponed. It is necessary to immediately understand which defects can be eliminated even before a problem arises. To determine this, it is enough to take measurements of the cracks during a visual inspection and examination, and measure their depth, if possible.
You can also invite specialists who, using equipment, will determine how dangerous this defect is and whether it will entail more serious consequences.
Repair and reconstruction can still correct the situation when cracks and splits are very small, when they can be restored with special mixtures. For example, slab deflections greater than the permissible norm due to loads cannot be corrected: most likely, the conclusion will include a recommendation to completely replace the floor slab with a new product.
Manufacturing of fiberglass for ceiling surfaces
This material is produced by melting glass of a special composition. Fiberglass for the ceiling is an environmentally friendly product, since quartz sand, soda, lime and dolomite are used for its production. When the melt is heated, threads are formed, then they are randomly layered on top of one another and glued together.
Outwardly, they look like a cobweb, which is difficult to break. At the same time, glass fibers bend easily without being deformed, and their structure is not disturbed. Next, the material is pressed to give it increased strength.
As a result, the produced fiberglass ceiling has the following qualities:
- environmental cleanliness;
- fire resistance;
- water resistance;
- resistance to damage.
In addition, this material has antistatic properties, and due to its inorganic composition it is not subject to mold formation.
The main reasons for the formation of cracks in the floor
If cracks appear after laying the wooden covering, it means that the work technology was violated, during which the material dried out and a gap formed.
The formation of cracks is also promoted by:
- Activity of rodents and insects that dig holes through the wood. This reason is the most common, since in order to save money, many people ignore the need to seal the underground space. The cracks in the concrete are open gates, which pests will definitely take advantage of and turn the wooden floor into dust.
- Increased humidity and improper care of the floor - if the ventilation system in the room is broken and high levels of humidity remain, the wood will certainly absorb it. Swelling of the fibers inevitably leads to the development of microscopic bacteria that will destroy the floor.
- Lack of protective coating - when the floor is not exposed to paint and varnish products, the wood wears out faster, and any temperature changes or mechanical damage can cause cracks and large holes to form.
The sooner the problem is identified and action taken, the greater the chance of maintaining the integrity of the wooden floor. Where there are cracks, there will always be insects, mice, rats and other parasites, the proximity of which is unacceptable for humans.
Installation of the reinforcing layer
It is not difficult to apply putty using fiberglass before painting with your own hands. The main thing is to follow the sequence:
- Gluing fiberglass begins with putty and leveling the walls. How to putty a wooden floor before painting? For this, PVA-based or oil-based putty is used. The walls are puttyed in a layer 2–4 mm thick. Large cracks and corners are glued with sickle before puttying. The surface must dry, then it is rubbed with coarse sandpaper.
- Dust and dirt are removed from the walls before painting. The cleaner the walls are, the better the fiberglass will adhere.
- The adhesive should be applied to the wall, from the corners. The width of the spread layer is slightly larger than a roll of fiberglass.
- The fiberglass is rolled to the wall and cut from the bottom using a utility knife.
The walls should be covered in such a way that the fiberglass joints do not overlap the putty seams. The material is glued end to end. Excess air under the fiberglass is expelled using a wide spatula or rubber roller.
Don't overdo it; raw fiber breaks and stretches easily.
Important! The walls should dry out within 1–2 days, but it is not recommended to ventilate the room. Photos are enlarged, click!
Photos are enlarged, click!
Work order
Proper repair of ceiling rusts guarantees the absence of cracks for several years. For work we will need:
- a primer that increases the adhesion of materials, preferably concrete contact and its analogues;
- fiberglass mesh (serpyanka);
- steel spatula;
- plaster plaster mixture (Rotband, Prospectors, etc.);
- for large gap widths - polyurethane foam.
Thoroughly moisten the surface of the rust with a primer and wait until it dries completely.
If the crack is large, carefully fill it with foam so that it does not protrude below the surface of the ceiling, and leave for a day. Before repairing a crack in the ceiling, it is necessary to fill it with plaster mortar, ideally Rotband, by about a third, and lay a serpyanka so that the middle of the tape coincides with the center of the rustication. Fiberglass tape will serve as reinforcement; it will protect against cracking, even with small movements of the slabs, which are inevitable in the future.
After this, the rustication depression is carefully filled with gypsum plaster and leveled.
If there is a small difference, then it is necessary to putty the entire surface area that is higher. To level the layer it is convenient to use a steel rule. If plastering experience allows, you can use a more convenient and lightweight wide spatula.
After drying, the entire putty surface is leveled using a special grater or grinder. The further order of work depends on the finishing method.
They also act to eliminate any defects. If you need to repair a hole, crack or chip in the ceiling, they also need to be cleaned and primed. For defects of a large area, use reinforcement with fiberglass or metal plaster mesh.
Wrong spatula selected
Choosing this tool can greatly facilitate or complicate the puttying process. You don't have to choose the most expensive tool. For beginners in repair, a flexible and wide spatula is suitable, because a hard one, when pressed too hard, leaves grooves in the mortar. A wide spatula is also good because it leaves much fewer stains on the surface being treated. It is best to use two flexible tools - 40 and 12 cm. The narrow one is used in hard-to-reach places. It is also used to remove the solution from the container.
Reasons not related to the problem basis
Cracks at joints can appear if the frame is properly organized and the walls are secure.
This happens most often when the start of the heating season is delayed and when the seasons change. When the humidity changes and the room is not heated, the plasterboard begins to draw moisture from the air through porous gypsum putties. The seams contain a relatively large amount of putty, not covered with cardboard. It is the seams that are saturated with moisture faster, and an uneven change in the humidity of the entire plane occurs. Hence the cracks and cracks. The sheets themselves can withstand deformation.
How to fix? Turn on constant heating. If the windows are wide open in summer, in winter you should try to maintain a stable temperature and humidity regime according to summer indicators.
Reason No. 2. The seams are sealed without reinforcement
This gross violation occurs frequently and cannot be determined after finishing work. The technology for installing gypsum boards involves the inclusion of reinforcing materials in the seams - fiberglass mesh, paper.
How to fix? Open all the seams, unstitch them and seal them again, but following the technology.
Reason No. 3. The seams are sealed with basic putty.
The probability of cracks appearing is 50/50, most often due to changes in humidity.
How to fix? See Reason #2. Professionals recommend using Vetonit SILOITE or SheetRock grout.
Advantages of fiberglass in various fields of application
However, this type of material can be used not only to strengthen the surfaces of walls and ceilings. It can be applied in other areas:
- Fiberglass is used during roofing work. So, there are types of it that are used as a basis for bitumen mastic.
- Using this material you can protect the pipeline.
- To strengthen walls. In this case, painting fiberglass is used. It creates a reliable protective layer that will protect the surface from the appearance of cracks, both small and quite large. And it can even prevent cracking of walls, which is caused by shrinkage of the structure.
- It is also used during the manufacture of the waterproofing layer. This material is often used to process polymer fabrics.
- Very often this material is used in the manufacture of drainage systems.
- Fiberglass is also used by designers, creating real masterpieces from this material.
This reinforcing material is also used to save money. And you can save quite a decent amount. The thing is that using fiberglass helps to significantly increase the time between repairs.
Rules for sealing cracks
- It is better to seal cracks at above-zero temperatures;
- Before work, thoroughly clean the surface of the logs and the crevices of the crack, remove debris and dust;
- Sealing of cracks is carried out in dry weather and on dry wood;
- When the gap is very deep, the edges are covered with masking tape to prevent sealant or other product from getting on the surface of the log;
- If the sealant gets on the surface of the frame, wait until it dries and remove it with fine sandpaper;
- After completion of the work, the surface of the composition is moistened and leveled with a brush to make the logs smooth;
- After application, the compositions are left to dry for at least 6 hours, moss - for three days.
Dirty tools
Any tiny dirt or speck that gets under the spatula will not allow you to cover the wall with an even layer, leaving scratches on the surface. Therefore, the bucket and tools must be perfectly clean. For puttying, you must have a separate container and not use it for other types of work. The presence of sand particles in the bucket is especially undesirable. After the process is completed, the bucket is thoroughly washed. Tools also need to be washed after each use. And the mixer - immediately after mixing.
Defect in plaster wall
A crack in a plaster wall occurs due to incorrect proportions of the mortar and poor care after plastering.
Most often, cracks occur on plaster walls, both outside the house and inside the building. And the use of cement-sand plaster will ensure 100% appearance. Mostly they become visible after priming the plaster. The cracks that appear in the ceiling are not large, but are located over the entire area of the wall.
The main reason for their appearance is a violation of the mixing proportions of the components included in the solution, improper application and curing, and improper care after plastering. Many people make the serious mistake of applying a thick layer of plaster without waiting for the previous layer to dry.
Cracks in plaster can also appear after puttying, wallpapering or painting. To prevent this from happening, the wall must be reinforced before final puttying. The following materials are suitable for these purposes: glass wallpaper (fiberglass mesh) or painting canvas. Fiberglass wallpaper is the most expensive option, so we will abandon it for now. We can only say that according to the principle of gluing, glass wallpaper is similar to fiberglass.
Smooth walls without cracks: sealing and leveling surfaces. Which putty should I choose?
Quite often, during repairs, cracks form on walls and ceilings over putty or other finishing materials. There may be several reasons, but they all require elimination.
The article discusses the features of sealing cracks, criteria for choosing a composition, as well as the technology for leveling walls with putty.
Why might cracks appear after applying the solution?
In most cases, cracks are formed due to non-compliance with application technology. However, problems can arise due to surface imperfections if building codes and installation rules are violated. The main reasons why cracks may appear after putty:
- Incorrect consistency of solution. Dry mixtures are diluted to a paste-like state, but ready-made mixtures are not diluted with water. If the solution is too thin or thick, the coating will shrink and crack.
- Dry or non-greased surface. The problem is typical for work in which the primer was neglected. Porous materials (concrete, brick, plaster) are especially susceptible to deformation.
- Low quality material. If low-quality raw materials were used in manufacturing, the unstable coating will crack over time. It is not recommended to use frankly budget compositions.
- Incorrect selection of primer or putty. Materials must match the substrate and not conflict with each other. It is better to select formulations from one manufacturer.
- Insufficient or excessive layer of solution. Too thin will cause the formation of cracks, and too thin will cause shrinkage and deformation of the base.
- Failure to comply with temperature and humidity conditions. If moisture from the solution evaporates actively, then as the screed gains strength, it will crack.
Failure to comply with the installation technology of the plaster mesh or its absence can also lead to cracks, as when applying several layers without intermediate drying.
Which mixture should I choose for sealing the ceiling and walls?
To seal cracks, non-shrinking compounds with high ductility and adhesion are chosen. Bergge brand putty is optimal. Available in two markings - LX and FX.
Bergge Grandplast LX
Bergge putty is a ready-made white composition, brought to a paste-like consistency. Designed for sealing large irregularities and cracks. Optimal when working with porous, uneven surfaces (concrete, plaster). Suitable only for interior work with a dry mineral or synthetic substrate.
- high ductility and filling capacity;
- possibility of tinting for dark substrates;
- suitable for leveling walls;
- environmentally friendly, odorless;
- resistant to mechanical stress;
- easy to apply, sets quickly.
- high price;
- requires prompt work;
- not suitable for facade work.
It is made on the basis of acrylic resins with the addition of mineral fillers and modifying additives. Recommended for preparing walls for wallpaper or painting. Consumption - 10 l/20 m2. Drying time - up to 24 hours, layer thickness - up to 1.5 mm. Requires compliance with temperature conditions ranging from +5 to +30 degrees. Sold in bags weighing 14 kg.
The material is made on the basis of polymers and does not contain gypsum. This makes it suitable for subsequent coloring.
Bergge Grandplast FX
In terms of performance characteristics, Grandplast FX is no different from its counterpart, but is suitable for leveling not only walls, but also ceilings. Sold ready-made, package weight - 24 kg. In some cases, the flow rate can be reduced to 10 l/15 m2. Recommended for large volumes of work for sealing cracks in the ceiling.
How to close it?
At the preparatory stage, the concrete is dedusted using a construction vacuum cleaner. It is important not to use a damp cloth or household vacuum cleaner. Then a layer of concrete contact is applied to the crack. There is no need to dedust the remaining materials. It is enough to apply 1-2 layers of universal strengthening primer and wait for it to dry.
How to remove small cracks?
Preparatory work is carried out before preparing the mixture to avoid its hardening. Small cracks must be lightly tapped with the back of the spatula handle to remove the putty, which easily comes off the wall. Dust is cleaned with a stiff brush.
How to repair small cracks:
- Using a sponge or brush, treat the crack with 1 layer of primer, wait until it dries;
- prepare the putty, let it sit for 5–10 minutes, mix again by hand;
- if you use a ready-made solution, mix it with a spatula;
- take a small amount of the composition and apply it to the crack at an angle of 90 degrees;
- make chaotic movements until the crack is filled with the composition, wait until it dries;
- maintain a layer thickness of 1.5 mm, if necessary, apply 1-2 more with a break for drying.
Instead of a spatula, you can use a stainless steel trowel. Small cracks do not require the laying of reinforcing mesh or preliminary jointing. It is enough to remove elements that easily lag behind the surface by lightly tapping. The treated area is sanded with fine-grained sandpaper or a sanding float.
How to embroider and remove deep ones?
Large cracks on the ceiling or wall are pre-sewn. To do this you will need an old screwdriver or a V-shaped spatula. Place the tool into the crack at a 90-degree angle and move it from side to side. The result is a cross-section in the form of a triangle or trapezoid. The recess must be cleaned with a stiff brush.
- with a sponge or brush, apply 1 layer of universal primer or concrete contact;
- prepare the putty according to the instructions or use a ready-made composition;
- scoop up the solution with a spatula, lay it on the cracked area in a layer of up to 1.5 mm, wait until it partially dries;
- apply a second layer, making chaotic movements until uniformity is achieved;
- drown the sickle or a fragment of fiberglass in the composition, driving out the excess solution with a spatula;
- after partial drying, cover the mesh with a layer of composition, achieving concealment of the texture;
- After complete drying, sand the fragment using a sanding float with a P180 attachment.
Do not neglect the reinforcing mesh when filling deep cracks - it will prevent the putty from cracking. Sanding is done using circular movements of the tool. Before decorative finishing, the surface is primed again.
Below you can see a detailed video tutorial on sealing cracks with putty:
How to properly align corners?
Work begins with leveling the internal and external corners. Internal distortions are detected using a laser level and a ruler. The beam is fixed parallel to the wall, then a ruler is applied along the corner in increments of 5–7 cm. The trace from the laser indicates the distance from the surface to the tool. If the misalignment is more than 5 mm, then it is better to level the corners with plaster.
Applying the mixture to internal corners:
- Apply a trowel with mortar on a gentle slope to the inner corner;
- press lightly, move the tool towards you, but make sure that the composition penetrates into the corner;
- Apply similarly to the other wall from the corner side;
- for convenience, use an angled spatula, applying the composition at an angle of 45 degrees;
- to squeeze out the putty, apply the spatula almost perpendicular to the surface;
- drown the sickle in the composition so that the solution comes out through the mesh, remove the excess with a spatula;
- After partial drying, cover the reinforcing mesh with another layer until the pattern is hidden.
To align the outer corners, use perforated corners. They are embedded in the first putty layer, removing excess mortar. The products are installed level, then covered with mortar on both sides of the wall. After leveling the remaining area of the wall, the internal and external corners are rubbed with a float with a P180 nozzle. To do this, use an angle tool.
Video on how to level a corner with putty:
How to level the walls for wallpaper and painting with the finishing compound?
It can be used to level walls with a skew depth of no more than 5 mm. Otherwise, apply gypsum or cement plaster. It is necessary to use dry mixtures, which can be applied in a layer of up to 5 mm.
- The mixture is poured into a container and mixed with a construction mixer until lumps are completely removed.
- Then leave for 10 minutes and stir again.
- On the wall, using a laser level, markings are made for metal beacons, on which a small amount of the composition is placed.
- The profiles are fixed in increments of 1-1.5 m.
- The solution is basted onto the surface between the profiles, tightened in an H-shaped rule, moving from the lower edge of the wall.
- The resulting bubbles are rubbed with a spatula or a damp sponge, then tightened again with a rule.
- Experts recommend dismantling the beacons. They are pryed with a chisel from the upper end and removed towards you. The seams are filled with putty and rubbed with a spatula.
- The corners are leveled with a corner spatula.
At the leveling stage, it is difficult to obtain a right angle. The problem is solved by subsequent grinding with an angle float.
How to do work without beacons?
Leveling without beacons is allowed with a perfectly flat plastered surface. The composition can be applied in a layer of up to 1.5-2 mm with a wide spatula. Work begins from the corners, which are modeled using a corner spatula or perforated corners.
- the finishing putty is applied to a dry primed surface;
- Using a paint spatula, apply the solution to the inner and outer corners of the walls;
- internal corners are leveled with an angle spatula at 45 degrees;
- using a cross-shaped movement of a wide spatula, the composition is transferred to the surface;
- layers are applied overlapping, avoiding straight seams, starting from the top edge of the wall;
- When performing work for painting or drywall, fiberglass is glued to the surface.
The finishing solution can be applied in a maximum of 3 layers of 1.5-2 mm. The maximum coating thickness does not exceed 10 mm. Each layer must be dried and primed. The average drying speed is 12 hours. 24 hours after drying, the surface is sanded using a grater in a circular motion. This stage can be neglected when preparing the wall for wallpaper.
Which leveling is better - drywall or putty mortar?
- Drywall allows you to hide significant unevenness of the base (with a difference of 5 cm), serves as additional heat and sound insulation, and hides communications. Indispensable for eliminating inconsistencies in FBS walls and hiding mortar and adhesive joints. The material is fireproof, allows the surface to breathe, and does not form dust or dirt during operation.
But drywall greatly steals the volume of the room, is unstable to mechanical loads and is not used in rooms with frequent temperature changes. Not recommended in rooms with high humidity, during facade work, it provokes the appearance of rodents. Difficult to install: requires installation of a frame, loads the base.
When puttying work, a lot of dirt and dust is generated, it requires more consumables, as well as the application of several layers. For communications, you need to punch separate grooves, and you need to wait at least 12 hours for one layer of solution to dry. However, if there is slight unevenness, it is better to level the base by puttying.
It is better to resort to leveling with plasterboard if the walls in a private house or apartment are made of wood, you need to hide communications, additional insulation is required, sealing of seams is required, or the work time is limited. In other cases, use putty or plaster.
Expert advice
Use the following tips when working with putty and filling defects:
- try to establish the cause of the formation of cracks - perhaps the problem lies in a defective surface, and not in the technique of applying the material;
- if the crack is long, it is better to use a drill or hammer to create a groove;
- at the preparatory stage, get rid of greasy stains using a solvent;
- give preference to polymer compositions based on acrylic - they are tinted, do not shrink, and are opaque;
- do not clean defects with a sponge or rag soaked in water to avoid the formation of dirt;
- when finishing with heavy materials, level the surface with putty, not plasterboard;
- To prevent cracking, keep away from drafts for 48 hours after the solution has dried.
Cracks in putty are formed both as a result of defects in the base and when application technology is not followed. For sealing, it is necessary to use elastic, non-shrinking compounds with high covering power. The walls are leveled with putty, plaster and plasterboard. The choice depends on the type of room, the depth of the unevenness, and other factors.
Hatch dimensions for attic stairs.
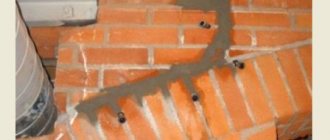
Hatches for stairs are usually punched between two slabs, at the junction. The width and length of the hatch depends on:
— Widths of floor slabs.
— The load that the cut slabs will experience. For example, the roof racks will rest on these cut slabs (the roof will put pressure).
If the pits are wide, then the hatch can be made larger. In the video above, the width of the reinforced concrete round-hollow slabs is 1.5 meters.
We often make hatches 900 mm by 900 mm in slabs 1.2 meters wide. That is, we cut 450 mm in one slab and 450 mm in another slab. These are the dimensions of the hatch for ladders, but they are very inconvenient. Since the attic ladder will always be stored somewhere nearby, in the living room.
It is best to use folding attic ladders, which are attached to the hatch cover and folded when the hatch is closed.
The most common sizes for folding attic stairs are: 600 mm by 1200 mm; 700 mm by 1200 mm; 600 mm by 1300; 700 mm by 1300 mm; 700 mm by 1400 mm.
For example, if you have chosen a folding attic ladder measuring 700 mm by 1400 mm, then it is very IMPORTANT to cut the hatch in the slabs in such a way that the long side of the hatch (1400 mm) is along the slabs and not across. We use this method when it is not possible to cover all non-multiplicities with slabs
When it is not possible to purchase slabs of different widths. When you don’t want to cut floor slabs lengthwise
We use this method when it is not possible to cover all non-multiplicities with slabs. When it is not possible to purchase slabs of different widths. When you don’t want to cut floor slabs lengthwise.
How to deal with this problem?
If the plaster has become completely unusable, as evidenced by the ability to make a hole in the wall right down to its base, it cannot be repaired. In this case, you will have to resort to completely replacing it.
Note! In this case, many people treat the walls with a primer and then putty them, but this does not completely solve the problem, but only temporarily eliminates this drawback, creating the effect of reliability.
If only parts of the wall were plastered with too much sand, and not its entire surface, as evidenced by the crumbling of plaster only in some areas, then there are several options for the development of events.
What are rusts
From time immemorial, natural stone or its imitation has been used in the decoration of building facades, the visible part of which is a smooth or faceted surface roughly processed by chipping. If such cladding is not streamlined, the result will be a plane with a monotonous texture that does not have any artistic appeal. Therefore, the joints of stone finishing elements with each other are made in the form of a dividing strip of a fixed width - rustication. Sometimes such a stone itself, finished with a strip of a fixed profile along the perimeter of the front part, is called rustication.
Peculiarities
Fiberglass is used for rough finishing to prevent cracking of the finishing material and its deformation during the shrinkage process. The material is non-woven sheets based on fiberglass threads, which are pressed. The material is produced in rolls 1 m wide. Material length is 20 and 50 m.
GOST dictates different thicknesses of threads and weaving them in a chaotic manner, which provides a reinforcing effect. The density of the material is 20-65 g/m2. Depending on the purpose of the material, rolls of one density or another are selected. Optimal for interior work is fiberglass with a density of 30 g/m2.
Due to its low density, the material looks like a translucent canvas, for which it received another name - “cobweb”. Another name is glass interlining.
A special feature of the material is the presence of front and back sides. The front side is located on the inside of the roll; it is smoother. The back is more fleecy for better adhesion to the surface.
Carrying out repairs
Before starting repairs, you should determine the type of crack and act accordingly to the results.
- If transverse cracks form, you should contact a specialist. Such deformations are extremely dangerous and are fraught with collapse. In this situation, a complete replacement of the slab or a thorough repair if this is not possible is required. Builders install temporary supports for the slab and strengthen it. After this, the supports are replaced with permanent ones. If all work is completed on time and in compliance with technology, the deformed slab can continue to be used;
- You can try to repair diagonal and longitudinal cracks with your own hands in order to continue operation. Most often, such defects indicate excessive load on the base. In this case, the slab should be freed from loads as much as possible. Before repairing, the trim should be removed and the substrate thoroughly cleaned. Then, by chiselling grooves over the voids, reinforcement similar to the existing one is inserted into them, and thus a frame is created that should be concreted. During the work, supports are installed under the deformed surface, which are removed no less than two weeks after the work.
A cracked slab can cause tragedy and the collapse of a building. Take the situation seriously. The best way to solve the problem is to contact professional builders to assess the situation, carry out calculations and solve the problem.
What to do if the wall under the tiles crumbles and crumbles
One day you may find an unpleasant picture on the wall. The plaster is crumbling, and the wall surface looks untidy and unsuitable for laying tiles.
The situation may arise due to saving cement during construction. The tiles can come off at any time and the plaster can turn into sand.
It is impossible to use the wall for construction in such a situation, so it needs to be restored. Be sure to plaster before laying tiles.
The plastered surface has increased strength properties; the wall can be prepared for the application of any material.
Strength increases by 30 percent. Afterwards the tiles are laid. Plaster levels the surface, it becomes smooth, without damage or rough elements.
If shedding occurs severely, then you only have to change and apply a new composition. Sometimes it is pre-coated with primer or putty.
These mixtures do not guarantee strength; they will only apparently hide defects. If the wall is crumbling in places, then it needs to be primed with a deep penetration agent.
Important conditions before sealing cracks
If the renovation has just recently been done, and there are already cracks on the ceiling, there is no need to try to fix them right away, since all the work may ultimately be done in vain. The first step is to find out the root cause of the damage. Most often, cracks on the plasterboard surface appear due to deformation of the ceiling, and if it has not stopped, then most likely this process will continue in the future. In this case, there is no point in sealing the cracks; it is better to redo the entire ceiling. This is especially true in cases where the plasterboard ceiling begins to move when you press on it with your hand. In this case, sealing cracks is pointless - the ceiling must be redone or dismantled anew.
Starting puttying from the corners
Puttying should smooth out surface defects, namely the most crooked corners. Therefore, starting to treat the walls from them will only worsen the unevenness. You should start working by stepping back from the corner by at least 5, and preferably 15 cm. The corners are processed at the end, after the very first solution has completely dried. Starting from the leveled area and focusing on it, slowly bring the angle to the same level. If the corners in the room are rounded, this can be removed with a hammer drill. Otherwise, the angle will not be even.
Errors and problems when filling
Experts consider the following problems to be the most common mistakes when sealing joints (seams, rustications, gaps):
Lack of preparatory work (failure to remove old layers during secondary sealing, refusal to blow and wash the surface, or priming during primary sealing). This will cause poor adhesion at the point of contact between the compounds and the seam. Use of cheap, low-quality materials, without labeling, instructions and guarantees from the manufacturer. At any moment, the useful life of handicraft industrial substances may expire. It will not protect the floors, the finishing materials will not adhere well, and cold bridges will form. New sealing will be required soon. Incorrectly calculated impact loads on floor slabs. Refers to engineering defects. Particularly noticeable on heaving soils and in seismically unfavorable areas. Manifested by cracking, widening of gaps, displacement of rustications
Therefore, when performing work, calculations and design should be given due attention. It is forbidden to ignore the technical standards of GOSTs and SNiPs. Deviation from the marking line when laying slabs and forming joints can lead to divergence in angles, geometric deformations and the formation of bulges
Geometric deformations are difficult to eliminate, especially when the ceiling is formed as a monolith. Do not remove corroded metal rods or mesh, parts of which are located in the seams. They can prevent good adhesion of the sealing and sealing compounds, and rust will appear through the material and cannot be removed by anything. Inaccurate sealing, without compacting and filling all the pores, will lead to peeling of the sealed surface. For monoliths, formwork is needed when the gaps between the tiles are closed. If the gaps are not tightly filled, they will have to be repaired again very soon.
Before any sealing operation, you must pay attention to:
- seam depth;
- defects;
- surface damage during operation.
They need to be eliminated in a timely manner. It is advisable to carry out work in dry rooms, at temperatures above + 15°C.
Putty defects: types, causes and ways to avoid them
Putty defects: types, causes and ways to avoid them
The leveling of walls and other surfaces is intended to ensure structural reliability and aesthetic appearance of the object. Putty is by far the most common and one of the most effective ways to decorate surfaces. There are practically no problems when creating a single-layer coating. But when the need for multi-layer application arises, the risk increases significantly. The causes of difficulties and defects are the following:
- Failure to comply with the rules for working with the material.
- Ignoring systematic surface preparation.
- Wrong choice of mixture and materials.
- Failure to allow layers to dry before applying the next one.
It is the job of the roughing manufacturer to take all possible measures to prevent defects in the filler. This can be achieved by following established work rules. It is important to observe the thickness of the coating, prepare and objectively assess the condition of the layers when moving to a new layer.
Typical problems encountered by craftsmen include the formation of bubbles, especially in corner areas of the surface, the formation of cracks, and the peeling off of new layers. Below we highlight the most common problems when leveling walls.
"Grooves"
A standard problem caused by insufficient surface preparation. It is important that no elements remain on the surface that are larger in geometric size than the components of the putty mixture. Otherwise, during the leveling process, these particles are drawn along with the mixture, pushing through layers of fresh putty. As a result, a ditch is formed. The task of the work contractor is to promptly identify such a particle, remove it and level out the resulting defect.
IMPORTANT: Prevent the risk of grooves by properly preparing the mixture and constantly monitoring the job.
"Steps"
This problem is less common. The surface is formed with insufficient geometric evenness. If the spatula is poorly pressed to the plane, then characteristic faults are formed. Immediately assess the condition of the spatula, adjust its design and maintain the required pressing force.
IMPORTANT: it is easy to eliminate the “step” at the moment it is detected - just treat the area with sandpaper, and then apply the material evenly to the area.
"Incision"
The problem occurs frequently, but can be easily resolved. When applying the material with a spatula, you can damage the integrity of the layer like a knife. Such a cut in the layer can simply be treated with another application of the material.
IMPORTANT: if you discover a problem during puttying, then promptly apply a new layer. If the problem becomes apparent after the mixture has hardened, then properly prepare the surface.
"Bubbles and Notches"
Failure to comply with the composition of the mixture or the thickness of the created layer leads to the formation of geometric irregularities. This is the most common defect. To eliminate the problem, it is enough to locally prepare the area and fill it with the optimal volume of the mixture. The process requires special attention and calculation of the putty so as not to create new problems.
The putty technique allows you to create excellent geometric surfaces. The technology is simple, but requires attention to detail. Experienced professionals know very well how to avoid common problems, so by collaborating with professionals you can ensure excellent results.
Due to the fault of the developer
Fluctuation of pressure on the foundation as a result of uneven settlement of the foundation. This is due to insufficient geological surveys or external factors.
The displacement of the soil under an already constructed structure causes shifting loads, which entails inclined cracks. Point compression of the soil also plays a significant role in identifying the causes of cracks, especially in new buildings. Nearby pits, traffic, dynamic influences are factors that influence the displacement, compression and settlement of the soil. There are cases when soil freezing, combined with insufficient flexural rigidity of the structure, contributes to the appearance of cracks.
The solution has specific properties
Lime and sand are taken to make the mixture. A lime mixture is added to the containers, then filled with water. Sand will give a thickening effect. A good brand of cement is used and a funnel is made from sand. Water is added to it in a small amount.
If the wall under the tiles is crumbling, then it is urgent to carry out finishing work to fill the cracks and level the surface. Nothing complicated, but you need to follow the rules.
If the wall is crumbling, the plaster is of poor quality and needs to be replaced with a new coating, what should I do? Write your opinion in the comments.
Source