9944 0 0
Felix September 27, 2017 Specialization: philological education. 20 years of experience as a builder. Of these, for the last 15 years he led a team as a foreman. I know everything about construction - from design and zero cycle to interior design. Hobbies: Vocals, psychology, quail breeding.
If applied incorrectly, the wallpaper joints may separate.
Greetings, my dear readers.
Often, after gluing wallpaper with your own hands, some problems arise. The most common problem is divergent joints between panels. I'll tell you why this happens and how to fix the situation.
For what reasons can joints diverge?
When glue is applied to the canvases, they become soaked and increase in size.
When paper-based wallpaper panels get wet when they are smeared with glue, they swell and change linear dimensions. This applies to both completely cellulose material and textile material with a paper backing.
Non-woven fabrics also swell, but to a lesser extent. Thus, the width of a standard material of 53 cm increases by 3–5 mm when it is moistened.
Without experience and knowledge about the behavioral characteristics of different types of panels, you will not be able to accurately determine the results of wallpapering. As you work, the seams can look great. But after the canvases dry, they shrink, trying to return to their original sizes. At the same time, their width will become smaller, which will lead to the opening of the joints.
Reasons why seams are visible on non-woven paper wallpaper:
| Photo | Description |
| Cause 1 An insufficient or excessive layer of adhesive was applied to the edges of the canvases. | |
| Reason 2 The base was poorly prepared. For example, not primed or puttied. | |
| Reason 3 The brand of glue is not suitable for the type of wallpaper used or the composition was prepared incorrectly. | |
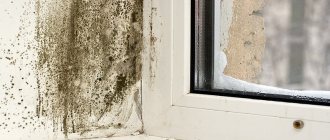
| Reason 4 The cladding dried when the temperature, humidity and other conditions in the room were violated. The manufacturers' instructions note that the wallpaper really doesn't like drafts. |
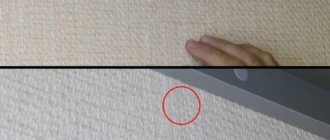
The seam between the wallpaper is noticeable when it fits perfectly
The problem is typical for vinyl coverings, but is slightly less common at the joints of non-woven wallpaper. It looks like this: from the picture you can see that the seams fit perfectly, but at the junctions of the rolls there is a white unpainted stripe. The cause may be a manufacturer error or improper storage and transportation of rolls.
Expensive wallpaper consists of at least two layers, roughly speaking – base and coating. Sometimes when cutting edges in production, the coating is cut a little shorter than the base. The second possible reason is careless transportation or storage. Because of this, the design on the edges may be erased.
The way out of the situation is to paint the joints. You can do this in two ways:
- Use a cosmetic pencil if the wallpaper pattern is glossy. Over time, the tinting procedure may have to be repeated. The technique is simple: carefully paint over the joints and rub them with a clean rag or your fingers.
- Tinting paste to match the coating (the cheapest one is possible). The color is applied to the joints using a thin spatula or a regular cotton swab in short sections. After a small area of the seam is covered with paste, this area should be wiped with a damp microfiber cloth. The colorless seam will be colored and will become invisible. Before you start working, be sure to check the color on an unnecessary piece of wallpaper; it should wash off well without leaving any traces. During the process, you need to regularly rinse the rag to keep it clean.
If the color of the coating allows, you can paint over the joints with a simple felt-tip pen or pencil. If you decide, be very careful; a felt-tip pen or pencil, unlike color scheme, cannot be washed off the wallpaper with a damp cloth.
If the coating is a single color, the joints can be painted in the appropriate color.
How to choose the best glue
To repair joints between wallpaper, you need to select the optimal glue for the seams. It doesn't have to be the same brand you used when you originally started. The main thing is that it matches the type of finish.
The most popular types of adhesives are shown in the table:
| Image | Brand of glue and its characteristics |
| Polyex-Rash/Universal . The composition is used for paper and all other types of wallpaper. Produced in the form of a dry composition. Packaging price is 150 rubles. | |
| Metylan/Vinyl-Premium . The material is used for vinyl panels. Available in the form of a dry mixture. The package costs 900 rubles. | |
| Metylan/Flizelin-Ultra-Premium . The adhesive is designed for non-woven fabrics. Available in the form of a dry composition. Cost - 1000 rubles. | |
| Metylan/Universal-Premium . Suitable for all types of wallpaper, including paper. Produced in the form of a dry mixture. Costs 500 rubles. | |
| Aquadecor-Ultra . The material is designed for fiberglass fabrics. Available in the form of a ready-to-use liquid. The cost of packaging is 150 rubles. |
Expert advice
Experts highlight several tips when gluing wallpaper:
- Use high-quality materials for repairs.
- The loose edges are cleaned of debris and coated with the same compound that was used during the repair, only diluted with a more liquid one.
- PVA can help, but in the future there will be difficulties with peeling off and yellow spots may appear. Therefore, its use should be avoided.
- The material will rupture when the wallpaper and plaster come off. In this case, you should remove the canvas, clean it, the wall and make a new pasting.
- The material for gluing is purchased with a reserve, which will allow you to resort to replacement when gluing the room.
- If a whole panel is being re-glued, and there are sockets or switches on it, measures are taken for preliminary removal.
- The moment is taken into account when selecting the composition for working with different types of wallpaper.
- The floor for coating the canvas must always be clean.
- Prepare rags without patterns to prevent the pattern from transferring to the material when wet.
Repairing broken seams on wallpaper
If the seams on the wallpaper come apart, most amateur builders prefer to completely re-glue the finish. However, there is an alternative to this. The situation can be corrected with restoration.
For repairs, it is better to use glue in such tubes.
Prepare for repair:
- a strip of wallpaper matching in length and width with the joint between the panels;
- adhesive composition, it should be contained in a tube with a thin tip (the solution can also be applied using a syringe);
- small roller;
- cloth napkins.
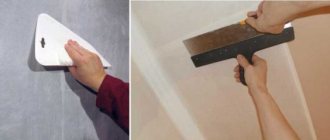
Tape the seam first.
Algorithm of actions:
- Carefully spread the glue over the joint. Apply the composition carefully so that it goes on evenly.
Go over the glued strip with a roller.
- Apply a strip of wallpaper to the joint, press it with your fingers and straighten it. Next, roll the area with a roller.
- Lastly, use a dry cloth to remove excess adhesive.
You can remove seams on wallpaper after gluing in this way if they are located on inconspicuous areas of the walls or if the finish is painted in a light color.
The repair will not be successful if dark panels are glued in conspicuous places.
Seam painting
The seams can also be painted over.
If the panels are colored, then the joints can be sealed by painting them.
For this purpose, prepare:
- gouache or pigmented sealant;
- brush;
- small water tank;
- gauze.
Restoration algorithm:
- Mix a little dye with the liquid so that the resulting composition has a creamy consistency. When choosing a sealant, do not dilute it with water; it is already ready for use.
- Using a brush, distribute the coloring composition along the joint between the panels. Do this carefully so as not to stain the lining. If this does happen, quickly remove the paint with gauze.
- Wait until the restoration layer dries. If necessary, apply paint a second time.
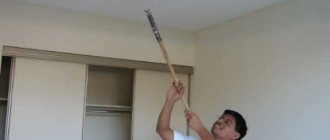
Essential tool for removing wallpaper from walls
Now it's time to prepare your tools and materials. To remove wallpaper and clean up after dismantling you will need:
- broom and dustpan;
- Trash bags;
- sponges and rags;
- bucket, detergent and water;
- gloves, goggles and face mask;
- work clothes.
In addition, tools and accessories are collected:
- stepladder for working at height;
- several spatulas of different sizes with sharp edges;
- wallpaper “tiger”, knife or needle roller.
It is necessary to stock up on special tools, namely liquid for removing wallpaper. If this is not available, a solution of water and soap will do. Another option is to prepare a piece of fabric and a steam iron or, if you have one, a steam cleaner.
When everything is ready, you can begin dismantling the old coating. You can do this using one of the methods listed below.
How to properly glue trim
First you need to cut out the wallpaper.
To avoid problems with wallpaper seams, you need to properly glue the trim the first time.
It's done like this:
- First of all, cut out the panels. At the top and bottom, based on the characteristics of the patterns on the material, leave a spare 3–4 cm.
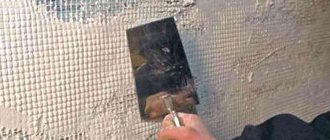
Apply glue to wallpaper only on a clean surface.
- Lay the piece of cloth on the thoroughly washed floor, face down. Use a large flat brush to spread the adhesive.
- Fold the cut and wait the time specified by the manufacturer for soaking the wallpaper. At the same time, you can prepare other panels.
You need to start working from the window or door.
- Glue the prepared cut to the base in the corner next to the door or window. The supply of material on their side should be 3–4 cm.
- Using clean and dry gauze or a roller, straighten the trim and press it to the base, simultaneously expelling air from under the canvas.
- Trim off any extra inches of wallpaper at the corners and at the top.
- Glue the second piece of wallpaper with an overlap of 3–4 mm on the first panel. This way the joints will not separate when the finish dries.
- Cover all walls using the described method.
Recommendations
Here are tips to help you hang wallpaper correctly:
- The panels must be glued to a leveled, primed and puttied base.
The glue must match the type of wallpaper.
- The brand of glue must match the selected type of wallpaper.
- Remember that the methods for gluing different types of panels are different. For example, when using non-woven wallpaper, it is not the wallpaper that is coated with glue, but the base. Sometimes it is necessary to apply a fixing compound to both walls and panels.
- You cannot glue wallpaper without seams, that is, joint to joint. The canvases need to overlap each other. Then they won’t come apart after drying.
- Do not press seams with strong pressure. You will squeeze out the glue, which will moisten the front side of the canvases. This will remove the paint layer on the finish.
- Finishing work should be carried out in a warm room and at low humidity.
- Until the cladding is completely dry, doors and windows, heating equipment and air conditioning must not be opened.
Solving the problem correctly
If it so happens that the joints of just pasted wallpaper have come apart, then we suggest you correct this misunderstanding. Fortunately, there are many ways, and you can choose the most optimal one for yourself.
- Re-paste the wallpaper. Yes, this is a radical method that requires additional nervous and financial expenses. But if the gap between the wallpaper is thicker than three fingers, then this is the most obvious and high-quality solution;
- Color in with a felt-tip pen. No, children's pencils and felt-tip pens will not help in this case. You will have to go to a hardware store and buy a special felt-tip pen;
- Mask the joint. Most often, homeowners resort to this method. You need to cut a strip of wallpaper a little wider than the divergence space, and glue it under the edges of the wallpaper that hangs on the wall;
- Install panels. You can stick panels or baguette on top of the peeling wallpaper. So in one fell swoop you will not only hide the defect, but also add originality to the interior.
- And remember that a mistake during renovation can happen to anyone. You shouldn’t get discouraged and worry about this, because the solution to the problem is always on the surface, the main thing is to know where to look for it.
Types of defects
There are several types of defects:
- the stripes have separated and a gap is visible (a piece of wall);
- glue came out;
- the edges of the wallpaper were wrapped together with glue and plaster;
- one edge in the joint area is different in color;
- the edges of the rolls did not match the pattern.
It’s difficult to deal with the last defect without re-gluing, there are two options - replace the strip or stick on a wide border, but this is ugly.
How to glue seams at joints and corners that are broken?
The main problem why wallpaper peels off is that working with it seems simple. They start it without knowing the subtleties and rules.
The recommendations are as follows:
- Do not skimp on finishing materials and try not to buy discounted goods.
- Before starting work, read the instructions.
- Use special spatulas and rollers.
- Have a supply of clean cloth napkins.
- Buy good wallpaper glue and a special one for joints.
- Carry out high-quality preparation of the base.
- Carry out gluing before the start of the heating season. It is advisable that the papered walls dry out in natural conditions.
- After repairs, you cannot ventilate the room to prevent drafts.
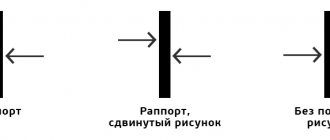
Different colors of wallpaper edges
It happens that the joints on the wallpaper are visible not because the gluing was done poorly, but because one edge of the roll is darker than the other. When two canvases are joined, a sharp color transition is visible. At the same time, the eye cannot perceive the difference in colors when looking at one canvas. This effect occurs due to the peculiarities of the technological cycle of wallpaper production and is not considered a defect. When gluing the entire volume, the tone transitions are not noticeable.
HOW TO FIX?
If there is no such icon, in order to avoid complications in the future, when purchasing, try to combine two rolls with different ends and check if there is a clear tone transition. Unfortunately, it is difficult to discern the difference in shades before gluing. It becomes visible if you glue a couple of canvases, let them dry and look at them from the side.
Cracks in the house - causes, methods of elimination
A crack may appear on the wall of a house at any moment, and the owners of the building immediately wonder how dangerous this phenomenon is. Experts distinguish between two types of cracks – passive and active. And if in the first case the defect in question can be “removed” with your own hands, then in the second case you will have to involve professionals in the work. But first you need to understand what factors provoke the appearance of cracks.
Causes of cracks in the house
It is believed that in the first five years after the construction of a house, cracks appear on the walls in 90% of cases - experts call this natural shrinkage, which does not pose any danger. But it also happens that the house is many years old, it is quite lived-in, all structures are regularly repaired, but cracks still appear. What is the reason for this phenomenon?
Firstly, cracks in the house may appear due to violations in the technology of constructing the walls themselves. For example, if the dressing of brickwork was carried out incorrectly.
Secondly, the phenomenon in question on the walls of a house may be caused by non-compliance with the sequence of construction work. For example, communication systems (water supply, sewerage) are often installed after the house has been built - the foundation has to be excavated, which negatively affects its quality characteristics.
How to prepare for removing wallpaper from walls
Removing old wallpaper from walls is a job that requires preliminary preparation. After all, during the removal process, dust, pieces of plaster and scraps of paper will fly off. We must not forget about the safety of work. Therefore, the room needs to be prepared in advance:
- Furniture. It is advisable to move all the furniture from the room to another room. You can arrange it compactly in the center of the room and cover it with film.
- Textile. Curtains, tulle are removed, bedspreads, decorative pillows and other textiles are removed from the room.
- Floor. Covered with film. It is necessary to spread newspapers on top so that the coating does not slip during repairs.
- Skirting boards. To keep the baseboards clean, they are covered with oilcloth and secured with tape.
- Doors. Wrap the handles and door with film and secure with tape. You need to place a damp cloth near the door threshold so that dust and dirt do not “stretch” into other rooms.
Now you need to take care of protection from electric current
Before removing wallpaper using water, it is important to turn off the power to sockets and switches. They are covered with film on top and sealed with masking tape.
The chandelier is de-energized, dismantled, and the wires are insulated using electrical tape, film, and tape.