— Tags
— Search by diary
— Subscription by e-mail
— Statistics
Thursday, August 18, 2011 1:34 pm + to quote book
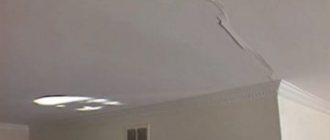
Bubbles caused by partial lack of adhesion (sticking) to the surface. Main reasons:
- The formation of bubbles from high temperatures occurs when painting a known hot surface or painting in direct sunlight
- Moisture escapes from the inside, and the paint film is repelled by water
- Painting a wet surface with alkyd paint
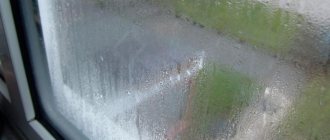
- Condensation on a freshly painted acrylate surface
- Dirty, unprepared surface
- Using poor quality or damaged paint
Solution:
If the cause of bubbles is excess humidity in the room, or moisture coming from inside the surface, find and eliminate the source of excess moisture. Create conditions for sufficient ventilation of the room. Completely remove the old coating mechanically (manual processing, sandblasting, high-pressure treatment), or chemically using special compositions for removing paintwork. Treat the surface with an antiseptic to prevent mold. Use a moisture barrier system for further painting. You can get information about painting techniques and material properties free of charge from our consultant. Use high-quality paints and varnishes and tools. Follow the dyeing technology.
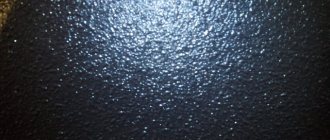
The formation of small bubbles on the paint film when drying, which looks like small bumps on the dried film, is a very common problem when coating with gloss and semi-gloss, especially when using solvent-borne paints. The most common reasons:
- “Whipping a cocktail” - the paint was mixed with a mixer in an open container at high speed, mixed with air and whipped into a cocktail
- The coating speed was too high; the roller, rotating very quickly, again created foam on the paint
- Applying gloss or semi-gloss paint to a porous, unprepared surface
- Too high a temperature of the surface to be painted or in the room where painting takes place leads to the fact that the film has time to dry faster than the coating is leveled
- Using a thinner that is not suitable for the type of paint
- Using a low-quality roller
- Using a roller with the wrong type of lint
- The paint has turned sour, deteriorated, or was of poor quality
Solution:
All paints foam to some extent during mixing or tinting. High-quality paints smooth out during application and drying. Use mixer speed on low to prevent foaming. If bubbles form during paint application, try reducing the paint speed. Follow the technical rules for painting. Porous surfaces must be primed before applying paint. Use high-quality paints and tools. You can get information about dyeing techniques and material properties free of charge from our consultant.
Other questions on this topic
I wanted to decorate the doorways (where doors will not be placed) with platbands, for example. Ultrawood, but there are a lot of doors and openings in the hallway, how to put it all together without it being too much? I am attaching a diagram of the hallway and a picture as I would like. On the diagram: 1-entrance.
Good afternoon I would like to address a question to designers and forum members who have encountered this problem. We have a small bedroom. One wall of the bed is completely adjacent to the wall... I would really like to decorate this one somehow.
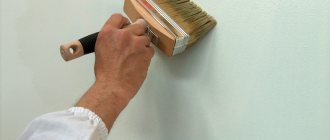
How to paint efficiently so that the wall does not bubble?
- First of all, you need to pay attention to the surface that you plan to “ennoble.” It is necessary to “remove” all existing defects and irregularities and clean it of previous coatings. Sometimes, to improve the quality of the canvas, special compounds are used and the walls and floor are leveled.
- Be sure to use a primer. Moreover, it needs to be applied twice, with a time interval of about a day. During this period, it will dry enough so that you can safely continue working. It is optimal to choose a matte or oil base.
- Tools must be clean and well dried.
- The product must be applied gradually, first in a thin layer, then leveling it until it is evenly coated. To achieve optimal results, this is done in several passes.
- Controlling the humidity level in the room is essential. The surface to be treated must be dry. It is also important to maintain a stable temperature and avoid overheating and cold.
Photo: remontidei.ru
These simple rules will help you make repairs efficiently and conscientiously.
Reasons for paint curling
The dried layer of paint is a film of a certain thickness, which has different physical and chemical properties and strength, and closely interacts with the environment. Sometimes on old coatings or when painting a car or other products in several layers, the base begins to rise. Here are the main reasons for this phenomenon:
- Solvent conflict. It is best to use the products recommended by the manufacturer to dilute the material. Otherwise, the liquid may contain substances that are not compatible with the components of the paintwork. It happens that an unsuitable solvent causes peeling or shrinkage of the film already during the operation of the product. Also, solvents of new paintwork materials can negatively affect the layer of old paint: a chemical reaction causes the film to soften and rise.
- Contradiction between layers. Often, when repainting, the coating begins to curl and peel off. There is also a high probability of the material lifting if the second layer was applied before the first had finished drying (the degree of drying should be at least “touch-free”). In a cold room, the solvent may not have time to erode, and the film will remain wet, then the final layer will begin to wrinkle.
- Violation of technology. If the surface of the product is heated, and the material is not designed to work at elevated temperatures, it will begin to curl. If the preliminary preparation is poor - leaving unsanded areas, dirt, grease - the paintwork material will also not adhere reliably. Some paints do not tolerate the lack of preliminary priming, especially when working on metal. The primer must also dry thoroughly, otherwise swelling of the paint will most likely occur.
- Damage to paint. When a paintwork material loses its viscosity, delaminates, and its expiration date expires, the consequences of application can be unpredictable. Paint can deteriorate if too much solvent is poured into it - it becomes like water and curdles.
- Incorrect drying. In order to speed up the drying of paint, some use heating with a hair dryer or a heat gun. Before carrying out such work, you should carefully read the instructions - it is possible that for a particular type of paintwork material heating during drying is prohibited.
How to fix defects
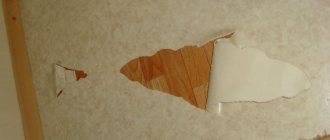
If you were unable to prevent cracks and bubbles from appearing on the surface of the paint, then all you have to do is fix them. To do this, the defect area is cleared of paint with a scraper or metal brush. The main part of the restoration consists of sanding the wall and, if necessary, puttingty.
After the putty has dried, the area of the bulge or crack is primed and painted with a new layer of paint, taking into account the factors listed above.
What to do if the paint has curled
If the swollen defect is small, you can try to get by with minor restoration work:
- dry the material if it is still wet;
- sand with fine sandpaper;
- remove all protruding pieces, even out the borders;
- repaint the area;
- dry the product, sand the problem area again.
In some cases, it is possible to cover up paint swelling with varnish. This method is only suitable for minimal paint peeling. The varnish should be sprayed in a thin layer, dried, and the work repeated 2-3 more times. The created film will cover the defect and it will not expand.
When the peeled coating is quite extensive, you will have to remove it completely, down to bare metal. The safest thing to do is to do this, and then re-prime the surface and paint it. In the future, wrinkling can be prevented if each layer is made thin and waits until it dries. When applying with a spray gun, you should not linger in one place - you need to go through areas quickly so that the film turns out to be uniform in thickness.
Why does the paintwork on a car lag behind?
A car is painted in two cases: at the factory upon release, and when the paintwork is repaired during operation. Since these are two different painting technologies, it is necessary to distinguish between swelling of the paintwork in one and in the second case, although visually they are similar:
- If the factory paint is swollen, the reason is poor-quality application or damage to the top layers of paint, due to which the metal of the body began to come into contact with air, dust and water, which led to oxidation and corrosion of the surfaces, and this process will grow. That is, the main reason here: poor-quality paintwork protection of the body, which destroys the metal, which leads to paint peeling.
- If the coating swells after repainting, this means that when preparing the surfaces for painting, the metal was not properly cleaned and primed and began to rust, which led to peeling of the paintwork. That is, here is the initial cause of paint peeling: unprepared, collapsing metal underneath.
Poor quality and peeling factory paintwork is a rare occurrence these days: manufacturers use reliable technologies, professional equipment and automated quality control of painting processes. But paint swelling after repair is common, and it is associated with poor cleaning of body surfaces, poor-quality paints, violation of technology, or incompatibility of protection layers.
Isolation of old coating from solvents of new paint
Sometimes there are several types of finishing materials on the surface being treated - primer, putty, varnish, paint. To prevent the finishing layer from deteriorating, it is recommended to use a special insulating primer. In this case, the base will become smooth, uniform, will absorb the paint equally, and the risk of it lifting will be reduced. Also, the insulating primer evens out the color, making the product look more attractive.
Typically, epoxy primers or products based on polyurethane and polyester resins act as insulators. Similar products are produced by many paint and varnish manufacturers. Such primers are applied to the prepared base with a spray gun, and after half an hour the surface can be painted. The chemically impervious layer that the primer creates will be an excellent base for most types of paint. This will virtually eliminate the coating from rolling up in the future and will significantly increase its service life.
Repair of peeling paintwork
Since the causes and processes of paint peeling during factory and garage painting of a car body are different, paintwork repair technologies may also differ.
When the factory coating peels off/swells, the process is localized by repairing the paint swelling areas themselves - the metal rusts only where the paint was applied poorly or was damaged. There is no need to completely repaint the car if you react to swelling of the paintwork immediately.
For local repairs of small blisters in factory paintwork, experts recommend several simple methods:
- Overcoating with varnish is spraying additional varnish onto areas where the paint is “raised.” When dry, it creates an additional film over the paint and protects the metal.
- Drying and removing bubbles - internal removal of moisture accumulated in the bubbles, light sanding, “dry” touch-up of surfaces and subsequent application of a base coat.
Extensive areas of paintwork swelling are repaired “to the full depth” - that is, the paint is stripped down to the metal, after which a primer and a new paint coating are applied.
You can carry out paintwork repairs not only at a service station, but also yourself. To do this, you need a well-protected garage, professional tools, and high-quality materials (primers and paints). The repair process itself has three stages:
Preparing work surfaces
First of all, it is necessary to clean the metal surfaces of the body in places where the paintwork is swollen from old paint, clean them and prepare them for applying primer. In the process of cleaning. You can also make minor repairs to chips, small dents and defects where the coating was repaired to prevent continued corrosion of the coating. To do this you need:
- use a grinder or drill with a sanding attachment (for small areas of the body) to remove old paint;
- clean and smooth the painted areas manually - with a block of coarse and fine-grained sandpaper;
- clean the metal from dust.
Padding
A very important part of the process - the adhesion strength of the paintwork to the metal and the level of smoothness of the coating will depend on its quality. The primer covers all irregularities, cracks and chips on the metal, and also increases surface adhesion. Therefore, the soil must be of high quality, and you must work with it carefully and carefully.
Experts recommend using metal paints with the addition of white spirit, red lead, quick-drying liquid insulating primers (15-30 minutes to dry) or epoxy primers as primers, which are evenly applied with a spray gun, creating sealed, chemically impermeable surfaces, ideally leveling any defects and can serve as a finishing coat for painting.
- Before starting work, check the manufacturer’s recommendations about the compatibility of the material with the paintwork you are using.
- The primer is applied in layers and dried in layers.
- To dry the soil, use a construction electric hair dryer.
After priming the surfaces, allow the material to dry completely. This requires at least one to two hours. After this, you need to lightly clean the surface.
Painting
To paint the car body in places where the old paintwork is swollen, you need to choose a high-quality paint (acrylic for varnish for modern foreign cars, synthetic acrylic for Russian cars or metallic for painting luxury cars), selected according to the color from the RAL catalog and the VIN code of your car:
- the paint is thoroughly mixed and poured into the spray gun;
- paint is applied to the repair site in an even thin layer;
- The applied layer dries in 15-20 minutes;
- the next layer is applied.
Typically, to create a high-quality paint coating, it is necessary to apply paint in 2-3 layers. At the same time, the metal of the body should not be cold so that condensation does not form on the surface - in this case, the coating will swell again.
After painting is completed, you must leave the car to dry for 12-18 hours. Then you can carefully polish the coating with a soft cloth and adding polishing pastes.
In conclusion, it should be noted that a swollen paint coating on a car body can have different natures and causes, but the result is metal corrosion. To avoid it, it is necessary to restore the paintwork as quickly as possible, and for this it is better to contact a service station, where the work will be performed by trained professionals.
You can deal with small areas of swollen paint coating yourself if you have a little experience, high-quality materials and professional tools. When repairing swollen paintwork on a car, be sure to follow the recommendations of the manufacturers of primers and paints, as well as safety rules when working with chemical paints.
Bubbles in paintwork
What kind of defect are bubbles in the paintwork?
Defect bubbles in a paint coating are gas bubbles that are stuck in the dried coating layer.
When sanding the coating, the bubbles open and turn into craters. The appearance of small bubbles in the paint coating is usually caused by the release of vapors or gases that formed after the top part of the coating had dried.
| Rice. 1. Bubbles in the paintwork, photo from True Factory website |
It is important to know!
The reason for such a nuisance may be the appearance of dampness in the room.
What to do to correct the situation?
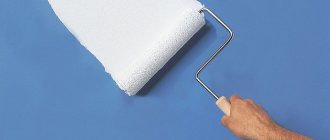
The appearance of bubbles when applying water-based paint is not the most difficult problem. It is much worse if the paint has already dried, then it will begin to swell and crack.
.If you decide to redo the work, you should pay attention to the layer that was under the old paint - it is usually uneven. If you ignore the application of treatment, the end result will be disappointing. If you reapply paint, the surface will look even worse, with roller marks and large blisters.
How to prevent bubbles from appearing?
Before painting the surface, it is necessary to treat it - this is the main thing! You must first clean the walls and ceilings of old materials: glue, paint or wallpaper. If necessary, use special products to remove them. It is better to wash or sand the surface to level it.
After cleaning, the surface must be well primed. Remember that the primer must be of good quality. Before applying the second layer, you need to wait until the first one has completely dried.
Mistakes when painting the ceiling - soluble salts
Sometimes soluble salts appear on the ceiling, which create a white crystalline coating on the surface, also called efflorescence. The most common reason for this is increased surface humidity. To prevent this defect from occurring, it is necessary to dry the ceiling and then clean it with steel brushes. After this, apply the plaster to the surface again and, after drying, paint it with oil paint, and then treat it with putty and primer.
If the surface was painted using old paint or without a primer, then “painting” may appear on the ceiling, which can be removed by washing away the old paint or, better yet, by cleaning the surface and painting the ceiling again.
If the paint composition is not mixed properly or the brush is pressed unevenly during painting, a defect such as “striations” may occur. It can be eliminated by washing the defective area and repainting it with a spray gun.
If you are painting a ceiling that has many cracks treated with gypsum, then apply the primer especially carefully, covering all the cracks, otherwise so-called “veins” may appear on the surface. To eliminate them, the painting procedure will have to be repeated again, after first removing the layer with the “veins” and applying a primer. Cracks should be primed twice.
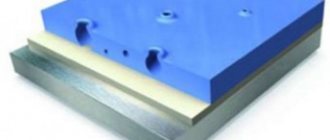
Using latex putty
Huge competition in the building materials market is due not only to the emergence of a large number of new types of products that have replaced proven old products, but also to the expansion of the range of well-known products, their refinement and innovation.
That is why latex putty appeared on store shelves - a material that is rapidly occupying its niche, displacing possible competitors due to its excellent performance characteristics.
Latex putty, its features and scope of application
Latex putty is rapidly replacing the well-known gypsum analogue. This material, which has good reliability indicators, can be applied to a wall or ceiling by anyone, even an inexperienced finisher. Using this product you can hide various cracks and potholes, as well as all irregularities on concrete, brick, plaster and wooden surfaces.
Today it is difficult to imagine carrying out any repairs without organizing putty work to level the surface. To perform these actions, a special mixture is used - putty.
Often the mixture contains antifungal additives
Latex putty is one of the latest developments in the production of leveling building materials.
It, like other analogues, consists of several components: plasticizers, modifying substances, fillers, antiseptics (included by some manufacturers, providing protection against fungus and mold) and water.
The main binding material of this composition is latex. The latex-based mixture is applied in a thin, even layer and eliminates all surface imperfections, creating a reliable, elastic cover.
Advantages and disadvantages of the product
Latex putty, like any other building finishing material, has its advantages and disadvantages. The advantages of latex composition over its analogues include:
- good adhesive characteristics of the material; putty, like the finishing coating, does not crumble under sudden temperature changes and can last for many years;
- does not deform after installation and drying, which prevents the appearance of bubbles and swelling of the finish coating;
- does not react to large temperature changes (the properties remain);
- the possibility of applying a thin layer of composition not exceeding 1-2 mm;
- It is not only a leveling composition, but also a finishing coating, fully replacing paint and varnish products (the product can be of different colors);
- It is sold in ready-made diluted form and the buyer does not need to prepare the mixture himself, bringing it to the desired consistency.
In addition, do not forget that latex putty for various purposes and needs of customers is packaged in various containers from 250 grams. containers up to 20 l.
Like all putty compounds, products of this type also have certain disadvantages. These include:
- the material in a closed state cannot be re-frozen (it loses its properties);
- the highest price among materials for these finishing works.
Possible causes of the defect: bubbles in the paintwork:
- incompatibility between different applied products or incompatibility of the paint material with certain substances contained in wood
- interaction of the hardener in a polyurethane coating with moisture. This moisture can be found both on the surface of the wood (humidity is too high) and in the air supplied to the sprayer
- high temperature during the initial drying period, causing excessively rapid drying of the top layer of paintwork materials with intense evaporation from the underlying layer. In this case, vapors of low-boiling thinner fractions from the lower layer encounter the dense upper layer, which leads to the formation of bubbles that remain in the paint layer. These bubbles are clearly visible in a clear finish. Using a slow thinner can solve this problem.
- advanced curing of the surface layer may also be associated with drafts in the room
- an excessively thick layer of paint and varnish material, in which the solvent from the lower layers does not have time to reach the surface
- When finishing products veneered with highly porous wood (oak), air bubbles may appear coming from under the veneer. A preventive measure in this case is a thin layer of liquid soil.
| Rice. 2. Wrinkles and bubbles in the paintwork |
- the life of the paint material is running out
- water in the compressed air supply system.
How to clarify the reasons for the formation of a defect?
To clarify the reason, it is recommended to repeat the same finishing cycle using the same paints and varnishes on a different surface.
If the bubbles do not appear again, then we are talking about problems with the interaction of the paintwork and the base. Some contamination may also be the cause.