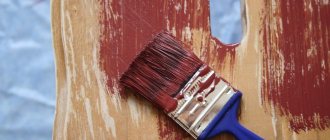
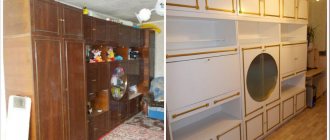
How to make aged wood at home and give it a vintage look with your own hands? This article is dedicated to just such tricks! Artificially aged items look very stylish and harmonious!
The 7 methods for aging wood with paint that we will look at here are interesting for their simplicity and excellent end result. They also do not require the purchase of any expensive special materials or tools.
We will analyze in detail the following 7 painting methods:
With a candle
This is a versatile technique that helps give wood or wooden furniture an antique look. It can be used on both untreated wood and already painted wood and furniture. Suitable for painting in one or several layers.
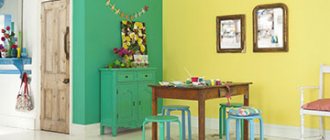
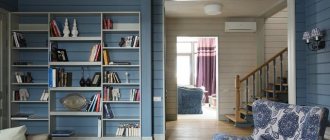
For example, this is the result obtained when painting white using this method (for a detailed guide, read the article “3 methods to paint wood white”)
Let's take a closer look at how to paint wood using this method, making three layers (brown, white and yellow).
Necessary materials:
- paint (brown, white and yellow)
- brush, candle, rag.
Step-by-step instruction:
Step 1: First coat of paint
- Decide on the color of paint that you will use as a basis. This will be the first, bottom layer of paint, which we will apply directly to the wood. In this case we use dark brown color.
- Paint the wood with slightly chaotic strokes, without painting the surface completely and evenly.
- Leave until completely dry.
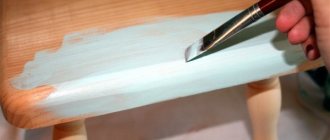
Step 2: Use a candle
Take a candle and rub it on the surface of the wood in several randomly selected places (press the candle quite hard so that a clear trace of wax or paraffin remains on the wood).
- Step 3: Second Layer of Paint Select a color for the next layer and apply paint (we're using white here). At this stage, the paint can be applied evenly over the entire surface, and not in strokes, as with the first layer. Leave until completely dry.
- Step 4: After this, take a rag and wipe the surface with some pressure. In those places where wax was applied, the paint will come off the surface. If two layers are enough for you, then you can stop there, but if not, move on.
- Step 5: Third coat of paint Repeat steps 2 and 3, but the last one using a different color of paint (here it will be yellow). After the paint has dried, you can apply a protective varnish. The latter is not necessary due to the fact that we deliberately gave it an antique look, so if the paint starts to lag a little over time, it will not be noticeable.
Four ways to age wood with your own hands
One of the most interesting ways to add flair to wooden objects is to age them. In this article, read how to age wooden products with your own hands.
Wood is one of the easiest materials to process. This is what makes it possible for manufacturers of wood products to pamper their customers with various decoration and finishing options. One of the most interesting ways to add flair to wooden objects is to age them. Such a procedure requires not so much time as effort, so that the cherished years or even decades are reflected on the tree in a matter of days.
Brushing
One of the ways that helps add age to a young tree is brushing. This method is actively used in all workshops where artificial aging is carried out.
It got its name from the English word brush, which translates as “brush”. After all, the main tool that helps to age wood using this method is a metal brush. With the help of such a simple tool, soft fibers are gradually removed from a wooden workpiece, as a result of which pronounced growth rings begin to appear on the surface. Such a pattern can only be observed on old, worn boards, but here it appears in a few hours. However, simply worn wood does not look very aesthetically pleasing, so after the initial rough processing, the workpiece is brought to its final form. First, using a special tool, burrs are removed from the surface, then the products are polished, stained and varnished. There is an option to paint different parts in different shades to create a patina effect. A floor aged by brushing looks very colorful.
Brushing is usually used to age rough surfaces: floors, walls, doors. But you need to remember that not every type of wood can be brushed. Pines and larch age well using this method. And, for example, such species as beech, birch, maple have an unexpressed texture and are not suitable for brushing. Of course, this method cannot be used for MDF products.
Scuffs of paint - patination
If you still need to age solid beech, maple doors or pieces of furniture, you will have to act more subtly and use the patination method.
Aging using wet paper
This method of giving wood an aged texture is similar to the previous one with candles, only now instead of wax there will be wet paper (if you suddenly don’t have a candle at home, then everyone certainly has paper).
Necessary materials:
- dye,
- brush, paper,
- bowl of water.
Step-by-step instruction:
- Step 1: Attach wet paper. No base paint was applied here so that the natural color of the wood could be seen. Therefore, we immediately take a sheet of paper and tear it into uneven pieces of different shapes and sizes. After this, dip each piece into a bowl of water and place it on the wood you are going to paint.
- Step 2: Apply paint. Having laid out all the pieces of paper, immediately start painting in the chosen color, that is, you do not need to wait until the paper dries.
- Step 3: Peeling off the paint Next, carefully lift each piece of paper from the surface. You can do this while the paint is still a little damp, or after it has completely dried.
You can make several layers, for example, as in the previous method. To do this, follow the step-by-step instructions described there, replacing the wax with damp paper.
Patching
But there is a method for processing these types of wood, for example, patina. So, if we want to age doors made of maple or beech wood, we will use the patina method. Initially, we will select a paint that will match the original tone of the door or furniture. The surface of the wood is covered with this tone in 1 layer, after which we allow it to dry completely, now we apply a second layer of paint, taking into account that it should be thin and not very bright, if you take a bright or too light tone of paint on the second layer, then your a piece of furniture will look new, but we are achieving the opposite effect, that is, antiquity. We also let the second tone of paint dry thoroughly.
When the tinting is finished and it is dried, it’s time to create the effect of an antique piece of furniture, for this we will need fine-profile sandpaper with which abrasions are applied to the surface of the wood, and we need to achieve the result so that through the upper tone, the lower tone begins to be visible, as if painted more than once. You can adjust the aging method yourself, bringing it to the age you need.
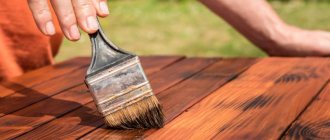
Dry brush texture "Loft"
This technique is great for creating an old and scratched look. The key to success here is simply to use a very dry brush. For example, old brushes with stiff bristles work well.
Necessary materials:
- brush with stiff bristles,
- water based paint.
Instructions:
This is what the process looks like:
- Dip the brush into the paint of your choice and leave as little paint on it as possible.
- Apply the paint in quick strokes in different directions. Be careful not to get carried away and cover the entire surface.
This technique is also suitable for painting with a loft metal effect, for example, for creating such artificial zinc letters.
You can also combine this method with using sandpaper to remove some of the paint after each coat.
Painting with scrapers in Provence style
The result will be approximately the same as using sandpaper. The difference is that sandpaper not only removes some of the paint, but also evens out the surface of the wood if there were uneven spots in that area (which is not suitable if you want to preserve the structure of the wood, leaving it as natural as possible). The second difference is that sandpaper is used only after the paint has dried.
Materials needed: brush, paint, scraper (or any unnecessary plastic card).
Instructions:
- First paint the wood.
- After the paint has dried a little (not completely dry, just a few minutes when the coating has already formed, but is still sticky to the touch), take a scraper or an old plastic card and scrape off some of the paint in some places.
TIP: If you paint furniture, scrape the paint off at the corners and edges, as this is where it most often comes off during use. Thus, the antique effect will look more natural.
Artificial aging of wood
Aging of wood is a long and painstaking process consisting of mechanical processing of wood and work with paints and varnishes. Leon42 associates this method of finishing wood with naturalness, antiquity, and folk culture.
According to leon42 , buying furniture and brushing it with a metal brush does not make it old, but simply scratches it or, at best, creates a textured surface. Furniture bought in a store - made of slats and “skinny” - is not suitable for texturing; it looks rather sad and defective.
leon42 believes that furniture for brushing should be rough and massive, capable of conveying the natural beauty of wood.
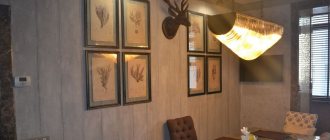
It is precisely the superficial approach to aging wood, according to a forum member, that forms in many people the opinion of products processed using this technology as “furniture of fire victims.” Meanwhile, the combination of aged wood with metal, stone or ceramics in the interior is always a fashionable and stylish technique that allows all the inhabitants of the house to touch eternity and feel like they are in the Middle Ages.
Under natural conditions, wind and moisture, sun and temperature changes “work” on the aging of wood. How to do something that takes many decades to do in a few days?
Preparation of material
For brushing, it is better to use soft and medium-hard wood with a pronounced texture, for example, spruce, pine or larch. In these types of wood, soft fibers are formed, as a rule, in the spring-summer period, when intensive growth of growth rings occurs, and they are more “loose”.
Wood with a uniform and unexpressed texture, such as beech and maple, is not suitable for aging.
Before working with wood, you should prepare its surface. Eliminate all defects and dirt, be it traces of sweat, grease or other stains that may appear during the application of the tinting composition. Treat any products (small architectural forms, furniture, etc.) after disassembling them: you will spend less time and can reach everywhere with a brush.
Brushing
Brushing (English brush - “brush”), or texturing wood, is giving it a relief characteristic of old wood. At the initial stage, soft fibers are removed from solid wood. There are several processing options: light aging - a barely noticeable roughness is created on the surface, or deep and rough, when the depth of the unevenness reaches 2-3 mm (for decorative elements, sometimes for rough furniture).
You can pre-process any part, say a ceiling beam, with an ax: make notches, trim the edges without fear of spoiling it - no one but you knows what the result should be. In this case, you will receive a product with a deep micro-relief of the surface and irregularities on it up to 20 mm deep.
Don’t forget about the “traces” of the vital activity of bugs and worms. Imitate them before finishing with a drill or drill. You can also apply simple carving elements: braids, dragons, etc. – you will get “Scandinavian style”.
Sanding: tools and brushes
Large enterprises use machines and automatic lines, where everything is provided - from the feed speed of the workpiece to a powerful dust removal system. For an ordinary summer resident, such equipment is an expensive and, in general, unnecessary pleasure. If you will be doing this kind of work often, it is better to purchase a brush machine. The most common and widely available is Makita. The most economical and simple option is a grinder or drill, preferably with the ability to adjust the speed.
The entire brushing process can be divided into three stages:
- Rough selection of soft fibers
- Grinding
- Polishing
Accordingly, each of them needs its own brush. At the first stage (brushing), metal (brushing) is used. If you are making structures for the street - a gazebo, canopy, fence, etc., then most likely this will be your only brush.
When processed with a metal brush, scratches may remain on the annual rings themselves, which are difficult to get rid of during further processing.
When working with brush, you must adhere to the following rules:
- move the brush along the fibers, otherwise you will damage the annual rings and spoil the wood grain;
- the speed of movement of the brush and the pressure should be approximately the same, otherwise pits will form;
- the light source should be placed on the side at an acute angle, directing the light beam across the fibers - this way you can better see the surface being treated;
- do not press hard on the surface, do not overload the motor, otherwise this may cause premature equipment failure;
- the rpm speed should not be higher than 3000, preferably 2000–2500: the brush can quickly fly apart;
- be sure to wear glasses and do not neglect protective gloves: pieces of wire from the brush can fly several meters away, injuring others;
- take care of respiratory protection and dust removal: during this work, even your eyelashes become covered with “mealy mascara”, let alone your lungs;
- the new brush needs to be “run in”, otherwise it will strongly “whack” the workpiece, after a while it will begin to treat the surface cleaner;
- work only in one direction (rotation), do not turn on reverse - this will “kill” the metal brush;
- The humidity of the wood being treated should not exceed 15%, otherwise instead of a textured surface you will get a shaggy-hairy surface.
When processing stable and hard wood (larch, oak), be sure to use dust removal systems: the dust from these types of wood is considered carcinogenic and can cause lung cancer.
If you want to get rid of lint and get a better finish, you will need another brush - a plastic (nylon) one, or rather a sanding disc made of a polymer-abrasive material. The most common grain size is 120.
An abrasive brush is a universal one, characterized by a more delicate surface treatment. If you use this brush, you can do without a metal brush, especially if the element being processed needs delicate treatment or if you want to avoid the specific scratches left by brushes.
The principle of working with an abrasive brush is the same as with a metal one. It is better to reduce the speed to 1500 to extend the life of the brush. The dust when working with a plastic brush is finer and stickier, so don’t forget about a respirator.
Surface treatment specifics:
- do not sand the edges and corners of the workpieces, especially if you do not plan to varnish them later: they will cling and chip;
- do not make deep relief on seats, tabletops and other horizontal surfaces - they will make it difficult to clean the surface: spilled drink stains, crumbs, etc. will get clogged between the fibers;
- In order to prevent clogging of dust and snags of the rag during cleaning, such surfaces must be sanded with an abrasive brush and fine-grained sandpaper.
The final stage of brushing is polishing or fine grinding: performed with sesal or other synthetic brushes. You can use fine-grained sandpaper, abrasive sponges, and steel wool, removing dust from the finished surface with a wide brush and vacuum cleaner.
Finishing operations
At the final stage, they do tinting (changing the color of the wood by several tones), patination (emphasizing the texture of the wood with special compounds that penetrate the pores opened during brushing), craquelure (the effect of cracking and drying out), and varnishing.
After brushing, the board will look like new, but with a textured surface. To give it an old look, it is coated with various compounds; dark colors look more natural.
It is the correct play with the color of brushed wood that gives it an aged look. Areas with soft wood (pores or cavities) are unevenly painted in a darker color, while areas with hard wood (ridges) are painted lighter. Recently, options with light troughs and darker ridges have become popular.
The easiest way is to liberally apply dark stain and immediately wipe the area with a rag or wide rubber spatula. In theory, the stain should absorb quickly into the soft surface, but more slowly on the ridges. However, in practice this often does not work out, so leon42 opted for a more complex method: after complete drying, the ridges are sanded with fine-grained sandpaper. This method requires further treatment with varnish or colorless impregnations, so the exposed top layer remains without a protective coating.
Another option is to use paint of two contrasting colors: the surface is completely painted over with the first color, then the second is applied. While the latter is drying, run a wide rubber spatula, removing excess paint and exposing the ridges of the first layer.
Proper texturing is a simple but messy, time-consuming and unhealthy process.
As a result of difficult and hard work, you will receive decorative elements that carry the beauty of antiquity and at the same time have high durability. Each detail, lovingly made with your own hands, will be unique.
Based on materials from a participant in the “House and Dacha” forum
Editor: Olga Travina
Subscribe to our Telegram channelExclusive posts every week
Rinse method
This method for creating the effect of old wood is suitable for elegant furniture in a rustic or Provence style. It is best used on damp wood.
Necessary materials:
- paint, brush,
- water, rag.
Instructions:
- Apply a coat of paint and let it dry for a few minutes (same as the previous method, so it's still tacky and not completely dry).
- After this, quickly rinse the wood with water , carefully wiping the surface with a rag. The goal is to wash away some of the paint on the surface. Leave to dry. That's all!
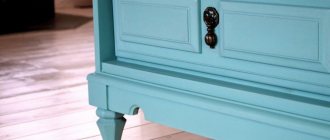
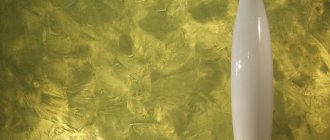
For example, a table painted soft green looks simply wonderful after using this method.
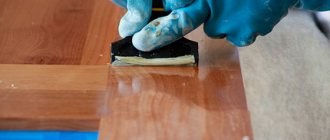
Wood wear
Method (wood wear). There is also a way to create unnatural abrasions - like applying wax to wooden surfaces. To do this, we rub with wax individual parts of the desired wooden product, which was previously antique-painted and dried, after which we cover the wood with a new, lighter tone than the main paint. Then, using a spatula, remove the layer of wax, and carefully sand the product, and after sanding, we tint the wooden surface with stain and treat it with paraffin.
Using this method, a very good and truthful result is obtained.
Method of painting with wooden blocks
This is a simple method that allows you to age wood or furniture using a wooden block.
Necessary materials:
- paint, brush,
- wooden block.
Instructions:
- Dip the end of a piece of wood into the paint and run it along the surface to be painted.
- Apply as many colors and layers as you like.
Here, for example, they made one layer of pale blue paint.
Paint filling method
This is a one-step method suitable for any type of wood with a lot of texture on the surface.
Materials needed: paint, scraper (or plastic card).
Instructions: You just need to pour a little paint onto the surface of the wood and spread it with a scraper. Wait for it to dry and you're done!
Recommendations and tips
Now that we've looked at all 7 methods of painting wood with an antique effect, I'd like to highlight a few basic tips that you can apply to all methods:
- If the surface you are going to paint has been treated with sealant, wax or varnish, it would be best to sand it a little so that the new paint will adhere better.
- Don't be afraid to experiment; you can mix and match these techniques to create your own personal design style.
- first on a piece of wood or on less visible areas of furniture (such as the inside of a cabinet door to be painted) before moving on to more visible parts.
And remember that the main thing here is your desire! Good luck!