When you apply paint to walls yourself, the coating often ends up in spots. However, it is not clear why they form. After all, the tool was used correctly and the preparation was carried out in compliance with all technologies. The spots are especially visible during the daytime in sunlight. Of course, you can apply a second layer of coating, but it is not a fact that the stains will disappear. Most likely, the situation will worsen, and the walls will become even more uneven in color. What to do if the painting of the walls is uneven and spots appear after drying? Let's tell you in more detail.
Causes of leaks
There may be one reason, or maybe several at the same time. When painting any surface, the following factors should be avoided:
- The thicker the coating, the harder it is to spread over the wall or ceiling. Before starting painting work, the paint must be sufficiently diluted, this is most important for the very first layer.
- Manufacturers of paints and varnishes often indicate on the cans that the paint is ready for use or that it can be diluted no more than 10%. However, any coating needs to be thinned. Water-based paints are thinned with water, while oil-based paints and enamels are thinned with a solvent. The amount of liquid may exceed 10% of the paint volume, but at the same time you should not add more than 20%.
- After dilution and thorough stirring, you need to check the thickness of the coating. Dip the roller into the paint and lift it up. If the paint flows off it slowly (it flows, not flops), then the viscosity is normal.
- You need to apply and roll the paint over the surface quickly, without interruption. Otherwise, the painted areas will dry before you roll the boundaries between them. And after complete drying, the walls will become striped.
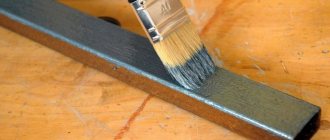
- It is best to paint a smooth surface with a short-haired roller. Using a long-haired roller is advisable only if you are working with a textured coating. In all other cases, such a roller will certainly “decorate” the ceiling and walls with smudges.
- The problem of poorly painted areas occurs when there is insufficient lighting or poor vision of the painter. On a wet surface it can be difficult to see areas that have not been completely painted. Therefore, you need to take care of a bright, but not blinding lamp, or don’t be shy about wearing glasses.
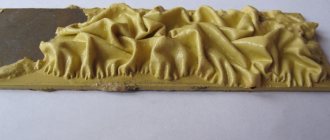
- If you apply paint to a plane in stripes, their boundaries become very clearly visible after drying. The coating should be applied in a W-shaped motion, which will be discussed in more detail below.
- A poorly puttied, sanded, or cleaned surface after painting will certainly expose the defects to everyone. Hoping that paint will hide some imperfections is deeply mistaken. On the contrary, she will show them “in all their glory.”
Preparing walls for painting with a roller
After purchasing the tools and paint material, you can move on to the next stage - preparing the room for painting. If possible, remove furniture from the room; if this is not possible, then it is compactly placed in the center of the room, completely covered with polyethylene or special capes. To keep windows and door panels clean, use film, securing its ends with masking tape. Skirting boards and door openings are also protected with masking tape.
To effectively paint the entire surface of the walls, it is better to dismantle heating appliances (radiators). For this:
- tightly close the shut-off valves at the entrance to the heating system;
- install a tray under the battery to collect water;
- unscrew the connection points between the device and the general system and drain the water;
- dismantle the radiator.
When all the preparatory work has been completed, we proceed directly to painting. It's best to start with a small area and see how long the paint takes to dry and what the results are. If you like everything, paint the whole room.
Advice. The power supply to the room should be turned off in advance to protect yourself and others from accidental electric shock. Masking tape is applied to open areas with removed sockets.
Some wallpaper requires additional painting after gluing to the wall. Such wallpapers very often help to find quite original and interesting color solutions for interior decoration. How to paint wallpaper for painting? To effectively apply the coloring liquid to the surface, a high-quality wallpaper roller is required. When making such a choice, you need to pay attention to the shaft itself. It is desirable that the nozzle material be homogeneous. The length of the pile is almost always the same and ranges from 5-25 mm. The holder must be attached to the body firmly, securely and comfortably for the hand. The roller should be easy to remove and rotate freely.
If defects have already appeared
It is easier to prevent smudges from appearing than to clean them up later. But still, no one is immune from mistakes, and if this has already happened, of course, there is no point in groaning and aahing. You need to arm yourself with patience and take up the correction.
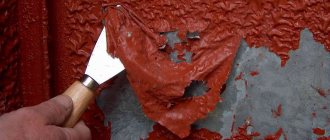
Firstly, the area must be cleaned of the applied layer of paint using fine sandpaper or a special device. You need to act carefully so as not to remove the putty along with the paint.
Secondly, the cleaned area is sanded until it is perfectly smooth. Then the wall (or ceiling) is wiped with a damp cloth and inspected for possible flaws. If any are identified, a finishing putty is applied to the surface and another grinding is performed.
When the area becomes flat and smooth, it should be primed. The primer is applied in 1 layer, which must dry completely, then 1 more layer. After drying again, evaluate the smoothness of the wall or ceiling again. If doubts still remain, repeat the priming procedure.
How to avoid them
Smudges appear on surfaces where several layers are required. The risk increases if a larger area needs to be treated.
See also
13 main paintwork defects, their causes and how to remove errors yourself
When painting furniture
Paint is often used to coat furniture. On the vertical walls of cabinets, the risk of streaks is especially high. The occurrence of smudges on furniture, measures to eliminate the problem:
| Problems | Elimination methods |
| Thick coat of paint | Apply several thin layers at 1 minute intervals. Hold the spray gun, aerosol can or gun at the optimal distance at an angle of 90 degrees. |
| Lack of clutch | Priming and sanding the surface. Use of high-quality compounds for priming. Complete drying of the primer layer. |
| Heavy smudges, liquid paint | You cannot add the entire volume of solvent to the mixture, so as not to make the composition liquid. It is recommended to add it gradually to achieve a suitable consistency. |
When painting a car
Repainting a car depends on the characteristics of the paint composition. It should provide strong adhesion and an even finish.
Possible problems when painting a car, solutions:
| The reason that caused smudges and stains | Possible Solution |
| Paint runs due to lack of adhesion | Before painting, preparation should be carried out. The surface is treated with a primer that will ensure adhesion. The condition for creating the preparatory layer is the use of a grinding machine or sandpaper. With their help, all visible flaws are removed. |
| Presence of slow thinner, too much thinner | The paint is diluted gradually, adding a few milliliters of thinner at a time, so as not to create a liquid mixture that is not capable of promoting the formation of a coating. A poor quality thinner does not allow the composition to create the necessary structure. |
| Violation of the rules on maintaining the optimal distance from which paint is applied | Excessive approximation or separation creates insufficient or excessive pressure, produces an uneven layer or a layer of incorrect thickness. |
| Thick layer | Coatings 2 or 3 times create a thick layer that provokes streaks |
| The spray gun settings are broken | Factory settings recommended |
| Temperature mismatch | A cold car does not take warm paint well. Cold paint does not adhere well to the surface, so it is important to bring both temperatures closer in key indicators. |
Reference! The optimal distance required for working with a cylinder is considered to be 15-20 centimeters.
What to do with old stains
There are long-term stains that appear from long-standing leaks and are not eliminated. No matter how much you make repairs, they will show through the paint again and again.
To remove these unsightly places, they should be thoroughly cleaned and washed. Then the problem areas need to be treated with any biocidal solution (a means for destroying fungus, mold, etc.). There is no need to rinse off the solution!
Be sure to wait until it is completely dry to ensure that re-cleaning is not necessary.
Next, a blocking primer is applied to the areas. It is waterproof and will reliably protect your walls and ceiling from stains and smudges. After drying, you can begin painting.
Cleaning clay treatment
Clay is well suited for cleaning any smooth, hard surface: paintwork, glass, chrome, mirrors, smooth plastic, wheels. The purpose of cleaning clay is to remove stubborn dirt, including pollen. Initially, body clay was invented in Japan precisely as a means for removing dust from the paintwork of vehicles. This is one of the safest ways to clean the body. Cleaning a surface with detailing clay is not always easy and not all surfaces can be cleaned with it. For example, pollen from structural plastic will be difficult or even impossible to remove using this method.
Overall, cleaning clay does a good job of removing pollen. Especially if the car has a protective coating (wax or sealant), then there should be no problems. Dust may only be a problem on a freshly painted vehicle that is not protected by wax.
Detailing clay comes in different grades. The more “aggressive” it is, the more serious stains it can remove, but the risk of micro scratches that will need to be removed by polishing increases. Start with a softer grade (fine grade) and, if necessary, move to a harder grade.
When cleaning in this way, you need to use a sufficient amount of detailing spray or a special “lubricant” so that the clay slides freely over the surface and does not cause any damage to it. The lubricant can also be a simple soap solution.
If you are using new clay, it will be a little hard at first, so you can dip it in warm water and squeeze it to soften it.
To effectively remove pollen, as well as other stubborn dirt, follow these recommendations:
- First you need to wash your car thoroughly.
- Work in stages, clean in sections of 50 cm by 50 cm, do not tackle everything at once. This way you can monitor your progress.
- Spray enough "lube" so that the clay can slide in different directions.
- Initially, the clay will resist sliding on the surface due to its resistance to dirt and dust. As you work the paint and remove unwanted particles, the clay will begin to move more freely.
- With very “stubborn” pollination, there are often cases when it is necessary to repeatedly treat the surface to completely remove particles.
- The longer you use clay, the more impurities it will accumulate. Crumple it as needed to reveal a cleaner area.
- Sometimes it is impossible to remove dirt in this way if the particles are old, from durable industrial paint.
- If the cleaning was successful, then you should carefully inspect the treated paint and, if necessary, polish it to remove possible defects. In most cases, a universal polishing paste, such as 3M with a green cap, will be suitable for this. It would also be a good idea to protect the body with wax or sealant.
Secrets of excellent results
- Lighting. Paint in daylight. You should be able to clearly see the painted areas and their boundaries.
- Humidity. The humidity level in the room should be above average (45%). That is why painting work carried out in the summer gives better results. In winter, the air in the room is very dry, which speeds up the drying of the paint. You simply won’t have time to distribute it over the entire area. During the cold season, it would be advisable to use a humidifier.
- Order. Agree that painting walls and ceilings when you always have to step over something is uncomfortable. Before finishing work, you should remove all objects from the room, or, in extreme cases, move them to the middle of the room. Instead of a stepladder, use a roller extension, this way you won’t waste time going up and down, and you won’t have to lift your head too much when working with the ceiling.
- Paint consistency. Be sure to dilute the paint with water or thinner and mix well so that it is uniform. It happens that a film forms on oil paint. In this case, it must be filtered through tulle fabric or nylon stocking.
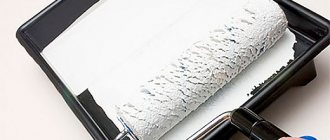
- Roller squeezing. The painting cuvette has one wall located at an angle and covered with protrusions. This is necessary to evenly distribute the paint over the coat of the roller, and not for squeezing. The roller should not be dry. Dip it in paint and “walk” without pressing along the ribbed slope. The paint will be distributed throughout the coat, and its excess will flow into the ditch.
- Zeal. When moving the roller along the work surface, you do not need to put pressure on it. It should roll easily.
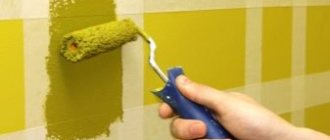
- Coating. As noted, paint over large areas should be applied not in stripes, but in W-shaped movements. Divide the area into squares and paint each one in turn. We made a zigzag, distributed the coating over the square and moved on to the next one. We rolled out the boundaries of the plots and moved on. And paint drips will not appear. If you are painting walls that have been previously plastered, spread the paint in a vertical motion. In log rooms, paint is rolled out horizontally - in the direction of the wood fibers.
- Control inspection. The surface must be inspected immediately after painting. To make possible imperfections more visible, illuminate yourself with a bright flashlight. If there are unpainted areas, roll them immediately.
Effective tools for elimination
Is it possible to do something if spots have already appeared? This question requires an immediate answer. Repairmen use special tools to solve the problem. List of tools:
- Micro cutter. This is a device designed to remove smudges. The height indicator can be adjusted independently. The cutter is made of high quality steel, the cut creates neat chips.
- Mini file. A double-sided file allows you to cut away layers and polish them at the same time. Both sides are made of durable elements, ensuring high-quality and fast work.
- Knife. A special knife with a pointed edge allows for a neat cut.
- Cutter. This is a knife with a case and lanyard from . A cutter is used to cut off the layer of varnish or paint at the base.
- Cutter for removing defects. The cutter is made from hard tool steel. It is used for its intended purpose only when the layer is completely dry.
See also
Which oil paints can and cannot be mixed, rules and color chart
Other things to consider
Stains appear more often when working with glossy and semi-gloss finishes. If you are not confident in your skill, use matte paint. Follow the link to learn how to make matte paint from glossy paint.
Flaws are best shown in white. To protect yourself from possible failure, do not take a snow-white coating or add a little color to it.
Over a large area, there are more defects. The larger the surface to be painted, the more responsible you need to approach the work.
To paint the walls, take the paint that you like best. For the ceiling, take the highest quality one. The ceiling is the most finicky of all planes, especially since you cannot cover the flaws on it with furniture or paintings.
The main components of an excellent result: a well-prepared base, a non-viscous coating and adherence to painting technology. But at the same time, know that the ideal does not exist, which means you shouldn’t squeeze all the juice out of yourself to achieve it.
Recommendations for applying paint and varnish
It is necessary to apply the first layer of varnish with a light spray (do not fill it). After drying, the following layers will adhere well to this layer. In total, 3 layers of varnish are usually applied, but more is possible. This will allow you to obtain a sufficient thickness of varnish for subsequent abrasive polishing, removing a thin layer of varnish with paint imperfections.
If you paint with acrylic paint with hardener without varnish, then you need to apply 3-4 layers. The time you have to wait after applying the base before spraying the varnish is usually longer than the time between base coats. You need to follow the instructions. Usually, you can wait about an hour and then apply the varnish. This time depends on the temperature in the room where painting is done.
When applying paint with a hardener or varnish, you need to look at how the paint is applied, “catch” the forming gloss with your gaze. As soon as the gloss begins to form, immediately move the paint gun further. This should develop into a skill. To do this, you need to have good lighting in the room where painting takes place.
As for the spray gun settings, I personally turn the paint supply all the way down. This requires you to speed up the movement of the paint gun when spraying and, depending on the viscosity of the paint and varnish, increase the distance from the surface to be painted. Paint and varnish are applied and spread well, at any temperature.
Spraying acrylic primer provides good training in mastering the skill of properly spraying paint and varnish. Before it dries, it also gives a gloss and is applied like paint. It’s not so scary if smudges appear when applying it. They can be easily removed on the ground during subsequent preparation for painting.
No ground surface
The base surface (or rather its absence) also very often interferes with the process. The liquid part of the paint is absorbed by the surface, while the thick part will cause streaks.
Or it happens that the surface itself is not primed, which also causes this problem.
Solution: Use a primer surface and level the walls well before applying it.
Products for removing old stains at home
You can remove polymer stains not only using aggressive professional cleaners, but also using folk methods. The cleaning process will take much more time and labor. There is soda in every home. It is optimal if you need to remove a small speck. To do this, you need to slightly moisten the stain with warm water and apply a paste of baking soda and water onto it. Leave the mixture for 20 minutes and then use a cloth to remove the stain using gentle movements.
Baking soda is optimal if you need to remove a small stain.How to clean acrylic varnish? Turpentine, which is included as a thinner in the composition of many varnishes. It helps soften acrylic stains, which can then be washed off in any simple way after softening. For example, using warm water and dishwashing detergent.
Turpentine helps soften acrylic stains, which can then be washed off in any simple way after softening.
Hair dryer. A jet of hot air acts as a “softener”. You can also use, but with greater care, an iron with a steam function. A hairdryer is good for treating hard surfaces, an iron or a steam generator is effective in combating stains on fabrics.
A jet of hot air acts as a “softener”.
For cleaning glass and mirror surfaces, you can use regular white spirit or nail polish remover. You can remove acrylic stains from linoleum and other floor coverings by lightly prying the edge with a sharp object.
For cleaning glass and mirror surfaces, you can use regular white spirit or nail polish remover.
Removal of small formations
It is a little easier to remove small sagging marks. If you notice such formations when painting a separate part of a car and during painting, they can only be removed by turning the part over so that the surface takes on a vertical or inclined position. After some time, the influx will spread by itself if the paint has not yet dried. So that it can spread in the required direction, you need to periodically turn the part. Unnoticeable smudges are completely hidden after applying an additional layer of paint to them.
https://youtube.com/watch?v=5Ol4L3wxnZE
How to remove small smudges after painting a car often has to be decided after preliminary drying. In this case, you also cannot do without a block of rubber and fine-grained sandpaper. It is better to start sanding with P1000 grade paper. Finishing the grinding and removing large drips should be done with P2500 sandpaper. The blade should not be used.
What kind of paint is there?
Before scrubbing the stain, you need to find out what kind of substance was spilled. You should start eliminating it only after you have selected a product that is suitable specifically for this type of surface and type of paint and varnish material. Otherwise, you may not be able to get rid of the stain and may damage your clothes, furniture, and various types of coatings. The entire variety of paints and varnishes for interior work and facade finishing can be reduced to three groups:
- emulsion;
- alkyd;
- silicate.
Emulsion paints consist of colorants, water and a binder. If you do not allow them to dry out, they can be easily washed off with water from the floor, hands, rollers, brushes, trays. This group includes popular water-based paints, acrylic, silicone, and polyvinyl acetate varieties. Silicate paints are based on liquid glass and are mineral. They are diluted with water and used mainly on plastered surfaces.
Alkyd (facade) paints are made using alkyd resin. They can be used to paint wood and metal products, as well as plastered surfaces. This group is represented by oil and enamel paints made on the basis of drying oil. They are characterized by water resistance. In addition to alkyd enamels, there are also polyurethane analogues that create a glossy film that is more resistant to mechanical stress. Aerosol paints required for finishing work are produced in spray cans, from which it is convenient to apply an even layer.
In addition to paints and varnishes for finishing interiors and exteriors, there are also paints for creativity:
- Dense matte gouache easily dissolves in water. It is created on an adhesive basis.
- Watercolor paints are softer and more transparent than gouache. They also contain vegetable glue, which is easily soluble in water.
After repairs, you need to wash and clean off many stains that have appeared in various places.