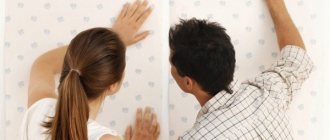
Many people believe that there is nothing complicated in wallpapering and do this work themselves. However, the result does not always coincide with expectations: the colorful canvas swells and, instead of a beautifully decorated wall, you get a problem. After all, over time, even minor bubbles can lead to further peeling of the coating.
Why do bubbles appear under the wallpaper? How to prevent their occurrence? In what ways can you straighten bubbles on the canvas when it is still wet or has already dried? You will find answers to these questions in our article.
Causes of bubbles
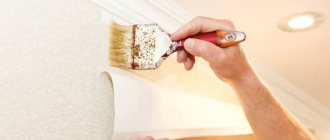
There are special construction tools that help to thoroughly smooth the canvas, expelling excess air. Among them are a roller and a spatula.
If you know the reasons for the appearance of bubbles on wallpaper after pasting, you will be able to avoid their appearance. Most often, the problem arises due to the mistake of inexperienced people who decided to do the repairs themselves, without the help of painters. In this case, it is necessary to initially control the entire process.
Absence or poor preparation of walls
Many people start wallpapering without preparing the walls. After removing the old coating or plaster, clean the surface and level it with putty.
Loose adhesion to the base due to the presence of tubercles, unsealed joints, and a large layer of paint causes air to accumulate in these places.
Insects can multiply in air bubbles, mold can appear and fungus can grow, which leads to poor health of a person.
Professional craftsmen use a primer for better adhesion to the wall. After applying the putty and special composition, you should wait until they dry completely.
Too much glue on the wall, canvas or its absence in some places
The glue must be applied evenly to both the canvas and the wall, if specified in the instructions. It is better to use a thick roller for this. You can buy a product with a tinting agent (usually pink) to control the presence of unpainted areas. After drying, the composition restores transparency and does not leave any stains.
To avoid the appearance of bubbles, leveling the canvas with a spatula from the center to the sides will help to expel air through the joints.
When choosing, pay attention to the manufacturer. It is better to buy glue that is recommended on forums, or that has received approval from friends and relatives.
Incorrect indoor microclimate
Another condition that is better to monitor is the microclimate in the room. You cannot paste wallpaper on cold walls in winter, as this will cause condensation and wrinkle the entire length of the canvas.
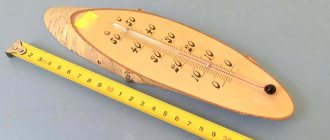
Optimal conditions for work:
- humidity from 50% to 60%;
- the thermometer in the room should show from 18 to 23 degrees;
- complete absence of drafts.
In summer, on hot days, it is recommended to install a bucket of water to avoid instant drying of the product, and in winter, thoroughly warm and dry the room.
You should not turn on the air conditioner for several days after wallpapering, which also causes a draft.
Incorrectly chosen glue or its dilution
Each roll contains instructions indicating the gluing method and suitable glue. The same information is printed on the packaging of the binder composition.
The instructions indicate:
- Suitable density and type of wallpaper.
- Exact amount of water for dilution. For example, non-woven wallpaper will require a thicker composition than paper wallpaper.
- Waiting time for the glue to allow all components to react.
- The time required for absorption into the canvas after application.
- Is it necessary to cover only the walls with glue?
Do not stir the glue intensively and for a long time after swelling to avoid saturating the composition with oxygen, which can then swell.
non-woven fabric is swelling
We tried to glue non-woven fabric (density 95) but it immediately wrinkles and cannot be smoothed out.
We thought that after drying the folds would stretch, but nothing improved. everything was torn off. what is the reason? We know how to glue wallpaper, we glued it ourselves, everything was fine. Masters online: 606 Orders per week: 1,463 Offers per day: 711
Did you smear only the walls, or the wallpaper too?
Hello. If you smeared the walls. then everything is correct. You just can't let it get too wet. The thickness of the glue, the glue itself. Everything matters. How the walls were prepared. Usually we smooth it with special irons. You can't just tell by looking at it.
meter-long wallpaper is difficult to glue, especially flezilin, invite a specialist, at least to show wrinkles there should be no base, the glue must be well primed, we apply the glue only to the walls, use a plumb line with a wallpaper roller, in your case, the wall absorbs moisture from the glue too quickly, mix it thicker, the quality of gluing is determined by the effect of the canvas sliding along let’s say I sometimes roll the wall with glue a couple of times and almost immediately apply the sheet
if a primer was made for the wallpaper, then the composition was very strong or your walls were probably oil-based. Use non-woven glue. The room should be warm, without a draft.
Hello Irina! It depends not only on the glue. whether the walls were properly prepared for wallpapering. The glue itself should not be very thick. When gluing non-woven wallpaper, ONLY THE WALLS CANNOT BE APPLIED WITH GLUE.
Try inviting a master. They say it helps against damage to materials! ;))))))))
I will answer everyone here. The walls are plasterboard, primed with glue. waited 5 minutes. Apply thick glue to the wall a second time (CLEO-EXTRA glue is diluted according to the instructions: 4 or 5 liters of water per 250g of glue) and prime with the same thick glue. We glue the canvas to the wall and begin to smooth it out. Right away everything is fine. But after gluing the upper part and starting to smooth out the lower half, the upper half, from smooth, right before our eyes, begins to wrinkle like a sharpei. There is glue in the folds and it is impossible to get it out; the interlining is wrinkled. non-woven fabric was 95th. Today we took the 110th and everything stuck with a bang. maybe thin non-woven fabric?
who to invite for 2 stripes of non-woven fabric? stupid. Yes, and sometimes it’s interesting to do something yourself. And this is not the first time we have glued it, but we only had wallpaper for painting.
the glue should be for non-woven linen, I come across many times that the glue is not the same, that is, it does not correspond to the quality, and there are even wallpapers like fleece and you will have to smear glue on it, understand, it’s not just the impregnation of the walls
Neither the walls nor the glue are to blame. The reason is the wallpaper. I had exactly the same case: I had to coat the walls and wallpaper with glue.
You already have enough answers.))
I didn't see any answer I needed. I already know everything that is written here.
You probably ran into non-woven fabric, which needs to be soaked like regular wallpaper and not just smeared on the wall, I smear the wall thicker, apply it, wait for wrinkles, remove it and re-glue it. Crazy, but it saves! Attention promotion! Free consultations on any issues regarding apartment renovation! Did you get the estimate correctly? Does the level of quality correspond to the stated price? What can you save on? How to choose a non-drinking contractor? What materials to use and how to choose? Any questions! My 17 years of experience should not be lost! To get information or order a free estimate, go to my website and look on the pages for a ready-made answer. If you don’t find it, use the feedback (the “ask a question” checkbox on the left). type in the Yandex search “apartment renovation Kaluga” select the site
Source
But when the wallpaper begins to bubble and wrinkle when applied to the walls, disappointment knows no bounds. The bubbles do not want to be smoothed out with a roller or spatula, the walls look terrible. Even novice craftsmen sometimes fall into a stupor from this phenomenon, what can we say if someone decides to put up wallpaper for the first time.
You need to try to calm down and read this article thoughtfully. The problem is completely solvable and you just need to show calm and restraint.
What to do if the wallpaper bubbles after hanging
If there are concerns that the bubbles will not disappear on their own, you can resort to proven methods shared by professionals.
- Smoothing . This action is suitable when the canvas has not yet dried. Remaining air or large amounts of glue are easier to remove around the edges. But if the width of the canvas is more than 52 cm, it is better to start correcting the defects immediately by tearing off the still wet side from the wall, gluing it again, intensively smoothing it with a spatula.
- Piercing and leveling . Sometimes it is enough to pierce small bubbles with a needle and expel air or glue through the resulting hole. It happens that this is not enough and you will have to make a small cut with a stationery knife at an angle to level the surface.
- Getting rid of bubbles with a syringe . They make a puncture in the problem area and pull out the contents. It will also come in handy if a bubble has formed on a dry area due to poor-quality application of the wallpaper fixing compound. A syringe without a needle is inserted into this place after a preliminary puncture and glue is injected. You will need to wait a little while for the wallpaper to smooth out.
You must follow all the rules for decorating walls and ceilings with wallpaper. It is better to glue them in daylight, which does not distort the view, and immediately take measures to eliminate the swelling.
Have you encountered the problem of bubbles forming on your wallpaper?
Yes
No
Preventing bloating
If you apply wallpaper in accordance with the instructions and follow the technology, there will be no swelling or they will be insignificant. To do this, you need to properly prepare the wall, level it and prime it.
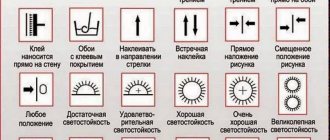
It is very important to choose the right glue. It is selected depending on the wallpaper material
When diluting glue, the dosage must be strictly observed. If the solution is very liquid, this can also lead to swelling.
To glue corners and eliminate blisters on a flat surface, do not use PVA. It leaves yellow spots, and during the next renovation it will be very difficult to tear the wallpaper off the wall. But this product is very suitable as a primer. It can be diluted equally with water.
The nuances of working with wallpaper
The fight against bubbles will differ significantly in each case, which is due to the different density of the wallpaper and the composition of the glue.
Non-woven wallpaper
For production, non-woven materials based on cellulose are used. Polymer additives make them the most durable, resistant to soaking and loss of shape.
Solution to the problem:
- removing the first sheet and leveling the wall;
- smoothing new canvases from the middle to the edges to expel all the air;
- If bubbles are detected after drying, filling the void with thick glue will help.
Blisters on such material are extremely rare and are caused by poor wall preparation. In some cases, when dismantling is impossible due to severe unevenness, additional decoration is used with stickers, frames with photographs or paintings.
Vinyl
Vinyl wallpaper comes in 2 types:
- Paper based . In this case, glue will need to be applied to the canvas and the wall. Let it sit for a while, and then fasten it, starting from the top.
- On a non-woven base , which does not require pre-impregnation. Such wallpaper is immediately glued to the oiled wall.
Non-woven fabric is a rather heavy material that requires special thick glue.
Paper
This option of budget material is often produced with a minimum width of 52 cm, convenient for gluing, but still requires care.
After applying the adhesive, the canvas is allowed to sit for a while so that it is saturated with the composition, becomes obedient and easier to lay on the wall.
This material is more susceptible to swelling and damage. You should carefully attach the canvas first from above to the ceiling, then lightly move the roller from bottom to top, from the middle to the edges, to expel excess glue and air.
How to delete?
The choice of method for removing bubbles depends on the cause of the air.
Smoothing
The method is used when gluing technology is violated or the material is insufficiently leveled during installation.
This method is suitable for removing air from recently pasted wallpaper. If the material is already dry, smoothing will not be effective .
Piercing and leveling
If the canvas has already dried out and the bubbles have not disappeared, it is recommended to try to remove them using punctures or small cuts and leveling:
Leveling is done with careful movements from top to bottom. This method is suitable for large bubbles formed due to incorrect or uneven application of the adhesive solution.
Using a syringe
Small swellings can be easily removed with an ordinary medical syringe with a needle, which is used to first pump out the air and then fill the resulting void with glue.
This method is applicable for medium or small bubbles that have formed due to improper gluing of the canvas.
The center of the swelling should be pierced with a needle , and it is recommended to smooth out the unevenness in the direction from the edges to the center.
We invite you to watch a video on how to get rid of bubbles on wallpaper using a syringe:
Preparing wallpaper
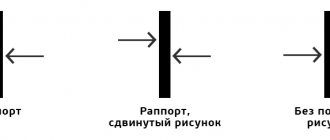
After the type of wallpaper, color and pattern that fits into the overall design solution of the apartment’s interior is selected for each room, finishing material is purchased. Here it is very important to take all the tubes of the same article and one change of release, so as not to get the problem of different shades in different wallpaper rolls.
Quantity calculation
When calculating the number of rolls needed for repairs, you cannot use special tables that show the required number of tubes based on the perimeter of the room and the height of the ceiling - non-woven wallpaper has a different width.
The calculation begins with determining the area of the walls (the length of the wall is multiplied by the height and all results are summed up). The area of door and window openings is subtracted from the result obtained. The resulting number is divided by the area of 1 roll.
Having dimensions of 10x1.06 m, the area of one tube is 10.6 m2. However, experts do not take into account the decimal value of the indicator and divide by 10. To the result obtained, add 1 roll per room for pasting corners, door and window openings and 1 tube for every 6 rolls if it is necessary to adjust the pattern.
Simple rules
To minimize the problem of blistering on the wall, it is recommended to follow rules that will help avoid the appearance of large blisters (why is wallpaper blistered and how to fix it?).
Rules for pasting walls:
During the work process, it is important to use good lighting and high-quality tools: spatulas should be free of chips, and rollers should be soft and easily move along the surface of the wall.
When wallpapering, it is important to avoid any drafts that could cause blisters to form.
Peculiarities
To get rid of the problem of air formation, you should take into account the type of base material, since each type of fabric requires a special approach. The most popular are paper and non-woven wallpaper (how to properly glue non-woven wallpaper?).
From under paper
The paper is thin, so you need to work with it very carefully.:
From under non-woven fabrics
The non-woven fabric is quite heavy and dense.
It is important to smooth it well and apply the adhesive evenly. You can get rid of air on non-woven material using punctures or neat small cuts made with a sharp knife or blade. It is advisable to smooth out uneven surfaces and remove small bubbles with a rubber roller . A plastic spatula can damage the material and ruin three-dimensional designs.
When gluing a non-woven covering, the adhesive composition is applied only to the wall (how and with what to apply the glue?).
EVITA Forum
Apartment renovation, suspended ceilings, country construction of houses, cottages, baths, gardening, business forum, children, health.
- Unanswered topics
- Active topics
- Search
- HomeList of forumsConstructionAPARTMENT REPAIR
- Search
Why does wallpaper bubble when applied?
- Send topic by email
- print version
Why does wallpaper bubble when applied?
- Complaint
- Quote
Post by Boris » 21 Oct 2022, 20:26
Why does wallpaper bubble when applied?
- Complaint
- Quote
Post by Arthur » 22 Oct 2022, 20:13
Reason: Uneven impregnation of wallpaper with adhesive, i.e. Before pasting it on the wall, somewhere the wallpaper was already quite wet, and somewhere else it was still dry. After some time, the areas that were drier become wet and a bubble forms, which disappears as it dries.
Air getting under the wallpaper occurs when, during pasting, the far part sticks faster than the part already drawn to the wall. These bubbles can be removed with a rag or a special spatula, pulling them towards the edge of the wallpaper. You can also use a needle to pierce the place of the bubble and remove all the air through the hole.
A large amount of glue gets under the wallpaper; this happens when the glue is applied unevenly to the surface. You can also use improvised objects (a rag, a spatula, etc.) to bring it to the edge and drain it, or make an incision in the middle of the bubble and squeeze the glue out.
Why does wallpaper bubble when applied?
- Complaint
- Quote
Post by Larisa » 23 Oct 2022, 09:17
If the wallpaper is swollen, blistered and looks old and frayed, like the nerves, the reasons are as follows:
Air formed between the wallpaper and the wall and was not expelled. There was haste when applying the sticker. Although non-woven fabric “breathes”, it will not exhale bubbles. The wallpaper changed its structure due to prolonged moistening with glue and expanded in some places. The expanded areas are the bubbles. This happens with the scheme: “they smeared the wallpaper with glue and went for a long smoke break.” Non-woven wallpaper cannot be applied with glue. Glue is applied to the wall. The wall turned out to be uneven, with bumps and knots. Every uneven place is a potential bubble. The glue was applied to the wall surface unevenly, with puddles or gaps. In the room in which the renovation is being carried out, changes in humidity and temperature are allowed. Opening and closing windows and hot stoves can be another cause of bubbling.
Why does wallpaper bubble when applied?
- Complaint
- Quote
Post by Nikolay » 01 Jan 2022, 15:04
Quite often, the cause of the appearance of bubbles is a violation of the technological process of wallpaper gluing. To avoid this, follow these tips:
When applying glue to a wall or wallpaper, try to spread it evenly over the surface, be sure to wait the time specified in the manufacturer’s instructions, only after that glue the canvas; try to level the wallpaper from top to bottom, from the central part to the sides; squeeze onto the wallpaper with such effort as to force out excess glue from under it, but do not overdo it so as not to stretch or deform the wallpaper; in the work process, use working tools in the form of rollers, wallpaper spatulas or brushes.
Surface preparation
The quality and durability of wall finishing with modern types of wallpaper is largely determined by the level of surface preparation. First of all, this applies to non-woven trellises, although another point of view is widespread among non-professionals that they can be glued to old wallpaper.
From a technological point of view, this approach is possible - the non-woven fabric is lightweight and the glue will always hold it on the trellises that have expired. But from an aesthetic point of view, this finishing option is impossible - the old pattern will be very clearly visible through the newly pasted sheets, unless, of course, the previous wallpaper is plain and light in color.
The entire process of preparing walls for wallpapering is discussed in detail in the work “How to prepare walls for wallpapering.” Let us briefly recall what was discussed there.
Before decorating an apartment with wallpaper, it is necessary to perform the following work sequentially:
- clean the walls of old finishes and, if necessary, plaster;
- repair the resulting microcracks, peelings, cavities, etc.;
- prime the surface;
- level uneven walls with cement-sand or dry (plasterboard, plywood, etc.) plaster;
- putty the surface of the plaster;
- treat the surface on which the trellises are glued with a primer.