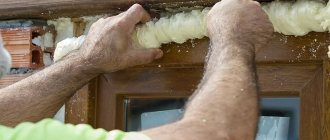
Polyurethane foam is a convenient material
Today, polyurethane foam is used in many construction works. It is a polyurethane foam two- or one-component sealant, which is produced in a special aerosol can. Applicable in two cases:
- for thermal insulation;
- sealing seams.
Suitable for materials such as wood, glass, metal, concrete. The main component of the foam is polyurethane, which was first created by Bayer in 1947. In the 70-80s, the first spray cans began to be produced and used for finishing work.
In addition to polyurethane, polyisocyanate and some catalysts were added to the composition. The first country to introduce this material was Switzerland. Later, other countries began to use the foam. Today it is used in Europe, Asia, USA, Russia. This wide distribution is due to the unique properties of the material. The foam easily penetrates into any crack and seam, fills the space and quickly hardens. Thus, this area is perfectly protected from various adverse events.
Why do you need polyurethane foam protection?
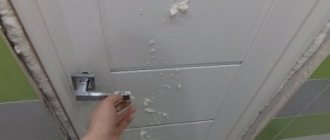
As already mentioned, the composition perfectly fills the space inside the cracks and seams. But at the same time, she also needs protection. The fact is that foam is destroyed under the influence of UV rays and moisture. If you do not protect it, then the total service life of such a seam will be no more than 5 years. That is why, after application, it is additionally coated with special compounds.
But the question arises: how to protect the polyurethane foam and what specific products are best to use? For these purposes, sealant, putty, liquid plastic, acrylic paint, etc. can be used. In this case, the coating must be waterproof and vapor-tight. That is, ensure proper ventilation and protect against water penetration. Therefore, when choosing formulations, pay attention to their properties (usually they are described on the packaging). Also, some consumers use special sealing tape for protection. It is quickly glued to the required area and is suitable for both old and new structures.
Protection with plaster and what you need to know for this?
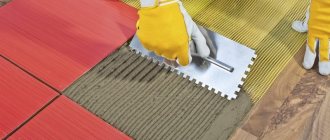
So, the question of how to seal the polyurethane foam has already been answered. But how to do this? Let's look at an example of finishing using plaster. Processing begins with removing excess material. This is necessary in order to level the base. In the case where plaster or putty is supposed to be used for protection, it is better to further deepen the surface by a couple of millimeters.
The second task that arises before finishing craftsmen is the question - how to putty the polyurethane foam? Which putty and plaster should I choose? For this, it is better to use a frost-resistant composition, which is sold in construction supermarkets. Rotband is a good brand. The composition is sold in dry form and is prepared immediately before use. And if the question is settled, then you can proceed to the direct preparation of the mixture. The recipe is always written on the package.
The solution is poured into water and stirred thoroughly so that there are no lumps. If the composition becomes too thick, it is better to add a little water.
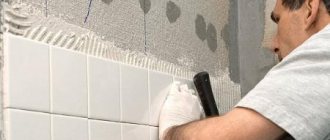
The putty is applied using a spatula or trowel. The layer must be at least 4 mm. Because if you apply too thin a layer, it may soon crack (this usually happens when it dries). At the next stage, the coating is given some time to harden, but does not wait until it dries completely. Then the surface is rubbed with fine-grained sandpaper or construction mesh.
Please note that you can easily do all the work described yourself. It is only important to follow the instructions. Therefore, the question of how to cover the polyurethane foam should no longer arise. Also, when performing work, you must wear gloves to protect the skin of your hands. All instruments are washed with warm water after use. The remainder of the composition is removed in a dark place.
In all construction and installation work, it is often necessary to resort to sealants, the most popular of which is polyurethane foam. This type of building material has become so integral to our lives that we consider it an indispensable tool for sealing small seams. However, it must be hidden under the finishing material, and for this you need to know how to seal the mounting foam.
Very often, foam is also used to seal cracks and doors. This popularity is easily explained by its performance characteristics and the fact that it always eliminates the problem as much as possible. Today this material is a polyurethane foam sealant, which in most cases is produced in an aerosol can. You can now find polyurethane foam on the shelves of all construction stores in a huge assortment. Construction foams are used in two cases:
- for thermal insulation of premises;
- sealing seams.
Polyurethane foam is in demand due to the fact that it is excellent for materials such as wood, metal, glass, concrete. Unfortunately, due to its unusual appearance, it does not always fit into the external interior of the room or premises. It is in order to preserve its special characteristics and at the same time make it invisible, the foam needs to be sealed with another material. Most people have no idea how to repair it, so they immediately call a specialist if such work is required. However, everything is quite simple, and even without special education, skills and special knowledge in the field of construction.
If you used polyurethane foam for work on the outside of the premises, be sure to remember that, for all its durability, it requires constant protection from ultraviolet radiation and getting wet. If you do not protect the polyurethane foam from exposure to adverse factors, its service life will be significantly reduced to 5 years. Sometimes, in order to avoid such situations, the cooled foam is lubricated with a special primer solution.
Why does foam need protection?
Foam best fills the space in a crack or hole or seam. If you don’t think about protecting the foam, its service life will not exceed 5 years. In the process of such incorrect operation, the foam is constantly destroyed, as a result - liquid and moisture penetrate into the crack and cause destruction. And in the worst case scenario, the gap inside the wall will become a source of mold and mildew.
A simple way to protect it is to use regular sealing tape. But if you protect the foam on the street, the tape is unlikely to serve as reliable protection for long.
Another way is to use special mixtures (primers) that provide moisture-resistant protection. They have their drawbacks - in most cases they do not protect against ultraviolet rays - the main problem with polyurethane foam, and invariably lead to its destruction.
Other options are also used - sealants, putties, plastic, or acrylic paint. But if the excess foam is trimmed, it will not provide sufficient protection.
The protective layer for the foam prevents ultraviolet rays and creates vapor and water resistance.
Therefore, the best solution in this case is putty or plaster. Moreover, its specific type and type are not important. This method is affordable and simple - even a person without special knowledge or skills in the construction industry can cope with such work.
Plastering on foam: selection of composition and tools, preparation of the base and work process
It is impossible to imagine modern construction without the use of polyurethane foam: this material serves a wide range of jobs and is used to seal almost any cracks and cavities in the building. The foam hardens quickly and provides reliable protection, but the appearance of the joints is not very attractive, and in order for the foam to last as long as possible, it must be protected from adverse influences.
The heat retention and sound insulation properties of a material can be maintained for many years only if it is reliably protected from the ultraviolet radiation of the sun, which can destroy the composition in just a few years.
In the photo: all finishing work is very simple, and you can easily master this process
What is it for
Environmental conditions determine the service life of finishing and building materials.
Polyurethane foam is used for various purposes: improves the appearance of structures (fills cavities, cracks, which allows you to level the surface in the future), strengthens it (when installing window blocks, doors), prevents the appearance of drafts, flooding of rooms through leaks.
All these properties are determined by the structure - after hardening, the material becomes dense and porous. This increases the thermal insulation qualities of protected structures.
But under certain conditions, polyurethane foam loses its properties: it becomes brittle, less dense, crumbles, and can crumble even from the slightest mechanical load. Such changes in the structure of the material are a consequence of violating the rules of its use and failure to follow installation recommendations.
The main factors that destroy the foam structure:
- moisture (precipitation and condensation);
- ultraviolet radiation.
When installation rules are followed, such material retains its properties for a long period.
According to GOST 30971-2002 “Installation seams of junctions of window blocks to wall openings”, the service life of hardened foam, which is characterized by its initial properties, is 20 years.
To protect the installation material from destruction and increase its service life, protective coatings are considered.
The most common and effective include:
- silicones;
- ribbons;
- cement;
- decorative panels;
- plaster compositions.
The last option is considered universal. It is used indoors and outdoors (provided that the properties correspond to the operating conditions). For comparison, decorative panels are not used outdoors to protect the foam, since they do not ensure the tightness of the base. In this case, the foam continues to be in contact with the air. Taking these features into account, plaster is distinguished.
Its advantages:
- vapor permeability;
- increased adhesion;
- strength;
- waterproofing properties;
- decorative properties (used to eliminate errors on rough structures).
Puttying process
Wait until the foam has completely expanded and dried. When ready for use, it has a wave-like shape and often excess foam appears in unusual points and positions. It will not be possible to hide such fragments with plaster, so they must be removed first. For these purposes, excess foam is cut off slightly deeper into the wall in order to use putty.
The polyurethane foam should be cut no earlier than 12 hours after application, but it is better to check the drying time. They are indicated on the can.
Before applying the plaster, apply regular masking tape around the areas of upcoming work to protect the clean surface that does not need any finishing from stains. Remove the tape after the plaster has been completely applied and dried.
How and with what to putty the mounting foam so that it is not damaged by UV rays
Today it is difficult to imagine construction or repair work where polyurethane foam is not used. With its help, they solve a lot of problems, because foam acts as a heat insulator, sealant, or is used as a fixing agent.
Polyurethane foam is highly durable and may not change its useful characteristics for many years, but under certain conditions there is no ultraviolet rays. If you do not hide the foam from ultraviolet radiation, it quickly deteriorates and, as a result, loses its beneficial properties.
What can help
There are a lot of ways to hide the polyurethane foam so that it doesn’t damage it or interfere with its aesthetics. A common one is to putty.
This method is simple. One thing, BUT, these materials do not fit together, so plaster is applicable in 2 cases:
- If fire safety is at the forefront. Then apply a layer of plaster, which is 80 mm. In this case, use putty only with fire-fighting foam, which resists fire for 120 to 240 minutes. Although the fire inspectorate will still have complaints;
- For decorative purposes. In this case, putty is not so much protection, but as an aesthetic coating. This is the way to finish the work, making it aesthetically pleasing and pleasing to the eye.
If additional protection from mechanical stress is provided, plasterboard sheets are used. The seams between them are plastered, the foam is hidden. Then they are not afraid of damage and shedding of the plaster.
Polyurethane foam protection
To hide the mounting foam, any of the existing types of putty is convenient. However, the preparation process and the proportions of dilution of the mixture depend on the choice of manufacturer and specific model.
After mixing is completed, the mixture has acquired a thick, uniform consistency; it is applied to the polyurethane foam.
They make a small, protruding excess, which is then eliminated with a spatula, but you should not go too deep, otherwise you will get a notch, a depression, which will have to be eliminated again.
The excess, when it dries, is simply wiped off using sandpaper or a special construction mesh, which is used for finishing work with plaster.
Begin washing after the putty has completely dried. In this case, the chances of causing damage are minimal; moreover, apply force to erase in order to quickly obtain the desired result.
Other ways to hide foam
It is not always practical to use putty; sometimes it is an extra waste of money. You can hide the polyurethane foam in other ways. Some of them are more expensive or cheaper than plaster, but are not suitable in all cases.
A simple and cheap method is to trim the foam and then rub it in. This method is relevant for cases where foam with a dense structure is used. This cut has an aesthetic appearance.
To make a neat cut, use not a knife, but a hacksaw for foam plastic - this blade does not tear the material. Next, after trimming the foam, it is sanded. To do this, use coarse sandpaper.
After sanding is completed, painting begins. To do this, use regular paint. It is better to prefer white or other light shades. Apply the paint in several layers, then it will become a homogeneous, flat surface, which will provide sufficient protection to the mounting foam from ultraviolet rays.
Other methods include the use of any available materials - boards or metal sheets, even roofing felt will do.
If the foam is in the shade, and aesthetics are not an issue at all, then it is left in this form. Despite the fact that moisture and air have free access to the dried foam, they will not cause damage to it, moreover, it will retain its properties.
If you are not sure that the shadow is permanent, hide the foam immediately.
In the future, they simply forget about this need, and when the issue becomes acute, it turns out that the foam needs to be applied again, wasting time and money on repeating the work already done previously.
What are the nuances?
When preparing the solution for further application to the foam, you should be careful and thoroughly stir the mixture to eliminate the appearance of lumps that will spoil the aesthetics.
It's better to use an electric assistant
Depending on what functions the plaster layer performs, prepare a place for it. If it is protective, then remove the excess foam with a recess of several centimeters in order to plaster it efficiently. If the layer is decorative, then a large recess is not needed; a depth of no more than a centimeter is sufficient.
If you need to hide the foam outside, take into account that even the impossibility of moisture getting on the protective layer does not eliminate the chance of damage from other atmospheric factors. Severe frost also causes damage to plaster. You should take care of this problem in advance and purchase a frost-resistant mixture. If the work is to be done indoors, this is not necessary.
Regardless of which recess is prepared for plaster, the holes are plastered so that the layer of the mixture is at least 5 mm. If you use a smaller layer, this will lead to the appearance of cracks on the surface of the plaster and its subsequent destruction.
If the layer exceeds this value, then the plaster is applied in several stages, waiting for the initial drying of the previous layer.
Grouting is not done after the plaster has completely dried; it is enough to allow time for proper hardening.
When working with plaster, do not forget to use gloves and glasses. Dried mixture on the skin is difficult to wash off, and contact with the eye leads to serious consequences.
Don't forget to clean the tools after completing the work. If the mixture has not hardened, do this simply by washing them in water; if it has dried out, it will have to be cleaned mechanically.
Preparatory work
In order for the protective coating to perform its function, you must follow the installation instructions:
- You need to wait until the foam hardens. To do this, take a break from work for 12 hours, but it is better to leave the material for 1 day.
- Using a stationery knife, remove the top layer of porous material - a depression of up to 5 mm should form. If this is not done, the plaster will not adhere, because the adhesive properties will be weak.
- For those cases where the seam of the installation material is minimal, other recommendations are taken as a basis: notches of significant depth are made along the entire length of the treated area, this will allow the plaster to better adhere to the surface.
- Clean the seam from dust. In this case, do not use the wet cleaning method, since water has a detrimental effect on the foam. It is enough to remove dust and contamination with a strong jet of air (vacuum cleaner).
- Apply primer. Moreover, in rooms with high humidity or on the facade, unheated balconies, compositions with antifungal additives should be used.
Tips and recommendations for use
Repairs that include blowing with foam and subsequent finishing of the room are best left to an experienced craftsman. However, you can do the work yourself. To do this, you need to study all the processes, select materials and follow all the steps. There are detailed instructions on the Internet on how to get the desired result. The following tips are highlighted.
- If you plan to use putty, the seam is deepened a few millimeters.
- It is better to cover deep differences in materials with special tape.
- Excess sections of foam must be cut off.
- Old polyurethane foam should be removed.
- The putty must harden thoroughly, only after this is sanding carried out.
- It is necessary to apply primer - the primer additionally protects the putty.
- For large volumes of putty, a construction mesh is placed between the layers, which will hold the mixture on the wall.
Applying putty over polyurethane foam is a mandatory stage of repair, which provides a high degree of protection for the sealed material and insulation from external adverse factors.
Preparatory work and calculation of material consumption
The first stage of work is cutting the foam. It is necessary to make a recess of 5-7 mm to fill with solution. The solution will not stick to an uncut surface. If the layer is too thin and there is nothing to cut, make cuts on the surface 2 mm deep at a distance of 1-2 cm from each other.
Then the cut is cleaned and primed: On window and door openings, the seam is sealed with PSUL tape and treated with a primer with antifungal additives. In other cases, acrylic sealant or deep penetration primer is applied.
Information on the consumption of the plaster mixture is contained on the packaging. Approximate calculations are as follows:
- Cement mixture. According to manufacturers, 1.5-1.8 kg of mixture per sq. m is required with a layer of 1 mm. Foam requires a layer of 5 mm. It turns out 7.5 kg per square. Calculation formula: (seam width + 4mm) x 1.5x7.5. You need to add 10% to the result.
- Gypsum mixture. The packaging indicates a consumption of 8.5 kg per 1 sq. m. With a layer of 5 mm - 4.5 kg per sq. m. Calculation formula: (seam width + 4 mm) X1.5X4.5. Plus 10%.
How to protect after cutting from the street and not only, why: from destruction and so on
The use of polyurethane foam allows you to solve various construction, repair and finishing issues. The composition penetrates deeply into all cracks and irregularities of the treated surface and reliably adheres to the base. The connections can withstand mechanical and deformation loads. But under the influence of external factors, assembly seams lose their properties. The structure of the seam is influenced to varying degrees by several factors. Therefore, it is necessary to protect installation seams at all stages of work. Outside (from the street) - from ultraviolet radiation and precipitation, in the center - from low temperatures, i.e. Insulation is carried out from the inside (from the side of the room) - from condensation and steam.
Polyurethane foam TYTAN LEXY 20 300 ml.
The presence of a protective layer allows you to solve several problems. Firstly, extend the life of the foam. Secondly, exclude the possibility of moisture getting on the surface of the seam. Thirdly, maintain the integrity of the seam. Fourth, prevent the formation of fungus and mold. Fifthly, give it a more attractive appearance. As a result, treatment is necessary to prevent loss of characteristics and quality, and, consequently, destruction of the seams. Various materials and means are used for effective protection.
Putty/putty for external and internal work, what to putty on: putty/mastic and other options
Puttying assembly joints involves performing several stages of work, where surface treatment takes only part of the time.
Ready putty TURY moisture resistant 1.7 kg.
- 1) First of all, you need to select the composition and prepare the tools. To perform the work, the performer will need a knife, a container for the mixture, narrow and wide spatulas, and gloves. Using a narrow spatula, the solution is selected from the container and applied to a wide one, with which the surface is treated. A narrow spatula will also be needed for sealing corners and processing hard-to-reach places. When choosing a putty composition, several circumstances must be taken into account:
* Location of treated surfaces. For interior work, the optimal solution would be to choose one composition, and for working with the facade and in wet rooms - another.
* Layer thickness and slot width. It is recommended to plaster deep surface defects. Since the putty is designed to hide small defects and is applied in a thin layer. But the plaster is suitable for leveling unevenness up to 15 cm deep. As an example of high-quality compositions for work in dry rooms, we can mention the Fugenfüller putty from Knauf. For facade work, it is necessary to choose mixtures based on cement or polymers. A universal remedy is Neomid putty. When protecting installation seams, you cannot do without a primer. It additionally protects the putty and provides better adhesion to finishing materials. Acrylic primer has the greatest list of advantages.
- 2) After choosing a means of protection, the installation seams must be prepared for work. Even with the most careful application of the foam, the composition lies unevenly on the base, as it significantly increases in volume. Excess foam is removed 8-12 hours after foaming; this can be done conveniently using a knife with a triangular-shaped oblique blade. It is important to start work only after the foam has completely polymerized. To avoid getting poor quality results, it is recommended to wait 24 hours. Since lower rates for foam curing can only be achieved when working under ideal conditions. It is also necessary to make a recess in the seam, thus freeing up space for putty. As a result, you need to get a smooth surface without any obvious defects.
- 3) The surface must be cleaned of dust and debris; it is recommended to use a vacuum cleaner.
- 4) The installation seams must be treated with a primer mixture and allowed to dry.
Reference. In most cases, foam is used to fix products of various types and textures. To avoid destructive processes, it is recommended to apply a special pre-compressed sealing tape (PSUL) to the seam before priming and filling.
- 5) The putty is applied in the following sequence:
5.1) The solution is mixed. The mixture is prepared in accordance with the manufacturer's instructions, the proportions are indicated on the packaging. You should take a prudent approach to determining the amount of solution. If there is too much of it, it will harden, it will not be possible to revive it, and as a result, the unused putty will have to be thrown away. The mixture should be enough for 30 minutes of work.
5.2) The first layer of starting putty is applied. If defects are still noticeable, an additional layer will have to be applied. The thickness of the layer depends on the type and variety of putty. But the general recommendation is to apply the mixture in a thin layer.
Reference. The dense filling of voids and cracks is facilitated by the perpendicular application of the mixture. The putty is not distributed level with the height of the joint, but with a slight excess.
5.3) After the starting layer has dried, it is recommended to sand it and prime it.
5.4) Finishing putty is applied to the dry base. After it dries, sanding with fine-grained sandpaper and priming is carried out.
5.5) Grouting is carried out only after the putty has completely dried. The result is a smooth coating that fits perfectly with paint or wallpaper.
Thus, there is nothing complicated in the process of puttying assembly joints. To obtain the desired result, you only need to strictly follow the technological process.
Reference. To process a large number of assembly seams, it is not always appropriate to use putty. This will require a lot of material and time. A simple option is to prepare cement mortar. To mask the seams, grout is added to the solution. After the cement has dried, the seams can be painted in a suitable color.
Paint it, what to paint it with so it doesn’t collapse
After applying the putty, you can begin painting the assembly joints. For exterior work, it is recommended to use façade paints; they are weather-resistant. For indoor work, you need to choose products for interior work or universal paints. The best option for protecting polyurethane foam is an acrylate composition with excellent adhesion. Depending on the type of paint, it is applied either with a thin brush from bottom to top to the corner of the frame, or by spraying from an aerosol can.
The paint is applied evenly, if necessary in two layers. It is possible to paint over the assembly seams, for example, with Tytan universal acrylic aerosol paint. It is suitable for both internal and external work.
Mounting tape, how to close it
Special tape is the most cost-effective and fastest option for protecting seams. It is also the most questionable aesthetically, so this method is often considered as a temporary measure. Because after a few months you will have to re-glue it with tape. The surface is pre-leveled, cleaned of uneven surfaces using sandpaper, and wiped from dust, dirt, and condensation.
Attention. The sticky side should not be touched with your hands, otherwise it will reduce the quality of fixation.
Suppliers have a range of tape in various colors, which allows you to choose the best option for window frames and door frames.
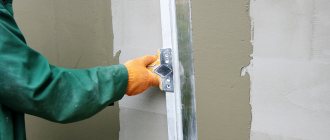
How to apply plaster
The dry mixture is diluted according to the instructions on the package and applied with a spatula.
In rooms with normal humidity, it is better for inexperienced craftsmen to work with gypsum composition. Cement plasters require absolute adherence to proportions when diluting; if the solution is made too liquid or thick, the applied plaster may subsequently crack.
Application rules:
- Apply the composition in 2-3 layers at time intervals: for gypsum plaster 30-120 minutes (check the degree of setting), for cement plaster - 120-180 minutes.
- The minimum thickness of the general layer is 5 mm.
- To ensure better adhesion of the composition to the surface and prevent the appearance of cracks, you can use a serpyanka mesh for interior or exterior work. It is applied to the first layer of plaster, slightly recessed, and the remaining layers are applied on top.
Apply the plaster over the wall 2 mm on each side. When the composition begins to set, go over it with a trowel to level it out.
To keep the seam line straight, apply masking tape to one or both sides of the seam.
When the plaster is dry, it needs to be sanded with P120/P150 sandpaper. Cement plaster dries in 2-4 weeks, gypsum plaster - 4 days. Drying speed depends on humidity and ambient temperature.
Further actions depend on the type of finish: before painting or wallpapering, the surface must be puttied, before applying decorative plaster to the facade of the house, it must be primed.
When plastering foam joints near a window or under a window sill, we recommend providing additional protection against cracking. To do this, the plaster should not be applied flush to the frame or window sill, but with a gap of 2-3 mm. Fill this cavity with silicone or acrylic sealant, the shade of which can be matched to the color of the frame and slopes.
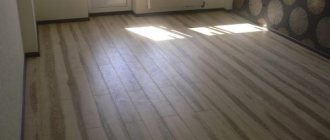
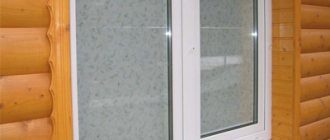
How to cover polyurethane foam after installing plastic windows
When installing windows or working with other openings, builders often need to use foam to seal cracks of different diameters. After treatment, the surface must be cleaned so that all further manipulations can be freely performed. For these purposes, you can use durable slopes made of different materials or plaster solutions.
Over time, the foam can lose its properties, which is why the quality of the sealing seam deteriorates significantly. In order for the structure to last as long as possible, auxiliary materials must be used. Dry mixtures are in demand, since after hardening they form a durable film through which moisture does not penetrate.
Final finishing of the structure
How to cover construction foam on windows: how to achieve optimal results
In view of all of the above, since everyone wants to maximize the service life of window units, the question of how to hide the mounting foam on PVC windows so that neither moisture, nor the sun's rays, nor frost or heat can damage it becomes very relevant. Moreover, in fact, there may be several answers, and everyone is free to choose exactly the option that he likes most, and also seems simpler and more accessible to implement. The only thing that is undeniable is that all this will have to be done quickly, so as not to change the entire structure later, which will cost much more.
Before you start figuring out how to close the foam around a window from the street, you should definitely think about using a special PSUL tape, more details about the properties and qualities of which can be read on our website.
- The most popular method of sealing an assembly joint with protruding foam is ordinary cement-sand plaster. Such a seal will be cheap, but it cannot be called the best, since freezing and leakage are possible, and therefore condensation may occur, which in turn can cause fungus or black mold to appear on the walls.
- There is also the option of sealing polyurethane foam using special sealing compounds, for example, based on polyurethane. But then the surfaces will have to be finished with something additional.
- In-demand and relevant means are the finishing of slopes, and, consequently, the sealing of foam, covering with plastic, sandwich panels, plasterboard or even wood.
- A good way to cover the mounting foam on a window is also a special plaster mixture, which is designed for temperatures well below zero, if we are talking about the external wall of a building.
- Acrylate paint or also liquid plastic is another fairly popular and not too expensive product that will help you cope with the task.
Indeed, there are simply a colossal number of methods and methods for sealing an assembly seam, that is, in fact, protecting the foam from external influences, and one of them can be called the most commonplace window putty. The main thing here is not to make a mistake, and to choose the right material, depending on the final goals, as well as the operating conditions of the structure. On the outside of the window opening, you should use only frost-resistant mixtures that are not afraid of moisture and ultraviolet radiation, always remember about the water barrier and vapor barrier, and from the inside, always remember about temperature changes.
It is clear that if you have absolutely no idea how and with what to cover the foam after installing plastic windows, it may be better to entrust this task to real professionals. They are the ones who can give a guarantee for the work done. If the foam crumbles or loses its properties, it is not at all excluded that even the PVC profile of the frame may become deformed, and then the entire window unit will have to be replaced, and this is a colossal expense. So if you are not sure, then it is better not to do the work yourself, although it is not particularly difficult.
The putty protects the mounting foam from the harmful effects of sunlight
Don’t know what and how to putty the polyurethane foam? The experience I have accumulated allows me to say that all the necessary materials can be found in the nearest hardware store, and anyone can cope with the task. Detailed illustrated instructions will help me prove this.
Characteristics of sealant
Mounting foam is a foamed polymer that hardens when exposed to oxygen. The liquid material is packaged in aerosol cans. When opened, high pressure is created, pushing the sealant out. The propellant gas boils, so many small air bubbles form in the mass, inflating the raw material. The primary expansion reaches 20 times, so one aerosol is enough to seal deep and long cracks. When exposed to air, the polyurethane foam dries and hardens. After polymerization, the material hardens and holds the window block in a given position. Due to secondary compaction, the volume continues to increase within 24 hours after application.
Polymer mass Source yandex.ua
Due to its viscosity, polyurethane foam has excellent adhesion to all popular building materials. The raw material binds, but does not glue, the structural parts. Do not use the substance with rubber, polyethylene and silicone. Due to the air trapped in the polymer bubbles, the sealant absorbs street noise and improves thermal insulation.
Polyurethane foam is divided into types according to the weather conditions of use. Summer types are appropriate at above-zero temperatures, winter types can withstand frosts down to -16-18 C. Universal (all-season) sealants work in the range from -10 to +30 C.
On the label of polyurethane foam for installing windows, the manufacturer indicates the flammability class. Budget options have a high fire type, so they are labeled B3. Self-extinguishing (smoldering) species are designated B2. Expensive non-flammable sealant is hidden under the B1 mark.
The main role of polyurethane foam for installing windows is filling cracks and adhesion of different types of materials. Under the influence of ultraviolet radiation, humidity, and temperature changes, the bubble mass begins to gradually collapse. After a year, the polymer dries out and crumbles on the street side, which will lead to depressurization of the seams. From the inside, the raw material darkens and takes on a sloppy appearance.
Using foam Source kwitka.com.ua
If you use polyurethane foam to install a glass block, the characteristics of the material will be maintained for decades. There are no gaps around the windows, so sound and heat insulation is not compromised. Treated street and indoor slopes look complete and beautiful.
From preparing materials to applying the solution
Is it possible to putty polyurethane foam? It’s not just possible, but even necessary. This is done to achieve two goals:
- Protection from the harmful effects of ultraviolet radiation Despite a lot of positive performance characteristics, polyurethane foam has one fatal drawback: it crumbles when exposed to the sun for a long time;
- Decoration Yellowish clouds of frozen mass around a door or window do not look very aesthetically pleasing. It is better to cover them with something more attractive to the human eye.
In order to complete the task, you need:
- Prepare tools and materials, visiting a hardware store if necessary;
- Prepare the surface to be treated, that is, bring the dried substance into a form suitable for puttying;
- Apply putty.
Stage No. 1: preparation of tools and materials
Before starting work, make sure you have on hand:
- Primer Will the putty stick to the foam without prior priming? It will be, but much worse, plus the level of danger of its detachment in the future will increase. Why take the risk?
- Two spatulas
- Wide – for applying the solution to the surface to be treated;
- Narrow - for applying the solution from a container onto a wide spatula;
- Putty Depending on the location of the work, use the following rules when choosing a suitable solution:
- Street - facade mixtures based on cement or polymers. As an example, consider the technical characteristics of NEOMID putty:
- Room - gypsum putty for interior work. As an example, consider the technical characteristics of the Knauf Uniflot mixture:
If we are talking about a room with high humidity, then it is also better to use façade compositions, since gypsum ones are deformed and destroyed in such an environment.
- Ceramics or heat-insulating boards - adhesive putties. As an example, consider the technical characteristics of the Weber Vetonit product:
If we are talking about sealing slopes, then you can additionally purchase sealant and reinforce the edges of the polyurethane foam with it so that they do not begin to crack over time.
- Serpyanka tape for reinforcing the putty layer;
- Gloves The price of such an accessory is low, but your hands will remain clean;
- Assembly knife for trimming excess dried mass.
Stage No. 2: preparation of the surface to be treated
Putty will not lie on polyurethane foam without its preliminary preparation:
| Photo | Description |
| We cut off with our own hands, using a mounting knife, all protruding excess frozen foam. | |
| Apply the primer using a roller. | |
| We are waiting for the soil to harden. |
If you are afraid that you might stain the window with primer or putty, then cover it with masking tape in advance. You simply remove it after finishing the work along with all the accumulated dirt.
Stage No. 3: applying putty
After the primer has hardened, you can begin to putty:
| Photo | Description |
| Mix the putty. This can be done manually, but a construction mixer will give greater uniformity to the composition. | |
| Apply the first layer of putty to one side of the window perimeter. | |
| We embed the serpyanka tape in the putty. | |
| Apply a second layer of putty covering the sickle tape. | |
| Use a rag to remove any excess putty that has fallen onto the window frame. | |
| Similarly, we seal all visible areas of the foam. |
Sources
- https://okna-veka64.ru/okna/chem-zadelat-penu-snaruzhi.html
- https://proosteklenie.com/kak-zashtukaturit-penu-pod-podokonnikom/
- https://vse-okna24.com/poleznye-sovety/shtukaturka-na-montazhnuyu-penu-mozhno-li-klast-budet-li-derzhatsya.html
- https://parilochka.com/materiali/chem-zamazat-montazhnuyu-penu
Which composition to choose
Plaster is available in a large number of options. Different types of mixtures may be considered for use as protection over foam. Compositions containing cement, silicones, and gypsum are more suitable than others. But they are not universal.
When you plan to apply plaster to polyurethane foam, consider:
- Purpose of the premises: living room, bathroom, balcony (heated, unheated). The scope of work in each of them is different, which is due to different levels of air humidity.
- Application on facades of objects or indoors. In the first case, when choosing a plaster, the key parameter is its waterproofing properties.
- The size of the gaps that are planned to be filled.
Regardless of what type of plaster is applied over the mounting foam, it is important that it is elastic. This property ensures a long service life of the protective coating and prevents the risk of damage to the layer of building material under the influence of shrinkage of the base and temperature changes.
Recommendations when choosing plaster to protect the installation composition in different areas of the building:
- Windows, door blocks: silicone, cement and gypsum mixtures, but in each case there are application features. When choosing the last option, a layer of cement plaster is first applied, and gypsum plaster is applied on top of it.
- Bathroom, kitchen - cement mixtures are used here, because they tolerate moisture well.
- Unheated balcony, facades - frost-resistant cement plaster is suitable. It must contain polymer additives, which will prevent deformation of the material under the influence of temperature changes and shrinkage of the base.
- Residential premises where the humidity level does not exceed the normal level: gypsum plaster is often used.
In order not to have to guess how the mixture will lie and how long it will last on the treated base, you need to immediately consider proven materials.
The following brands are most often applied on top of the foam:
- Ceresite;
- Rotband;
- Forward.