Sheathing that imitates natural materials with a higher quality than themselves is, if not a dream, then at least an object of desire for most homeowners.
If such cladding is relatively inexpensive and can be installed in a short time, then its preference is undeniable. These are the characteristics that siding has.
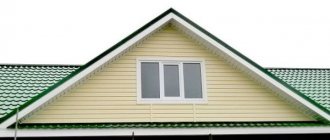
Houses covered with siding have clear, even outlines and look neat and stylish. Such a finish, for all its external ideality, is quite simple and accessible to everyone; you just need to familiarize yourself with the general structure and several installation rules.
The installation itself is simple and intuitive for anyone; some questions arise when decorating elements of the house, in particular window openings.
Window design without slopes
Siding on windows without slopes.
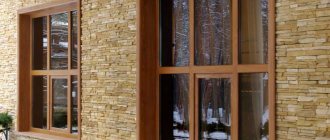
Photo No. 12. If the window has no slopes and is located on the same plane as the wall, the cladding technology is slightly different: platbands or a wide J-profile are used.
- First we need to know the width of the window frame. Then - the width of the platband.
- After this, we take the platband, which will be placed at the bottom of the window opening. On it we measure the width of the window frame + two widths of the casing. If the width of the frame is 90 cm and the width of the casing is 4 cm, then we need to measure 90 + (4*2) = 98 cm. Then the excess part of the casing is cut off.
- From each end of the casing you need to measure an angle of 45° (the mark can be made with a pencil or chalk). Then, using this mark, you need to cut off the outer part of the panel.
- The same measurements and trimming must be done with the platband, which will be attached at the top of the window opening.
- The side trims are measured using the same principle, but there is no need to cut them at an angle.
- After the preparatory work, the lower casing is mounted on the sheathing under the window opening. Then you should secure the side strips one by one, inserting their edges into the inside of the lower casing. This way there will be no gap between the panels.
- The final stage is the installation of the upper casing.
!
Expert advice.
Covering a window with siding is usually done before the installation of ordinary panels begins.
Quantity of materials
When you have chosen which materials you will use and how, you need to calculate their quantity. Window siding is covered around the perimeter of the opening.
To calculate the number of platbands, you need to calculate the perimeter of the opening, divide by the length of one platband and add 15% for trims.
To find out the required amount of materials for a slope, you need to calculate the area of each window slope, sum it up, divide by the area of one slope (or siding panel, if you decide to cover the slopes with it) and add 15%.
As a rule, our windows are symmetrical; accordingly, the areas of the vertical and horizontal surfaces of the slopes should be equal in pairs. But in practice things happen differently. Therefore, it is better to measure all 4 walls of the slope.
H-profile fastening
The H-profile is designed to connect siding planes in the longitudinal direction. Its installation is no different from the installation of internal or external corners, it is carried out simultaneously with them and is subject to similar requirements.
The only caveat may be the location of the H-panels, which can be installed symmetrically, distributing the length of the panels into equal sections, or, to save material, using the full size of the panels on one side and trimmed parts on the other.
Most often, the first option is used on the front sides of the house, and the second - on the reverse, invisible sides.
Protection of openings
You shouldn’t immediately cover everything with panels and platband. It is recommended to protect the window opening first.
For this purpose, waterproofing work is carried out. They protect openings from precipitation.
Here you can make an apron around the perimeter using aluminum foil. But I would replace it with a thin sheet of galvanized or stainless metal. The strips should be placed on top of each other, sealed with a high-quality sealant and nailed. The edges are covered with aluminum tape. There is no need to attach the apron to the frame itself.
Let's start finishing step by step instructions
Finishing window slopes with siding from the outside is not a complicated process, however, to successfully carry out this work you need certain tools:
- hacksaw;
- hammer;
- square;
- level;
- pencil;
- roulette;
- screwdriver or screwdriver;
- self-tapping screws
Preparatory stage
High-quality finishing of windows from the outside with siding requires certain preparatory measures.
They include:
- removal of decorative elements;
- cleaning old plaster;
- removal of old wooden structures;
- removal of communications - wires, pipes, drains, etc.
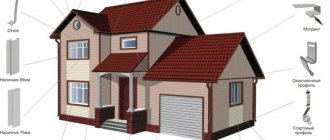
An example of lathing and finishing profile arrangement
Naturally, you also need to remove a variety of large objects - air conditioners, antennas, etc. It is also recommended to clean and dry the surface.
Such preparation is especially important if, in addition to windows, you plan to veneer the entire facade.
Frame installation
If you want to know how to add siding around a window, then be prepared for the fact that you won’t be able to make cladding without creating a sheathing.
It is necessary for at least two reasons:
- for simplicity and reliability of fastening the material;
- to ensure surface leveling.
This is what the frame looks like
To create the sheathing, one of the two materials below is suitable:
- wooden beam with a section of 4 by 6 centimeters;
- metallic profile.
The frame elements are attached at a distance of approximately twenty centimeters from each other in a vertical position.
Arrangement of insulation
When installing siding, finishing windows involves installing insulation, which will protect not only the window frame, but also the entire house from the negative influence of cold air and sudden temperature changes.
For insulation, it is recommended to use polystyrene foam, which is attached using dowels with wide, round caps.
Sealing cracks with sealant
Since even with the help of insulation you will not be able to avoid the formation of small cracks, prepare a sealant that will improve the waterproofing properties of the entire structure.
If you are covering a façade
And although the article is devoted to the topic of how to decorate a window for siding, we cannot help but talk about exactly how to decorate the facade of a house. Since quite often complex cladding of the entire structure is carried out.
Well, the most important thing is that self-tapping screws will allow you to perform fastening according to all the rules, which means a small space for the panels to “walk”, which will prevent damage to the panels during their thermal expansion or contraction at different times of the year. Installation of siding is installed strictly from the bottom up and not vice versa, and when you reach the window openings, be prepared to cut the panels
Siding installation is done strictly from the bottom up and not vice versa, and when you get to the window openings, be prepared to cut the panels.
Cladding of window slopes
According to experts, finishing windows with siding involves arranging drainage, which will protect against the negative effects of moisture:
- window;
- frames;
- walls;
- insulation.
The following can be used as drainage:
- special drainage;
- plastic pipe cut in half.
The drainage system is secured as follows:
- cut the pipe to the required length;
- bend it along the edges;
- this will create a border;
- the structure should be located at a distance of about five centimeters or much more from the wall;
- Apply a little foam to the protrusion under the frame;
- apply the dewatering device and press it into the foam until it hardens;
- wait until everything hardens and additionally secure with self-tapping screws.
The side panel slides under the top
After the drainage system is secured, you can begin installing slopes, which will be small strips of siding:
- the side parts are inserted under the top ones;
- to ensure the tightest possible connection, the tongue of the top panel is cut at an angle of 45 degrees;
- It is recommended to treat the joints with sealant.
It is also worth installing aluminum flashing, which will protect the walls and windows from moisture.
Low tide installation example
Such installation will ensure the maximum level of insulation, protecting the structure from moisture penetration
As you can see, the essence of arranging slopes is exactly the same as facing walls - the only difference is that you need to pay special attention to the joints
Finishing arched windows with siding will also not cause problems - you just need to create a sheathing in the shape of an arch.
Technological features of finishing
For each of these cases, actions can be performed in a different order. We especially recommend that you familiarize yourself with the finishing of windows without slopes. In this case, siding includes the use of special platbands.
There are some tips regarding finishing technology:
First, determine the width of the frame.- After this, cut the platbands. They must be intact. The required length of the strip is calculated using a certain formula, which uses data on the width of the casing (a) and the length of the frame (b). The formula will help you make calculations: L=2*a+b.
- The profiles must be joined at right angles. This connection can be made at an angle of 45 degrees. In the second case, the joint will look much better and aesthetically pleasing. Sealing of various structural elements can be achieved by making a cut on the side of the vertical slats. In this case, all horizontal elements should be trimmed and bent.
- If you decide to make joints at an angle of 45 degrees, then the cut should be made at the very top of the vertical element.
- To begin with, install only the horizontal elements, and then proceed to the vertical ones.
- At the last stage, you can install the horizontal platband.
Helpful advice! For a high level of reliability, the elements must be sealed with sealant.
Trim the panels below and above the window structure. The slot must be slightly narrower than the width of the strip near the window. You can learn more about the technology and see how it is done in the video.
Window trim with slopes
Slope preparation
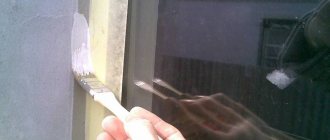
Primer of slopes. Photo No. 8.
Before finishing the window opening, it is worth checking the condition of the slopes. If you see cracks and chips, they should be repaired and plastered.
It is recommended to treat repaired slopes with a waterproofing penetrating primer. It will protect slopes from moisture, mold and harmful microorganisms.
Window trim for siding
Lathing with wooden slats. Photo No. 9.
Window trim for siding is an important element when covering a facade with siding panels. It needs to be arranged at the very beginning of work. For this, wooden slats or metal profiles are used.
The profiles are installed vertically in increments of 30–40 cm. The profiles are also mounted closely near window and door openings.
Exterior window siding
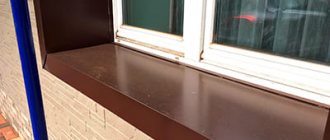
Low tide installation
Low tide on the window. Photo No. 10.
This element protects the window frame from rainwater. Mounted below on the outside of the window. It can be plastic or metal. Installed like this:
- To begin, measure two indicators: the width of the window opening and the width of the front part of the window strip. How to correctly measure the required distance at low tide:
- Using a tape measure, measure half of the casting and mark this location with a pencil.
- Let's say the width of the window opening is 90 cm, and the width of the strip is 3 cm. In this case, we measure 48 cm in each direction from the middle of the low tide and put the appropriate marks.
- Then cut off the excess parts of the flashing.
- Make cuts on the sides of the ebb and bend the side plates up.
- The area between the window frame and the ebb should be treated with silicone sealant.
- A low tide is installed in the opening. Using self-tapping screws, it should be attached to the window support profile. The side bends of the ebb should extend onto the slopes and sheathing. The bends are also attached to the sheathing with self-tapping screws. The tilt angle of the tide should be approximately 10°.
- All joints must be treated with sealant.
- The area under the ebb is sealed with mounting foam for sound and heat insulation. While the foam is drying, the ebb can be pressed down with a weight to prevent the expanding foam from lifting it up.
!
Expert advice.
Exterior finishing of windows with siding can be done without installing drip lining. Sometimes it is enough to cover a window with platbands or near-window strips.
- Installation of finishing strip. Needed for attaching window trim. The finishing strip is mounted along the inner edge of the window. In our case - on the sides and top. The strip should fit closely to the window profile.
- A window strip is built into the finishing strip. The other end of the plank is attached to the sheathing. There are holes along the edge for self-tapping screws. With their help, the bar is screwed to the frame. !
Expert advice.Do not tighten the screws too tightly. It is necessary to leave a gap of 1 mm to avoid deformation of the material when stretched or compressed.
- The side window strips should overlap the side bends of the ebb.
- The planks can be joined at an angle of 90°. To do this, you need to make cuts where the planks meet and bend the material inward. An alternative option is to join the planks at an angle of 45°.
- If the windows are of standard sizes, the seams can be sealed with silicone. It is better not to do this in large windows, as the profiles may swell under the influence of temperatures.
What to consider during installation
There are several universal rules that must be followed when installing fittings and siding panels.
- Use only stainless or galvanized screws for installation.
- When screwing in screws, maintain an angle of 90°. If you allow a slight tilt when screwing in, the fastener will be unreliable. Subsequently, the entire window siding may suffer from this.
- Do not tighten the screws as tightly as possible. When temperature changes, siding panels can expand and contract. If the screw is tightened to the limit, the panels will become deformed and the entire finish will have to be repaired. Therefore, there should be a gap of 1–1.5 mm between the head of the screw and the surface of the siding.
- Self-tapping screws need to be screwed only into special grooves. You cannot break through the panel. This causes the siding to swell.
- Use sheathing. It provides a ventilated gap between the panels and the wall. This will remove water vapor, less cold will penetrate into the house in winter (easier to heat), and in summer the house will not heat up so much.
- The ideal option for lathing is metal profiles. But if you decide to use wooden blocks or slats, they need to be dried and treated with protective compounds against mold.
- The drip tide must be installed in the window opening first. This way, its fastening elements can be easily covered with vertical strips that are installed on the slopes.
- When joining fittings and fasteners, it is important not to leave gaps through which moisture can get under the casing. This will damage the entire finish and wet the insulation.
- Requirements for self-tapping screws. The length should be enough to fit into the sheathing or wall (if it is wooden) by at least 35 mm. The minimum diameter of the cap is 8 mm.
- If you are using an angle grinder to cut siding, use it at low speeds. At high speed, the grinder can melt the vinyl panel or profile at the cut site.
These rules are important, regardless of the type of fittings, the presence or absence of slopes, or the overall design of the finish. Now let's look at how to cover a window with siding.
Preparing to install Docke trims
Before starting work, the openings are protected from moisture penetration: waterproofing of window and door openings can be made of aprons made of galvanized steel, aluminum foil or roofing felt (Fig. 22). Additionally, Stroymet specialists recommend the use of silicone sealant.
Rice. 22. Waterproofing of window and door openings: a - flush with the wall; b - protruding from the wall; 1 - sheathing; 2 - silicone sealant; 3 - lower apron made of roofing sheet; 4 - the same, lateral; 5 - the same, upper; 6 - aluminum tape or sealant; 7 - upper L-shaped apron made of roofing sheet; 8 - the same, side
Regardless of what apron material you use, their installation should begin from the bottom strip of the opening.
- Apply silicone sealant to the sheathing. Next, nail the bottom strip of the apron on top of it (fastening with nails along the upper edge of the strip will allow, if necessary, to bend the strip and place ordinary siding under it, thereby ensuring water drainage).
- Having installed the apron on the bottom strip of the opening, proceed to install the side strips. Fastening is done with nails at the same distance from the opening that was chosen when installing the lower apron.
- Complete the fastening of the top strip by installing the apron.
Important: All waterproofing elements must be installed on top of each other - this is the only way to ensure normal water flow. If the waterproofing is not mounted flush with the wall, but along the protrusion of the sheathing of the opening from the wall, you should use L-shaped aprons made of roofing sheet with a narrow edge extending over the entire thickness of the sheathing
The latter are fastened in compliance with the rule: the side aprons cover the bottom one, and the top one covers the side ones.
If the waterproofing is not mounted flush with the wall, but along the protrusion of the sheathing of the opening from the wall, you should use L-shaped aprons made of roofing sheet with a narrow edge extending over the entire thickness of the sheathing. The latter are fastened in compliance with the rule: the side aprons cover the lower one, and the upper one covers the side ones.
Important: Under no circumstances should the siding backing/profiles be attached directly to the window/door unit. In this case, when replacing a window or door, you will be forced to partially remove the siding.
Sheathing installation work
Thanks to the lattice structure, an air gap is created between the wall and the material. Typically, the step between profiles is about 40 cm (each siding panel must have at least 2 bars, they are located in the same plane without differences). In the case of horizontal siding, the profiles form a vertical structure, and when using vertical siding, they are placed horizontally. They are also mounted below, above, and along all outer corners of the building. Additional sheathing is created around windows and doors for attaching elements to it.
It is recommended to use metal profiles, since initially dry wood absorbs moisture during operation and releases it into the environment. Because of this, the fixed segments may undergo deformation. The thickness of the sheathing must correspond to the parameters of the insulation sheet.
Features of installing siding around windows
Since the architecture of each house is individual, window openings can be completely different. The finishing of window slopes with siding and its features depend on the configuration of the window.
There are three main types of window arrangement relative to the walls:
- The windows are recessed into the wall by five to nineteen centimeters;
- The window opening is located on a wall without slopes;
- The window slopes are more than nineteen centimeters;
- Arched or lancet window openings.
Naturally, the installation of siding in each of these options will be different.
Slopes around window openings are less than nineteen centimeters
Since, according to European building codes, slopes are no more than nineteen centimeters, the window strip has a standard size - up to twenty-two centimeters.
To attach the window strip to the frame, a finishing profile is used, into which the window strip is inserted. Finishing a window with siding yourself using a window trim is not a complicated process at all.
If desired, the window strip can be replaced with cheaper fittings - a chamfer and a J-profile (as we can see, this fastener can be used in almost all window finishing options).
Slopes around windows are more than nineteen centimeters
But construction standards in Russia differ from European ones, so the slope around the window and doorway can be significantly greater than nineteen centimeters. In this case, finishing windows with siding involves the use of external corners, which are mounted around the perimeter of the window opening.
A universal J-bar is placed near the frame, and an outer corner is placed around the perimeter of the window opening. The slope is decorated with siding panels cut to size, which are inserted into the grooves of the fittings around the window opening.
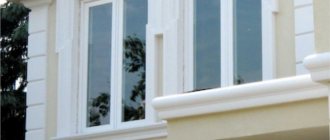
Windows without slopes
The easiest option for installing panels yourself.
For finishing, you can choose a platband with a width of 6.2 centimeters, then the emphasis will be placed on the window openings in the design of the facade. First, the platband is installed, and the finishing panels are inserted into it.
If the design involves an inconspicuous window trim, then it is better to choose a narrow J-profile for attaching siding around the windows. When finishing window openings with siding is done independently, then it is quite possible to choose the option that suits you in terms of cost and decor.
Arched or lancet windows
Siding manufacturers recommend using a flexible J-profile for finishing arched windows, but it can be replaced with a standard one. When installing, you just need to cut it a little, placing it around the window opening, as shown in Figure 6.
On the Internet you can find many photos and videos with step-by-step instructions for installing siding around window and door openings
Therefore, let us pay attention to the most basic principles that should be followed when installing material around windows
Useful information is contained in the article.
What siding components will be required?
To decorate windows, special components are required:
- Platbands.
- J-straps.
- Finish profile.
- Corner strips (complex).
- Simple corner.
- Sections of main panels.
The listed elements are not needed all at the same time; this list includes elements that may be needed in one case or another.
A more specific list can only be compiled with a specific opening in front of your eyes with its own parameters, the main of which are the presence and depth of slopes.
NOTE!
Many manufacturers produce their own elements for decorating window openings, which are used only for a certain type of siding. When purchasing casing, you should find out what components are needed for it and whether there are any specific parts.
Rules that cannot be ignored
Siding installation rules
- You only need to purchase galvanized screws, as they do not rust from moisture.
- Screw the fasteners at right angles; any distortions reduce the strength of the structure.
- The holes for self-tapping screws have an oblong shape, ensuring the mobility of the fasteners when expanding. Do not tighten the screw completely, leave a gap of 1 mm.
- The gaps between the profiles allow the structure to expand without problems when heated.
Installing siding near window openings is a complex area of cladding; to know how to properly complete the finishing, you can watch the video tutorial.
How to install sheathing correctly
Installed sheathing around the window
- the frame can consist of either a dry wooden beam or a special metal profile. For most buildings, a frame for profile siding is preferable because it does not change its shape during use and is more durable;
- the sheathing prevents contact of the facing material with the facade and creates good ventilation;
- the pitch of the frame guides is determined by the width of the insulation and the features of the building. Typically the step is from 0.5 to 1 meter and depends on the size of the insulating boards that are mounted in the space between the frame guides;
- a necessary and sufficient condition for installing the frame is the presence of its blocks where the panels surrounding the door and window openings are joined.
Installation of Docke siding profiles near windows
The Docke window profile can be used to frame openings with slopes up to 200 mm deep (taking into account the thickness of the sheathing). This profile can be used to frame almost all windows and doors, if they were installed according to the standard.
The window siding profile is still the same platband, the only difference is that a vinyl slope is attached to the profile, which can be used to cover the slope of the wall near the window or door. The technology for installing near-window profiles is similar to the technology for installing platbands, but with a slight difference:
- the slope part of the near-window profile is cut differently than the casing;
- A finishing strip must be attached around the perimeter of the window, in which the slope part of the profile is then placed;
- special notches are made in the slope part, ensuring reliable fixation of the strip along the entire perimeter of the window.
The wall part of the near-window profile is trimmed according to the recommendations for trimming the casing. The process of trimming the slope part, as well as installing the profile, is carried out as follows: it is necessary to install the upper and lower strips, followed by two side ones (Fig. 24).
Trimming elements:
the vinyl shelf forming the slope in the upper plank is cut to the length of the upper slope of the opening, subtracting from the length of the element the amount of temperature gaps that should be made on both sides of the profile;
Important: The size of the gaps depends on the length of the inil profile. The gap will allow the plank to expand freely as the ambient temperature increases: the panel will not rest against the side slopes, and therefore the profile will not warp
When installing the panels, take into account the current air temperature: the lower it is, the larger the gaps should be left. And vice versa: installation of profiles in hot weather requires minimal gaps or, alternatively, they may not be made at all.
The marking of the lower profile is carried out similarly to the upper one, however, this time no cuts are made along it - the “excess” material is folded onto the slopes of the walls (and you can do the same with the upper profile - do not cut the material, but bend it onto the walls).
Installation of ebb tides is not necessary - it is replaced by the lower window strip.
Installation progress:
- Installation of side profiles. To do this, it is necessary to rest the top of the side slope against the upper slope (the lengthening of the side bar is practically not observed, so the elements can be mounted end-to-end). The temperature gap is left only between the lower edge of the side slope flange and the lower profile flange. Since the ends of the lower profile were bent to the wall, the gap at the junction of the slope shelves will be invisible.
- To install side slopes, first the left panel must be moved to the right towards the center of the opening (approximately 10...12 mm), then the right panel - similarly to the left. Thus, narrowing at low air temperatures, the upper slope will not fly out of the upper fastening unit.
When performing work on windows of standard sizes, Stroymet engineers recommend filling the seams with sealant. Silicone will allow the parts to be glued to expand when the ambient temperature changes. Often this reserve is sufficient. But on large windows, the seams should be left unchanged - this way the profiles will not swell during expansion caused by temperature changes.
Video description
You can watch the installation of the window sill in the following video:
At the next stage of window covering, the J-bar is attached. It is fixed on the sides and top of the frame. Siding cut to size is inserted into this profile. In this case, the side slopes at the top and bottom are cut at angles that are equal to the slope of the horizontal finishing strip and the ebb, respectively.
The dimensions of the upper slope are determined in the same way as the dimensions of the low tide. The difference is that the width will be equal to the same size at the opening. At the same time, it is necessary to measure the inner and outer sides of the upper slope, respectively, along the length of the frame and the outer part of the opening.
All prepared slopes are placed in J-profiles. The joints between the panels in the opening and the façade finishing are covered with external corners. If required, siding on slopes can be inserted horizontally into the profiles. This is influenced by the architecture of the building.
The simplest window finishing option
The materials you will need are platbands and universal Alta-Profile slopes. The procedure will be as follows:
- Installation of the corner slope element. One end of the element is inserted into the starting strip, the other is attached with self-tapping screws to the sheathing. Corner elements allow you to easily connect slopes and platbands without the need for trimming. Installation of the corner slope element. Photo No. 13.
- Installation of slope. 15 cm are sawn off from the universal slope along with mounting fasteners. Then it is connected to the corner element with the cut part. The other side is attached to the next slope - and so on until the entire perimeter is completely finished. Joining a universal slope with a corner element. Photo No. 14.
- After completing the installation of the slopes, the corner element of the platband is installed. It needs to be inserted into the mounting groove of the slope angle, and the other end attached to the sheathing with self-tapping screws. Installation of the corner element of the platband. Photo No. 15.
- Platband installation. On one side of the plank you need to saw off 6-8 cm along with the mounting fasteners. The sawn-off side of the casing should be fastened to the corner element. On the free side it joins with the next platband. This is how the perimeter is completely finished. Platband installation. Photo No. 16.
We tell you more about how to finish windows using Alta-Profile materials in the video:
Accessories
To work you will need the following components:
J-trim strip or casing for windows without slopes
J-trim bar. Photo No. 2.
Window trim for windows with slopes
Window strip. Photo No. 3.
Finish bar
Finishing bar. Photo No. 4.
You may also need:
Plastic platband "Alta-Profile"
Plastic platband "Alta-Profile". Photo No. 5.
Universal slope.
A special additional element for finishing the slopes of window openings.
Universal slope. Photo No. 6.
Corner elements for platbands and slopes.
They simplify the joining of platbands and slopes in the corners of the opening.
Angle of repose. Photo No. 7.
Installation of additional elements
General diagram of installation of the starting bar and external corner
First, install the starting strip - place it 4 cm above the level of the siding. Subsequent starting panels are mounted with a gap of 5 mm. These gaps are needed to avoid overlaps. An end strip is installed under the cornice.
To prevent precipitation in the form of rain and snow from entering the corner joints, a special sealant is used. This material is attached with a self-adhesive side to the sheathing, and is fixed on top with siding.
After installing the additional elements, you can begin. Installation of panels should begin from any corner of the building. The bottom row is attached with a lock to the previously installed starting bar - subsequent rows are attached to the previous ones in the same way, using lock connections. Do not forget to control the horizontality of the planks using a building level.
Preparing the surface of walls and facades
As with any finishing activities, you first need to prepare the facade. It is necessary to eliminate defects such as peeling plaster or defective masonry.
Finishing work may include climbing plants, lanterns, gutters and similar elements. Using a spirit level, check walls and corners for accurate vertical orientation.
Identified irregularities (more than 20 mm) must be eliminated by installing a leveling sheathing. The lathing can also be installed if you need a ventilated façade.
Equipment
Additional elements
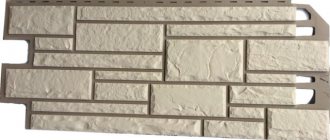
Here are the parts included in the cladding kit:
- Narrow long panels are the main element from which the cladding is assembled.
- The corner is external, usually 3 m long.
- The corner is internal, has the same length.
- The starting plank, into the protrusion of which the lowest cladding panel is placed. Installed above the plinth and above window/door openings. Typically 3.8 m long.
- J-section plank. This part covers the ends of the panels if the cladding is open. For example, if the siding is not installed along the entire perimeter, or there is an extension adjacent to the house, which it was decided to leave unfinished. In addition, the J-plank is used as a frame for gable trim, and if desired, it can also be used as a finishing strip.
- Planks with T-shaped and H-shaped sections. They are used to design joints between siding panels - mainly when extending them along the length. The length of one part is 3 m.
- Near-window slats. They are used in cases where windows and doors are recessed into the wall. Length - 3 m.
- Platbands. They are used for finishing openings, the filling of which - a window or a door - is located in the plane of the outer surface of the wall.
- Window tides. Before purchasing, you should make sure that you have not already installed them: these parts are usually supplied complete with metal-plastic windows.
- Drain plate. An additional accessory designed for installation above a window.
- Wind board.
Conclusions and final words of advice
Most siding manufacturers have their own installation nuances. They may vary depending on the panel collection. Therefore, it is important to read the instructions carefully. You can watch a video where everything is clearly demonstrated. Do not neglect the little things and details that you might not pay attention to during a cursory study of the issue: gap dimensions, rules for screwing in self-tapping screws, etc.
Unfortunately, these are typical mistakes made by many non-professionals, even among professionals who undertake installation for money. Visually, at first, the window decoration when covering a house with siding will seem correct and beautiful. But over time, problems will begin to appear: waves on the surface of the panels or elements falling out of their proper places. Or even worse: mold may appear under the cladding, which will gradually corrode the walls of the house. You will only find out about this many years later, when you change the cladding. And then the damage caused may no longer be repairable.
Therefore, if you are not confident in your abilities, entrust the work to a master.
And choose it carefully. After reading this manual, you now know many nuances. Don’t be shy to ask the installers about this. If they answer incorrectly, don’t answer, and even get angry at you for being too curious, most likely they are not competent enough specialists. And it's better to look for others. Return to list
Structures recessed into the wall
Window strips are ideal for cases where the window is recessed into the wall, but not too deep. Thanks to the use of planks, slopes can be closed. After this, the near-window strip is placed in the hole of the finishing profile. When joining planks on elements located vertically and which are connected to the slope, special cutouts should be made. Be sure to cut and bend horizontal elements. After this, finishing the siding around the window can be considered complete. Various design solutions used when installing windows have their own installation nuances.
If the window is recessed deep enough into the wall, then there is no need to use near-window strips. For this type of construction, only small pieces of wall panels are used. When installing, use a corner. Installation can be done using a special ebb. Its edges must be cut and folded under the vertical elements. To increase the reliability of fastening, be sure to use sealant.
Installation of siding on windows is carried out in the following order:
- First of all, a J-profile is attached around the perimeter.
- After this, the pre-prepared panel elements are installed on the walls.
- At the end, corner profiles are installed.
When installing, you should follow rules similar to the general installation of siding panels. Each connection must have a gap of 0.5 cm
Arched windows
This type of structure looks elegant, but its finishing gives owners some difficulties. Installing siding on arched windows is complicated by the fact that there is a curved part at the top of the structure. Usually for finishing they take a J-profile, which itself is quite flexible. But usually its cost is much higher than that of a regular profile. Because of this, they often buy not the J-profile, but its cheaper analogue. To do this, you need to make several cuts in the standard profile, which will be made on the mounting part, and then bent to create the required radius of curvature.
Alternatively, you can replace the arched opening with a polygonal opening. The design of an arched window should be done using the same technology, but the profile cutting should be larger. The convenience of bending the J-profile will largely depend on the material of manufacture. If we are talking about metal, then it will yield much harder than the same plastic. Creating an arc requires a radius of curvature, and vinyl siding is ideal. To make it easier to create a bend, first warm the material well, but do not overuse it - plastic melts easily.
If you take into account all the recommendations and rules, you can finish the windows quite efficiently and quickly. This will make it possible to save energy and time. If the cladding material is installed correctly, the window will look very beautiful.
Laying insulation
Insulation is recommended using mineral slabs
To create comfort in the premises of the house, you need to additionally insulate the facade near the windows and openings. Such insulation will play a dual role:
- firstly, heat will be retained inside during the cold season;
- secondly, the facade will not heat up in the hot season.
It is advisable to choose basalt fiber wool as the insulation material. Mineral wool not only retains heat, but also has high fire resistance, which cannot be said about some other materials. The only drawback of mineral wool is the possibility of its interaction with moisture - to avoid problems, waterproofing is placed on top of the insulation.
You should start laying the insulation from the bottom side. The first row of material should rest on the plinth or sheathing strip. Gaps should not be allowed to form - otherwise the properties of the material will not be able to fully realize themselves.
If you use polystyrene instead of mineral wool, the formation of cracks is inevitable. Get rid of them using polyurethane foam. The insulation is attached to the walls using plastic dowels.
When installing insulation around windows, the mineral slab is carefully cut to the required dimensions. It is desirable that the trimmed slab be slightly larger than the space between the sheathing profile.
External window trim with plastic
The use of sheet plastic allows finishing work to be carried out as quickly and accurately as possible. The panels have an aesthetic appearance, they are durable and practical.
They do not require additional finishing, since they are ideally combined with the material of the frames and form a harmonious and complete solution in tandem.
Advantages of PVC slopes:
- long service life;
- extensive color palette; low thermal conductivity;
- no condensation forms;
- resistance to moisture and mold formation.
Weaknesses of plastic:
- the need for replacement in case of damage - cannot be restored;
- low noise and heat insulating properties.
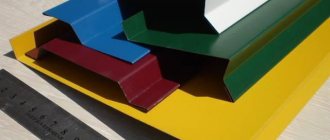
What siding is used for finishing window and door openings
To frame any opening, several main types of material can be used:
- Vinyl. This siding is made from a mixture of PVC and special additives and is very popular. This is due to the excellent qualities of the products, including resistance to precipitation, temperature changes and low weight. The undoubted advantage of the product is its affordable price, which is significantly lower than other types. When choosing a plastic material, take into account that products often available on sale are made from recycled PVC and are characterized by low performance properties.
- Metal. This type is superior to the previous version in many respects: the metal siding surface has better resistance to ultraviolet radiation, which significantly increases the durability of the coating, the material imitates the wood structure well and is classified as fireproof. Disadvantages include a higher price and the possibility of corrosion in damaged areas.
- Wood. This siding is also suitable for decorating openings. The cladding has an excellent appearance. Disadvantages: high cost and the need to apply a protective and decorative coating, since the production treatment gradually wears off.
In theory, metal and plastic slopes can be mounted on any siding, but in practice it is desirable that the slope material and the siding material match.
To decorate the house, different types of materials can be used: wall (facade) and basement, having different decorative coatings. Each option is suitable for framing a window or doorway.
Attention! For work, it is recommended to use only high quality panels and additional elements. Although the cost of such material is noticeably higher, this is compensated by durability.
Types of siding for windows
There are two types of siding for framing windows: vinyl and metal.
Of the two, vinyl is the most popular. And this is due to a number of factors:
- Less weight
- Affordable price
- Does not allow moisture to pass through
- Easy to clean
- Durable when used correctly.
- Aesthetic and neat.
Whereas metal siding can boast a long service life.
Considering that it is installed on the outside of the wall, it is deliberately covered with a layer of plastic.
However, it is easy to create various kinds of reliefs on plastic. Including repeating the shape of the wood.
Tools that may be useful for window framing
- Screwdriver and attachments for self-tapping screws.
- Metal scissors.
- Knife for cutting vinyl siding. Basically, it doesn't cut. They draw a line along the siding, and then break off the outer piece.
- Hammer.
- Tape measure, rulers and corner ruler.
- Laser or water level.
- Chalk for marking.
It is better to purchase all profiles and fasteners immediately along with the rest of the siding.
Because then you may not guess with the color. If the windows stand out a little, it's not so bad. But it’s visible.
We create a drawing and mark the following points on it:
- Width under frame
- Slope width
- Window frame parameters
- External sides of slopes
After calculations, add another 15% of the length of all materials for cuts and bends.
Installation features
1. Self-tapping screws must be made of stainless steel or galvanized.
2. Self-tapping screws must be screwed in only at right angles.
3. When screwing in the screw, the cap does not need to be embedded in the material. Since this is an external design, there should be some play. Otherwise it will come off under the influence of the wind.
4. If you plan to install a flashing, it should bury all the screws with the side.
5. Slopes from 20 cm are formed with a j-profile, tiles and external corners at the edge of the recess.
6. In Europe, windows are recessed to a depth of 20 cm. For these, a special window strip is used, the edge of which is hidden by the finishing profile.
7. If the window is flush with the wall, it is decorated using siding, platband or j-profile.
8. When designing an arch, a j-profile is also used. Often in a plastic version - for smooth bending.
Preparing slopes for windows
If there are cracks or holes, they must be plastered. If this is not done, the finishing will then disappear.
You also need to coat them with a deep penetration primer so that they do not absorb moisture from the air.
Before installing the sheathing, you need to calculate where the batten will be. It can be located vertically or horizontally.
Depending on how the panels and profiles will be located on the slope.
1. Measure the bottom of the frame
2. Set aside a distance on the platband equal to its width. From it measure a distance equal to the bottom of the frame. And also another segment equal to the width of the casing.
3. Cut off 45 degree corners on both sides and cut off the front side.
4. The side panels go through the same procedure.
5. The top bar remains intact.
9. You can alternate platbands and j-profile.
Tools for work
There are practically no differences in the installation of vinyl and metal siding in terms of technology. The same can be said about the tools used during installation.
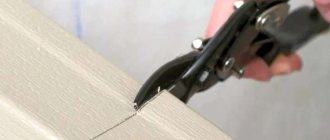
The only exception is cutting panels or additional elements - it is better to cut vinyl parts with a fine-tooth hacksaw, a hand-held power saw or, which is somewhat worse, a jigsaw.
The most suitable tool for cutting metal siding is tin snips or a hand-held power saw with a special blade.
A very convenient tool is cutting shears, which allow you to make cuts or holes of any configuration , which is convenient when it is necessary to design elements of a non-standard shape.
CAREFULLY!
Cutting metal siding with a grinder is prohibited. In this way, the protective coating will most likely be damaged, resulting in the immediate onset of corrosion processes that destroy the material.
The remaining instruments are almost identical in composition:
- Ruler, tape measure.
- Pencil, chalk for marking.
- Hammer.
- Cutter knife.
- Screwdriver, screwdriver, electric drill.
- A square, in some cases a protractor is convenient.
- Building level.
- Hammer.
The listed tools are a general set; in special cases, additions to this list are possible.
If the slope is more than 20 cm
See also:
Is it necessary to prime the bark beetle before painting: let’s look into it in more detail
This applies to deep-set windows. In this case, at the first stage, the ebb is installed. It needs to be made 20 mm wider than the slopes themselves.
When you make a metal casting based on the size of the window, do not completely cut off its side parts. It is better to straighten the remaining strips vertically and secure them to the wall using appropriate screws. Before fixing the molding to the wall, apply good liquid nails to this area.
If you are faced with a situation where the window recess is more than 20 cm, then you need to install a sheathing. Determine the right angle and screw the starting profile according to it. Cover the slopes with siding panels, and also cover the joints around the perimeter using external corners.
In areas where the siding is connected to the profile, there is no need to leave gaps. The rigid principle of fixation is applied here.
If the window has a semicircular shape, then use a flexible profile J. If you do not have an elastic profile, then use a regular one. But then it will need to be cut along the bar. When fastening, adhere to a step of 150 mm.