It happens that several small abrasions, cuts, torn pieces or painted areas appear on the wallpaper at once. Most often this happens in the nursery.
Conclusion
Now you know how to seal a hole in wallpaper with your own hands. To do this, you only need a sample of the same fabric, a sharp knife, PVA glue and a little time. I recommend watching the video in this article. In the comments you can ask questions that interest you.
With proper wallpaper restoration, it is not possible to detect the restored area during a quick inspection.
Household tricks
To the question “how to fix a hole in the wallpaper?” more often they approach it in a simple and logical way - hide it until renovation time. Here you can come up with many ways, using items available in the house.
Use of paintings, photographs
What's the fastest way to fix a hole in wallpaper on a wall?
If damage is found near the desktop, or at a height inaccessible to children, then an excellent solution would be to decorate the area with a photograph or picture.
In the paper version, they easily “sit” on stationery or PVA glue and are secured with double-sided tape. Buttons are used less frequently. Another method involves driving a nail or screwing a self-tapping screw to hang a neat frame.
Decorating with stickers
The modern market is replete with a wide variety of decorative items with an adhesive substance on the reverse side, represented by flat and textured objects, and canvases in rolls. This is an easy way to close damage. You can also simply attach a self-adhesive hook under a towel, oven mitt, robe or jewelry.
A bit of classics
How else to disguise a hole in wallpaper? For those who like to control the minutes and keep track of dates, hanging a clock or gluing a calendar or a pen with a stand would be an excellent solution.
If you are interested in retro-style things, then a tear-off calendar with a notepad on a spring tie will be the solution.
Some may find it more interesting to attach a telephone charging unit or a traditional device with a handset.
Hanging items
For children, dart targets and basketball hoops of various formats are placed in this way.
Rearrangement of furniture
How to decorate a hole in wallpaper without paintings, stickers and clocks? This approach is good because you can make the long-awaited rearrangement and place another floor shelf. Disguising one small hole in the wallpaper will take time and physical strength. But finally there will be a reason to change the situation.
Masterful approach
How to seal a hole in wallpaper with scraps from repairs? Finishers recommend two ways to solve the problem. The painstaking option involves restoring the edges with shading the tear lines, for example, using cosmetic shadows, children's crayons or watercolors. The second method involves completely replacing the damaged area. It would seem that it would be more difficult to work on restoring the canvas, but it is better to consider the patch method in more detail.
Required Tools
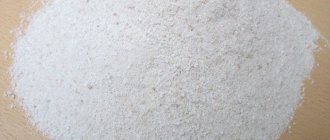
If the damage was caused by an impact load, causing a depression to form on the base, then you will need to acquire a small amount of putty. You can buy a small jar of wood finishing paste, it comes in colored and white. The application layer is approximately 1 mm. The material dries quickly, so you can repeat the procedure for better alignment. The coating is easy to sand. For this you can use:
First, in the exposed area, you need to remove dust and remnants of the wallpaper backing. The surface must be impregnated with a primer. You can apply a construction primer with a sponge, rag or brush or prepare it yourself from wallpaper glue or by mixing PVA with water.
Replacing a damaged fragment
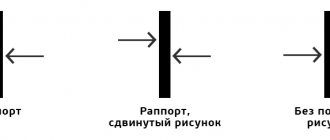
We select an identical segment from the remains after repair based on texture and pattern. Apply to the damaged area. It is important to press it so that no discrepancies occur when cutting through the two blades.
The cuts should be made at a slight angle relative to the plane away from the hole. This way the patch will fit neatly into place, you won’t have to insert it and worry about the edges. The angle is kept small, approximately 70 degrees. We apply the resulting sample to the area being repaired and check that the edges match.
Next, we prepare the work area for gluing the flap. Regarding the latter, it is necessary to follow the technology, despite the small size of the patch:
You cannot use a lot of glue, as it will need to be removed later.
Press the finished flap gently, without strong pressure. We correct the edges with our hands or a wallpaper wing.
Immediately blot off excess glue with a clean, dry sponge. After 15-20 minutes, you can wipe the wall with a slightly damp cloth.
What to do with bubbles
The air under the wallpaper often attracts attention. From a technical point of view, it leads to peeling of the canvas or rapid damage to the swollen area. You can correct the situation using a construction knife or a syringe with a thick needle. First you need to make a cut at an angle, spread the adhesive solution with a blade and press the wallpaper with a dry, clean cloth without moving to the sides. Because of this, the material is deformed. Using a syringe, simply inject glue closer to the edges of the swelling; using a rag or sponge, move excess adhesive towards the center (where a small inlet hole is made).
Bloating from humidity
Typically, bubbles on wallpaper appear where there is contact with moisture, or the humidity in the room where the new decoration was made is constantly increased. If you used too much primer before gluing the paintings and did not allow the composition to dry, bubbles can form literally immediately after the repair is completed.
Small single blisters can be removed in a matter of seconds. It is enough to pierce their central part with a thin needle, release the air and inject a little glue inside. After smoothing the canvas with a roller, the bubble will disappear.
Important! If there are a lot of blisters on the wallpaper strip, it is better to carefully remove it and re-glue it.
Non-standard solutions
How to close a hole in the wallpaper in a house with animals when the finishing on the corners periodically gets damaged? Here, the optimal solution would be to cover favorite places with corrugated cardboard, pile sheets, painted sheets of hardboard or plywood. You can also glue wall panels about 1 meter high to create a nice overall design.
How to decorate a hole in the wallpaper on the wall in a children's room? Children really love areas of attention that are created just for them or for the whole family. These can be magnetic boards, large Whatman notepads. You can also make appliqués from various materials: wallpaper, colored paper or woven scraps.
A creative approach contributes to the design of entire textured paintings. The origami technique is applicable here, assembling flowers from various materials; cross-sectional design modeling (houses, airplanes, steam locomotives) looks attractive.
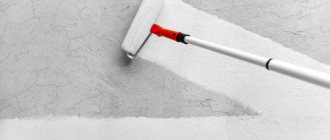
Today, a type of decorative plaster called “liquid wallpaper” is gaining popularity. This is a material that consists of cotton, cellulose and silk. It is easy to prepare the solution using warm water. You can take an inexpensive sample in white or grayish design. Then, with the help of tinting paste, the composition can be transformed. It is not necessary to use the entire package; it is enough to seal the excess and place it in a dry, shaded place. If you are tired of one patch, you can soak it, remove it and replace it with a new one.
This reusable method does not contain harmful additives, so it is suitable for finishing in children's rooms.
You can make voluminous patches from liquid wallpaper. Apply an additional layer of decor with a soft rubber spatula or using a plastic stencil 1 mm thick.
Source
Repair using leftover wallpaper
The most common way to fix damage to a wall is to use a patch. Pieces of wallpaper left over from the renovation will come in handy here. The location of the defect must be carefully cut out with a stationery knife, and then a patch must be prepared. Its dimensions should be slightly larger than the damaged piece. Using glue, new overlapping wallpaper is glued to the empty space. When the glue dries, the edges of the patch need to be trimmed so that the pattern matches. In this case, the patch will remain invisible, and the wallpaper will again delight the owner.
A hole in the wall
There is a small hole in the wall - a shelf was hanging, they removed it, and what was left was a deep drilled hole (approximately 1-1.5 cm in diameter). What can I cover it with? All around there is smooth white paintable wallpaper without a pattern, painted. Need putty? I don't want to buy a jar because of one hole. Maybe there are still ways and materials. And in general, what do they do in such cases. I'm thinking about carefully covering it with something and painting everything.
Masters online: 537 Orders per week: 1,946 Offers per day: 666
Buy white paintable sealant and use a gun to pump it into the hole and then paint it. It will be completely invisible
carefully cut out a piece of wallpaper and make a patch without overlap from the wallpaper, fill the hole with paper, level it with a hammer, paint it will be invisible
fill with white sealant if you don’t want to bother with putty
Covering it with Rotband and painting it will be perfect
You can carefully cover it with plaster, it is sold in small packages, acrylic sealant is expensive, not all of it will go away and when it dries it will shrink.
You are thinking correctly. . ) Good luck.
YOU CAN SEAL THE HOLE WITH PUTTY AND THEN AFTER DRYING, GRIND THE SMALL HOLE WILL NOT BE VISIBLE ON THE WALLPAPER
you take a little putty powder, mix it with paint (there’s probably a little left of the wallpaper after painting), carefully close the hole, trying to stain the wallpaper as little as possible and wait a day, smooth it out with zero sandpaper and it’s in your pocket
It all depends on the depth of the hole. If the hole is deep, then sealing is definitely done with polyurethane foam (and there is no need to save on repairs, after a while everything can cost a pretty penny), then cut off the excess with a knife deeper, and coat the hole that formed with acrylic sealant, remove the excess with a wet cloth, then you can paint , glue wallpaper, whatever you want to plant a “butterfly” in this place. Such problems can be solved easily and most often independently. But the advice they give is not always correct.
Agree. Apply WHITE sealant and lightly touch up. And if you show your imagination, you can stick something on it, some kind of drawing or something else. Imagine and everything will be beautiful.
What to do if there is no suitable wallpaper
There are situations when it is impossible to glue a patch to areas of wallpaper with a defect. The remnants have not been preserved, and the store no longer sells similar goods. In this case, you can resort to various methods of masking the damaged coating.
If the renovation was done recently, but the wallpaper is already damaged in places, this is not a reason for sadness. Thanks to imagination and modern materials, a damaged place can be easily decorated. Unusual solutions will add novelty and bright colors to the interior.
Source
How to hide holes from self-tapping screws in wallpaper. How to mask holes from self-tapping screws
If you no longer need screws on a certain place on the wall or even on furniture, it would be best to mask the holes left by them. It doesn’t matter whether they are noticeable to your eye or not. Let's find out how to do this.
Toothpaste
The first method of masking involves using toothpaste. Simply apply it to the holes using a knife (or flexible eraser) as a putty knife. True, you should first add crushed aspirin to it so that it becomes more matte and invisible. The paste is best suited for white walls. If your walls are a different color, wait 24 hours and paint over the area with a pencil of the desired shade.
Soap
In order for this method to work, almost nothing needs to be done at all. With great diligence, but carefully, rub soap on the wall with your screw hole to disguise it. Soap shavings will fall on the floor, and you will have to clean up later. It is better to remove residual shavings from the wall around the hole with a damp cloth.
Like a professional
If you want to cover screw holes like a professional, our instructions will come in handy.
First, sand the wall.
Then fill the hole with a special paste, which is sold in a building materials store or hypermarket. After the aggregate has dried, you will need to plaster and paint the wall. True, not everything is so simple. Even if you take the paint that was used to paint the walls before, due to time (walls change color from the sun, humidity, time) the shade will be different. It is better to choose a shade that matches the current color of the walls (usually a tone paler and lighter).
Tell:
About Us
Furnish Home is an online magazine dedicated to architecture, interior design and modern furnishing of your current and future home. Our mission is to help you make your homes more beautiful and comfortable.
How to replace part of the wallpaper on the wall? Masking torn wallpaper
During use, small scratches on the wallpaper can occur even for the most thrifty owners. Most often these are marks from cat claws or a dent on the wall due to careless rearrangement of furniture. Many people believe that if the wallpaper is torn, there is no point in decorating the defects; it is better to re-glue the wallpaper.
If the problem is large-scale, then the only correct solution is a complete update. But sometimes it’s enough to just glue the torn fragment back or disguise the flaw with a painting, a photo in a frame, a flowerpot with a flower or any other decorative element.
Material rupture
It happens that a piece of material simply breaks out. This usually happens in homes where families with small children or pets live, or when furniture is moved carelessly.
The hole can only be sealed with a patch cut from the base material, otherwise it will immediately catch your eye. The easiest way is to choose a piece of plain wallpaper or covering with a small ornament.
Advice! It is better not to cut, but to tear off the patch - this way its edges will adhere more reliably to the surface.
You can glue a piece of wallpaper using any wallpaper glue, paste, or PVA. If during the renovation a whole strip of wallpaper remains, it is easier to re-glue it completely - this way the defect will not be visible on the wall at all.
How to disguise peeled wallpaper
Sometimes the problem occurs gradually. Small cracks appear on the wallpaper, the edges begin to move away from the wall, and joints become visible. It is obvious that the repairs were carried out incorrectly, in a hurry, with the hope that the wallpaper would hang normally, but it did not work out.
We advise you to pay attention to the little things when working with wallpaper. Control the process. It is better to correct all the defects at once than to re-do repairs and figure out how to disguise the defects.
But the beloved Barsik is difficult to control. The wall is torn, the cat likes it, but you don’t really like it. What to do? To remove scratches on wallpaper, you will need:
Pets can tear even the most durable wallpaper with their claws
Repairing damaged wallpaper occurs as follows:
If the scratch is large, the damaged area must be carefully separated from the wall, coated with glue, and the glue must be applied to the wall as deeply as possible. Cotton swabs are ideal for this. The technology is also suitable for situations where you need to glue the edges of wallpaper. If the detached edge fits clearly on the old place on the wall, then everything is simple.
If the loose edges are torn, a patch may be needed, so always save any remaining finishing materials after repairs.
The patch requires strict alignment of the pattern. Make it with slightly larger sizes to accurately align the old panels and the new piece. The required fragment is cut out very carefully using sharp scissors.
Repairing minor damage
Minor wallpaper defects include scratches; this is the most common household defect that occurs in almost everyone. Removing scratches does not require special skills; all you need to do is prepare the necessary tool and use it.
To work with minor damage to the wallpaper we will need:
- PVA glue in a small bottle,
- material for wiping the glue, preferably a rag that does not leave fibers,
- glue brush,
- household hair dryer.
Scratches are not visible on all wallpaper, it all depends on their depth and the texture of the material.
The method for eliminating scratches is as follows:
- carefully apply PVA glue to the scratch using a thin brush,
- press the wallpaper to the wall in this place using a cleaning material,
- remove any remaining glue,
- If necessary, heat the area where the glue is applied with a hairdryer, press the wallpaper tightly against the wall and wait for it to cool.
The above described manipulations should be enough to eliminate a small scratch, but if it is large, you will have to complicate the task slightly.
To eliminate a large scratch, you need to slightly separate the wallpaper from the wall, carefully coat the wallpaper, trying to reach as deep as possible with a brush, press the coated piece firmly, remove any remaining glue and heat the working surface with a hairdryer.
For deeper treatment of the glue, you can use a cotton swab. In addition, it is important to apply glue to the entire surface of the wallpaper separated from the wall. Nuances play an important role, we remember this.
The scratch on the wallpaper has been fixed, now let's move on to gluing the edges of the wallpaper. It happens that the edge of the wallpaper has moved away from the wall and is bent, something needs to be done.
We apply the method described above, slightly modernizing it.
Still think that wallpaper on your walls looks bad?
If the detached edge of the wallpaper in its shape clearly matches the bare wall where it previously hung, it is not torn, or torn only slightly, and when connected to the wall, the general appearance of the wallpaper will be restored, then in this case it is enough to glue the edge back.
We carry out standard manipulations: carefully and thickly coat the edge with wallpaper glue, apply it to the wall and smooth it out, remove the remaining glue with a rag and, if necessary, dry the area with a household hair dryer. Such a simple and quick wallpaper repair should restore the original appearance of the wallpaper.
If the detached edge of the wallpaper is torn, if it has a missing part, then you will have to use a patch in this place.
Making a patch involves using the same type of wallpaper that is pasted on the wall. Select the pattern and color of the wallpaper, combining them at the location of the defect. To use as a patch, we will need a piece a couple of centimeters larger than the one that came away from the wall and was torn. This is done in order to successfully combine the old wallpaper and the new piece so that the seam is perfect.
How to replace some wallpaper on a wall
If the wallpaper is damaged over a large area, you will have to completely remove it in that area and apply a patch. Replacing some of the wallpaper will require a lot more effort. The main emphasis is on accuracy.
Attention! To remove is not just to rip it off. In our case, we need to carefully cut out an even figure on the wall, this will make it easier for us to fit the patch, and replacing part of the wallpaper will be perfect.
If the damaged area does not peel off well from the wall, you can wet it with water or apply a special wallpaper remover.
Do-it-yourself wallpaper restoration occurs in the following sequence:
For all the details on how to apply a patch to wallpaper correctly, watch the video:
The glued patch is several centimeters larger, so it overlaps. We remove it with a sharp knife, cutting along the joint between the patch and the old panels. This creates a perfect connection that will be almost invisible after drying.
How to hide holes in drywall. How to repair a hole in drywall on a wall?
The technique for eliminating a defect in the form of a through hole can be performed in 2 ways. And the specific one is selected depending on the size of the hole.
Filling small holes
There are several materials you can use to fill a hole in drywall on a wall. Small holes with a diameter of less than 10 mm (from self-tapping screws, anchors, etc.) can even be filled with acrylic-based sealant, which is leveled flush with the surface.
Holes with a diameter of up to 30 mm are sealed as follows:
- The inner edges of the hole and the area around it are primed.
- A homemade plug is prepared from any available material (paper, foam), the edges of which are coated with glue, and inserted into the hole.
- Puttying the repaired area after the glue has hardened and finishing.
Another option for eliminating minor damage is considered in the following
It is more advisable to repair through damage with a diameter of 30 to 100 mm using patches. To do this, use a drill with a crown with a diameter slightly larger (5-10 mm) than the size of the hole to expand the hole. If such nozzles are not available, the hole can be made square manually.
Next, a square is cut out of the plasterboard sheet with dimensions 40-50 mm larger than the hole. Using the same crown, carefully drill out the patch from the back side of the square so as not to damage the front cardboard layer.
Photo 2. The process of making a square liner
The cardboard remaining around the perimeter of the round patch sticking out after cutting is carefully removed - you should get a rounded liner with smooth edges. The landing site and the patch element itself are primed. After drying, the edges of the hole are coated with putty, a prepared liner is inserted into it, the surface of which is leveled with the wall. Excess putty is spread with a spatula over the surface to be repaired.
Another, but less reliable way to seal small holes:
- Serpyanka is glued over the through damage.
- Then puttying is done.
- After the putty layer has hardened, another piece of serpyanka is glued on, followed by putty.
- After the 2nd layer has hardened, another layer of putty is applied.
How to glue fallen wallpaper
A more global problem is that the wallpaper begins to fall off in entire sheets or peels off from the wall near the ceiling, floor or in the corners. These are the most difficult areas during repairs and this is where defects form. To glue fallen wallpaper, you need to move its edges away from the wall and study why the peeling occurs.
If you need to glue the edge of the wallpaper, you need to apply the glue as deeply as possible
The main reasons for wallpaper peeling off the wall:
To prevent the problem from recurring, you need to study why it happens. The wall will have to be well prepared for wallpapering.
Falling off wallpaper is only applied to a clean surface.
How to glue wallpaper that doesn't stick to the wall:
To speed up the drying process, you can use a household hair dryer. In addition, by heating the joints, you can strengthen their contact with the wall and perfectly align them. To achieve the desired effect, press the joints against the wall and wait until they cool completely.
How to secure a cable to a wall without drilling. Methods of attachment to different surfaces
Walls and ceilings are made from various materials with different structures and densities. Depending on this characteristic, the method of fastening changes:
- Dense - wood in any form, plaster and soft plaster solutions (including gypsum). A nail or self-tapping screw fits perfectly into all these materials. In some - chipboard, OSB and some others - it is better to first drill a hole with a slightly smaller diameter than a self-tapping screw, and then screw it in. Nails are often driven in immediately without pre-drilling.
Self-tapping screws are screwed into wood and products made from it. Only for attaching the cable it is better to take them with a flat head
- Solid. This category of materials includes brick, concrete, screeds, and cements. You can’t screw a self-tapping screw into them even with a pre-drilled hole. For such materials, dowel-nails are used (they are also called dowels). This is a fastener consisting of two parts - a plastic dowel cap and a metal (sometimes plastic) screw. In such cases, a hole is drilled in the material with a drill diameter equal to or slightly smaller than the diameter of the dowel. A plastic cap is inserted into the hole. Its top edge should be flush with the surface (if necessary, you can hit it a couple of times with a hammer to level it or cut off the excess with a sharp knife). Then a fastening element (plate, clamp, etc.) is applied, which is attached to the inserted dowel with a screw.
Dowel installation
- Thin or soft. These are plastic, plasterboard, fiberboard, aerated concrete, foam concrete, etc. The usual fasteners do not hold in them; you need a special one, which has an extended “back” part. It has a large support area, due to which the fasteners can be held. Some examples of such fasteners (umbrella, butterfly dowel and dowel with drill) are presented in the photo.
How to fix loose joints on wallpaper
The next problem is loose or poorly joined seams. The defect is formed after gluing paper wallpaper, which can stretch slightly under the influence of moisture. After drying, such stretched canvases shrink, leaving a gap between the joints.
Even small gaps are clearly visible on bright or dark wallpaper if the base plaster is gray or white. Experienced craftsmen prefer to paint the joints with paint that matches the color of the rolls being prepared for gluing.
Joints can be corrected using putty and color when complete masking of unsuccessful joints is achieved:
After drying, the joints can be visually noticeable only from a very close distance, but are absolutely indistinguishable from afar.
How to hide torn material?
Quite old wallpaper can peel off, and torn material can hardly be called interior decoration. If this happened on top or on the sides of the canvas, then it will be enough to glue the wallpaper to the wall.
Attention
Attention! When re-gluing, it is necessary to saturate the edges of the canvas with glue. If the wallpaper is thick, then more glue is required.
If it is impossible to seal up tattered wallpaper, for example, torn by a cat, then you can decorate it with various materials, or temporarily cover it with furniture. If the damage is small, then you can cut out a piece of torn wallpaper and glue a fresh one in its place.
Why does wallpaper peel off - recommendations for preparing walls for wallpapering
Many problems with pasted wallpaper could have been avoided if they had been applied correctly. Properly preparing the surface, following instructions, and using modern materials and tools are the main key to successful repairs.
Basic rules for wallpapering walls
Let us repeat a number of important aspects that should be adhered to when working with wallpaper:
You can repair damaged wallpaper yourself if you follow our recommendations. You will return them to their original beauty without much expense. For the future: there will be no problems if you always strictly follow the instructions!
Source
How to remove claw marks from wallpaper?
Well, what can you do, domestic cats love to tear up wallpaper. ... The cat scratched the wallpaper? A simple restoration method.
- Apply a thin layer of glue to the surface of the wallpaper. ...
- Then heat up the iron and turn off the steam mode. ...
- Having ironed the entire restored surface, replace the sheet of paper and repeat the procedure to consolidate the result.
18 Feb
2022 Interesting materials:
Can an electric kettle be washed in the dishwasher? Can enamel pans be washed in the dishwasher? Can I wash my cap in the washing machine? Can leather sneakers be washed in a washing machine? Is it possible to wash a car with white spirit? Can a blanket be washed in a washing machine? Can the pillow be washed in the washing machine? Is it possible to put vinegar in the washing machine? Is it possible to leave the washing machine? Is it possible to leave things in the washing machine?
How to decorate with your own hands - options, photos
There were scratches from pets, tears in the wallpaper, loose joints, and abrasions. Young artists left drawings, greasy stains formed - all this can be eliminated if you know a few simple techniques.
How to improve the appearance of seams and joints?
It happens that the joints on the wallpaper begin to diverge. You can connect them yourself:
Such a seal is not visible either close up or from afar.
Sometimes the edges of the wallpaper rise like a house along with a thin layer of plaster. To solve this problem, clean the raised edges from adhering particles, lubricate them thoroughly with glue and press them against the wall using a rubber roller. Make sure that no bubbles form (you will learn why bubbles occur and how to remove them here). Repairs to joints should be made with glue designed specifically for this work. They have better grip and drying.
When working with wallpaper, it is better not to use PVA glue , because yellow spots may appear.
You can learn more about the causes of yellow spots on wallpaper and how to eliminate the problem here. We talked in more detail about how to repair wallpaper joints in this article, and you can find out how to join wallpaper when gluing it so that it does not separate, you can find out here.
How to decorate old, tattered ones?
Are you tired of the old wallpaper, but you still can’t hang new ones? There are several ways to liven up your interior.
We apply water-based paint in a thin layer so that the wallpaper does not swell. An interesting effect can be achieved if you use the technique of glazing with flakes: apply special decorative flakes evenly with a brush onto the painted wall - a shine with a pearlescent tint will appear on the surface.
If you doubt that the result of painting will please you, experiment on a separate piece of wallpaper, if there is one left after the last renovation.
Making such a “picture” with your own hands will not take much time and will help complement the interior. Or you can simply cover up imperfections in the wallpaper by hanging family photos or buying inexpensive posters or paintings.
How to improve torn ones?
How can you hide stains?
Several of these paintings with similar patterns - for example, geometric ones - look especially interesting. Or, if it is one drawing, divided into three elements (pictures).
You need to cut with sharp scissors so that the edges of the pieces of the design are neat. You can make a sketch of the future drawing, so that later you don’t sculpt it haphazardly. Glue your original design with wallpaper glue. It is not necessary to make the drawing complex, since our goal is to hide the stain.
As you can see, decorating wallpaper is not so difficult . You need to choose the method that suits you. Don’t rush to throw away pieces of interesting wallpaper after renovation. Call on your ingenuity and imagination and creative ideas will appear. Your room will sparkle with new colors and become incomparably more comfortable.
Source
Repairing damaged wallpaper: we restore it ourselves
Damage to wallpaper can occur for various reasons: during rearrangement, furniture was carelessly moved and caught on the wall, a pet sharpened its claws, recommendations for wallpapering during repairs were not followed, and much more. The nature of the damage can also be different, ranging from minor scratches to the appearance of a bubble in the middle of the wallpaper.
Photo: you can do everything yourself
There are many reasons, but you need to somehow correct the detected defects, which can be done with your own hands. Correcting each such damage requires its own approach.
Minor defects on the wallpaper
For example, scratches on damaged wallpaper can be fixed like this:
- prepare the tools and material: you need PVA glue, a lint-free cloth, a thin brush and a hair dryer;
- coat a small scratch with glue using a brush and press this area with a rag, removing excess glue;
- if the scratch is still visible, turn on the hairdryer and warm up the area, then press the area of damaged wallpaper until the treated area cools down;
- if the scratch is large, then carefully bend the edge, coat the wallpaper with glue and repeat the steps described above. Instead of a brush, you can use a cotton swab to reach the furthest point of the scratch. Try to apply glue to the entire surface of the damage.
Photo: liquid wallpaper is also easy to repair
The same method can be used if the edge of the wallpaper is hanging, but has not come off completely.
- Place it in place to see how it looks after gluing. If the result satisfies you, then coat this piece with glue and, smoothing it with a damp cloth, remove excess glue; you can also warm this place with a hairdryer. If done correctly, there should be no trace of damage left.
- In case of more serious damage, when only an incomplete fragment of wallpaper remains, it is necessary to make a patch. Find a piece of wallpaper that is the same color and pattern, hold a piece of cut wallpaper against the wall to match the pattern, and select a piece that is an inch larger than the damaged area. Cut it out, and if it is thin paper wallpaper, then carefully tear off the desired section of the wallpaper, since thin torn edges will stick to the wallpaper better and will be less noticeable on light-colored wallpaper with a small pattern. Apply glue and glue the wallpaper, smoothing it with a rag. You don't need to press too hard so that the patch doesn't move. Please note that you need to use specialized glue that matches the type of wallpaper. For example, repairing non-woven wallpaper for painting is done using one glue, and paper wallpaper using another. Otherwise, the patch may not stick or fall off after a short time.
If desired, girls can also handle the restoration
Correcting serious defects in wallpaper
If a larger piece of wallpaper is damaged, then this section should be cut out and removed from the wall. If damaged wallpaper does not come off the wall well, you can moisten it with water.
- You need to find exactly the same wallpaper and adjust the pattern if necessary. Cut the wallpaper so that the new piece is five centimeters larger than the old section.
- Next, you should coat the wall and the patch with glue, glue it, press and smooth it so that there are no air bubbles left. The edges of the patch end up overlapping, so we cut off the excess areas with a sharp painting knife so that the cutout fits along the joint of the pasted wallpaper. Thus, the replaced area will be practically invisible.
The wallpaper has come off the wall
If the wallpaper lags behind the junction of the wall with the ceiling or floor, you need to carefully bend the canvas and fix it in this position. Be careful not to tear the wallpaper further.
- Now we need to find out why the wallpaper did not stick to the wall. Perhaps the wall was poorly prepared and the old plaster, which had fallen off, was not removed. You should remove all crumbs and vacuum away dust and debris, then plaster the wall and wait until the layer of plaster dries.
- If necessary, you need to prime the wall.
- Now coat the wall and wallpaper, press the wallpaper against the wall and smooth it to avoid voids under the wallpaper, remove all excess glue with a cloth. For strength, you can heat the joints with a hairdryer and press with a rag until the seams cool.
Armed with knowledge, you can cope with even such a difficult task.
Gaps at the joints between the wallpaper
Now let's look at the case when gaps appeared between the joints of the wallpaper. If during the repair you glued the wallpaper joint to joint, then there may be a gap at the joints, and therefore a gap may appear. If the wall is a very different color from the wallpaper, it will look bad. You can prevent such a defect in advance and, by measuring the wall, find out where the edges of the wallpaper will meet. In those places, paint the wall with paint that matches the color of the wallpaper, in a narrow stripe. This will mask any gaps between the wallpaper.
If you have not provided for this, then you can disguise the defect by using one-color putty, the color of which matches the color of the wallpaper. It is necessary to coat the resulting gaps with your finger, wipe with a rag across the seams until the putty dries, and wipe off the stains on the wallpaper with a clean, dry rag.
We smooth uneven joints using a special roller
Preparing walls before pasting
To avoid such cases, it is necessary to carefully approach such a responsible task as wallpapering. After all, wallpaper is glued for a long time, at least until it loses its appearance and becomes faded due to exposure to the sun or humidity in the room.
- If you decide to restore the wallpaper, then remember: the first step is always to remove the old layer. Wet them with water and they will come off the walls in larger pieces more easily. After removing the old wallpaper, prepare the wall for wallpapering.
- It is necessary to remove all the paint to which the wallpaper does not want to stick, clean and remove the putty, which crumbles and falls off.
- It would be a good idea to check the fastenings of sockets and switches located in the wall, secure them and putty them so that later the socket along with the wallpaper does not fall out in these places.
- Check the corners of the room; if they are too uneven, smooth them out with putty.
- Use a primer designed for the material from which the walls are made. In order for the wallpaper to stick well to the wall, it must absorb moisture, otherwise the wallpaper will take a long time to dry and may not stick to the wall.
- After pasting, avoid drafts. The room should not be too hot. Wallpaper glue must match the type of wallpaper. For non-woven materials, one glue is used, for textile ones - another, and so on. Do not use too hot glue; its temperature should not exceed thirty degrees. When repairing, constantly monitor the quality of your work, because it is much easier to fix immediately than after the wallpaper has dried.
We recommend watching a training video (how to restore wallpaper):
We can only hope that you will be satisfied with the DIY repairs made, and that various defects will not appear on the wall that could overshadow the joy of the repair.
Elimination of defects on walls. How to disguise wallpaper?
When gluing wall coverings, some problems may arise. If the gluing technique has not been followed, damage may appear after some time.
They may also become dirty or have other types of defects. To avoid complete re-gluing due to one damaged sheet, you need to know how to correct defects. In the article we will tell you what types of defects there are, how you can hide seams and other defects with decorative elements, and also how to disguise overlaps.
How to repair a hole in a wall - photo review of practical ideas and tips from experts
Life is an unpredictable thing, such things happen in it that it is better not to remember them. So for some reason a hole appears in the wall and you need to get rid of it. How to do it? Yes, it's very simple.
This article provides step-by-step instructions from professionals in their field. Don't be afraid to take on repairs. After all, as they say, “the eyes are afraid, but the hands do.” Moreover, any person can cope with this, the main thing is to understand the technology.
When choosing a sequence for repairing a hole, you must take into account the wall material and the parameters of the hole. The wall may be brick, concrete or plasterboard, and the hole may be small, large or medium.
So, based on these parameters, let’s figure out what’s what.
Types of defects
Defects occur under random circumstances or due to improper gluing technique; in any case, they look unpleasant and spoil the entire appearance. Unnoticeable stains or holes are usually not noticed immediately. But as soon as they are discovered, they should be removed immediately. To do this, it is not necessary to re-glue the entire canvas. It is enough to know certain methods to solve the problem.
Joints
Joints are vertical lines that highlight the edges of the canvas (how to join wallpaper correctly?). The reason for their appearance is incorrect gluing technique or incorrectly distributed glue on the wallpaper and wall. Often, defects lead to joints (how to repair wallpaper and joints if they have come apart?).
To avoid the appearance of joints between the wallpaper, it is enough to follow simple rules:
If the wallpaper is plain and the pattern is far from the edges, then you can solve the problem of joints with paint. When choosing paint, you should take into account its consistency with the colors of the wallpaper. Apply toner to the joint with a brush, and wipe the surface of the edges of the canvas with a napkin. The more patterns and details there are on the wallpaper, the more difficult it is to choose the right paint color.
There is a second way to fix joints:
Holes
If damage occurs in the form of holes, it is easy to fix. For this you need:
The patch should be fixed so that there is not even the slightest gap between it and the wallpaper.
If the hole is not in the wallpaper, but on the wall, then the correction scheme will be different:
Scratches and cracks
Scratches come in different sizes. The amount of work directly depends on this. If there are a lot of scratches over the entire surface of the canvas, then plywood would be the best option (how to glue wallpaper correctly?). And if the scratch is on one section of the wall, then it’s easier to fix it.
To work you will need:
Stains
Stains can be of organic or inorganic origin. There are many types of stains, but they can be corrected in many ways.
Stains can ruin the appearance of the apartment and need to be corrected immediately. There are greasy stains in every apartment. If there is wallpaper in the kitchen, then this kind of pollution will definitely appear. If grease appears on vinyl wallpaper, it will be easy to remove. Also, wallpaper based on non-woven fabric prevents fat from penetrating into the structure of the fabric. The water-repellent effect allows you to use detergents to remove stains.
There are several ways to get rid of grease on wallpaper:
Yellow spots may appear on wallpaper due to faulty water pipes. Often such spots appear on light-colored wallpaper. Such streaks on the walls give the impression of an uncleaned house. But you won’t be able to remove them using normal methods. They are either re-glued or the spots are decorated with various materials.
In the photo you can see how you can hide seams and other defects with decorative elements.
What you need
To carry out the work, it is necessary to prepare the following tools and materials:
- wallpaper that matches the pattern and texture (it is best to use identical pieces);
- construction knife;
- adhesive composition. In most cases, high-quality and inexpensive PVA glue will do, but if you have to work with heavy vinyl or silk wallpaper, it is best to give preference to special compounds that are designed specifically for them. In addition, glue can be made independently using starch;
- a spatula for removing part of the damaged wallpaper and cleaning the wall from glue residues. It is best to choose small tools with a sharp edge;
- clean cloths with which you can wipe the wall after gluing the wallpaper to it;
- tools for applying glue. These can be special brushes, rollers, and if they are not available, a regular foam sponge for washing dishes will do;
- pencil or marker for marking the area.
Masking the overlap
Before correcting the overlap, it is necessary to understand the nature of its occurrence. If an overlap appears after the wallpaper has dried, this means that the wallpaper took its original shape after applying the glue.
To remove the overlap, you need to do the following:
It is worth considering that these actions must be performed quickly. The glue sets quickly.
An overlap means that a mistake was made when gluing. More precisely, the canvas was not fixed in accordance with the level of the wall. The best way to get rid of overlap is to re-glue the fabric.
Masking seams
The wallpaper joints are glued as follows:
Gluing wallpaper joints
- Using a thin brush, carefully coat the folded joints of the wallpaper.
- Then, using a roller, they are re-rolled onto the wall.
- Let the canvas soak.
Radical method. If, after diligently smoothing the wallpaper, seams have formed at the joints, then they can be successfully disguised. To do this you will need a thin brush and paint to match the color of the wallpaper. The edges of the wallpaper should be carefully pulled away from the wall, if possible. Then paint the wall at the joint and let it dry.
You can also play it safe if the preparation of the wall is not good enough, at the joints, glue paper tape (the usual one for cash registers will do) this procedure is good to carry out at the time of wallpapering the walls.
How can I restore fragments?
Restoration is more of a creative work than a construction one.
Restoring wallpaper requires skill and patience. The scope of work depends on the damage. For work you need: But if there are no spare or torn pieces, and the damage is too great, then you can combine it with other canvases.
You can disguise damaged wallpaper. And it is best to do this immediately after discovery; you cannot delay this matter. If the damage is very severe or the coatings are old, then it is better to re-glue all the walls completely.
Source
Closing a hole in a brick or concrete wall
The procedure for closing a hole in the wall depends entirely on the size of the hole. But before construction work, prepare the hole; to do this, you need to clean the edges of the hole from any covering (plaster, wallpaper, etc.).
Further actions are selected only based on the size of the breach.