Home |Construction |How to place beacons under a floor screed?
Date: August 28, 2017
Comments: 0
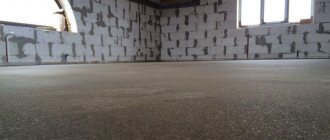
The technology for installing any type of floor covering requires the elimination of defects and unevenness, followed by planning and ensuring the horizontal surface of the floor. In order to level the base, a dry or wet cement-based composition is used, which is distributed evenly over the surface. Beacons for floor screeding are used when performing this operation, serving as a guide, as well as simplifying the process of pouring the base and facilitating the work. Let's dwell on the varieties, figure out how to install beacons for screeds, study the specifics of installation, as well as the technology of implementation.
What are floor screed guides?
Beacons are special elements fixed at one mark, located horizontally and at an equal distance. Varying in design, guides provide a solid base, the top level of which serves as a guide when forming the base.
Beacons are simple devices intended for one-time use.
The location and correct installation of the fixed elements determines the level of the future floor, affects the final appearance of the decorative coating, as well as its characteristics during operation. The method of making the screed is influenced by the design features of the guides and the materials used in manufacturing.
The following types of special elements are in demand:
- rack and pinion
They are used when forming a dry base with expanded clay filler, as well as when arranging a sand-cement or concrete base using the wet method; - rappers.
Used in the manufacture of self-leveling bases. They are a structure with a height-adjustable rod fixed to a base with three support points.
Varieties of elements and recommendations on how to install screed beacons
When carrying out activities to form floor foundations, the following types of elements are used as guidelines, differing in the material used and design features:
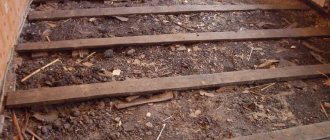
- Wooden slats.
The control level is formed by square wooden blocks with a side of 3 cm. The vertical displacement is adjusted by placing conical wedges of different thicknesses under the bars. It is allowed to use self-tapping screws of increased length. Pre-soaking wooden beams in water reduces moisture absorption when using the wet pouring method. The main disadvantage is the possible warping of the wood, as well as the need to remove the bars from the formed massif. This way the wood can be prevented from decomposing over time.
Beacons for floor screed are divided into groups depending on the type of mortar being poured
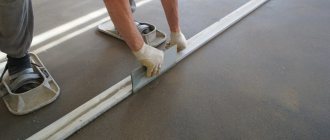
- Metal profiles.
The most common type of device today. U-shaped profiles with dimensions of 2.7x2.8 cm and 2.7x6 cm are used. They are fixed with self-tapping screws to the base with the flat side, and the sharp edges of the U-shaped structure are located in the opposite direction. In order to increase the strength characteristics, the installation of nested profiles is used. The design has proven itself positively when performing activities in rooms with limited space. The height of the profiles is adjusted by rotating the threaded rods. - Plaster profiles.
They are used as guide rails when carrying out plastering activities and forming floor foundations. Their use when performing finishing work significantly facilitates the process of leveling the base and shortens the overall production cycle. The slats are attached to the base using cement mortar. A profile with a height of 0.6 cm is used for plastering activities. Surface planning is carried out using beacons with a side size of 1 cm. Increasing the layer thickness to three centimeters can bend the profile, which is deformed under the weight of the heavy solution. - Benchmarks.
The zero mark is determined by the location of the rod, the degree of vertical movement of which is adjustable. It is secured in a support structure supported by three points. When performing work, benchmarks are placed at intervals of up to one meter in a checkerboard pattern. Using several reference points allows you to plan the floor in one room. Benchmarks are widely used by professional builders who have special training and know the features of their installation. After the filling process is completed, the control elements are easily removed from the formed array.
Installing beacons using self-tapping screws is also popular
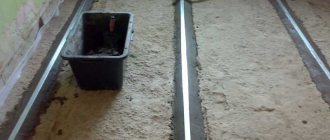
- Self-tapping beacons.
Self-tapping screws or self-tapping screws screwed into the base are the basis for performing work on forming the surface. Threaded winding facilitates screwing at the required level for subsequent tension of the construction thread between them. Cement mortar is then laid in slides along the cord to install the guides. The installed profiles rest on the formed slide and are immersed in cement mortar to the required level so that the supporting surface touches the cord stretched between the screws. The interval between the screws located in opposite rows should allow the rule to be used with a margin of 5–7 cm in each direction. - Metal pipes.
The use of steel pipes makes it possible to fill floors of increased thickness in rooms with larger dimensions. The design features of the tubular elements are increased strength characteristics and the complete absence of deformation under the influence of the mass of the cement base. The use of round pipes as guide supports, as well as box-shaped structures of square or rectangular cross-section, allows you to form a reliable base that maintains its position when filling the interval between the elements with cement mortar. - Guides from the solution.
A supporting surface made of cement mortar is used when laying out floors using the dry method, with the composition being laid in an increased layer. Cement mortar slides are made starting from the corner areas of the room along its length, with an interval between the supporting surfaces corresponding to the length of the base leveling tool. In accordance with the location of the zero mark, the height of the cement platform is formed. The process of screeding is carried out using a rule that moves along the surface of concrete slides after their final hardening.
There is another unusual way to set horizontal landmarks - cement slides
After reading the recommendations, it’s easy to figure out how to set up beacons for floor screeds, depending on their types.
Beacons for self-leveling mixtures
Some people consider the level control procedure unnecessary. They are confident that a screed without beacons significantly saves time, especially when it comes to work using self-leveling mixtures (for example, self-leveling floors). But this opinion is not entirely correct: firstly, the beacon-benchmark, which is used in this case, has a simple design; and secondly, it does not require much time to install and dismantle it. Setting beacons for this type of screed is simple, but they allow you to adjust the thickness of the fill. We proceed like this:
- prime the surface;
- let it dry for 4-5 hours;
- set benchmarks (step – 1 meter);
- by rotating the control rod located in the center, we set the height of the beacon, which corresponds to the previously made markings;
- pour the mixture;
- level;
- dismantling the benchmarks.
Definition of zero level
The process of determining the zero mark is one of the most critical operations affecting the quality of foundation formation. In order to determine the zero level, it is advisable to use a hydraulic level or use a modern laser device, which allows you to quickly and efficiently perform the work.
Installation of beacons for floor screed begins with calculating the zero floor level
Follow the following algorithm:
- Mark the starting point, moving one meter vertically up from the level of the floor slab.
- Using a level, draw a basic line along the closed contour of the room in which the work is being carried out.
- Check the distance from the drawn line to the floor surface and mark the farthest and closest point.
- Draw a line along the furthest point and connect the marks with a solid line, forming a base level.
- Move a meter towards the base and draw a solid line around the perimeter of the room, parallel to the existing mark.
- Step back from the resulting zero mark to the required height of 3–4 cm and draw a line.
The indicated line corresponds to the required thickness of the array and serves as a guide when performing work.
Floor marking
Whatever type of beacon is chosen for work, it must be installed correctly, and this requires accurate markings. First, the planned level of the future screed is noted. Guidelines are made on the walls around the entire perimeter of the room. The more marks, the better.
Determination of the highest point
Method of marking the horizon with a laser level
Using a laser or water level, the highest point on the surface is determined. To do this, mark the first point on one of the walls, at a distance of a meter from the concrete floor. A horizontal line is drawn from it along the entire perimeter of the room. The best way to cope with the task is to use a ruler level: draw a line and check the horizontality.
Varnish for wood and concrete floors: types, characteristics and prices
Next, measure the distance from the line to the floor in different places. Where it is the smallest is where the highest point is located.
In addition to this, it is necessary to check the surface over the entire area. Nails are nailed along the line or screws are screwed in. A wire is pulled over them and, measuring the distance between the base and the lines, the highest point in the entire area is determined. Once identified, its projection is transferred to the wall and the height of the planned screed is added. Using a ruler level, draw a horizontal line. It is called the zero level.
An example of the method for calculating the top and bottom points of the floor can be seen in the video:
Important! The thickness of the final floor must be calculated in advance so that it does not later exceed the height of the threshold.
Defining lines for installation
Marks are made on the floor. They are exhibited according to the following rules:
- The lines should be parallel to each other (ideally and to the walls).
- First of all, mark the locations of the 2 outer beacons. To do this, step 20-30 cm away from the wall and draw a line.
- Marks for the remaining beacons are placed last. The distance between them depends on the length of the tie rule. 10-15 cm are subtracted from it and marks are placed (usually at intervals of 1-1.7 m).
- Self-tapping screws are installed on the lines that indicate the zero level of the floor. They are installed exclusively in places corresponding to the ends of the marks for beacons. They will come in handy in the future when pulling rope guides.
After marking the surface, you can proceed to the installation of beacons. For a quick way to install beacons on a concrete base, watch the following video:
Selecting the distance between beacons
Guided by the dimensions of the rule used to perform the work, it is easy to determine the interval between the supporting elements. During operation, the rule must slide along the supporting surface.
To do this it is necessary to provide:
- the interval between supports, which should be 10–20 cm less than the length of the tool;
- parallel arrangement of guides and equal distance between them.
You need to start installing the rail from the wall. The distance will be approximately 10-30 cm
The use of easily deformable materials as guides requires reducing the distance between them to 20–25 cm.
How to set beacons for floor screed at zero level
Setting to the zero level is carried out in accordance with the preliminary markings made, taking into account the thickness of the array. The supporting elements are fixed in such a way that the upper plane, which will be in contact with the rule, corresponds to the zero mark.
Sequence of events:
- Fix the first profile at a distance of 30–50 cm from the wall.
- Fasten the next element in parallel, taking into account the length of the rule.
- Check that the location of the guides corresponds to the zero mark.
Depending on the design of the beacons used, use the appropriate fastening method and the necessary elements for fixation.
It is important to ensure:
- fixed distance between supports;
- immobility of guides.
How to find the zero mark
To create a perfectly flat plane near the future floor, it is necessary to correctly mark the room by level. To do this, you can use a conventional hydraulic one. But working with a laser analog will give more accurate results.
Working with a water level Source ppt-online.org
The device is installed in the center of the room according to its manufacturer's instructions. The laser pointer is fixed at a height of one meter and is first directed at any of the walls. A mark is made on it. Moving the pointer in a circle, you need to repeat the operation with each wall.
By the way. Experienced craftsmen claim that such a procedure can be performed easier and faster with a simple water level. And no less accurate. From arbitrarily placed marks on any of the walls, points are marked on the others.
The resulting marks are connected by a line to obtain the base level. Now you need to measure the distance from it to the base of the floor near each wall. The smallest one is selected from the results obtained. This size is laid out on each partition from the base line strictly vertically down.
The newly plotted points are again connected to each other by a solid line. And this marking is considered level zero. This should not be confused with the floor level. To get the latter, you need to do some calculations. To do this, sum up all the elements of the future finishing coating. For example, the height of the joists and the thickness of the floor board. Or a layer of glue and tile parameters.
Screed level Source sense-life.com
How to make a floor screed using beacons
Using the example of a cement-sand composition, we will consider how to make a high-quality fill.
Carry out the work following the sequence of operations:
- Prepare a cement-sand mortar based on Portland cement grade M400.
- Gradually fill the space between the supports with mortar, starting from the far corner.
- Distribute the composition evenly as a rule, smoothly moving it along the supports.
- Move excess grout towards the area to be poured.
- Remove the floor screed guides and fill the existing recesses.
- Smooth out uneven surfaces using a wide spatula.
- Allow the cement mass to harden to ensure strength.
- Cover the surface of the screed with plastic wrap.
The normal course of the cement hydration process is facilitated by light and periodic moistening of the surface for two weeks.
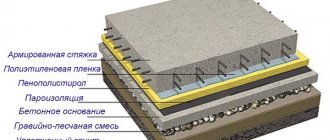
Screed: preparing the base
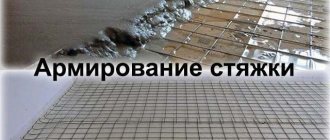
Clean the base of the room. Then place waterproofing on its surface: film or special solution. The next layer is polystyrene foam boards as a layer of thermal insulation. Place a reinforcing mesh on top. Then, according to the chosen scheme, place the water heating pipes.
We place water heating pipes in front of the screed