Icer
12664 0 2
Icer October 29, 2016Specialization: master in the construction of plasterboard structures, finishing work and laying floor coverings. Installation of door and window units, finishing of facades, installation of electrical, plumbing and heating - I can give detailed advice on all types of work.
Such types of work as gluing fiberglass and puttying on it are inextricably linked, and if I have already discussed the first part of the process in one of the previous reviews, then the finishing process needs to be analyzed separately. This work is not very difficult if you know all the nuances of the technology and follow all the recommendations that will be presented in the review. We will also figure out how to select high-quality materials so that the result is as reliable as possible.
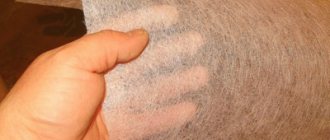
In the photo: the surface of the fiberglass is not very smooth, and the seams on it are visible, so it is better to putty it
Scope of application of fiberglass
Painting fiberglass canvas “gossamer” is a canvas that consists of fiberglass and is intended for gluing various surfaces. It differs from glass wallpaper in that it is a non-woven material created by pressing. Fiberglass is fiberglass strands intertwined with each other.
In its original form, fiberglass is quite thin, crumbles, is easy to tear, and only after pasting the base does it acquire its basic properties:
- strength,
- resistance to water, chemicals, friction,
- fire resistance (non-flammability),
- preservation of shape for many years,
- hypoallergenic,
- ease of use,
- vapor permeability,
- does not accumulate dust, fungus, mold,
- does not emit harmful substances.
The main purpose of the material is gluing on walls and ceilings to prevent cracks from appearing or to hide them. Such defects can appear if plasters are used incorrectly, or if painting and puttying technology is violated. The area of the seams between the slabs, which was poorly sealed, cracks especially often. The use of fiberglass allows you to eliminate all defects with minimal effort and cost.
When choosing what to buy - non-woven fabric or fiberglass, you need to remember: non-woven canvas is ordinary paper, it is not resistant to mold, is flammable, and quickly becomes unusable.
Tips and tricks
Tips from the experts:
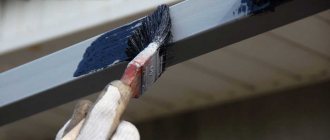
- It is better to prime the walls with a roller. To avoid gaps in the ceiling, use a paint brush.
- if perforated corners are installed, then they need to be covered with sickle or fiberglass.
- Do not confuse fiberglass with glass wallpaper - the latter do not reinforce the surface and do not prevent cracking.
- Strengthen the fixation of the web by coating it with a layer of glue diluted in water immediately after installation.
- If the decorative finish requires gloss, then choose latex paint.
- Cover one wall without interruption, close windows and doors tightly, and avoid drafts.
- After priming, no fiberglass dust will form, so you can remove the respirator and safety glasses before painting.
- Unglued canvas is fragile, so try not to bend or stretch it across the surface.
When working with fiberglass, it is important to follow safety precautions. After contact with the skin and mucous membranes, the components of the material cause itching, irritation, and pain. It is advisable to putty the canvas, otherwise the consumption of decorative building materials will increase significantly.
Material Specifications
To get excellent results, you should purchase only high quality material. It must have optimal density. It ranges from 25-50 g/sq.m. m. For walls, it is better to buy material with a density of 45-55 g/sq. m. Such a canvas will ideally cover all uneven areas and cracking areas. Usually the material is sold in rolls of 50 m, a meter wide, but there are rolls of shorter length.
For the ceiling, use thinner fiberglass - 25-40 g/sq.m. m. You can glue it to a plasterboard ceiling or walls at a temperature of +10...+25 degrees, but usually this happens at room temperature. Permissible air humidity is up to 60%. When purchasing, you should immediately purchase additional consumables for gluing fiberglass:
- special glue,
- putty knife,
- construction knife.
What you need for work
Gluing fiberglass is much easier than wallpaper, it takes little time, but you can rest assured of the quality of the finish and not be afraid that due to shrinkage of the house or temperature changes, repairs will soon be needed again. Let's find out what kind of material this is, how it “works” and what is needed to install it.
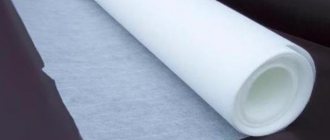
Fiberglass
Fiberglass is a non-woven fiberglass material that looks like a thin “blotter”. It is produced by pressing rather than interweaving fibers. By itself, it does not have strength and breaks easily, but after gluing to the surface, provided that the technology is strictly followed, it forms a reinforcing coating that is very resistant to deformation.
Fiberglass is sold in rolls of 45-50 meters with a width of 1 meter, and may differ in density. It has a front and back side, which must be taken into account during installation.
The price of the material is low; depending on the density, a roll can cost from 300 to 1000 rubles. This is not something to skimp on, as repeated repairs resulting from cracks will cost much more.
Auxiliary materials and tools
Of course, the fiberglass itself will not stick to the wall; this requires special glue and a standard set of tools:
- Glue sometimes comes complete with fiberglass. If this is not the case, buy glue for glass wallpaper - no other glue, including PVA or composition for heavy wallpaper, is suitable;
Note. When calculating the required amount of glue, multiply the consumption stated for glass wallpaper by 1.5-2, since fiberglass has high absorbency. In addition, the instructions require that the already glued sheets be coated with adhesive on top.
- To apply glue, which has a fairly thick consistency, to the surface it is best to use a wide brush;
- It is convenient to smooth fiberglass with a special plastic wallpaper spatula, which experts call a “shark fin”;
- You will also need a sharp painting knife and a long ruler or wide spatula for joining the canvases and trimming overlaps.
How to glue fiberglass for painting
Before gluing the material, it is necessary to clarify the safety precautions. The coating crumbles easily and pieces can penetrate the respiratory system. They also irritate the skin, so work is carried out only with personal protective equipment. You need to prepare gloves, a respirator, durable protective clothing, and goggles. It is also important to exclude the presence of drafts, exposure to the sun, and proximity to heat sources.
How to glue fiberglass to walls or ceilings? The correct procedure is:
- Level the walls (ceiling), putty, carefully seal the seams.
- Be sure to apply a deep-penetrating layer of primer to the putty.
- Place the material on the floor, cut a strip with an allowance of 10 cm.
- Apply glue to the wall or ceiling slightly larger than the width of the cut.
- Glue the canvas, pressing it with a roller or spatula. You should start from the corner located near the window.
- Lubricate the second part of the zone with glue, then glue the fabric overlapping. The pile on the fiberglass should face one direction, otherwise the coating will look unsightly after painting.
- Using a knife, remove all excess parts of the canvas from the edges and cut the necessary holes.
- Apply a finishing layer of glue on top directly over the material until a uniform color is achieved.
- Do not open windows or doors in the room until the glue has completely dried.
Installation of the reinforcing layer
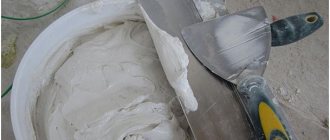
It is not difficult to apply putty using fiberglass before painting with your own hands. The main thing is to follow the sequence:
- Gluing fiberglass begins with putty and leveling the walls. For this, PVA-based or oil-based putty is used. The walls are puttyed in a layer 2–4 mm thick. Large cracks and corners are glued with sickle before puttying. The surface must dry, then it is rubbed with coarse sandpaper.
- Dust and dirt are removed from the walls before painting. The cleaner the walls are, the better the fiberglass will adhere.
- The adhesive should be applied to the wall, from the corners. The width of the spread layer is slightly larger than a roll of fiberglass.
- The fiberglass is rolled to the wall and cut from the bottom using a utility knife.
The walls should be covered in such a way that the fiberglass joints do not overlap the putty seams. The material is glued end to end. Excess air under the fiberglass is expelled using a wide spatula or rubber roller. Don't overdo it; raw fiber breaks and stretches easily.
Important! The walls should dry out within 1–2 days, but it is not recommended to ventilate the room.
Photos are enlarged, click!
Painting without putty
Many people are interested in whether it is necessary to putty fiberglass before painting it? Indeed, there is a technology for painting materials without putty. Painting work is done immediately after the surface has completely dried from the glue. No preparation of the base will be needed.
And yet, experienced craftsmen always putty on fiberglass, because without this stage any joints, irregularities, or seams will be clearly visible. Only a layer of putty can completely hide defects in the walls or ceiling. The room will have a more beautiful appearance. Therefore, you need to decide whether you need to putty before painting. It is important to remember that the quality will be much better with putty.
Conclusion
I strongly recommend puttingtying the surfaces on which fiberglass is glued; do not listen to those who say that this is not necessary, the technology was invented for a reason, and no one would complicate the process just like that. Therefore, do everything as expected - and enjoy the perfect renovation of your house or apartment.
The video in this article will help you understand some aspects better, and if you still have questions, write them in the comments below.
Source
Paint selection
Fiberglass can be painted with materials that are suitable for glass wallpaper. Water-based paints are best suited for this purpose; they do not affect the performance of the base material. Such paints do not have an unpleasant odor and are harmless to humans. Contains only environmentally friendly components (polymers, water, targeted additives). There are several types of water-based paints, they are described below.
Acrylic paints
These paints are the most popular, they have many advantages. Easy application and quick drying, coupled with a low price, are the main advantages. Paints can be applied to fiberglass or wallpaper, the coating will be resistant to friction and water. The materials adhere well to the surface and give a beautiful decorative look. Most brands of paint are sold in white; they can be tinted in absolutely any shade.
Latex paints
Such materials have a higher cost. These are water-dispersion-based enamels, without chemicals, harmless and suitable even for children's rooms. The composition contains natural latex, which makes the coating more resistant to water.
Surfaces with latex paints can be periodically washed or wiped with a damp cloth. This material is very economical and allows you to get long-lasting results. If acrylic materials give a matte film, then latex materials give a matte, semi-gloss, glossy film.
Silicone paints
Enamels containing silicone do not get dirty, this is their important advantage. There are no aggressive chemical components here either, so the material is completely safe. Silicone paints can last up to 25 years without losing their external gloss, but their cost is the highest among water-dispersion compositions. The material is waterproof, vapor-permeable, heat-resistant, and not susceptible to mold, mildew, or ultraviolet radiation.
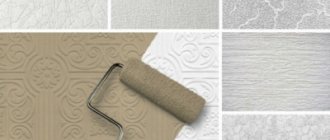
Types of glass wallpaper
The first glass wallpaper was a special web. Today these materials have different types and textures. Therefore, you can choose the necessary pattern or texture individually for the interior.
Fiberglass wallpapers are distinguished according to several parameters:
- Texture. The simplest and easiest options really look like a cobweb. They are intended primarily for covering the ceiling. Wallpaper for walls has a denser texture and a relief pattern.
- Pattern. Wallpaper for walls has quite a few types of patterns: diamonds, stripes, herringbone, drops, twisted lines. When choosing a pattern, it is important to consider that vertical lines visually increase the height of the ceilings, while diamonds and herringbones expand the space. Also, the pattern should repeat the main motifs in the room.
- Color. Standard wallpaper is designed to be painted, so it is usually a neutral white color. Expensive options can be colored; such wallpaper does not require subsequent painting.
When choosing wallpaper, it is also important to pay attention to its quality and class. Good, high-tech products are the most expensive. Very cheap materials may have defects and will peel off quickly. Here it is better to stick to the golden mean.
Applying paint to fiberglass
To properly paint fiberglass, you need to familiarize yourself with the preparation methods, purchase the necessary tools and consumables, and then begin painting work.
Preparation rules
To make painted fiberglass look perfect, it needs to be puttied. This will completely smooth out the joints and irregularities. The putty is applied in 2-3 layers, the amount depends on the type of material and the quality of the base. The thickness of the layers should not be large, a millimeter is enough. The ceiling is puttied in no more than 2 layers. The last is the finishing material with a fine texture and perfect whiteness.
After puttying, the base is sanded. The procedure is done with fine sandpaper, which will eliminate small pits, craters, bulges, and stuck debris. At the end of the work, check the quality of the surface using a flashlight - this will allow you to identify subtle defects. To complete the preparatory stage, apply a layer of primer.
Tools and Supplies
For painting you will need a paint tray, a roller and a brush for touching up corners and hard-to-reach areas. Instead of a roller, it is convenient to use a spray gun on large areas. You should also purchase tape for gluing doors, windows, and edges of wallpaper (so as not to stain them). It is advisable to cover the floor with cellophane.
Painting stages
Even a beginner can do the coloring; there are no difficulties in the work. Paints are applied only to flat, pre-primed surfaces. This will improve the adhesion of the paint to the base material. After covering the edges of the windows and doors with masking tape, they begin to work. Its stages are as follows:
- mix the material well, which is done especially carefully if color is added to it,
- pour a small amount of paint into the roller tray,
- wet the roller in the paint, squeeze it out so it doesn’t leave streaks,
- paint from top to bottom, making smooth, beautiful strokes,
- when the first layer has dried, it is advisable to apply another one - this will make the coating better and more durable,
- Next, carefully paint the corners on the walls and ceiling with a brush.
If you have to paint heating or water supply pipes at the same time, special anti-corrosion compounds are used for this purpose. Completing all successive stages of work will allow you to achieve an ideal decorative coating that will serve for many years.
Workflow Description
We will look at several aspects, each of which is important in its own way, just read all the information so that you have a complete picture of the work ahead in your head.
Necessary materials
First we need to collect a whole list of materials that we will use. Below is a table that lists specific types of mixtures; I use them myself, so I can vouch for the quality and reliability.
Of course, there may be other options, the main thing is that they are of high quality, since even perfect adherence to technology will not allow you to do the job efficiently if you used low-quality components.
All formulations are of high quality and ease of use.
| Material | Description |
| putty | I use Vetonit compounds, as they apply just perfectly and rub off very easily. This type of dry mixes is ideal for beginning craftsmen; there are several composition options for different rooms; you must choose what is best suited for your conditions. As for the cost, the price is 400-450 rubles per bag weighing 25 kg |
| Primer | Where would we be without soil, because it is an indispensable attribute of any finishing work. The amount of composition depends on the chosen technology; below I will talk about the main aspects. The fact is that the composition can be applied once or twice, hence the required volume of primer also changes |
The soil allows you to strengthen the surface
I would like to mention another putty composition - “Shitrok”, it is sold in buckets in finished form, which increases the ease of use. I don’t recommend it only because of its high cost - a bucket weighing 28 kg will cost you about 1,200 rubles, but if costs are not important to you, take this option, as it is easier to use due to the fact that it does not need to be prepared before application.
"Shitrok" is another option that is popular among finishers
Work tool
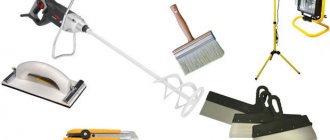
In order for us to carry out work quickly and with maximum quality, we need to have a convenient and reliable tool at hand:
Fiberglass putty is done using these devices
The mixer can also be rented
A grater is needed for final leveling of the putty layer.
Protective equipment allows you to protect yourself from dust
The working process
Many developers do not know whether fiberglass needs to be puttied before painting, everything is simple: if you do not finish the surface, then the texture of the fibers will appear on it, and the seams will also be noticeable, even if they are joined perfectly and there are no unevennesses. Even if you glue wallpaper, you need to putty on the fiberglass, otherwise later, when tearing the material off the walls, you can separate the cobwebs, which is extremely undesirable.
I hope you have figured out how to glue fiberglass to putty or drywall, and your surface is perfectly flat, otherwise the work will become more complicated, because you will have to create a plane, and not just distribute the composition over the surface.
Now let's look at how to putty a surface; instructions for doing the work yourself are as follows:
The workflow consists of these actions
Masking tape will prevent any damage to the adjacent finish.
Mix the ingredients thoroughly
“Vetonit” in its finished form retains plasticity for a day, and if it is stored in a closed container, then for two, so there is no need to prepare the mass, like gypsum-based options, in small portions. Calculate how much you will have time to apply in one approach, and prepare as much solution as you need, this is very convenient.
Work begins from the abutment, the composition is stretched in a thin layer
Directional light reveals all surface irregularities
The primer strengthens the surface