assets/from_origin/upload/resize_cache/iblock/e7d/600_450_2/e7d6b2aa4e457c592f276815370c3938.jpg From this article you will learn:
- What tools and solutions are needed to level the ceiling for painting?
- What are the stages of leveling the ceiling for painting?
- What are the advantages of leveling the ceiling with plasterboard?
- What is the cost of leveling the ceiling for painting?
Do you want to update your ceiling in the easiest way possible? Then painting is exactly what you need. This type of decoration is perfect for the entire room as a whole. However, do not forget that all imperfections are visible on the painted surface. It is quite simple to paint the ceiling, but in order for the end result to please you, it is important to prepare the surface, namely, to level it. We will tell you how to properly level a ceiling for painting in this article.
Necessary tools and equipment
The ceiling is treated before painting using the following tools:
- safety glasses that will prevent small particles from getting into the eye;
- respirator to protect the throat and lungs from caustic dust;
- thick clothing that will protect you from getting washed-off whitewash on your skin;
- a stepladder or table on which you can stand confidently;
- poppet, roller with long and short handles;
- For hard-to-reach places, use a brush;
- construction mixer or regular drill with a mixing attachment;
- various spatulas;
- hammer;
- knife;
- rule;
- Master OK;
- water container;
- sandpaper for the ceiling for painting, a grouting sponge or sanding mesh.
Briefly about the main thing
Leveling the ceiling before painting is carried out with various solutions in compliance with two main technologies.
Regardless of the chosen method, the original ceiling must first be cleaned of old finishes, repaired, and preventively treated with protective compounds.
If cosmetic repairs are being carried out or the unevenness of the ceiling is initially small, then a rough base is created using plaster before puttying.
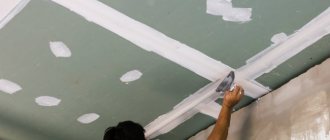
In the case of large differences in level, it is more rational to carry out the initial leveling of the ceiling using a suspension system (usually plasterboard).
After plastering, the surface is first covered with coarse putty to fill defects, then with finishing putty to smooth out traces of quartz and sandpaper.
On a sewn ceiling, the joints are first filled with plaster, then reinforcement is performed using coarse putty, and finishing putty is performed.
In the case of cladding materials, due to the heterogeneity and properties of the materials, it is recommended that instead of continuous puttying, gluing the “cobweb” wallpaper in order to level out the absorbency of the base.
Ratings 0
Preparatory stage
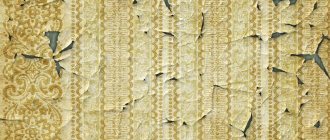
How to level a ceiling for painting with your own hands? First of all, you should remove the old coating. The whitewash is washed off and the wallpaper is removed. If there is peeling putty on the surface, then it is also removed. If you pay insufficient attention to this stage of work, the quality of the resulting surface will be very low, which will negatively affect the overall appearance of the ceiling.
If the surface is affected by fungus or mold, then they are also removed. In this case, it is advisable to treat such areas with special antiseptics, which will prevent the formation of these phenomena in the future. Since such products are poisonous, they are applied very carefully, and the room must be ventilated. Fungicides cover not only the affected area, but also the area around it. It is necessary for the coating layer to dry, after which it is applied several more times. This will ensure complete destruction of the fungus.
After the ceiling is cleared of the old coating, it is checked for cracks. If they are found, the cracks are deepened with a knife or spatula along their entire length. If there are “humps” on the surface that protrude more than 2 cm from the main ceiling level, then they must be knocked down with a hammer. Neglecting this step can result in the fact that it will be very difficult to level such a surface with putty.
After this, they begin priming the ceiling. It is better to give preference to a deep penetration primer, as it will strengthen the surface and block the development of fungus. It is applied with a roller or brush in two layers, while making longitudinal movements. For hard-to-reach places, use a brush. The second layer of material is applied only after the first has completely dried.
How to cheaply level a ceiling. The cheapest way to level the ceiling
When the goal is to reduce the cost of ceiling leveling as much as possible, the first option is to do this work yourself, while saving on labor costs for craftsmen. In this case, the main costs will go to the purchase of materials and tools.
One suitable option is covering the ceiling with plastic panels. A variety of colors, shades and sizes allows you to choose panels to suit every taste. This method has many positive aspects:
- Easy to stick and fix together;
- No ceiling leveling required;
- The panels are easy to clean and do not absorb moisture.
Plastic finishing is well suited for small spaces such as a bathroom, toilet or corridor.
Another relatively inexpensive way to finish the ceiling is by gluing wallpaper. This will require dexterity and skills. It is advisable to choose non-woven or vinyl wallpaper. They are easier to work with and more durable. The color of the wallpaper must be monochromatic, or one that does not require matching the pattern. The disadvantage of gluing wallpaper is that you still have to level the ceiling.
If it is not possible to properly level the ceiling, then you need to choose other finishing options:
- Foam tiles;
- Drywall;
- Solid wood panels.
The use of these options will not require careful leveling of the ceiling. The foam tiles are fixed to the ceiling with glue and connected to each other with locks.
To install drywall, you must first install the frame. Then the plasterboard panels are screwed to it. This turns out to be a budget option for a suspended ceiling. After installation, you can paint or wallpaper them.
Wood paneling works in the same way, using drywall as an example. Fastening occurs to a pre-assembled frame. To install it on the ceiling, additional tools and consumables will be required. The basis of the frame is a special profile designed just for these purposes. Depending on the ceiling material, you should select fasteners.
A useful tool is a screwdriver, level, stepladder, hacksaw or grinder. We must not forget about safety precautions when using power tools.
The variety of finishing materials, their relatively low price and your own desire will help you finish the ceiling, where the only limitation is your imagination.
Ceiling finishing technology for painting
You can often hear the following phrase from non-professional builders: “how to level a ceiling for painting if the surface is uneven, because this is simply impossible.” In most cases, leveling the ceiling is not that difficult. To do this, just apply a few professional tricks. Thanks to them, finishing can be turned into a completely affordable task (read also: “Ceiling painting technology: principles and secrets”).
So, first decide on the choice of putty.
Alignment options
What to do if imperfections are obvious, but there is no money in the family budget to hire a team of professional finishers?
In this case, you need to be patient and do the work yourself. And there are two advantages here: firstly, you will save a lot of money, and secondly, you will do everything for yourself, and subsequently you will know that after a month, another new ceiling will not collapse on your head.
And today I, a professional builder-finisher, will share with you the most effective methods for leveling the ceiling and offer detailed instructions so that you can complete the finishing work no worse than specialists. So, let's get to work!
There are three main ways to make your ceiling perfectly level:
- Plastering and subsequent leveling with finishing putty. This is the simplest and most cost-effective method, known for a long time.
- Installation of suspended ceilings. This option is ideal for rooms with high ceilings. Hanging structures give the room an elegant look, creating a bright, memorable design.
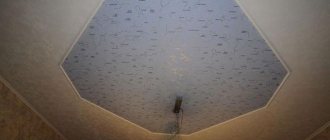
- Stretch ceiling. It is also a fairly popular method that allows you to hide not only cracks and other defects in the ceiling covering, but also beams and pipes that spoil the appearance of the room.
Now let's talk about each of these options in more detail, focusing on technology.
Types of putty for ceiling work
It is recommended that the finishing of the ceiling for painting be done with gypsum-based putty. This surface becomes smoother and whiter.
There are two types of putties:
- starting;
- finishing.
The first is used to level out rough defects; it is laid in a thick layer. The second is intended for removing minor blemishes. Both types of putty are gypsum and cement. As mentioned above, it is better to purchase gypsum mixtures for finishing the ceiling with paint.
Regardless of the type and material of putty, they are prepared in the same way. To do this, simply add water to the dry mixture. But the proportions depend not only on the type, but also on the manufacturer of the putty, so you need to carefully read the instructions. After this, the resulting mass should be kneaded well. To do this, use construction mixers or a drill with a special attachment. Never mix using just your hands.
Ceiling spray gun - time saving
If you have a large area to paint or just high ceilings, the application process using rollers and brushes will be very, very labor-intensive. To simplify work, there is such a convenient tool as a spray gun or paint sprayer.
A hand-held spray gun is a device consisting of a sprayer in the form of a hose, a long container and a pump. Such paint sprayers allow you to paint approximately 200-300 square meters of ceiling area in 1 hour of operation.
Painting with a hand spray gun
Painting the ceiling with a spray gun will save your time and has several advantages over painting by hand. Let's take a closer look at these benefits:
- when spraying paint on the ceiling, there are no streaks left;
- painting speed;
- almost complete absence of paint contamination of surfaces during repairs;
- less paint consumption;
- good coloring of hard-to-reach places.
There are several types of spray guns: electric, manual, airless and pneumatic. The cheapest and easiest to use are, of course, manual paint sprayers.
To choose the right spray gun, you need to pay attention to its body and what material it is made of. The best devices that will serve you for a long time are made of aluminum. If you are going to do repairs only in your apartment, and this is not a permanent job for you, you can limit yourself to purchasing an inexpensive manual or electric spray gun.
Putty on reinforcing mesh
How to level a ceiling for painting? Quite often the method of leveling the ceiling surface using reinforcing mesh is used. It allows you to further strengthen the putty layer and protect the surface from cracking. To secure it, the ceiling is first covered with starting putty, after which the mesh is simply recessed into the layer that has not yet dried. The protruding mass is leveled with a wide spatula or a rule. This way the mesh will be completely closed. After this, another layer of putty is applied. No putty is applied along the edge of the mesh strip (about 5 cm). This is necessary so that the next section overlaps the previous one, thereby forming a single surface.
To allow the putty to dry completely, leave it alone for at least 8 hours. After this, another layer is applied to it (thickness up to 2 mm). The mass should be stretched over the surface very carefully, without leaving streaks. After the material has dried, all formed lumps, sagging and irregularities are wiped off with sandpaper. After the sanding process, you can put another thin layer of putty on the surface (read: “Do-it-yourself ceiling putty for painting”).
The finishing putty is applied over the starting putty in a thin layer (up to 1 mm). To apply it, use the widest spatula, and press it firmly against the surface. The angle at which the spatula is directed should be sharp. The smaller it is, the thinner the putty layer will be. Excess mass is removed as a rule. Without allowing the coating to dry, a second layer is applied to it. If after you apply this second layer you are not satisfied with the quality of the surface, you must allow time for the putty to dry. After which it is leveled one more time.
To make grinding the surface easier, a beam of light is directed at it at an angle. Now you can easily distinguish all the flaws. Grouting the ceiling before painting is done using fine-grained sandpaper or a special sponge.
General preparation of the room for painting
Before preparing the ceiling for painting, you should take preparatory measures in relation to the entire room being repaired:
- Clear the room of furniture and other interior elements. If for some reason this cannot be done, you must at least cover them with plastic film as protection from dust, paint, etc.
- De-energize the electrical wiring in the room, since during the preparation process you will need to wet the ceiling with water.
Protecting windows from dust and paint
- Window and door openings should also be covered with film, and it is better to temporarily remove the lamps altogether, since it will be difficult to wash them off from chalk splashes.
Advice! It is most convenient to carry out the work in an empty room, the walls of which have not yet been finished (for example, covered with wallpaper), then they will not have to be additionally protected.
Putty on beacons
There is another way to level the ceiling for painting. It allows you to create a smoother surface, but is also more complex. At the same time, the use of beacons does not negate the installation of reinforcing mesh (read also: “How to putty a ceiling for painting: the basics of craftsmanship”).
To install beacons you need:
- draw a horizon line around the perimeter of the room;
- stretch a nylon thread in several places between opposite walls. It is leveled so that a flat plane is obtained. Fasten the threads as close to the ceiling as possible, but not less than 5 mm.
After such preparation, further finishing will proceed much faster. Beacons are screwed into the ceiling with self-tapping screws. The guide leg for the rule should lightly touch the threads. Therefore, it is very important that all threads are in the same plane. The beacons are fixed at such a distance from each other that the rule does not slip between them.
Then a layer of starting putty is applied to the ceiling, which is leveled according to the beacon rule. The excess is removed using the same rule, first at a large angle, and then at a sharp angle. If you need to lay a thick layer of putty (more than 15 mm), then this is done in several passes. First, one layer is pulled out, the excess is removed, and time is given to dry. After this, a second layer is applied, etc.
If you want to strengthen the putty with a reinforcing mesh, then it is recessed into the first layer. Each layer that you put on the ceiling can be sanded after drying. This way you will get a smoother surface at the last stage of work. After sanding the ceiling, it is covered with finishing putty, which will hide the coarse-grained texture of the starting putty.
How to level the ceiling before painting, watch the video:
Expert advice
If you follow the plastering technology, you will achieve excellent results, and the recommendations of the experts will help you avoid difficulties in your work:
- to eliminate small unevenness on the ceiling, you can use ready-made plaster mixtures;
- If you use lime plaster, protect your hands and eyes;
- for better adhesion of surfaces, use a primer from the “Betonkontakt” series;
- if you need to apply a plaster layer more than 5 cm thick, install a reinforcing mesh.
Leveling and painting the ceiling
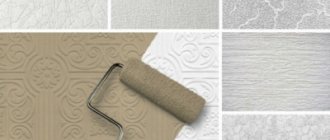
Well, you are almost finished finishing the ceiling surface. But before applying paint to it, the ceiling is cleaned of dust. We also advise you to prime the surface. This will increase adhesion, that is, the adhesion of the paint to the base.
Priming is done with a velor roller in two layers. In this case, the first and second layers must be applied perpendicular to each other. Do not allow excess mixture to form on the surface. After the primer has dried, you can begin painting the ceiling.
Now you know how to make a ceiling for painting. As you can see, the operations are not complicated and even a person with no experience in construction can easily perform high-quality surface leveling.
Further operations depend on the chosen paint and the presence of decorative elements on the surface. Therefore, we advise you to read our other materials that relate to repair work and ceiling finishing. Good luck to you in your endeavors.
Removing old coatings
Preparatory work for applying the finish always begins with the removal of old coatings. The golden rule of any repair is that it is possible to guarantee one hundred percent quality of the further operation of ceiling coverings only when the materials are applied directly to the floor panels, that is, to the “skeleton” of the structure itself.
In order to clean the ceiling from the previous finish, you may need:
- Not wide spatula
- Roller
- Water sprayer
- Hard foam sponge
- Water
- Grinder
- Paint remover
- Hammer
The specific set of tools depends directly on the material that is applied to the ceiling. To remove oil paint, a grinder or remover will not hurt, for whitewashing - a scraper and sponge, for polystyrene foam tiles - a spatula. A hammer is needed to knock off plaster that does not adhere well. We need a clean floor panel.
Removing old coatings