Renovating a modern apartment is rarely complete without drywall. Leveling walls, installing partitions or creating design delights in the form of arches, figured niches, columns cannot be done without this universal material. Drywall is inferior to classic plaster in only one respect: it does not “stand the blow” enough. A dent or hole can occur under accidental circumstances or during a planned event, such as moving sockets or hanging shelves to another location.
Therefore, an inexperienced craftsman may have a question: how to repair a hole in drywall on a wall? After all, the classic method of filling holes in plaster will not work here - behind the sheet there is usually a void or soft soundproofing material.
But don’t worry that to eliminate the defect you will have to dismantle the entire damaged sheet and buy a new one in its place. The technology for sealing holes in drywall is so simple that even a beginner can handle it. Let's consider methods for repairing damage in order of increasing size.
Technology for repairing plasterboard ceilings
Quite large holes - more than 3 cm in diameter, cracks in drywall more than 3 cm wide - are repaired using more complex technology. There are several options.
If the diameter of the hole does not exceed 4 cm, the procedure is as follows.
- The edges of the hole or crack are cleaned so that no pieces of paper or crumbs remain.
- The edges of the hole are treated with a primer. They also prime the sheet around the damage at a distance of 5–10 cm.
- A piece of foam plastic or cardboard is inserted into the hole, having previously been coated with glue. In this case, the edges of the cork should be flush with the edges of the ceiling.
- After the glue has dried, the hole is sealed with putty. If necessary, you can glue it with serpyanka.
Holes up to 6 cm in size are sealed differently: here you will need a plasterboard patch.
- First, the hole is given the correct shape. To do this, use a knife or drill with a “crown” attachment and make a round hole. It should be at least 2–3 cm larger than the diameter of the hole itself.
- A patch is made. To do this, cut out a square 4–5 cm larger than the diameter of the hole from a sheet of drywall. From the wrong side of the patch, a round hole is drilled with a crown, the dimensions exactly matching the dimensions of the hole. Drill to the front paper sheet. The plaster is then removed with a knife to create a round liner with a square paper base.
- The patch and the edges of the hole are primed. After drying, apply gypsum putty to the edges of the hole in the ceiling and place the patch into the hole. Excess putty is leveled over the surface of the drywall and the square part is pressed against the sheet.
Important! The patch can also be made square using a knife. Then the hole in the ceiling is given a square shape
Holes in drywall larger than 10 cm or cracks wider than 5 cm are rare. But sometimes you have to deal with such damage.
- First, a patch of drywall is cut out, slightly larger than the diameter of the damage. Then apply the future plug to the ceiling and outline the contours of the hole.
- Use a knife to cut a hole along the mark. The edges should be cleaned at 45 degrees to avoid further deformation of the material.
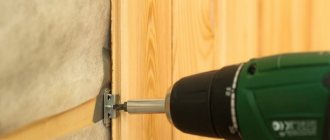
- A wooden frame is made for the patch. To do this, cut slats 5–6 cm longer than the side of the hole. The bars are secured to the inside of the ceiling and screwed with self-tapping screws to the drywall: this is how a wooden base for the patch is formed. There should be enough slats to ensure complete immobility of the plug. If the hole is large, you will need an additional transverse rail. If the crack is long, the bars are mounted across the crack in the required quantity.
- The patch is installed in the hole and screwed with self-tapping screws to the wooden base, and not to the drywall. Then the seams are primed, sealed with sickle tape and treated with putty.
- After complete drying, the joints are treated with finishing putty and sanded with sandpaper.
With such repairs, it is necessary to completely reproduce the decorative finish. If we are talking about painting, it is recommended to paint the entire ceiling. If the surface is plastered, then finishing is carried out only on the damaged area of the ceiling, while achieving complete identical appearance. When wallpapering, you should select a fragment with the desired pattern.
DIY plasterboard ceiling repair: video
How to repair a hole or crack in drywall is demonstrated in the following video:
Final stage
sealed with plaster, paint, wallpaper or stucco. The main thing is that the place where the hole occurs does not stand out and fits harmoniously into the overall interior of the room. Since holes most often form in inconspicuous places on the walls, there should not be any problems with masking them. As a result, after the completed manipulations, the hole will be completely masked. Therefore, in order to properly repair any hole in the drywall, you need to strictly follow the instructions and that’s it, your repair will again become unsurpassed, and you will save your nerve cells.
First - preparation
All work of this type begins in exactly the same way: the surface for repair must be carefully prepared. In the case of repairing holes, it is necessary to determine what size the defect is: for small holes, only reinforcement needs to be done before plastering, and larger holes are eliminated using inserts. At the same time, in the second option it will be necessary to first increase the opening, which will subsequently be sealed.
Then everything follows one scenario: having decided on the size of the area to be repaired, they prepare a patch. In order for it to fit more tightly into the hole, its dimensions must exactly match the hole. This is not difficult to achieve: the future patch is cut out, its edges are cut off so that the front part is slightly larger, and there is a bevel along the inside of the lump. Turning the front side to the wall, press the workpiece and outline it. Based on the resulting contour, it will be possible to cut a perfectly suitable hole. Its edges must also be beveled - the insert must fit as accurately as possible.
Final treatment of the crack
After the fugenfüller has completely dried for 24 hours, you can begin the final treatment of the crack. Apply another layer of primer on top and wait a few hours for it to harden.
Now you need to apply satengypsum or finishing putty to the sealing area. Typically, once the hole is filled with finishing putty, it does not require additional sanding. A wide spatula covers the entire width of the surface to be puttied and makes it perfectly smooth. The main thing in this case is to prevent foreign abrasive substances from getting into the putty solution.
To complete the repair of a plasterboard ceiling, it must be painted after the finishing putty has dried.
To obtain a uniform color of the ceiling, it is better to paint it completely, so the restored areas will not stand out against the general background.
Of course, it is better to initially make high-quality repairs in compliance with all drywall installation technologies, because repairing cracks is more difficult than preventing their appearance. But sometimes circumstances turn out to be stronger, and therefore you have to endure some losses.
The fact that plasterboard ceilings are very popular at the moment is an indisputable fact. This material is an excellent option for implementing the most daring design solutions. It has a wide range of applications, is strong and durable. However, despite all its strength, nevertheless, sometimes home craftsmen have a question: how to remove cracks in a plasterboard ceiling?
Final treatment of a crack in drywall
Drywall is quite easy to work with, so even a non-professional can learn how to create real design masterpieces from this material. However, to do this, you need to know the specifics of working with this material, and, accordingly, the stages of the work.
Finishing the damaged area
To remove any kind of gaps, use universal gypsum putty, reinforcing serpyanka tape and plaster spatulas. The perimeter along which the patch is joined to the plasterboard sheathing is carefully covered with putty and serpyanka is glued on top. From above, all surfaces are covered with another layer of gypsum board plaster, carefully leveling the mixture over the drywall.
Finishing the damaged area
Puttying holes in drywall
When the putty dries (it becomes snow-white when completely dry), it is rubbed with fine-grain sandpaper (120-160) on a grater. Thus, all irregularities are removed, making the surface ideal. Upon completion of the restoration work, they proceed to painting the drywall or other finishing, which is carried out in accordance with the general design.
Instructions on how to repair a hole in drywall
This method allows you to efficiently repair damage to walls and plasterboard ceilings. In this case, it is possible to restore both through holes and dented dents or simply wet areas. But it is possible that for a larger hole it will be necessary to apply reinforcement with fiberglass mesh over the entire area of the damage. If the damage is very extensive, it is worth assessing whether repairs are feasible; it may be much easier to replace the entire sheet of drywall.
How good - the installation of the plasterboard ceiling is complete, everything is beautiful and wonderful. But even if the repair was done efficiently, after some time cracks may appear on the plasterboard ceiling.
Our article will tell you why this happens and how you can quietly and quickly eliminate such a glaring defect in the ceiling structure.
Two options for solving the problem
Depending on the size and depth of the damage, two relatively simple repair options can be used: puttying or more complex repairs. At the same time, complex types of repairs can also be easily carried out with your own hands. Almost anyone can apply putty - there is nothing complicated in the process and it is not worth considering it in too much detail. Repairing large holes will require more work. Therefore, we will discuss in more detail how to repair a large hole in drywall on a wall later.
Filling other types of holes
Some practical tips for sealing holes in the ceiling and walls, depending on their type.
Cracks at the junction of the floor and the wall
They are sealed in the same way as holes in the walls, with one peculiarity - before cleaning, the gap must be widened by 5–10 mm along the entire length. This will provide more reliable adhesion for the new plaster.
Holes in the ceiling after falling plaster
The easiest way is to simply cover it with a new layer of plaster, but this decision will not be correct, since soon the hole will appear again, because you need to not only remove the “symptom”, but completely cure the “diseased organism”. The order of work is as follows:
Before repairing a hole in the ceiling, you need to thoroughly clean the damaged surface.
It is important to do this efficiently. Treat the surface with an antifungal agent, because it is the fungus that most often causes the plaster to crumble. Go around the hole and the area around it with primer. Putty the surface in 2-3 layers, depending on the required thickness, and do not forget that each layer must be given time to dry. Rub down the ceiling and re-prime.
Cracks at the junction of panels
A problem that often occurs in panel buildings. They are sealed in the same way as cracks between the ceiling and the wall, but for reliability you need to glue a fiberglass mesh along the entire length.
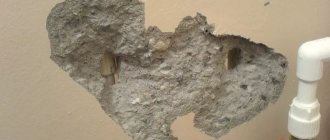
Holes near risers
Often, plumbing work to replace the riser is carried out in bad faith and after it is completed, cracks and holes appear. Small holes up to 5 mm can be filled with silicone sealant.
Holes from plumbing operations require aesthetic correction.
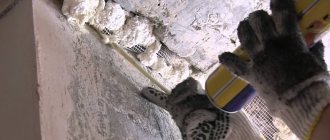
With large holes it is more difficult; you need to do simple reinforcement, then foam the hole. When the foam has hardened, it is necessary to cut it 5–10 mm above the ceiling level and putty it with gypsum putty. If the hole is large, then Rotband, which is used for plaster, is perfect.
Causes of defects
Cracks and dents are formed mainly due to the following factors:
- shrinkage of building walls;
- deformation of floors;
- installation errors;
- low-quality raw materials;
- careless operation.
The problem is unpleasant, but easily solved with your own hands without turning to specialists. Below are four sure-fire ways to fix drywall cracks.
How to be?
If a crack or any other kind of deformation is detected on the ceiling structure, there is no need to rush to make hasty decisions to restore the ceiling covering. Here you should first find out what led to this state of affairs. Otherwise, restoration work will have to be done several times.
Very often, finding out the reasons for the appearance of deformation may show that a complete rework of the ceiling is necessary. In this case, the repair must be done again.
Note! To find out whether you need to redo the ceiling, you should press the ceiling with your hand. If, after pressing, the structure “breathes,” then the repair needs to be redone
Otherwise, the crack will have to be repaired constantly.
In a situation where the defect is isolated and does not lead to movement of the sheets, then you can simply repair
, and leave the repairs the same. Sometimes a small piece of fabric will need to be replaced.
Large crack in drywall
How to Paint a Hole in Drywall
Using paint and masking tape, you can create a decorative geometric composition, making the patch an inconspicuous part of it. By mixing paint and tinting paste by hand, it is almost impossible to achieve the color of the old coating - liquid and long-dried materials have different shades.
Maximum color similarity can be achieved by selecting and ordering a shade according to the color charts. To do this, when going to a paint store, you should take with you a chipped piece of the wall, so that you can compare it with the palette from the catalogs and find the corresponding article number. However, even with this approach, there is no guarantee that the paint on the wall will look the same as in the store. We should not forget about the characteristics of lighting and adhesion of the base.
Repairing holes
How to repair a hole in drywall? Regardless of the location of the hole, the repair procedure depends only on its size. For small holes the procedure is as follows:
- first of all, sickle tape is glued to the hole;
- a layer of putty is applied;
- After the mixture has dried, the procedure is repeated. It is recommended to apply about 3 layers;
- After the solution has dried, use sandpaper to smooth the surface.
If the size of the hole exceeds the 10 cm mark, you will need to use a patch to close it. It can be built from a sheet of plasterboard. To seal, perform the following steps:
Measurements are taken using a ruler. You need to measure not only the hole, but also other damage to the sheet
This is especially important if the defect was caused by a heavy object falling. Markings are made on the surface using a ruler and pencil. Keep in mind that it is applied starting from the corners. The edges of the hole are trimmed to create a rectangular hole. The dimensions of the required patch are transferred to a new sheet of drywall and cut out.
Drywall must be cut in a certain way so as not to damage it. The procedure is as follows:
- The sheet is placed on a horizontal surface, such as a table.
- An incision is made into the top layer of material.
- The sheet is turned over and a blow is made at the cut site so that the material breaks.
- The remaining part of the sheet is cut. This method will help you get smooth edges.
If the edges still turn out uneven, they will need to be processed with a plane. Next, place the cut section against the hole and make sure the dimensions are correct. For more information on how to repair a hole in drywall, watch this video:
Apply putty to the edges of the patch
Then the following procedures are performed:
- From the back, the patch is cut to plaster. There should only be a layer of cardboard left on the front.
- An incision is made and the anterior portion is trimmed down to plaster.
- Two blocks of wood are attached inside the hole. However, they should not protrude from the hole. It is best that they are at a distance of about 4 cm from the hole. Fastening is done using self-tapping screws.
- Putty is applied to the edges of the patch.
- The patch is pressed against the surface to be treated.
Masking the patch is done as follows:
- joints are treated with self-adhesive;
- another layer of putty is applied to the patch;
- We remove all defects and irregularities with sandpaper.
Final stage
The final seal can be done using plaster, wallpaper or paint. The main goal is to disguise the site of damage. It should not stand out against the background of the overall interior. To learn how to mask a hole, watch this video:
Thus, sealing the holes is not that difficult.
The main thing is to eliminate the cause of their formation so that the problem does not arise again. It is better to carry out all work immediately after detecting a defect.
Basic methods of sealing
Defects in a sheet of drywall can appear, for example, when rearranging furniture or other interior items when impacts occur. The result is a hole in the wall. When such defects form, there is no need to panic, as there are ways to help get rid of such holes.
When repairing damaged areas, you must first take into account their size. There may be a lot of reasons why such holes form, but they will not affect the process of eliminating them. Holes often appear in walls more often than in ceilings.
There are only two ways to mask holes in drywall. These methods differ from each other only in that the first is used to hide holes with a diameter of less than 15 cm, and the second is used for larger damage.
In the first case, the hole can be repaired using special tools and materials. It is enough to apply the putty with a spatula onto the reinforcing mesh, which is attached to the site of damage to the drywall .
Such a hole must be sealed carefully so as not to damage another part of the surface of the material.
In the second case, a plasterboard patch is used, which is cut out and installed in the damaged area.
Like magic
After the preparatory work has been carried out, high-quality sealing of the crack is possible.
Some experts recommend filling the defect with regular putty. But when using putty, you need to additionally use adhesive tape to complete the putty with satengypsum.
Fix a small hole in drywall
If you use a fugenfüller, you can do without using adhesive tape. Fuhrenfüller is a putty that sets more quickly and becomes rigid when cured. Therefore, many experts recommend using it to eliminate cracks in the ceiling.
Filling the defect with putty is carried out as follows:
- prepare the solution exactly following the instructions on the back of the package. You can also take a ready-made solution;
- Apply a small part of the solution to a spatula and carefully distribute it over the entire surface of the crack;
- if necessary, apply several layers of solution;
- try to bring the solution flush with the rest of the ceiling. Applying the solution
After carrying out the above steps, the solution should dry for about a day. As a result, you will have a perfectly flat ceiling. To remove unevenness and roughness remaining after the putty has dried, we grout them using sandpaper.
Professionals are able to cover the defect evenly and without unevenness the first time. But beginners can easily remove all irregularities with sandpaper. After this, you need to prime the surface and it will be ready for painting.
Note! You should not paint only the sealing area, because... this will most likely lead to the appearance of a brightly visible spot
After all, it is almost impossible to choose paint of the same color and tone. Therefore, you need to paint the entire ceiling to avoid uneven tone.
If everything is done correctly, then repairing a defect such as a hole in the ceiling will go quickly and without nerves. In doing so, you will avoid the risk of a similar defect occurring in the future. And your ceiling, regardless of the circumstances, will always look great and lift your spirits with its beauty.
They can arise for various reasons and ultimately require high-quality repair of unaesthetic damage.
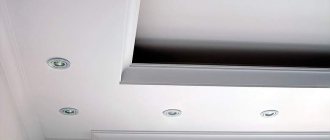
Fix a hole in the drywall near the light fixture
The most common cause of cracks in plasterboard ceilings is a violation of the ceiling assembly technology.
Nuances
When choosing how to repair a hole in a plasterboard wall, many people choose polyurethane foam. However, this approach is not very justified in the case of surfaces that may be subject to mechanical stress. Even for small-diameter holes, it is better to make an insert - it will provide higher strength to the repaired area.
If the damage is small and you only plan to putty it, the serpyanka will make the applied layer of the mixture stronger and nothing will fall off later. Many people do not do such reinforcement and get a natural result: after a short time, cracks appear exactly where the additional layer of putty was applied.
Before filling a hole in a plasterboard wall, all areas to be worked on must be primed. This will ensure better adhesion of materials, and this is especially important on small parts.
How to repair a hole in drywall: 4 main tips
Holes in drywall are quite common, and even a novice can repair them.
When something breaks, for example, during repairs, it is unexpected, it upsets and changes plans. And this often happens with drywall, on the wall or on the ceiling. Plasterboard walls cannot be called particularly strong, so punching a hole in such a structure is not difficult. Most often this happens when moving furniture.
How to repair a hole in drywall
There can be many reasons why there is a need to seal a hole: holes from old sockets and lamps, simply mechanical damage of various forms. Sometimes holes are cut specifically for repairing utilities or for laying additional wiring.
The first thing to take care of is to cut off any loose or frayed areas from the edges of the hole. The result should be a neat edge without protruding paper or burrs on it; this is achieved by cutting a chamfer around the entire perimeter of the hole. The area to be repaired is primed.
Round holes up to 5 centimeters in diameter can be sealed without adding a filler, simply by filling them with gypsum putty or plaster. “Fugen” or “rotband” are well suited for these purposes.
It is worth noting that it is unlikely that you will be able to cover the problem area the first time: the gypsum mixture will definitely float. Therefore, you need to wait for the plaster to set, cut off the protruding areas with a spatula and go over it with fresh putty again.
For larger holes, it is necessary to make inserts from the same plasterboard as the old cladding. To secure the workpiece, you can use profile sections (PP or PN), which can be inserted into the hole to be repaired.
However, profile pieces have a significant drawback in this situation: it is very inconvenient to hold a piece in a small hole, and decent pressure on the profile is required to tighten the screw. Because of this, the safely screwed first screw breaks out very easily when trying to tighten the second one. Therefore, instead of a metal profile, it is much more practical to use small cross-section bars or plywood no thinner than 10 mm.
When the profile pieces or bars are secured, the insert is screwed onto them. It is not at all necessary that it fit perfectly into its place; gaps of 1-2 cm are quite acceptable. The main thing is that the workpiece, as well as around the perimeter of the hole, is chamfered and there are no shaggy areas of paper.
After installation, you should check that the repaired area does not protrude from the plane of the wall. This can be done using a spatula. If there are protruding areas on the insert, they must be cut out, observing the rule of no protruding rags (bevel everywhere). Only after this can you begin to putty. In all cases, the areas to be repaired must be puttied “to strip” - the applied mass is removed with a spatula, the plane of which is almost perpendicular to the plane of the wall.
As a result, the treated area is plastered “to strip” as many times as necessary to achieve an ideal result, usually 2-3 times, for the ceiling it is possible more.
Many people have a question: is it necessary to somehow reinforce the area being repaired?
For example, if you plan to glue wallpaper onto the cladding, then there is no need for reinforcement. If you plan to paint, then reinforcement is highly desirable; it can be done using a construction bandage, paper tape or fiberglass. Serpyanka is poorly suited for these purposes. After reinforcement, the area is also plastered “to strip” several times.
It was originally a round hole in the ceiling left after removing a spotlight.
Due to its too small size, it was not convenient to mount the liner, so the hole had to be expanded to a rectangular shape. The insert is secured to two plywood strips. However, you should not unconditionally accept the advice on reinforcing the painted surfaces with gypsum plasterboard. Let's look at an example: round lamps were removed from a painted suspended ceiling and the holes were sealed using the technology described above. If you glue fiberglass (or other material against cracks), the repaired area will protrude from the plane of the ceiling. Let this “protrusion” be measured in fractions of a millimeter - after painting it will be noticeable. Therefore, in this case it is better to neglect reinforcement to prevent cracks.
After the putty has dried, the area will be cleaned and painted along with the entire ceiling. This approach does not provide a 100% guarantee that no cracks will form in this area, but it is the simplest option. To achieve “reliable reliability” it would be necessary to cover the entire plane with the hole with fiberglass.
Covering holes in the wall
Filling holes in brick or concrete walls, like any other matter, begins with preparation. The first thing to do is estimate the size of the hole.
To fill small holes you will need:
- vacuum cleaner;
- small spatula;
- pliers;
- dowel nail.
Holes in the wall can be cleaned using a vacuum cleaner.
The hole is cleaned from the inside using a dowel-nail clamped in pliers. Next, all small construction debris is removed with a vacuum cleaner. The cleaned hole is covered with putty. Movements with a spatula should be both pressing and leveling.
Remember that the aesthetic qualities of the wall will depend on how well the hole is cleaned.
If the hole is large, then first you need to decide what to use to seal the wall. Alabaster, plaster or cement mortar work well.
You will need the following tools:
- Spatulas, large and small.
- Alabaster, plaster or cement mortar - your choice.
- Sandpaper.
- Sponge.
Holes in the wall need to be covered with putty.
As with filling small holes, you first need to clean the surface of crumbled plaster. Then you need to wet the cleaned area and wait until it dries. Afterwards you can putty the hole and the area around it. When the material hardens, it needs to be sanded with sandpaper.
Through holes up to 3 cm
For repairs you will need a minimum set of tools and materials:
- Sharp knife;
- Sealant or PVA glue;
- Any available material to fill the hole space. This could be crumpled paper or a piece of foam left over from the packaging of purchased household appliances;
- Putty;
- Sandpaper;
- Putty knife.
Before filling a hole in drywall of this size, you need to prepare the surface:
- Clean the edges so as to obtain a smooth inner surface without crumbling pieces and shreds of paper;
- Carefully prime the inner edge of the cleaned hole and the area around it at a distance of 5 - 10 cm;
- The prepared lump of paper or foam plastic is smeared along the edges with glue and the hole is closed with it. It is necessary to ensure that the edges of the homemade “plug” do not protrude above the plane of the wall;
- After the glue has dried, the sealed hole is puttied.
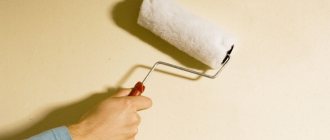
Further actions depend on the type of decorative wall covering: painting requires careful leveling, since the slightest flaw is noticeable on the painted surface. Therefore, another layer of putty and careful smoothing with fine-grit sandpaper may be necessary.
Tools and materials
Before repairing damage to drywall, you need to make sure you have the following tools:
- construction knife;
- centimeter;
- pencil;
- putty knife;
- sandpaper;
- drill for stirring solutions.
Suitable materials:
- self-tapping screws;
- block of wood;
- reinforced mesh;
- sheet of drywall;
- putty.
- gypsum.
Please note that in rooms with high humidity it is necessary to use only moisture-resistant coating . With all these tools and materials, you can easily repair even the largest holes yourself.
But before you start doing work, you need to carefully prepare the wall surface.
Preparatory work
Fixing even a fairly large hole is not that difficult. Moreover, you will not need to incur large expenses in terms of financial expenditure. In such a situation, one of the features of drywall plays into its hands: its easy and simple workability without special equipment and tools. To prepare for the restoration of a damaged surface, all you need is a regular stationery or construction knife. It is necessary to cut off the material at a distance of 40-50 millimeters from the hole.
Preparatory work
This is done in order to remove drywall that is of poor quality in structure, since it becomes brittle due to wetting or impact.
The cut is made in several approaches, after which the resulting edges are inspected and, if necessary, the hole is expanded to solid material. They do this as follows:
- Around the resulting damage you need to draw a rectangle with the specified parameters. Preparatory work for repairing the hole
- Using a knife (you can also use a hacksaw blade for metal), you need to make cuts and remove the damaged part. Repairing holes in drywall
- Afterwards, you need to remove and smooth out all the irregularities on the resulting edges, slightly trimming the edges with a blade.
At this point, the preparatory work can be considered complete.
Step-by-step instruction
How to cut drywall correctly?
To understand how to repair holes, you need to understand how to properly cut the material. The main tool in this case will be a construction knife; a hacksaw for drywall and a drill are suitable as auxiliary tools.
If it is possible to use only a construction knife, then it is better to use only that, since this method produces the least amount of dust and allows you to make a smooth edge.
Let's look at several ways to cut a piece from a sheet of drywall.
- Regular cut on one side. Markings are applied to the reverse side of the product with a pencil or marker. Then the cardboard is cut along the line. The layer on the back side is the densest, so it’s better to start there. Then the plaster core is broken on the edge of the table or any hard surface. Cut the cardboard from the front side to separate the fragment.
- A rectangular fragment from the edge of a sheet. We apply markings and cut out lines from the edge to the center with a saw. We make a cut parallel to the edge with a construction knife, then follow the pattern as in the previous case.
- Rectangular cut in the center of the sheet. We mark the shape of the fragment, drill holes in the corners from which the cutting line will go. If the hacksaw has a pointed end, then you can do without a drill.
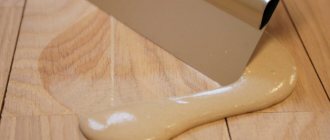
How to prepare putty?
Putties are supplied ready-made or in the form of a dry mixture. In the first case, you can start working immediately. The dry mixture must first be diluted with water.
- For mixing, use a small container and a spatula. All tools must be clean so that dry particles do not get into the binder. You should not use a large amount of putty, as the solution will set quickly and will not be able to be used in the future.
- The container is filled with water, then the mixture is added. Most of the material should be in the water, with only small dry areas remaining on the surface.
Sometimes they start adding water to the mixture, this leads to the appearance of lumps.
- The composition is mixed with a spatula, then left for 10 - 15 minutes.
- After waiting, the putty is mixed again until it reaches the consistency of sour cream.
What to do
Each repair case is individual, but, nevertheless, the method of repair and getting rid of defects in the ceiling structure in the case of gypsum plasterboard is always the same. In general, you have to perform a number of quite simple operations:
- Determine the size of the damaged area.
- If possible, find the places where the guides pass, on which a sheet of drywall or other load-bearing elements of the frame are held.
- If necessary, widen the hole to such an extent that you can attach the “patch” to the frame.
- Prepare a patch of the desired shape and size.
- Secure it in the desired place using self-tapping screws.
- Perform puttying and sanding of the repaired area.
You can get an insert that fits perfectly into the opening you are cutting out not only by tracing its contour. If the hole is small, the insert can be drilled into the surface with a regular “crown” - a drill attachment. There will be a cut out circle inside the nozzle, and the hole itself will be round. It will be easy to combine these two parts.
If it is not possible to determine where the frame parts are located, then repairs can be carried out without attaching a patch to it. In this case, in order to seal a hole in a plasterboard ceiling, you will need two or more wooden blocks or slats slightly larger than the hole made. They will become the basis for fixing a piece of plasterboard installed in the hole. The principle of installing a repair piece of surface is very simple:
- First, you need to make the hole or hole a little larger and give it a rectangular or square shape.
- Wooden blocks or slats need to be attached along the long side of the cut hole. They should be slightly longer than the hole to be repaired.
- The bars or slats are fixed with self-tapping screws through the drywall along the edges of the hole.
- Next, you need to carefully try on the patch to the cutout you made - its shape and size should be adjusted very well. It is best to cut the inner edges of the insert at an angle, which will increase the adhesion area and allow the edges of the workpiece to be more accurately adjusted to the opening being sealed.
- If all is well, then the patch is fixed, attaching it to the edges of the previously installed bars.
- All that remains is to putty everything again and sand the repaired area after the putty has dried.
In this way, it is possible to restore the integrity of both a small area of a few centimeters and carry out more global surface repairs on large areas. Do not forget about one more point: it is always necessary to treat the areas being repaired and the surrounding areas with primers. This will improve the adhesion of the materials to each other and the putty will adhere better.
Some tricks
To achieve the best result, there are several nuances.
- Self-tapping screws for fastening must be made of stainless steel. Then corrosion will not occur, rusty spots will not appear, which are very difficult to cover up.
- In order for a plasterboard patch to be as accurate in size as possible, first use a sharp knife to cut through the cardboard on both sides - outer and inner, and then break the plaster base with a sharp, strong pressure.
- To attach to the slats, you can use special glue rather than self-tapping screws. The reliability of the fastening will not be affected by this.
- Do not try to force the patch into the hole. It is easier to fill small cracks with putty than to repair an even larger hole.
- Don't have wooden slats on hand? A suitable piece of plastic or the same drywall will completely replace a piece of wood.
- If the hole is small, you don't need to use putty. Construction stores sell special synthetic putty. It is easy to use, flexible, and easy to grind.
- If you glue paper tape, gauze, or serpyanka onto PVA, the fastening will be almost monolithic.
These tips will help if the hole in the drywall is not too big. When half the wall is destroyed, patches will not help the matter. It's easier to change the sheet completely. But, if you managed to resolve the issue on your own, with few losses, honor and praise plus new life experience to add to your knowledge base.
How to Fix Cracks in Drywall Sheeting
As a rule, cracks are a concern only on painted surfaces; if there is wallpaper, they are simply not visible. In general, when installing drywall for subsequent wallpapering, they don’t bother too much with reinforcing the joints. In the areas to be painted, it is necessary to carry out all the reinforcing operations: this is reinforcing the joints of sheets and corners using sickle tape, paper tape or a construction bandage, plus the entire area is covered with fiberglass. Very often, fiberglass is not used to simplify the work. That's why cracks appear.
To eliminate cracks, fiberglass is needed. First, the cracks are opened (enlarged using a sharp knife to cover them up), and then puttied. Next, fiberglass is glued, and after the glue dries, a continuous finishing putty is performed. As already noted above, if you glue fiberglass only locally, only in places of cracks, with an overlap of 15-20 from the problem area, there is a danger of visual manifestation of the repaired area after painting.
It is recommended to glue fiberglass not only to gypsum boards, but also to any surfaces that will be painted, including plastered walls.
Therefore, the best solution would be to cover the entire plane with problem areas with fiberglass. Although, of course, first of all you need to proceed from the required quality and budget. There are cases when local “patches” made of fiberglass are more acceptable. For example, when the surface is planned to be finished with any type of decorative plaster - non-uniform, rough, etc. the repaired areas will not be noticeable.
Partitions made of PGP
For the construction of load-bearing partitions, KNAUF and Volma companies produce tongue-and-groove slabs, which are cast from a gypsum mixture. GGPs are non-flammable and fire resistant. They are installed using mounting adhesive.
It is not correct to compare which manufacturer is better, since each type of product has its own scope of application and its own niche in the market. The main differences boil down to the following factors:
- KNAUF produces slabs with a thickness of 80 and 100 mm, and Volma only produces 80 mm;
- KNAUF slabs do not need plastering, and PGP Volma do not have a sufficiently smooth surface;
- KNAUF products cost more compared to the alternative Volma product;
- Volma produces hollow slabs, which Knauf has no analogues.
PGP KNAUF Working qualities and properties of PGP:
- Safety for health and the environment;
- Environmental cleanliness;
- The ability to regulate the microclimate of the home space;
- Vapor-tight;
- Non-toxic;
- Without smell;
- High thermal insulation and sound absorption indexes;
- Do not conduct electric current (dielectric);
- Suitable for use in any type of premises;
- High speed and ease of installation;
- The ability to perform installation alone with your own hands;
- Sufficient strength and density of the resulting partitions and walls from PGP;
- The use of PGP eliminates the need to plaster the rough surface;
- The main scope of finishing is sealing joints and seams;
- Low weight;
- Practicality;
- Energy saving qualities;
- Democratic price range.