The best ways to beautifully hide radiators
There are several ways to hide batteries; in this section we will look at the most popular and effective ones.
Hinged screen
It is by far the most practical and popular method; most often this design is made of metal and has its advantages:
- simple installation;
- heat exchange remains the same;
- can be made with rounded corners, which reduces the risk of injury.
Glass screens
A screen made of glass will be an interesting and stylish solution, especially for those who choose minimalism or a modern style in interior design.
Photo printing or various patterns can be applied to the glass, but this method is not a budget option.
Installation is carried out on a screw holder, but you will have to drill holes in the wall. However, the heating radiator will be stylishly protected. This option will fit into any interior.
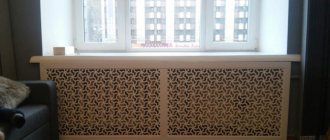
Box screens
Box screens are an excellent option for decorating radiators.
- They will help to completely hide the battery.
- The box can become a piece of furniture.
- The screens are easy to install and easy to maintain.
- Protect from burns or other injuries.
Curtains to the floor
Let’s not forget about the most popular way to hide batteries - simply hang them with opaque or translucent curtains. Using this method, over time you will even forget that there are pipes and a radiator behind the curtains.
The main thing is to choose curtains that will look harmonious and not show everyone that there is something behind them.
Painting the walls in color
How to hide a heating radiator on the wall if other designs are “prohibited”. There is only one way to paint it the same color as the wall.
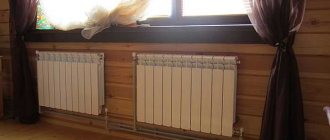
Wood frame
Wood will create coziness and warmth in the apartment, and the disguise of the battery will be elegant and beautiful. This option is for those who are furnishing their home in eco-style using natural materials.
These ways to hide batteries can be used as a stand for home decor.
Built in furniture
Another common way to cover a radiator is custom-made furniture or built-in furniture (shelves, cabinets, folding tables, seating).
Hide the radiator with furniture
Arrange furniture, such as an armchair or desk, so that it covers the radiator. A cast iron radiator is not attractive to many, but pieces of furniture can hide it.
Replace with designer model
For those who don’t want to invent anything, unique designer ways to hide batteries have been developed that already initially have a beautiful appearance and you simply don’t want to hide them.
Simple ways to protect your summer veranda from snow and rain
Typically, the meaning of a veranda is the additional area of a house or cottage, which often plays the role of a balcony or open area.
Quite often this is something like a greenhouse or winter garden. Often the veranda is an additional extension of the cottage.
Today, few standard projects involve the construction of a veranda simultaneously with the construction of a particular house. For this reason, many people build verandas on their own.
Most often, such a structure is already a closed roof or canopy, since it is much more convenient to enjoy fresh air and the landscape when the hot rays of the sun are not shining from above and the rain is not dripping.
Sometimes it all starts with creating such a site or simply trying to expand the living space. Open verandas look extremely tempting in the summer, allowing you to have a good rest and enjoy the freshness of nature.
However, with the onset of colder evenings, its use becomes extremely difficult and inconvenient.
That is why many resort to solutions such as closing verandas from unfavorable factors and even insulation, which provides this building with the actual status of part of the house.
https://youtube.com/watch?v=5Tl5cF_V3TY
Today, there are a large number of ways that allow you to close the veranda from a wide variety of adverse natural phenomena.
In addition, it is better to think about the possibility of insulating the veranda at the initial construction stage. Subsequent reworking of the basic design into an insulated one may require additional costs and be much more labor-intensive than the initial design.
Original ideas
There are many creative ideas that can turn batteries into a decorative element:
Forged products
Hide the radiator with fabric
Painting and decoupage of batteries
A simpler approach
The complexity of the work in this case depends on what kind of material needs to be used to decorate the surface. If it is paint, then everything will be very simple - you just need to purchase a special brush with a curved handle or make something like a thin roller yourself by attaching a foam coat to a wire. With other materials it is more difficult, and there are several finishing options:
- Wallpaper
- Plaster
- Plastic or MDF panels
- Foam ceiling tiles
- Tile
The most difficult thing will be with the tiles - they do not bend, it is difficult to push them into the narrow space behind the radiator, and it is even more difficult to align the tiles relative to each other. In addition, you will have to cut grooves in some of the tiles into which the brackets on which the heater hangs will fit. That is why finishing the walls behind the radiator with tiles is usually done with the removal of the heating device.
It is not so difficult to deal with wallpaper and the most important point will be to press the panel tightly to the surface. The cut canvas is smeared with glue, inserted behind the radiator and leveled there using a long brush with a curved handle or other suitable device. It will not be possible to completely remove the bubbles, but in this place they are practically invisible and this moment will not be the most critical. The main thing is to glue the piece of wallpaper well so that it does not come off later.
The panels are also easy to install. They can be fixed with glue or with lathing. In the first case, the work is simple and there is no need to consider it separately. The second case is not so simple. You will have to arm yourself with a screwdriver with a very long blade in order to be able to screw the panels through the heater sections. In addition, finishing the walls behind the heating radiators with panels on the sheathing is possible without removing them only if the panels are arranged vertically. Otherwise, it is almost impossible to install the sheathing. The most difficult case with plaster and it is worth talking about separately.
In addition to all the above methods for decorating the surface behind the radiator, there is another universal option that is not suitable in all cases - decorating the walls behind the radiator with ceiling tiles. It is simply glued to the desired surface, easily inserted into a narrow space. However, this method is not always suitable, since the designed surface will differ from the rest of the space.
Masking of radiators and the laws of heating engineering
The main task of any heating radiator is to heat the room. The goal is achieved by combining or separately using two methods - infrared radiation and convection. Thanks to them, comfortable conditions are formed.
Infrared radiation transfers heat to objects in the room, while convective radiation heats the air.
We can feel thermal energy if we place our hand in close proximity to the radiator. Convection ensures air circulation and uniform temperature distribution throughout the room.
This is known from school physics courses - warm air, rising upward, displaces colder air.
The screen for the radiator performs several important functions: it links the device with the design, protects it from damage and settling dust, the combustion of which releases toxins.
You need to understand that almost any method of hiding pipes and radiators will lead to an inevitable loss of heating power. The simplest example is the use of a glass screen with artistic painting.
It would seem that the task of decorating the radiator was completed successfully, but the room immediately became noticeably colder. This all happened because glass almost completely neutralizes infrared radiation.
An original way to disguise a heating radiator will help to expand the window sill and use the structure as a piece of furniture.
The deeper and more securely the radiator is hidden, the greater the losses will be.
This statement fully applies to blind screens that prevent both long-wave infrared radiation and short-wave convection.
Maximum perforation of the grille and the presence of gaps in the upper and lower parts of the lining are the key to normal convection.
The same can be said about the blind boxes above the top of the radiator - they are an insurmountable barrier to the spread of warm air upward (the convection method does not work). The conclusion suggests itself - the larger the area of the holes in the lining, the smaller the heat loss will be.
Installing a reflector on the wall increases the efficiency of the radiator
Decorative grilles for batteries
When closing the radiators, care must be taken to increase the heat flow in the room. The first is the placement of a special shielding thermal insulation material on the wall. The simplest and cheapest consists of a sheet of foam rubber covered on one side with foil.
Foam rubber glued to the wall is a good heat insulator. It does not allow cold to reach the battery. The shiny foil reflects the heat and partially returns it to the radiator; the rest is carried upward by the air flow. The heater sections become even hotter.
If you decide to cover the battery with a metal screen, paint the back side black. It attracts heat and absorbs it. The efficiency of heating systems will increase.
We also recommend reading:
How to sheathe the inside of a house with plasterboard beautifully and for a long time How to arrange a basement in a private house with your own hands Insulating a house with mineral wool. Sheathing guide Insulating a house with polystyrene foam: how to properly sheathe a house with polystyrene foam with your own hands? Do-it-yourself Art Nouveau houses with half-timbered elements
Requirements for the decoration of heating radiators
The availability of pipes and radiators is another important point in choosing decor after the requirements of heating engineering. It is well known that the heating radiator, namely the connection with the pipe, is the weakest point.
In addition, the radiator itself, due to improper installation and operation, or for a number of other reasons, may leak.
In emergency cases, it may be necessary to remove the radiator for repair or replacement. From a plumbing point of view, the cover or screen should not have a fixed attachment, ideally the use of attached screens.
Even if you decide to ignore the advice of a plumber, still listen to the voice of reason, which suggests that any weak point in the system is the connection nodes. The presence of an inspection (plastic door) can significantly simplify the task of servicing the radiator and heating system in the future.
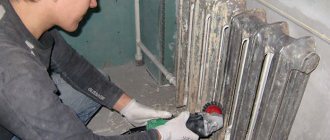
System purging
Airing or clogging of radiators leads to a completely cold canvas or part of it. Purging the system will help. There are several methods, each of which will require additional equipment:
- hydraulic purging;
- pneumohydroimpulse;
- the use of chemical compounds or soda ash.
These types most often involve servicing the entire system. This seems to be the most effective, because central heating is a complex system of pipes and pipelines.
It is recommended to carry out a single collective cleaning, which will be much more effective than individual cleaning.
How to close batteries correctly - technical rules and tips
Before closing the radiator, you need to take into account several technical nuances:
- Keep in mind that the heat transfer of a closed radiator is reduced in any case, no matter what masking method you choose. The main thing is that the change is not significant.
Ideally, the decrease in air temperature in the room should be about 1-1.5 degrees.
- Before closing the battery, put it in order: blow it out, wash it (this is done at the end of the heating season) and paint it.
- Keep in mind that the denser the grille weave, the better it masks the radiator, but the worse it conducts heat. Therefore, when choosing a screen for a battery, try to look for a middle ground or rely on heat saving.
- To minimize heat loss, the screen can be placed on legs and a groove can be cut in the center.
When closing the battery, it is very important not to block convective air flows, otherwise it will blow in the room and the windows will begin to fog up, which will ultimately lead to the appearance of mold on the walls. Ideally, the window sill visor should protrude no more than 30 mm above the radiator; the top and bottom of the radiator should be as open as possible.
- There should be a distance of at least 35-50 mm between the battery and the screen. There should be a gap of about 60-70 mm from the radiator to the floor and to the window sill.
To resolve emergency situations, it is necessary to provide free access to the radiator. For example, the box grille can be removable, folding, opening on hinges or retractable on profiles.
At a minimum, for trouble-free maintenance, the following must remain in good accessibility: pipe connections, valves, thermal head and threaded connections.
You can increase heat transfer by 20-25% by placing a heat-reflecting screen, for example, fumisol, on the wall behind the radiator. Often this is quite enough to completely compensate for the heat loss of a closed battery.
Decoupage application process
Despite the fact that decorating heating radiators with napkins is not a complicated process, to obtain the desired result it is necessary to adhere to a certain order of work.
Radiator surface preparation
First of all, you need to thoroughly wash the battery using detergents. It should be noted that there are many hard-to-reach places on radiators, so it is recommended to use a brush with a long handle or a brush to remove as much dirt as possible. Then let the surface dry or wipe dry with a cloth.
Next, you should give the surface perfect smoothness. To do this, you need to take sandpaper and clean out all the bulges and irregularities, as well as remove pieces of peeling paint. It is better to use coarse sandpaper to remove deep unevenness, and then sand the surface with a sheet of fine-grain sandpaper. After this, rinse the battery again.
The final stage of surface preparation is the application of heat-resistant white or light-colored enamel. The paint must dry completely, for this it must be left for a day.
Applying decoupage
After the surface of the battery is ready, it is necessary to prepare fragments of the pattern for decoupage. There are several methods for drawing. For example, you can cut out strips of napkins with designs. To do this, first measure the width of the radiator fin and line the napkin into strips of the appropriate size, then cut it out.
You can do it differently: take a napkin with a pattern and tear off the edges so that only a fragment of the pattern remains. This method will allow you to mask the edges of the transition when composing the composition, and will also provide a more reliable adhesion of the fragments to each other.
Next, you should try the drawing on the battery and evaluate how well it matches the drawn sketch.
Currently, there is a huge range of adhesive compositions for decoupage of various surfaces, but in order to save money, it is better to use PVC glue, especially since its properties are in no way inferior to other means. PVC glue should be diluted with water in proportions 1:1.
Place a fragment of the pattern on the battery and, starting from the middle, apply glue, evenly distributing it in the direction from the center to the edges. Movements should be smooth so as not to damage the napkin. If there are gaps between the drawings, they can be painted over with light enamel. To give the decoupage strength after the glue has completely dried, it is necessary to apply heat-resistant varnish in two layers.
If some fragments did not turn out the way you would like, then don’t be upset. An unsuccessfully applied napkin can be painted over with white enamel, wait until it dries, and try again.
Ideas for decoupage can be seen in the video:
Hide with drywall
Separately, I would like to talk about how you can hide batteries using drywall. It’s worth noting right away that the material has its drawbacks, but plasterboard construction is still very popular for repairs.
- The material is environmentally friendly and is not subject to combustion.
- You can find several varieties of this material on the market.
- This camouflage option is budget-friendly, and installation can be carried out in different ways, in a way that is convenient for you.
- Also, it is drywall that will allow the apartment owner to come up with any design, which will help not only to cover the pipes and radiator, but also to make additional decorative elements.
The downside is that drywall is afraid of external influences; if you do it carelessly, it is quite easy to break or pierce it.
And if a breakdown or leak occurs, the entire finish will have to be replaced again, but this material is cheap.
Plastic gratings
Cheap, but at the same time definitely not for residential premises, they will hide the battery/pipe, but when heated they can release compounds dangerous to humans, especially if the panel (grid) is made of cheap plastic by a “gray” manufacturer.
Plastic grilles to hide the battery
Advice! Plastic screens are suitable for non-residential premises, taking into account their resistance to high humidity - for bathrooms.
Do-it-yourself installation of a plasterboard box
In order to close the battery, you need to measure it, and then buy metal profiles and other additional products.
What materials are needed:
- 12 mm plasterboard sheet,
- metal profiles 27x28 and 60x27,
- self-tapping screws for drywall and metal,
- dowel-nails size 6x40,
- construction serpyanka,
- perforated corners.
Tools:
- screwdriver,
- hammer drill,
- metal scissors,
- stationery knife,
- construction stapler,
- pencil,
- roulette,
- building level.
Attention , for the construction of a plasterboard box there is an important requirement : the window sill must extend beyond the radiator by at least 3 centimeters.
Work order:
Installation of the frame. The profile should be mounted on three adjacent sides: floor, wall, window sill.
- Press the 27x28 metal profile to the base with your hand, drill a hole using a hammer drill in both the profile and the wall.
- Using a screwdriver, screw the dowel-nail into the hole.
- At the bottom of the window sill, a 27x28 metal profile is mounted on self-tapping screws; the length of the screws should not be greater than the thickness of the window sill.
- Next, you can install jumpers made of metal profile 60x27.
Selecting the grid size. This hole must be made slightly smaller than the grid size.
You can focus on three recommended sizes: 60x120, 60x90 or 60x60.
Installation of drywall. Plasterboard sheets can be cut with a utility knife. Screw it in with a screwdriver.
Installation of corners. They must be secured at the corners with a construction stapler, or attached to gypsum plaster.
- Serpyanka should be applied to all seams of the plasterboard box and covered with plaster.
- Before painting or wallpapering, the plasterboard box must be puttied, sanded and coated with primer.
Assembling the frame
Take profiles measuring 60x28 and 27x28. First, secure the elements that will not be on the wall:
- Place the profile against the line on the wall.
- Secure the profiles with dowels in increments of 20 cm.
- Check everything with a level.
Then install the second level of the frame. Divide the profile into sections of the required length. Then cut the edges 5 cm along the fold of the profile.
It turns out that the edges of the profile product are cut off, and the middle cut part is bent to the side. At the exit, a structure with an angle of 90° is formed.
Next, secure the vertical products to the front side of the structure. This way you will have a finished frame for drywall.
Masking heating pipes
It doesn’t matter whether it’s an apartment or a house, a bedroom or a kitchen, everywhere I would like to have a good renovation. Questions immediately arise: how to beautifully hide heating pipes and how can this be done with minimal cost and maximum efficiency?
At the same time, the method of disguise should be truly invisible and unnoticeable, fitting into the room.
The pipe can be hidden inside the wall, or it can also be closed into the floor. Remember that the old heating system should not be hidden in this way; this option is possible after a complete update of all elements.
Box on frame
It is best made from wood, plastic or plasterboard. Do not place the heating pipes close together; there should be at least three centimeters between the box and the pipe.
Hide behind decor
Decoration of pipes in various ways, for example, wrapping them with jute rope. But remember that this reduces heat transfer. Many owners decorate pipes with flowers; this can be done using bamboo with leaves.
Only imagination should work here; even an old pipe can look completely different.
Painting to match the color of the walls
The easiest and most practical method is to paint the radiators or riser in the same color as the walls, but the heat generation will not be reduced.
Hide under the floor plinth
A good invention was the floor plinth, in which you can easily hide batteries located horizontally and low to the floor.
Design options
There are many technologies that make it possible to decoratively cover heating radiators with plasterboard and at the same time guarantee the design thermal conditions. The most expensive is considered to be an individual order for a custom interior. But for reasons of economy, in most cases they design the batteries on their own:
- Construction of a suspended screen structure.
- Creating a wooden removable panel.
- The use of plasterboard boards is for arranging the box.
It would be worth noting that the latter option is considered especially popular today. At the same time, he cannot be considered the most impeccable.
How to cover a battery with plasterboard
The protective structure must meet the following characteristics:
- Jets of hot air should not have obstacles in their movement.
- Absolutely all threaded connections must be easily accessible.
- When developing a protective system, it is necessary to provide access to the battery control valves.
There are two options for using plasterboard that can be used to cover a radiator: a decorative wall made of gypsum plasterboard or arranging an ordinary plasterboard box with a removable metal lattice covering. The choice will depend on the location of the battery with communications in the apartment.
Photos in the interior of the rooms
Kitchen
The kitchen is the ideal room in which all ways to hide batteries will become practical and convenient.
If the room is small, then you can hide the radiator with the help of a beautiful tabletop or make a folding table, which will fold out when convenient.
Factories of metal-plastic structures offer a large selection of beautiful large-sized window sills that imitate stone, wood and other materials. A modern window sill does not break under weight, is not afraid of external factors, is easy to care for, wipe clean, is not afraid of scratches, and so on.
You can hide any type of battery in this way, including cast iron.
Living room
If the radiator is in a niche, then a wide window sill will help create a work area.
You can place souvenirs, vases or potted flowers on the constructed wooden box. You can also cover unsightly radiators in the living room with thick curtains.
The photo shows a modern living room. In order to hide the radiators, a wooden structure was installed, which also serves as a place for rest, storage and decoration.
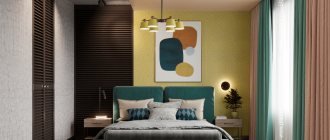
Bedroom and children's room
In the interior of a bedroom and children's room, batteries can be used as another place to relax, a tabletop for decorative elements or a workplace.
Bathroom
You can hide the pipes in the bathroom using a louvered door, plastic grilles or a cabinet with opening doors.
We hide heating radiators using wooden, glass or plastic screens.
Hallway
For radiators in hallways, glass screens or wooden boxes are suitable. In a small room, covering the battery is only necessary from a practicality point of view.
This could be a locker for storing shoes, or the battery will become a small coffee table where keys and other necessary items will be stored.
Using special screens
The screen for the battery must match the design of the room and allow heat to pass through well.
To cover heating radiators in a house or apartment, you can use decorative screens. Choose the one that suits you based on two parameters – design and material of manufacture.
Design features
Masking shields are classified according to the method of fastening to the batteries. According to this principle, screen boxes and hanging products are distinguished.
The decorative box consists of a frame with a large-mesh lattice on the front side. Such products are used when it is necessary to hide the unaesthetic appearance of the battery, and sometimes even the heating circuit pipes. The boxes are installed along the window sill or cover only the radiator. They can be equipped with opening doors, which makes cleaning and temperature control of the coolant easier.
There are two types of hanging grid screens:
- models in the form of a horizontal panel located on top, with a decorative grille built into it;
- options consisting only of the facade part, which are called shields.
The first option is used to hide radiators located in niches or not covered by a window sill on top, and is installed directly on the radiator.
Flat screens mounted to the wall are often placed on radiators under the window, not covered by the window sill. They are also used to hide batteries installed in niches.
Material of manufacture
Plastic screen
To choose a decorative element based on this indicator, you need to take into account the characteristic features of the material.
To mask batteries, screens made of the following materials are used:
- metal;
- wood;
- MDF;
- glass;
- plastic.
To cover unsightly heating radiators, apartment owners most often prefer simple white metal boxes. Such options cannot be called sophisticated, but they are inexpensive and give off heat well. If strength and appearance are important, and cost does not matter, it is better to opt for a stainless steel product, which is characterized by a long service life and aesthetic design. Typically, such decors are used to hide cast iron radiators.
MDF is the most practical and inexpensive material that has all the advantages of wood and at the same time is not afraid of moisture and temperature changes. Screens made of such material are less susceptible to deformation and bending. There are openwork options made from MDF on sale.
Glass panels for heating devices are distinguished by maximum design variability. They are made entirely from glass or with the addition of other decorative materials. The location of the corners must be such that it is impossible to get hurt or caught on clothing. Usually, drawings and patterns are applied to the surface of the product. To prevent glass from breaking or scratches, it is covered with a laminate. In addition to laminated glass, triplex or acrylic is often used.
Plastic screens are the cheapest, but at the same time dangerous option. The shield is subject to deformation from the heat of a hot radiator and releases harmful components into the air. It is not advisable to use such screens where people stay for a long time.
How to beautifully decorate radiators
Installing a decorative box to cover heating radiators is not the only solution, and not everyone can come up with something and do it on their own.
There are several more ways on how and with what to decorate radiators under the window.
Radiator painting
One of the important issues in decorating a room is the combination of colors. Well, how can a white radiator look, for example, on a dark wall? Although for some reason white color is considered ideal for batteries...
The choice of heat-resistant paints on the modern construction market is huge; all that remains is to choose the right shade and tint the white base.
Even if you don’t guess the shade by a couple of tones, it’s okay, such a difference seems not noticeable at all. But it will still be better than just white. Well, if you wish, you can also manually paint the batteries, especially if there is an ornament on the wallpaper. To make the work easier, you can use a stencil.
Remember: if you decide to paint the radiators in your apartment, buy only heat-resistant paints.
By the way, you can paint not only ordinary cast iron radiators, but also steel, bimetallic, and aluminum ones.
Fabric screen
Another decor option is sewing and attaching a fabric screen screen. This masking method has been tested and is quite effective in terms of minimal heat loss, since the fabric, even the densest, still allows warm air to pass through (unlike a hard screen).
Previously, when heavy curtains were in fashion, all the radiators and the pipes suitable for them were hidden behind them.
And now, when Roman or roller blinds that do not reach the floor are used everywhere, we have to invent something. A practical solution is to attach Velcro to the bottom of the window sill and sew the other half of the adhesive tape to the fabric to create a removable fabric screen.
You can choose the material for it according to your taste and financial capabilities - from thin curtains, to natural linen or cotton, or vertical strips of blinds. The only condition is that the fabric can withstand temperatures up to 60 degrees.
Well, having arranged the space under the window in this way, you can choose roller blinds or window blinds as protection from the sun, without worrying about the unsightly appearance of radiators.
Heating battery box
Most often, such structures are either mounted on the wall or are attached, making it easier to maintain communications. Such boxes are made mainly from MDF, chipboard, wood or plywood.
The first option is the most practical, since MDF does not dry out and is not exposed to temperature changes, and it can be given any shape.
A prerequisite for such a design is the presence of perforations (holes), and the larger they are, the more heat will enter the room. There must be a hole at the bottom for the influx of cold air, and at the top for the exit of warm air.
You can use ordinary wooden blocks as a frame for the box, and if you have the skills of a carpenter, you can build a box according to individual dimensions: it can be either a structure the entire width of the room, covering both the radiator and pipes, or a box covering only the radiator.
Usually, the installation of a box that hides radiators is accompanied by dusty work, so you need to think through the design and create a sketch at the beginning of the repair. A decorative box can not only hide nondescript radiators that are unnecessary to the eye, but also become an element of interior decoration.
Hard screen
The most common (but, unfortunately, not the most practical) solution is to install a hard screen; hardware stores even offer ready-made solutions from a variety of materials. Each of them has its own disadvantages and advantages over others.
- Made of metal. For production, as a rule, stainless steel is used, followed by painting or chrome elements. Such structures look like ordinary mesh boxes. Of course, a metal object under the window is not suitable for every room; the ideal style for such a solution is hi-tech or loft.
But this design conducts heat well and will last a long time.
- Made of wood. Wood has always been considered a win-win option, as it fits into almost any interior. Wooden screens are a structure in the form of wooden lamella panels, horizontal or vertical, located at a sufficient distance from each other. Thanks to good perforation, such a grille does not interfere with proper convection; a wooden screen for a heating radiator will be a reasonable solution.
The only condition is that it must fit perfectly into the environment. This can be achieved by making a custom-made design with tinting to match the furniture.
- Made from glass, it will fit perfectly into the interior of any room. The glass can be frosted or colored, almost completely covering the radiator, or it can have a pattern that matches the style of the room. However, along with the elegant and airy appearance, there is one huge drawback - heat loss in the absence of perforation will almost double. Even the thermal gap at the top and bottom of the screen does not help the situation.
You can improve air circulation by using not solid glass, but glass panels located at some distance from each other.
- From plasterboard. Of course, we are talking, rather, about drywall as the basis of the screen itself, and with the help of other materials you can make a decorative panel-overlay that covers the batteries flush with the box itself.
When installing such a structure, you need to remember all the laws of heating engineering and safety, leaving access to communications in the event of a leak or the need to replace batteries.
A few highlights
First, you need to choose the most effective cladding method, which hides all the pipes and taps as much as possible, matches the style of the interior of the room and has a neat appearance. In order for the structure to last for a long time, the following points should be taken into account:
- reliability, strength and durability of the heating system (if there is any doubt at this point, it is better to construct a collapsible casing);
- the meter, faucet, machine and other heat or pressure regulators must be freely accessible;
- The architecture and geometry of the system will affect the shape of camouflage shields and screens, and it may be necessary to construct a box.
Examples in different interior styles
Modern style
For a modern style or a high-tech and minimalist style, any material made of wood, glass (glass panels) or metal is suitable.
Classic style
It is recommended to use natural materials; it is better to opt for a wooden lattice.
Provence
Wood also loves styles such as Provence, country, chalet and eco-style.
Scandinavian
Wooden grilles in light colors will look appropriate in the Scandinavian style.
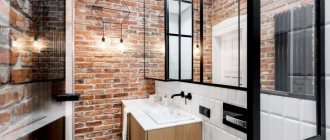
Loft
In the loft style, old radiators and pipes are most often not covered; they are left on display or replaced with interesting design options.
Painting
The easiest way to hide the battery is to simply paint it to match the wall near which the radiator is mounted. You just need to purchase special paint for painting batteries. This is an option when radiators match the overall style of the room
Cast iron radiators look great in a Venetian style interior
Painting a stylish radiator red
How to close a radiator: photo gallery
Plaster
It is very difficult to apply the solution onto a plane. For the work you will need a thin metal strip, 3 - 5 centimeters wide and 10 - 15 centimeters longer than the radiator. The plaster or putty is diluted a little thicker than usual so that it does not flow off the narrow strip of metal. The solution is applied to the edge of the strip along its entire length, and the strip itself with the applied mixture is passed through the space behind the battery, at an angle of forty-five degrees. The process is very similar to working with the rule - plastering must be done according to the same principle.
When the solution is applied to the entire area behind the heating device, the mixture must be given time to dry, and then, using the same metal strip, sand the surface by attaching sandpaper to it.