The installation or reconstruction of a heating system involves the installation or replacement of heating devices. The good news is that, if you wish, you can handle this yourself without the involvement of specialists. How heating radiators should be installed, where and how to place them, what is needed to carry out the work - all this is in the article.
It is possible to install heating radiators with your own hands
Connection diagrams
Before installing a heating radiator yourself, decide on the method of connecting it to the network. The most commonly used schemes are:
- Lateral (one-sided) installation scheme for heating radiators, in which the pipe supplying hot coolant is connected to the upper pipe of the heating device. The outlet pipe is connected to the bottom one. This ensures high heat transfer. When connecting the other way around, when the supply pipe is connected from below and the outlet pipe from above, the heat transfer is significantly reduced. Such a connection in a one-pipe system requires the installation of a jumper to facilitate the operation of the system.
- The second, diagonal connection of the heating radiator is as follows. The pipe supplying hot coolant is connected to the upper branch pipe of the battery, and the “return” is connected below, on the opposite side of the heating device. This connection is advisable if the battery is long and has a large number of sections. The diagonal design guarantees maximum heat transfer. But if the supply pipe is connected from below and the outlet pipe from above, the heat transfer will decrease by 6-10%.
- The last method - connecting heating radiators from below - is used when the consumer wants to hide heating pipes in the wall, in the floor or near its surface. With it, the forward and return pipes are connected from the bottom of the radiator, but from different sides. This connection scheme (otherwise called “Leningradka”) is characterized by aesthetics, as well as low heat transfer. Heat loss is up to 15%.
You can ask the specialists how much it costs to install a heating radiator, and perhaps agree to their services. Experienced craftsmen will tell you which connection scheme to choose and what auxiliary elements will be needed for installation.
To do this, first drain the coolant from one radiator, which is changed if it can be localized by closing the valves at the inlet; or from the entire one-pipe system. When carrying out work in an apartment building, you should contact the housing department so that its employees drain the water from the riser on which the replacement is being carried out. After this, you can remove the old radiator.
To install a heating radiator yourself, you first need to install shut-off and control equipment on it.
After installation, the connections need to be crimped.
Having familiarized yourself with how to properly install heating radiators, you should think about whether you need to do this work yourself. If you do not have the skills to install heating devices, it is better to hire professionals, having previously found out the prices for installing heating radiators in the locality where they will be installed.
From all of the above it follows that the installation of heating batteries can be quite simple if you initially prepare well for it and study all the instructions supplied with the device. After completing all procedures in the established sequence, the heating system will be durable and will last for decades.
Advantages of a country house
The main trump card of an individual private house is a heating system that is not tied to the thermal power station or other enterprises that decide when to turn on the heat and when to turn it off.
Also, the happy owners of their homes are not familiar with the eternal problem with pressure in the system. Replacing heating batteries in a private house is done only on an individual basis, and only the owner has the right to decide when to start a replacement and which radiators to install.
In cases where there is no candidate for “crazy hands”, it is worth contacting local authorities and applying for replacement of heating batteries through the housing office during the hot summer months.
This is due to the fact that in the fall the likelihood of getting into the queue will decrease significantly, and during the heating season, budget spending on repair work will naturally increase significantly.
The installation process itself
Before starting work, it is necessary to completely shut off the heating circuit, drain the water from the system, and the pump will help remove any remaining water efficiently. Using a level, carefully check the battery hung on the supports vertically and horizontally.
- You need to unscrew all plugs from the device.
- Connect a valved bypass, which is only required for a single-pipe circuit. To connect to a two-pipe circuit, a bypass is not needed; only a squeegee with a valve connected to it is used for connection.
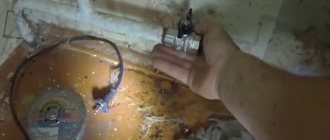
Using threaded connectors, we connect the battery to the system, using tow or another sealant to seal the joints (if you have experience in welding, the joints between the connectors and the pipeline can be welded).
It is important to note that until the installation is completed from aluminum. bimetallic and steel devices do not need to remove the packaging shell
Installation is complete, but some more pressure testing will be required. To do this, you will need to call a plumber. Both his experience and the device will be useful, which does not make sense to buy for the sake of installing several batteries.
Fasteners for steel heating devices
There are two different types in this group: tubular and panel radiators. They have different designs and, accordingly, different fastenings.
In panel radiators, brackets are welded on the rear wall, with the help of which they are hung on brackets. The shape of this type of fastener is different: it is designed specifically for staples.
In panel radiators, brackets are welded on the rear wall
When installing panel radiators, it is necessary to strictly monitor the vertical position of the brackets. High precision required: four or six staples must fit exactly onto the hooks
It is also important that the wall is perfectly flat and smooth. In general, using conventional brackets, panel radiators are quite difficult to hang
It is easier to work with other types of holders.
Standard bracket for panel radiator
Since the mass of the heating device is small, it is quite enough to fix it on the upper brackets and install stops at the bottom that will give it direction in the horizontal plane. They are not attached to the wall, but are hooked onto a bracket and simply rest against the wall. For reliability, the part that faces the wall is expanded.
This is what a set of brackets for tubular steel batteries looks like: the upper collector is hung on the hooks, and plastic stops are placed below
There are also special mounting strips for easy installation. They are a strip of metal with plastic clips at the top and bottom. When using this fastener, there is no need for brackets on the rear panel. The slats are fixed to the wall, a radiator is inserted into them, which is held in place by plastic hooks.
Rail for quick installation of panel batteries
Fasteners for tubular radiators are similar to sectional ones: the same hooks, only of a different size, often equipped with plastic covers.
There is also a special fastener with SMB tube grips. This is a strip of steel with plastic clips and a shelf at the bottom that serves as a support for the radiator. This mounting plate can be used if the weight of the device filled with water does not exceed 100 kg. Installation is simple: place the battery on the shelf, bring the top edge closer to the latches. They grab the nearest tube and a click is heard. The radiator is installed, the supply pipes can be connected.
Bar for quick installation of a tubular radiator with shelf and clamps
There is a second option for quick installation: SVD fasteners. It consists of two parts. One is attached to the radiator, the second to the wall. Then they are connected to each other and secured with a steel loop.
Another type of holder for tubular models: two parts, one is attached to the wall, the second is attached to the pipe. They are held together with a wire fastener.
Floor mounting for tubular radiators can be of several types: tubular supports that are welded at the factory, or stands with hooks. Radiators are hung on such racks, and the racks themselves are attached to the floor.
https://youtube.com/watch?v=VkAVZDnvz6w
Brackets for radiators are of different types and types: for wall and floor installation. The standard ones that come with the kit are reliable, but they are more difficult to work with. Planks and devices for quick installation save time, but cost a lot.
Radiator installation
Those who are wondering how to hang a heating radiator without the help of professional plumbers need to know what steps this process involves. So, you need:
- prepare equipment and materials;
- calculate location;
- install brackets;
- hang the radiator;
- seal or solder the joints;
- check the entire system for functionality.
We purchase the necessary materials and equipment
To begin with, it should be noted that it is not recommended to install radiators in winter.
And even if you decide to install heating yourself, in any case you need to call a plumber who will disconnect your apartment from the riser. To fix the radiator on the wall, you will need such components for heating radiators as: corners, bushings, nipples, brackets, brackets, couplings, adapters, tow, valves, keys. If you plan to install cast iron batteries, you also need to purchase Mayevsky taps, designed to bleed air from the heating system and prevent airing. Aluminum and bimetallic radiators are equipped with them initially.
Calculating the location
This stage is important to ensure that the heating device works at full capacity and does not collect air. To do this, sections of underwater pipes should be installed at a slight slope relative to the floor. The minimum slope is 0.5 cm. Here are the optimal battery location parameters:
- 3-5 centimeters from the wall;
- 10 centimeters from the floor;
- 5-10 centimeters from the windowsill.
If the selected type of battery does not have high heat dissipation, you can also install a heat-reflecting tap on the wall behind the battery. It is usually made of insulating material or a special heat-reflecting substance that is applied to the wall.
Installing brackets
Brackets are mounts for heating radiators in the form of durable metal hooks installed inside the wall.
It is easy to calculate the number of brackets: 1 piece per 1 m2 of battery. Of course, even if the entire battery area does not exceed 1 square meter, you will still need two brackets, since fixing the structure on one will be very unreliable. Now you need to mark their location: we use a tape measure and a level for this.
Then we drill holes in the wall, install special dowels in them, tighten the fasteners for the heating radiators and use our hands to make sure that the brackets sit tightly and do not wobble. If the choice fell on cast iron radiators, you may need a special mount for cast iron heating radiators - floor support elements in the form of legs. They will help distribute the weight evenly across all fastenings.
Installing the radiator
The last stage of radiator installation. We hang the battery and check how tightly it fits, whether the weight of the structure is distributed equally across all fastenings. Try to shake the radiator a little: if the fixation is strong enough, you can move on to the next step.
Connection and assembly of connections
There are three different radiator connection schemes:
- lateral one-sided. The most popular option. The inlet pipe is connected to the upper pipe, and the outlet pipe is connected to the lower pipe on the same side;
- diagonal connection. More suitable for long radiators in large rooms and ensures uniform heating of the entire battery. The inlet pipe in this scheme is connected to the upper pipe on one side, and the outlet pipe to the lower pipe on the other;
- bottom connection. It is used in cases where the heating system is hidden in the floor. Both inlet and outlet pipes are connected to the lower pipes from different sides. Heat transfer with a bottom connection is approximately 10% less than with a side connection.
Let's start assembling the connections. Regardless of which heating radiator fittings you purchase, you must carefully seal each connection.
Any leak can literally and figuratively result in additional repair costs.
Special tapes, silicone, sealant or good old tow are used as seals. If the purchased battery is protected with a special film, it is better to remove it only after thoroughly crimping each connection.
Now all that remains is to return the water supply to the heating system and carefully check all connections for leaks.
Heating system connection options
In addition to choosing the radiator itself, during installation you will also need to decide how to connect it to the centralized network. There are several different options available to you, each of which has its own scope of use:
Diagonal connection. This scheme is the best choice for long multi-section heating batteries. It is distinguished by the fact that the water supply pipe is attached to the pipe from above on one edge of the radiator, and the outlet pipe is attached to the lower pipe on the other side. Among the disadvantages of such a system are difficult repairs in case of problems: the scheme does not imply removing the battery without completely turning off the heating.
Radiator connection options
Important! When supplying water from below, you will lose about 10% of the possible heat
Bottom connection
This wiring diagram looks the most inconspicuous. It is used if pipes are located inside the floor or hidden under baseboards. The supply and outlet pipes are directed perpendicular to the floor surface. The main disadvantage is that this system involves the greatest possible amount of heat loss. Lateral one-way connection. It is the most common and effective. Maximum heat transfer is ensured by connecting the inlet pipe from above, and the outlet pipe from below on the same side of the battery. When inverted, the heating power is significantly reduced, so it is not recommended to swap pipes.
- Bottom connection. This wiring diagram looks the most inconspicuous. It is used if pipes are located inside the floor or hidden under baseboards. The supply and outlet pipes are directed perpendicular to the floor surface. The main disadvantage is that this system involves the greatest possible amount of heat loss.
- Lateral one-way connection. It is the most common and effective. Maximum heat transfer is ensured by connecting the inlet pipe from above, and the outlet pipe from below on the same side of the battery. When inverted, the heating power is significantly reduced, so it is not recommended to swap pipes.
Important! If the distant sections of the battery are not warmed up enough, a water flow extension is used. Parallel connection
It occurs through a heat pipe built into the heating system. The withdrawal is implemented in the same way. This system allows you to replace batteries without turning off the central heating, but the main disadvantage is that if there is insufficient pressure in the system, the batteries do not warm up well
Parallel connection. It occurs through a heat pipe built into the heating system. The withdrawal is implemented in the same way. This system allows you to replace batteries without turning off the central heating, but the main disadvantage is that if there is insufficient pressure in the system, the batteries do not warm up well.
Important! Connecting a heating radiator with your own hands in this way is quite difficult; it would be better to entrust this work to experienced installers. Serial connection
In this case, heat transfer through the system occurs due to air pressure in it. Excess air is drained using a Mayevsky tap. The main disadvantage of such a system is also the impossibility of repairs without shutting down the entire heating system
Serial connection. In this case, heat transfer through the system occurs due to air pressure in it. Excess air is drained using a Mayevsky tap. The main disadvantage of such a system is also the impossibility of repairs without shutting down the entire heating system.
How to choose the right bracket
The main rule when buying a retainer: it must withstand the weight placed on it. The maximum load is usually indicated in the included instructions. It is easiest to choose a bracket for an aluminum radiator, since it weighs little and any type is suitable for it.
For very powerful batteries, use floor stands. But if the covering in the house is wooden, then you need to make sure that the clamps are equipped with additional fasteners to the wall. This is necessary in order to reduce the load on the boards. For light heating elements that will be located in a deep niche under the window, it is better to buy a long bracket.
For cast iron radiators, it is recommended to use holders with the ability to slightly change the height, otherwise installation difficulties may arise. The price of an adjustable bracket is not so high as to give up installation convenience.
It is important that the alloy contains no toxic substances released when heated. You should not buy parts secondhand, especially without the appropriate accompanying documents.
Please note that the lightest one - the corner bracket - is intended only for aluminum and copper radiators
Replacement of heating devices through the housing office
So, replacement of heating devices is carried out through the housing office only in situations where the established service life of the radiators has been exceeded, they are in disrepair and cannot be repaired. In other cases, when batteries leak, minor repairs are performed.
According to current standards, the service life of a cast iron radiator is 15-30 years when used in an open system and 30-40 years when used in a closed system. But, even if we are talking about an apartment building where the batteries were installed more than 40 years ago, the operating company is often limited to only repairing the radiator, since replacement is included in the list of major repairs, the timing of which may not yet be determined.
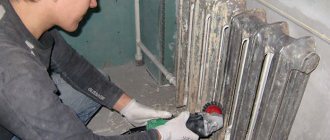
Replacing the battery using gas welding
To replace emergency batteries free of charge, residents must contact the Housing Office with a corresponding application. It is recommended to prepare two copies of the application and mark both as having been accepted by the responsible person at the housing office. The application and its copy are marked with the number, date and legible signature of the responsible person.
Duplicating the document will help if problems arise in the future related to the reluctance of the management company to change emergency batteries at the expense of the capital repair budget. But residents must defend their rights, since they paid for the replacement of old radiators through monthly payments for housing, maintenance and major repairs of the common property of the house.
Required tools and materials
Technology for unscrewing and assembling cast iron batteries: a – nipples capture the threads of sections (2-3 threads); b – tighten the nipples, join the sections; c – install the third section; d – two radiators are grouped.
Replacing or installing various cast iron radiators can occur in several stages and in completely different ways. To carry out this installation, you will need:
- gloves;
- protective glasses;
- gas welding;
- mounting keys;
- rubber gaskets;
- screwdrivers;
- radiator keys (short and long).
If you decide to install or replace it yourself, be very careful and follow the technical and safety rules. Welding work can be harmful.
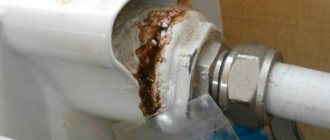
Problems of insufficient fastening of batteries to the wall
Correct and reliable fastening of heating devices to the wall is a guarantee of peace and well-being of apartment residents. Insufficient fixation of batteries, especially in combination with the following factors, can lead to deformation of the product or depressurization of seams, which will cause leaks
That is why it is very important to install them correctly and reliably.
So, the factors that aggravate the improper fastening of batteries:
- mechanical damage to devices during their operational life;
- distortions of heating radiators when filling them with water.
Some subtleties of hanging a radiator, advice from experts
After installing the radiator on the installed fasteners, it is necessary to check the correctness of its placement in the horizontal and vertical planes.
Checking the correct placement of the radiator in horizontal and vertical planes
It is allowed to lift the edge of the radiator on which the air vent is located. This will ensure that the air trapped in the system accumulates at the highest possible point, and its release will be carried out quickly and with maximum efficiency.
Air vent for radiator
But a change in level of more than one centimeter is unacceptable, as is a reverse tilt. In this case, the formation of an air lock is guaranteed, and the supply of coolant further along the pipeline will be limited or stopped.
Advice! Almost all companies producing heating devices require installers to install only on pre-prepared walls. That is, the surface must be smooth and clean. This will allow you to correctly mark the locations for fasteners.
The heating radiator is hung on two hooks (brackets), which are located in the upper part, and the third must be installed as a support for the lower edge of the device. The installation worker must remember that the number of brackets is determined by the weight and length of the battery.
Calculation of the required number of fasteners
The minimum number of radiator mounts cannot be less than two on top. A device suspended on one bracket will inevitably create tension at the connection points with the pipes of the heating system, which will lead to an emergency. The minimum required set is two fasteners on top and one on the bottom . When installed on a wall, the lower element is more necessary to maintain the vertical position of the radiator.
The total number of brackets can be determined by the standard: 1 bracket per 1 m2 of battery area. But there are recommendations from SNiP 3.05.01-85. For cast iron batteries (there were no others then) for 6-8 sections, the minimum set of fastenings is: 2 at the top and 1 at the bottom. Next, 1 bracket is added for every 5-7 sections. Floor racks are selected in the same way, first 6-8 cast iron sections are installed on 2 supports, then 1 more piece is added every 5-7 elements.
As for light batteries, the minimum set is used for the first 10 sections, then 1 mount is added every 10 radiator elements.
How to choose steel heating radiators wisely
How to install a heating radiator
You need to hang a heating radiator on a wall or in a niche after the surface has been completely puttied. However, to do this, connections for radiators must be removed from the wall or niche in advance. Depending on the type of connection of the heating batteries, these can be either chrome-plated tubes or simply metal-plastic or plastic pipes.
To install a heating radiator on a wall, you must first carry out the marking work correctly. To do this you will first need:
- Roulette and building level;
- Pencil;
- A long rule or a piece of even profile;
Before installing a heating radiator with your own hands, you must decide on its height, as well as how the radiator will hang, in a niche or under a window. According to the rules, heating radiators in niches are installed in the center, and under the windows on the other side, as low as possible from the floor. If we talk about the height of the heating radiator at which it should be installed, then this distance does not exceed 15 cm from the finished floor covering.
After all the above questions are completed, you can hang the heating radiator on the wall. The first thing to do is measure the distance from the window slopes or niche edges. The resulting size must be divided in half. This must be done in order to find the center.
Then a vertical line is drawn from the resulting markings, from which further markings will be made for installing the heating radiator. Depending on the type of heating device, its installation on the wall can be different, and this applies not only to the dimensions between the fastening elements.
How to hang an aluminum radiator on the wall
To hang an aluminum radiator on the wall, you need to move two sections towards the middle from each edge of the radiator. Thus, it will be clear between which sections the fasteners will be installed to fix the aluminum radiator to the wall.
Then you should measure the distance from the installation locations of the fasteners, and then transfer them to the wall. Using the marks obtained, holes are made in the wall for installing dowels in them and subsequent installation of fastening elements for the heating radiator.
How to hang a metal radiator on the wall
Panel heating radiators (metal) can be hung on the wall using a slightly different scheme. Initially, everything happens as in the first stage of installing an aluminum heating radiator. You need to find the center under the window, and then decide on the height of the radiator from the floor.
The fastening elements of the metal heating radiator are welded to its rear side. Therefore, the dimensions when installing a radiator on a wall are fixed here; they cannot be increased or decreased as, for example, when installing an aluminum radiator in one or two sections in the middle or to the edges.
In addition, to install a metal radiator on the wall, small fasteners are used rather than such long hooks. You should first measure the distance from the middle of the fasteners on the metal radiator, and then transfer them to the wall and install the heating radiator yourself.
How to hang a heating radiator on drywall
You should know that when installing a heating radiator, you need to take into account the material from which the wall on which the heating radiator will be hung is made.
It often happens that when drilling, the drill gets into a brick seam, and after that the dowel does not want to stay in the hole normally. In this case, you can go in two ways: hang the radiator higher or lower, or seal the resulting hole with putty, and then try to drill a new hole again.
A heating radiator is hung on a plasterboard wall in a completely different way. There are no usual screws or plastic dowels here. In order to hang a radiator on a plasterboard wall, you need to purchase special fasteners (moles).
Individual heating point
Criteria for choosing a radiator - technical parameters, types
Despite the fact that the main selection criteria are appearance, compliance with the interior and cost, without taking into account technical parameters, correct, trouble-free and durable operation of devices is almost impossible. Therefore, in addition to the type of material and design features, it is important to take into account the technical characteristics of the device.
Options
In order to correctly assemble and install heating radiators, you must first understand their basic technical characteristics:
- System pressure. The materials and design of the device must be designed not only for the operating pressure, but also for possible water hammer. For autonomous systems, its value, as a rule, does not exceed 2-4 atm.
- Heating level. The temperature of the coolant leaving the boiler circuit should not exceed the permissible heating level of the battery. Otherwise, this will lead to deformation of the seals and distortion of the housing itself, which can lead to depressurization and leakage. For private systems, its value usually does not exceed 900C.
The use of thermal heads allows you to control the heating level of the battery Source otoplenieblog.ru
- Coolant purity level. Various suspensions and dissolved substances present in the coolant, when heated/cooled, can settle on the walls of radiators, narrowing their clearance and reducing heat transfer. Over time, this will lead to excessive consumption of coolant, overloading the pump and the need to replace devices.
Important! Often, when designing a house, special niches are placed in the walls into which heating radiators can be hung, but such a design must be created correctly from the beginning. This is not only the dimensions and depth of the excavation, but also the sufficient thickness of the partition, facing the other side onto the street, in order to avoid significant heat loss and excessive consumption of energy resources.
Varieties
When choosing radiators, the material of its body and design features are also taken into account. Based on this feature, they are divided into 6 main varieties:
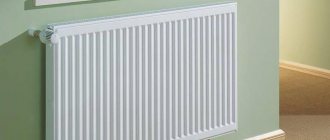
- Aluminum sectional. Made from an alloy of aluminum and silicon. They are distinguished by their light weight, aesthetics, maximum heat transfer and heat resistance. However, they are sensitive to water hammer and the composition of the coolant.
Aluminum sectional radiators of different heights Source googleapis.com
See also: https://m-strana.ru/services/inzhenernye-sistemy-otoplenie-vodosnabzhenie-kanalizatsiya/
- Bimetallic with a silumin body and a steel base - sectional and monolithic. Heat transfer is close to aluminum analogues. Quite expensive products.
- Steel panel and tubular. They are universal in use, but are not as durable as their cast iron counterparts; in addition, they are characterized by insufficient heat transfer.
- Cast iron sectional. They are characterized by low cost, durability, strength, durability and inertia. Disadvantages: heavy weight, cumbersome.
- Copper. Suitable for installation and operation in any conditions. The downside is the very high cost.
- Plastic. Applicable for systems with low pressure and stable operation when heated to no higher than 800C.
The most popular are aluminum radiators; they are lightweight, quickly transfer heat and are durable - they are assembled from silumin sectors - however, installation in an autonomous heating system requires strict control of parameters. This is primarily the operating pressure, pH level and degree of purity of the coolant. Otherwise, the device body quickly corrodes, deforms, cracks and fails.
Aluminum radiators will easily fit into any interior of a modern home Source teplosfera31.ru
Mounting aluminum radiators
Aluminum batteries are considered one of the most efficient and versatile heating devices. They have a relatively low price and a high degree of heat transfer. If the radiator installation was done correctly, this type of radiator will serve well for many years.
Radiator mounting diagram.
Aluminum batteries should be used in two- and one-pipe heating systems, which involve the construction of horizontal and vertical pipelines to connect heating devices. Such batteries can be used for systems with natural and forced circulation.
Often, batteries are installed directly under the window or using special racks near the window near the wall. Batteries are connected from one or different sides.
The degree of heat transfer from the batteries depends on how correctly the fastening was done. So, installation should be carried out in accordance with certain parameters - a distance of about 10-12 cm should be maintained from the floor, a distance from the battery to the wall should be approximately 2-5 cm (as the distance decreases, heat loss increases). There should be at least 10 cm from the battery to the windowsill.
In order to be able to control the heat level in the room, control valves with automatic or manual control modes must be installed at the outlet and inlet of the battery.
It is worth considering that installation of aluminum radiators can only be carried out by a special worker who has the appropriate license. According to the instructions, before installing radiators, you should thoroughly flush the heating system. Under no circumstances should you use alkaline solutions for cleaning. Any radiator must be equipped with special valves designed to release air.
Marking fastening points and calculating the number of fastenings
A water heating radiator passively heats the air, radiating heat into the interior of the room and organizing the movement of thermal air upward, receiving a cooled flow from below. For its normal operation, choosing a location where there are no obstacles to performing functions is the main task. Specific recommendations for the location of the heater and corresponding fastenings are given in the technical documentation for the device, but they are based on the following standards SNiP 3.05.01-85:
- the central axis of the radiator should not deviate from the central vertical axis of the window by more than 20 mm;
- the width of the heating radiator should be within 50-75% of the window width;
- the distance from the floor to the radiator is at least 60 mm;
- the gap between the radiator and the wall is in the range of 25-50 mm. Closer to 50 mm is better;
- the distance between the battery and the window sill is at least 50 mm.
Recommendations for placing heating radiators under classic windows.
Some tips:
- The batteries need to be placed further from the entrance, in a niche under the window, then it will not fog up.
- If it is impossible to comply with the standards in a tight niche under the window, you need to make decorative holes or slits in the window sill board.
- It is necessary to maintain a slope of 4-5 mm in the supply pipe to the heating device so that air pockets do not form in the radiator.
Choosing a bracket for a new heating radiator
When installing or replacing batteries yourself, there is a need to select related equipment. One of the fastening elements is a bracket, which allows you to securely fix the heating radiator and thereby ensure the proper operation of the entire system. The fastener is a galvanized steel hook with a round or rectangular cross-section, the other end of which has a fastening plate or thread.
The correct choice of brackets is very important, since the equipment cannot be allowed to one day sag, collapse from sudden seismic activity or from an accidental impact.
Types and application of radiator holders
Batteries are made of copper, aluminum, cast iron and bimetal (their inner layer is made of steel, the outer layer is aluminum). They are either suspended from the wall or based on floor installations; it is possible to combine these options. Some fasteners can be adjusted in height and length. There are many types of brackets, divided into 2 large groups:
- pin (anchor) fixed (short and long) holders for bimetallic or steel radiators;
- adjustable in height (change range is about 20 mm) with a mounting plate, they allow you to hide installation errors, surface unevenness, or hang batteries with a large number of sections (more than 6) perfectly horizontally;
- corner - for small or light heating elements.
There are also anti-noise holders with a special coating (rubberized). Technical characteristics of this bracket for mounting radiators: material – steel, diameter – 7 mm, can withstand weight up to 82 kg. They are usually taken for bedrooms so that the slight knocking noise that occurs in the equipment when heating is not heard.
A clever meter that saves electricity Pays for itself in 2 months!
2. Overview of brackets for mounting a floor radiator.
They come in the form:
- an independent stand with a sole, used for massive structures that are impractical to hang, for example, near too thin (plasterboard) partitions or display windows;
- additional for batteries screwed to the wall - these are the most suitable brackets for cast iron radiators;
- a stand with hooks that can be screwed to the floor and to the wall; It is also intended for large equipment, but is used to distribute the load between planes (for example, in a wooden house).
Floor holders can also be height-adjustable. There are options:
- in the form of a stand without fixing the radiator;
- with additional holding elements: with a chain or clamp;
- on a sole or on a tripod, can be screwed to the floor or simply placed on it.
Size calculation
Making your own pipe heating device is not very difficult. But there is one important point here - to correctly calculate the dimensions of the device. After all, such an indicator as heat transfer will depend on them.
Required indicators
The calculation is not easy, because it requires some criteria for the premises itself. For example: glazing area, number of entrance doors, what windows are installed, whether the floor, walls and ceiling are thermally insulated.
It’s difficult to take all this into account, so there is a simpler option that takes into account only two indicators:
- area of the room.
- ceiling height.
How can this help when assembling a homemade heating device? To do this, you will have to compare it with a conventional cast iron radiator of the MS-140-500 brand. The heat output of one section is 160 W, volume is 1.45 liters. What does this give us?
You can determine exactly how many sections will be needed if you use a cast iron device. The total volume of coolant that will fit in one battery is determined from the number of sections. And knowing this number, you can approximately determine the volume of the pipe radiator.
The thing is that the thermal conductivity of steel is 54 W/m*K, and that of cast iron is 46 W/m*K. That is, a small downward error will not have any effect on the quality of heat transfer.
Calculation example
Conventionally, we will assume that an eight-section cast-iron heating device corresponds to the above-described ratio. Its volume is 8x1.45=11.6 liters.
Now we can calculate the length of a pipe with a diameter of 100 mm, which we will use to assemble a homemade battery. The standard cross-sectional area of the pipes is 708.5 mm². We divide the volume by the cross-section, we get the length (we convert liters to mm³): 116000:708.5= 1640 mm. Or 1.64 m.
A slight deviation in both directions will not greatly affect the heat transfer. Therefore, you can choose either 1.6 or 1.7 m.
Stages of work
If you decide to do the battery installation work yourself, you need to know what steps the process involves.
The instructions for carrying out such work divide it into:
- Preparation of materials and equipment.
- Location calculation.
- Installation of brackets.
- Production of the actual installation.
- Soldering or sealing the joint.
- System check.
Preparatory stage
These operations are not recommended to be performed in winter, especially in severe frosts - this is unsafe. Even if you decide to do all the work yourself, you will still have to call a plumber from the housing office to disconnect your apartment from the common riser. In preparation for installing the system, you will need to purchase or find the following tools and additional materials, such as:
- Keys.
- Tow.
- Valves.
- Sgony.
- Couplings.
- Adapters.
- Brackets.
- Bushings.
- Nipples.
- Corners.
If you still choose, for example, cast iron batteries, you will probably have to purchase Mayevsky taps and install them yourself. In bimetallic and aluminum sections they are already built-in. This device allows you to bleed excess air from the system and maintain its functionality, preventing airing.
Washing
If you want to get a modern kitchen design, washing under the window is an excellent solution that has many advantages. Most often, the window is not involved in space optimization. By placing a sink underneath it, you will free up some space for other tasks. You can also save a little on electricity by getting more natural light from the window.
Frosted glass is an excellent analogue to curtains
Having made the choice to place the work area along the window, you need to pay special attention to the curtains. As a rule, it is very difficult to maintain perfect cleanliness where people cook. Therefore, textiles should be practical and not interfere with the cooking process.
Short curtains or blinds are perfect for this.
Therefore, textiles should be practical and not interfere with the cooking process. Short curtains or blinds are perfect for this.
Modern sunny style
Colorful elements in a bright kitchen make it more interesting
The disadvantage of placing the sink under the window is the additional costs involved. The main costs are the transfer of communications. For example, the most pressing issue will be battery transfer. What can be done to successfully implement such a project?