Attaching heating radiators to the wall surface is not a labor-intensive process, but it has its own characteristics and subtleties. Installation of heating radiators to the walls is one of the important stages of work on organizing a heating system. The rules for fixing radiators primarily depend on the material from which they are made. To do this reliably, you should know about the types of these elements of the heating system, fastening options and take into account other subtleties of the work process. Then attaching radiators to the wall will not cause you any difficulties.
How to choose wall brackets
It is not necessary to use the fasteners from the kit to the purchased heating radiator.
You can find a lot of bracket options on sale:
- with adjustment of installation parameters;
- reinforced - for batteries with heavy weight;
- decorative;
- floor;
- wall-mounted, at least two dozen more devices.
They are available in any construction supermarket, in Leroy Merlin, Epicenter. It’s even better to contact a specialized heating equipment salon, for example, Rifar, where there are examples of installed brackets with radiators.
Do you like to do everything at home with your own hands?
When choosing a bracket you need to consider:
- Fastening strength. You need to make a choice, choose a wall or floor installation option. The weight of the body with water is quite considerable, even for aluminum models. Therefore, if the walls in the house are finished with plasterboard, then it is better to choose a floor model;
- Difficult to install. The radiator bracket should not be too difficult to install and adjust, otherwise it will be difficult to correctly align the position of the heating battery relative to the water drain line;
- Possibility of adjusting the distance of the heating surface of the radiator from the wall and window sill board.
Experts call the last condition the most important of all those given. Maximum heat transfer is achieved only if the distance provides the best flow rate of warm air in the gap between the wall and the rear surface of the radiator. It is not always possible to align the radiator relative to the wall correctly the first time. Therefore, the problem is solved with the help of adjustable brackets.
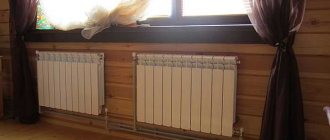
When planning to hang on wall brackets, it is necessary to leave a gap between the top edge of the radiator and the base of the window. For aluminum and bimetallic models, the gap must be at least 100 mm, for cast iron batteries - up to 20 mm.
The gap between the wall and the heating surface is recommended within 30-50 mm, selected individually. If the coolant temperature is no more than 60 °C, for example, when using an individual heating boiler, then the gap is reduced to 20 mm. The higher the temperature of the battery, the greater the distance from the wall should be.
General information
Not only their aesthetics, but also the degree of heat transfer depends on the quality of installation of batteries. Therefore, the installation must be carried out taking into account the requirements of SNiP:
| Options | Values |
| Distance from floor | Within 10-15 cm |
| Distance from wall | Within 2-5 cm |
| Distance to window sill | From 10 cm. |
Of course, the batteries must be fastened firmly and securely, since the durability of the device and the heat pipe depends on this.
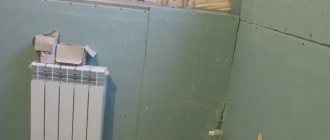
Marking for battery installation
Bracket for cast iron radiators
Cast iron batteries were traditionally hung on hooks made of forged or stamped reinforcement. They were driven into the brick wall at least 20-30 cm, which ensured reliable fixation of the radiators. Although such brackets looked rough, they were able to withstand the record weight of a cast-iron radiator without subsidence.
Installing the drive-in brackets required skill and experience. Each hook was driven into the wall according to preliminary markings so that the battery rested with the necks of the registers on its concave part without sagging. It was difficult to do this, so each hook had to be wedged. The slope of the drain line was adjusted in the same way.
Anchor hooks
In houses with concrete walls, cast iron radiators are placed on anchor brackets. They are no longer driven in, but threaded into a dowel driven into the wall.
This scheme makes it possible to position the cast-iron radiator more accurately and, if necessary, turn the brackets so that the heating surface of the radiator is parallel to the wall.
Anchor brackets are used to attach all types of radiators, so when purchasing you need to pay attention to the material of the hook and the maximum load. For cast iron batteries, forged steel models with a diameter of 10 mm and a working load of up to 50 kg are suitable.
Wall Welded Brackets
Each fastener is a mounting strip in the form of a pair of steel hooks, 4 mm thick, welded to a support strip 20 mm wide of the same metal. The distance between the supporting surfaces is 30 cm or 50 cm, the overhang of the supporting surface of the bracket is 80 mm and 95 mm.
Mounting strips can be installed on any type of wall; fastening is done using dowels or bolts. If it is a cast iron battery, it is mounted on a wall inside the room.
Fastening cast iron radiators with mounting strips has its nuances.
Namely:
- It is necessary to accurately mark the position of the brackets on the wall. If a mistake is made, both planks will need to be moved.
- After marking, the brackets are secured to the wall with dowels through the upper holes.
- The radiator is hung on the slats, its position is leveled, and only then the drilling locations on the wall for the lower holes are determined.
Any other methods of installing mounting strips require the use of a ready-made jig template. This option is used in residential construction.
Useful recommendations from experts
To achieve the most efficient operation of aluminum radiators, it is necessary to follow certain rules regarding their location:
- the distance from the aluminum device to the wall should be at least 2 centimeters or maximum 5 centimeters;
- the space from the bottom of the battery to the floor covering is 10-12 centimeters;
- from the top of the device to the window sill - about 10 centimeters.
When installing this equipment, it is necessary to install shut-off and control equipment at the inlet and outlet so that it is possible to regulate the temperature in the room manually or automatically (if thermostatic valves are used). This will be required if you plan to disconnect the batteries separately from the main heat supply in the future. For example, in the following situations - repair, flushing, replacement with new devices, leakage, emergency work.
Bracket for bimetallic radiators
The weight of bimetal batteries is several times less than cast iron registers, so there is no particular need to drive long, forged “crutches” of reinforcement into the wall. Bimetallic heating systems with a large number of registers are often secured using pin hooks.
This hook is similar in design to an anchor for a cast iron heating radiator, but its dimensions are smaller, and the depth of immersion in the wall is halved. The support arc is covered with plastic or silicone.
Bimetallic heating radiators are also installed on plate corners.
The mounting scheme for panel steel heating radiators is somewhat different. A standard steel panel is attached by hanging loops welded to the back of the radiator to several steel brackets pre-sewn to the wall with dowels. The number of brackets and hinges depends on the length of the heating radiator.
The steel radiator bracket is a steel angle with perforated mounting holes. During installation, the heating panel is laid in loops on the teeth with inserts. Oval holes for dowels allow you to adjust the position of the dowels, and different sizes of corner shelves make it possible, if necessary, to unfold the fasteners and place the body at different distances from the load-bearing wall.
Types and features of batteries
- Cast iron radiators are characterized by thick walls and resistance to corrosion. They retain heat for a long time and have a long service life. However, it is the large weight of these products that makes it necessary to make the most durable fastenings and supporting stands for them.
- Steel batteries are light in weight, which makes their installation not difficult at all. But they are short-lived and quickly lose heat.
- Aluminum products for the heating system are attractive in appearance, the installation of which is also simple due to their light weight.
- Bimetallic radiators are considered the most universal, combining the properties of steel and aluminum structures. Their installation is also not labor-intensive.
Bracket for aluminum radiators
For lightweight heating systems made of aluminum, corner types of fasteners are used. This can be a regular stamped steel corner or a more complex welded version with a height-adjustable supporting surface.
As a rule, aluminum radiators are supplied with universal brackets with a double arc. This scheme makes it possible to install batteries on any walls, without restrictions. But the strength of universal systems is noticeably lower than custom-made steel angles.
The manufacturer limits the load per point to 30 kg. Therefore, before assembling the heating system, you need to recalculate the total weight of the registers. If the battery is too long, you have to order additional fasteners or use special floor brackets for heating radiators.
Types of fasteners
When choosing fasteners for radiators, you need to focus on the convector model. The brackets allow you to qualitatively fix the heating element in the required place. To mount heating radiators, wall holders are best suited. Floor fastenings are used as additional ones, less often as main ones. Such brackets will be needed when the niche is not suitable for installing a battery or design ideas require such an implementation.
When to Use Floor Brackets
The heating system of the house is planned in such a way that the radiators are located around the perimeter of the room, blocking heat loss through window openings, balcony doors, and main walls. But it is not always possible to use walls as a load-bearing surface for fastening.
In such cases, floor fasteners are used:
- the use of panoramic windows from ceiling to floor in the room;
- if the walls are lined with lightweight materials that cannot be used as a supporting base for heating radiators;
- for temporary placement of a heating system.
The last case is the most common. Major renovations in a room are impossible without a properly functioning heating system. To plaster the walls, you have to remove the heating system. But the plaster will not dry if the water heating system does not maintain 18-20 oC for a week.
Floor brackets are used for modern cast iron batteries due to their heavy weight or due to the specific interior of the room. In this case, the fastenings are structurally combined with the supply of the heating system.
In what cases is it better to select fasteners individually?
First of all, the choice of fastenings depends on the weight of the radiators, the material of the walls and their condition. If the first is taken into account when designing standard fastenings, then it is currently impossible to produce universal elements suitable for any wall material (especially if it is an old wall in poor condition).
During restoration work, the desire to preserve historical authenticity and apply modern technologies for heating rooms forces restorers to select the necessary mounts for radiators. The same applies to the renovation of an old house and public building, where dilapidated wooden walls and floors of dubious quality force a combination of standard fasteners to securely fix the heating system. When designing and constructing modern buildings, where design ideas come into conflict with engineering pragmatism, limited by GOST and SNiP standards, a compromise has to be sought.
You can determine whether the complete mounts are suitable for your conditions only by studying which brackets are used in each case.
Heat transfer from heating radiators: comparison and calculation methods
How to hang a heating radiator on brackets
Installation can begin only after the final assembly of the radiator. The finished body will help determine the anchor points of the hooks.
Determine the drilling points on the wall for the hook-brackets. You can transfer the markings to the wall using a template or through the gap between the registers. We attach it to the wall and note the risks of connecting the heating system pipes. It is best to install the case on a temporary stand.
Using a building level, you will need to set the drain slope and transfer the line to the wall. We remove the body and mark the drilling points for the dowels on the line.
We drill holes to a depth of at least 70 mm, hammer in the plugs and screw in the brackets.
All that remains is to hang the heating radiator and make sure that the slope of the housing corresponds to the previously marked drain line.
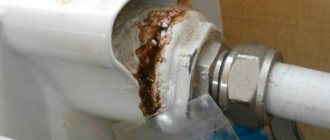
Problems of insufficient fastening of batteries to the wall
Correct and reliable fastening of heating devices to the wall is a guarantee of peace and well-being of apartment residents. Insufficient fixation of batteries, especially in combination with the following factors, can lead to deformation of the product or depressurization of seams, which will cause leaks. That is why it is very important to install them correctly and reliably.
So, the factors that aggravate the improper fastening of batteries:
- mechanical damage to devices during their operational life;
- distortions of heating radiators when filling them with water.
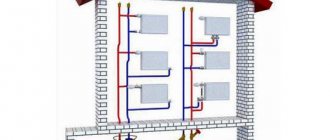
Wiring methods
First of all, it is necessary to distinguish two general schemes of heating systems: one-pipe and two-pipe.
In a single-pipe system, radiators are connected in series, and one pipe is used for hot and cooled coolant. This scheme is more demanding in selecting the diameter of the pipes, and the number of heating devices should not exceed 4 - 5 with a total pipeline length of up to 30 m. Since the water cools when passing through the radiators and giving off heat to them, the radiators located lower down the riser should have a larger power (i.e. surface area) to compensate for the lower coolant temperature.
Wiring diagrams for one-pipe and two-pipe systems
It may seem that a single-pipe design is cheaper due to fewer materials used, but this is not the case. In it:
- Overall efficiency decreases due to the gradual cooling of the coolant;
- A larger pipe diameter is required, which also increases initial costs;
- Larger radiators are required.
Connection methods
Having looked at general heating schemes, which you are unlikely to be able to influence in an already built house, let’s move on to how to connect each radiator. After all, when installing radiators, you will need to decide for yourself which method to choose.
To understand why the connection method is important, let's look at the figure:
1 – diagonal, 2 – bottom, 3 – diagonal with bottom feed, 4 – side, 5 – side with bottom feed, 6 – bottom one-sided
An incorrectly selected connection option can lead to heat loss of up to 22%. Of course, this does not mean that he is “bad”. Losses can be compensated for by greater radiator power. But they must be taken into account before purchasing radiators, so you need to decide on the connection method at the design stage.
What general conclusions can be drawn from the figure? The most important thing is that it is recommended to place the supply at the top, then, according to the laws of natural convection, the cooled coolant itself lowers and flows out from the bottom of the battery. If possible, use the recommended connection method - diagonal.
Methods 2 and 6 with bottom connections are often used in modern houses with horizontal riser wiring in the floor for design reasons. Today, there are even models of radiators with a bottom one-sided connection, in which the coolant circulates as if it were diagonal. Thus, with an aesthetic and discreet connection, these radiators do not lose in efficiency.
Selection of heating devices by type and power
If you have not yet purchased batteries, then before installation you need to select heating radiators from 4 varieties available for sale:
- Sectional aluminum. They are made from a light alloy - silumin (aluminum + silicon) in the form of ribbed sections, painted with a heat-resistant polymer composition.
- Bimetallic heaters are made in two types - sectional and monolithic, although outwardly the finished batteries look the same. Construction: a frame made of steel pipes is embedded inside each silumin section.
- Cast iron heating devices - designer and Soviet-style - are only available in sections.
- Steel radiators are welded from stamped metal (panel) or made by casting (tubular).
Note. In addition to the heaters shown in the photo, there are copper and baseboard convectors. They are rarely used in water systems.
Select the type of heating devices according to two criteria: price and appearance that matches the interior of the rooms. One caveat: for the autonomous heating system of a private house, any batteries are suitable, and for an apartment with centralized heating - radiators that can withstand a pressure of 12 bar. How to choose heaters is described in detail in a separate instruction.
The heat dissipation of batteries and registers is specified in the manufacturer's technical documentation. According to current standards, the power of radiator sections is indicated when the temperature difference between the coolant and room air is 70 °C.
For example, the room temperature is 20 degrees, the water in the pipes is 90 °C, then the section will give off approximately 180 W of heat. Since the coolant rarely heats up to 80-90 °C, the actual heat transfer will be much lower. Hence the conclusion: take radiators with a margin of 80-100%. Simplified methods for calculating power are described in our material and in the video:
Almost all types of batteries are offered in 2 versions - with side or bottom connection. Here the choice depends on the method of laying the pipes and the arrangement of the connections. This means that before installation you need to consider the question...
The installation process itself
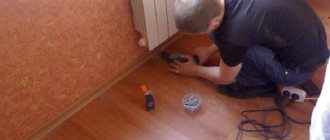
Before starting work, it is necessary to completely shut off the heating circuit, drain the water from the system, and the pump will help remove any remaining water efficiently. Using a level, carefully check the battery hung on the supports vertically and horizontally.
- You need to unscrew all plugs from the device.
- Connect a valved bypass, which is only required for a single-pipe circuit. To connect to a two-pipe circuit, a bypass is not needed; only a squeegee with a valve connected to it is used for connection.
Using threaded connectors, we connect the battery to the system, using tow or another sealant to seal the joints (if you have experience in welding, the joints between the connectors and the pipeline can be welded).
It is important to note that until the installation is completed from aluminum. bimetallic and steel devices do not need to remove the packaging shell
Installation is complete, but some more pressure testing will be required. To do this, you will need to call a plumber. Both his experience and the device will be useful, which does not make sense to buy for the sake of installing several batteries.
Calculation of the required number of sections
The number of sections of heating devices is determined depending on the heat losses through the building envelope. An accurate calculation can only be performed by a specialist with the appropriate education.
But enlarged standard indicators for standard buildings have long been determined, which take the required heat consumption at the rate of 1 kW of thermal energy per 10 m2 of room . This figure provides a guaranteed reserve power reserve of the device by 10-15%.
The heat output of sections of bimetallic radiators in Watts is indicated in the product passport, which is included in each package. Therefore, to determine the number of sections required to heat a room, it is necessary to multiply its area in m2 by 100 and divide by the heat transfer of one section in W.
The resulting result is rounded up to the nearest whole number. A rough check is made from the condition that on average one section heats 1.2-1.4 m2. Performing calculations allows you to avoid purchasing unnecessary items and save money.
Work technology
Owners of private houses can replace radiators at any time convenient for them. To do this, just turn off the boiler and drain the water from the heating circuit. But in an apartment in a multi-storey building, the replacement of the radiator will have to be previously agreed upon with the servicing utility organization.
If all installation work is carried out in the summer, when the heating is turned off, there will be fewer difficulties. However, you will still have to clarify whether water was drained from the system or not.
Please note that many experienced mechanics advise replacing radiators while the central heating is running. This is done because when the coolant is supplied to the circuit under pressure, you can immediately check the functionality of the radiator - if the installation was carried out incorrectly, leaks will occur.
The efficiency of their operation will depend on how well the radiators are mounted to the floor or to the wall. The fasteners must be installed absolutely level, since if they are skewed, problems may arise when connecting the system.
Using available means - a pencil, a level, a plumb line and a tape measure - perform the initial markings. Mark the central axis of the window, which should coincide with the middle of the radiator. A horizontal line is drawn through this point along which the upper supports will be attached.
In cases where there is only one lower support element, it is mounted on the central axis. If there are several of them, another horizontal line is drawn parallel to the top line. After marking, begin drilling holes and installing brackets.