Facade finishing is one of the most important construction operations. The coating of external walls is exposed to precipitation, cyclic freezing/freezing and exposure to harsh ultraviolet rays. Such difficult operating conditions place increased demands on the quality of finishing. Eliminating defects on façade walls is very expensive and time consuming. You will have to install scaffolding, wait for good weather, and remove construction debris. To eliminate the occurrence of unpleasant situations, you need to take all measures to prevent them.
Facade reinforcing mesh
Why do you need a reinforcing façade mesh?
Finishing of facade walls is carried out using various materials and technologies. Reinforcing stack is used in two cases.
To improve the performance characteristics of the plaster layer. For such purposes, it is better to use a metal mesh made of galvanized wire.
Galvanized welded mesh
Reinforcement is recommended to be used on façade walls made of foam concrete blocks; no additional measures are required for brick walls.
All metal mesh
The fact is that among the many advantages of foam blocks, you must definitely pay attention to one very significant drawback - low physical strength. Another problem is that concrete blocks begin to crumble when they freeze/thaw under conditions of high specific humidity. As a result, the cement plaster begins to peel off with all the negative consequences.
Foam block plaster
The reinforcing mesh allows the plaster to adhere to the wall surface. Conversations that such a mesh should be used when the plaster is thick, and that this prevents cracks from appearing on the plaster, are only partially confirmed. Firstly, there are simpler and cheaper methods to prevent cracks from appearing in thick plaster. The simplest one is to spread the solution in a thin layer in several stages. Secondly, the adhesion of the mortar to the façade wall can be increased by slightly increasing the amount of cement in the mortar. If this is not enough, then spray it with cement laitance.
To protect façade wall insulation from damage. Reinforcing facade mesh is used during the finishing of foam insulation boards.
Plastering on foam plastic
Not to improve the fixation of glue to the surface of polystyrene foam and to prevent cracks, as some “sofa” builders write, but precisely for mechanical protection.
Reinforcement
Why do we say this? The surface of expanded polystyrene is protected from the negative effects of ultraviolet rays and, oddly enough, damage from birds. For some unknown reason, birds are very fond of pecking at polystyrene foam; if you leave it unprotected, many large and small depressions will soon appear on the surface. Conclusion - polystyrene foam needs to be covered. The cheapest and most reliable method is to use glue.
By the way, the advertising characteristics of manufacturers of plastic reinforcing mesh “they are not afraid of UV” do not in any way affect their actual performance indicators. The fact is that even the thinnest layer of glue or other cement-sand mixture does not completely transmit ultraviolet rays. Why should the consumer pay for features that he does not need? And one more nuance. Most often, builders fix the reinforcing mesh on the entire wall. We think that this is done either out of ignorance of the physical properties, or by the desire to earn more money. We recommend using reinforcing mesh to a height of 1.5–2.0 meters; there is no need to go higher. No one will damage the finish screed on the foam that high. Mechanical damage occurs due to various impacts, careless maintenance work near the facade wall, etc.
Mixtures for interior spaces and decorative finishing
Types of facades of private houses
The emphasis is on their harmlessness, economical consumption and accuracy of work. When figuring out what kind of glue to glue foam plastic indoors, they also focus on the fact that most often it has a roll version. In this case, dry gypsum-based powders are suitable; they provide reliable adhesion to brick, foam concrete and plaster. When choosing such adhesive for polystyrene foam, it is advisable to prime the working surface. If the temperature is below +5 °C, dry gypsum foam glue is not used, the required humidity is not higher than 50–55%.
For internal thermal insulation with filling joints or fastening polystyrene foam wall panels, it is better to buy aerosol polyurethane (the same Titan Stiro 753 or Stolit PC). This type of glue (“liquid nails”) is suitable for gluing decorative ceiling elements and foam moldings. Its advantages: strong and reliable adhesion, environmental safety and heat resistance, disadvantage - high price. You need to work quickly with the mounting gun, clean the tip and not keep it open for more than 15 minutes, but judging by the reviews, it’s more convenient and practical than gluing foam plastic to putty.
Approximate consumption rates, ways to save
On average, 4 to 6 kg of dry glue is used per 1 m2, and one 750 mm polyurethane aerosol can is enough for 10–14 m2. The foam sheet must have at least 5 points of contact with the working plane; in some cases, the composition is applied in strips or even in a continuous layer (with differences in the base of more than 5 mm). The rate of adhesive consumption greatly depends on the method of fastening, the evenness of the walls, humidity, ambient temperature and the weight of the finishing outer cladding glued over the foam. Dry mixture or polyurethane aerosols are used in accordance with the attached instructions (its presence is mandatory, as well as an environmental certificate). In practice, this means that powdered adhesive for foam plastic is diluted exclusively in the recommended proportions and applied within the allotted period of time; when it hardens, it loses all its beneficial properties and must be disposed of.
The easiest way to save costs is through preliminary measures: stripping, priming, plastering and eliminating unevenness. Expanded polystyrene does not need additional processing, but sometimes it is coated with liquid fire retardant (this, like cutting sheets, is carried out in advance, and not at the time of gluing). You can make glue at home with your own hands: mix fat cottage cheese with slaked lime in equal proportions until smooth. According to reviews, this composition has good adhesion and is cost-effective, but it is impossible to store it due to rapid hardening.
Cost, recommendations for purchasing
| Name | Total per package/can | Consumption per 1 m2, kg | Price, rubles |
| Polymer cement composition with mineral fillers Ceresit ST 83 | 25 kg | 6 | 540 |
| Facade universal adhesive T-Avangard-Ku | 5 | 380 | |
| Dry mounting mixture Termofik-P | 4,5 | 390 | |
| Gypsum glue Knauf Perfix | 30 kg | 4 | 320 |
| Bitumen-rubber mass for waterproofing and gluing polystyrene foam Den Braven | 10 kg | 2-3 | 1250 |
| Polyurethane foam Ceresit ST 84 | 750 ml | 75 ml | 500 |
| Universal glue Titan Stiro 753 | 420 | ||
| Liquid Den Braven Montagefix ST for extruded polystyrene | 330 | ||
| Adhesive foam for Proffix foam | 850 ml | 75–100 ml | 300 |
The final choice depends on the application conditions and scope of work. Each of the mentioned types of glue ensures sufficient adhesion of polystyrene foam if the operating instructions are followed. All requirements: temperature, humidity, amount of added water, time period of use must be met, otherwise the material will not stick. For exterior work, it is economically feasible to buy dry mixtures, but installing foam plastic will take longer due to the preparation of the solution and its complete hardening. When insulating a basement or foundation, it is worth buying bitumen-based mastic; the high price is paid off by reliable waterproofing.
https://youtube.com/watch?v=kRVVA9K3GSk
Types of façade reinforcing mesh
Facade mesh
Facade reinforcing mesh is made of galvanized wire or polymers. The former are used for facade plaster, and the latter are used for universal use.
| Name | Cell sizes, mm | Roll dimensions, m | a brief description of | Approximate cost, rubles |
| Safety | 2×2 | 1×50 | The material of manufacture is fiberglass, used to reinforce plaster near door and window openings, to level the joints of insulation boards | 900 |
| OXISS | 5×5 | 1×50 | The mesh has enhanced protection against alkalis and can withstand significant dynamic and static forces over a long period of action. | 1050 |
| Fiberglass mesh facade | 5×5 | 1×50 | For holding plaster on concrete facades and insulation boards. Withstands a tensile load of at least 1400 N/cm. | 1400 |
| STREN S5 | 22×35 | 2×25 2×50 | Withstands rough and finishing facade plaster up to 5 cm thick. | 2750 5500 |
| KREPIKS Facade 1300 | 4×4 | 1×50 | Fiberglass, protected from alkalis and ultraviolet radiation. | 1560 |
| KREPIKS Facade 1500 | 5×5 | 1×50 | Reduces the likelihood of cracks due to thermal linear expansion | 1970 |
| KREPIKS Facade 2000 | 4×4 | 1×50 | For reinforcing finishing plasters during finishing of the insulating layer of the facade | 2300 |
| Galvanized welded mesh | 6×6, Ø 0.6 mm | 1×15 | Increased strength, resistant to precipitation and sunlight | 1110 |
| Galvanized welded mesh | 10×10, Ø 0.8 mm | 1×15 | For rough façade plasters 3–5 cm thick | 1330 |
| Galvanized welded mesh | 25×25, Ø 1.0 mm | 1×25 | For strengthening facade walls, universal use. Hot galvanizing of wire, minimum coating thickness 20 microns | 1770 |
| TsPVS mesh | 20×20, Ø 0.5 mm | 1×25 | All-metal expanded metal. It has an increased contact area with the façade plaster solution. | 580 |
KREPIX 1800 5x4mm
Plaster mesh TsPVS
Modern facade mesh
Prices for construction reinforcing mesh
Construction reinforcing mesh
Installation of foam plastic on the facade - some features
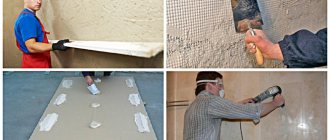
The adhesive can be applied to the sheets in stripes, in separate sections, or in one solid layer. There must be at least 5 points of contact between the adhesive and the wall to achieve the best adhesion. In addition, just recently a new aerosol adhesive made of polyurethane appeared on sale, the hardening time of which is about half an hour.
Do not mix adhesives from different manufacturers.
There are several types of adhesive mixtures for gluing foam. It is advisable to use glue from the same manufacturer, because different glues may differ in composition. In addition, they now produce universal adhesive compositions that are intended for all types of insulation.
The adhesive must be applied around the perimeter of the foam, without unnecessary gaps, and with a tape about 4-5 centimeters wide; the height must be sufficient so that the adhesive composition can be squeezed out during the installation of the slab. An important condition for high-quality installation of polystyrene foam is the application of glue along the perimeter of the slab.
The adhesive should be applied around the perimeter of the foam board
If this is not done, the slab will “play” along the edges, expanding and contracting. The space that will be occupied by the adhesive between the foam board and the wall must be at least 40%. Its thickness should be at least 1 centimeter.
After you have glued all the slabs and the glue has hardened sufficiently, you should proceed to additional fastenings. To do this, they use special dowels, in other words “fungi” or plastic “umbrellas”, which were originally intended for fastening foam plastic, and now they are used to fasten any wall heat insulators.
Do not drive the head of the façade dowel deep into the foam sheet
The dowel should be driven in so that it passes through the entire thickness of the foam, the layer of glue and enters the required depth into the wall. An important point is the choice of dowel length. Their number may vary, depending on the width of the slab itself and the number of floors of the building
The length of the dowels should be given special attention. Under no circumstances should the fungus cap be driven into the slab more than 1 centimeter.
This can only contribute to the rupture of the slab or the attachment point.
If you have a drill, you can purchase a special cutter for it, which makes neat grooves no more than 1 centimeter long. After you have driven in all the dowels, it is enough to plug the holes with special washer plugs.
For an even more even installation of foam plastic on the facade, beacons should be used, which must first be applied along the perimeter of the wall.
The insulation of ventilated facades is no different from the insulation of conventional facades. Dividing the work into stages, we get the following:
- The first stage consists of preparatory work, creating a base for insulation. The facade should be cleaned of dirt, the base should be milled, and defects that will be discovered during the cleaning process should be plastered. Before plastering a polystyrene foam façade, it must be primed.
- The second stage begins with setting up a profile. Its horizontal position is determined directly at the level at which it was agreed upon at the stage of designing the house.
Gaps of 2-3 millimeters wide must be left between the profiles in order to compensate for expansion due to rising temperatures.
As you can see, there is nothing complicated and finishing the facade with polystyrene foam yourself is quite possible even with a minimum of preparation and a minimal set of tools.
Metal mesh fixation technology
Metal mesh is used only for cement-sand facade plasters; foam insulation is not finished with it. The reason is the small thickness of the screed on foam boards. But a metal mesh cannot be aligned with such precision; it must be pressed down with a thick layer of mortar. Metal façade reinforcing mesh can withstand great forces; it is used when it is necessary to apply a thick layer of plaster on an uneven base.
Metal facade reinforcing mesh
The algorithm for fixing it has several features, the implementation of which guarantees the expected effect. The mesh can be laid in both vertical and horizontal stripes. This does not matter for the strength of the plaster; decide for yourself how it is more convenient for you to work. How to properly fix a metal mesh to a façade wall?
Plaster metal mesh
Step 1 . Take the dimensions of the wall and cut the metal mesh along them. Select a cutting tool based on the wire diameter. A universal tool – metal scissors.
Metal scissors
If they are not there, then a thin mesh with a wire diameter of up to 0.8 mm can be cut with ordinary scissors. True, after this these scissors will have to be sharpened; they will no longer cut paper.
Prices for construction scissors for metal
Metal scissors
Step 2. The metal mesh can be fixed with dowels; the length of the hardware should ensure strong fixation. For facade walls made of foam blocks, you can use ordinary nails 80–90 mm long. They are easily hammered into blocks with an ordinary hammer, and working with them is much faster and easier. Nails are much cheaper than dowels, and the quality of fixation is no different. Use dowels only on brick or concrete facade walls.
Fastening to brickwork using a self-tapping screw with a wide washer
Step 3. Using an electric drill with a hammer drill, drill the first hole for the mesh. The depth of the holes should be several centimeters greater than the length of the plastic part. Otherwise, it is impossible to insert the dowel to the required depth - the hole fills a little with brick chips during drilling and reduces its effective depth. It is difficult to remove it from there; it is better to drill more.
Important. The height of the protruding part of the dowels should not exceed the thickness of the plaster mortar. Monitor this parameter over the entire area of the façade wall so that you don’t have to adjust the dowels during plastering.
Step 4. Drill holes along one line at a distance of about fifty centimeters, hang a mesh on each dowel. Pull it a little, do not allow large irregularities. The position of the line does not matter; it can be vertical or horizontal depending on the method of fastening the reinforcing metal mesh.
Step 5. Check the position of the opposite edge of the grid; if it lies unevenly, then move the grid onto adjacent cells.
Fastening the plaster mesh - diagram
Step 6. Everything is fine - continue to fix the mesh, install the dowels in a checkerboard pattern. Most metal mesh is one meter wide; to secure it you will need three rows of hardware.
Fastening metal plaster mesh to a brick wall
Fastening metal mesh to the wall
Important. Where two rolls overlap, install the dowels at a distance of approximately 10 cm from the edge. Two strips of reinforcing mesh will be hung simultaneously on these dowels.
Step 7. In the areas of window and door openings, the mesh is cut to size. But there’s nothing wrong if you don’t cut it off, but simply bend it. Just make sure that the edges of the bent sections do not protrude beyond the thickness of the plaster layer.
When plastering such a façade wall, the mortar must be applied in several stages. For the first time, the mass should be slightly thicker than for final leveling. Specific values depend on several indicators and are determined individually, taking into account the practical experience of the master. The consistency of the solution is influenced by the weather, the ability of facade walls to absorb moisture, the linearity of the wall, the maximum parameters of unevenness, etc.
The process of plastering a wall using a fixed metal mesh
What kind of glue to glue polystyrene foam, features of polyurethane compounds
Facades of one-story houses - photos of cladding, how to decorate the facade of a house
Anyone who has ever tried to use polyurethane adhesive for foam plastic remains satisfied. It is easy and simple to work with - it is practically devoid of all the disadvantages inherent in cement-based adhesives. Its advantages include the following points.
- Clean and pleasant work - not dirty, as is the case with cement-based adhesives.
- Lifting a dozen cylinders to a height does not present any problems.
- The glue hardens quickly and after two to three minutes it adheres firmly to the surface. Even if you cover the ceiling with foam plastic, you won’t have to hold it with your hands for long.
- As mentioned above, it does not require additional fixation with “umbrellas” even on the ceiling.
- The ability to do without specialized equipment during the work process - neither a mixer nor a whisk is needed. Polyurethane glue is sold in cylinders both for a professional gun and in a household version with a straw.
The only “but” associated with the use of this glue is the surface itself, which is covered with foam plastic – it is almost impossible to level it using such adhesive compositions. It is excellent for insulating smooth walls, but not for curved walls with deviations from the level of surfaces.
If you are looking for an answer to the question of how to glue polystyrene foam onto flat walls, then the clear answer will be polyurethane glue in cans - it is extremely easy to use, and most importantly, pleasant. Before use, the container should be slightly warmed in hot water and shaken thoroughly. After this, by lightly pressing the trigger of the gun or the tube, glue is applied along the entire perimeter of the sheet from its back side and in the middle, with a cross from corner to corner. The foam is glued to a previously primed surface (it must dry) - just stick it on, press the glue in a circular motion of the foam without pressing and leave to dry. The next sheet can be glued immediately, without waiting for the first one to dry completely. If we are talking about the ceiling, then, naturally, the foam will have to be held for a minute or two. Alternatively, it can be supported with something like a mop, only larger - the top crossbar of such a support should be slightly larger than the long side of the foam sheet.
Polyurethane adhesive for foam plastic photo
As you can see, the question of which adhesive is best for polystyrene foam cannot be considered within the framework of various modifications of the material - they are different and intended for use in different conditions. Another thing is to choose glue within one of the groups of adhesive compositions described above; here you need to proceed solely from the reputation of the manufacturer
You shouldn’t even pay attention to the class of glue (standard or economy) - for example, “Moment,” which is classified as an economy class material, is not much different from a similar glue produced by the same company under the Ceresit brand. One can say more - the first one is even ahead of the second one in some qualities
If we take other companies that produce foam glue, then among the whole set we can additionally highlight Anserglob.
And the last thing I would like to say regarding the question of which glue for polystyrene foam is better to use is that in most cases the quality of the glue plays a secondary role in the process of insulating a house with polystyrene foam - as they say, in crooked hands even super-high-quality materials cannot create a beautiful house facade. As in any other work, it requires a competent approach to business, accuracy, accuracy and full adherence to technology!
Author of the article Alexander Kulikov
Step-by-step instructions for fixing plastic mesh
The durability of its operation largely depends on the correct implementation of recommendations for installing plastic reinforcing mesh on foam insulation. In all cases, do not rush, work carefully. We have already mentioned that there is no need to reinforce the entire wall height; it is enough to protect only the lower vulnerable area. But these are our recommendations; if you have doubts, protect the entire surface of the façade wall.
Fiberglass mesh
Any brand of glue is suitable for gluing the mesh. Study the instructions, it should have high adhesion to plastic materials. In most cases, a finishing layer of adhesive several millimeters thick is applied over the plastic reinforcing mesh. The final coating is done with facade paints or a thin layer of decorative plaster.
Glue for gluing fiberglass mesh to the facade
Step 1. Inspect the surface of the slabs. If they were fixed with dowels, then completely recess the caps and seal the recesses. You can close the gaps at the same time, but this is not necessary. The fact is that the cracks will automatically close during the application of the first layer.
Fastening sheets using umbrella dowels
Step 2. On the wall, draw a horizontal line along the height of the reinforcing layer. It will help you monitor the height of glue application. A thin layer of material dries quickly, and this not only causes an increase in material consumption, but also negatively affects the final leveling of the layer for painting.
Step 3: Prepare the glue according to the manufacturer's instructions. Always pour water into the container first, and then add the dry mixture. This technology will greatly simplify the mixing process. You can mix it manually with a trowel or using a mixing attachment for an electric drill.
Preparation of glue
The second method is not only easier, but also more effective. You need to stir for a few minutes, and then leave the mixture to stand for another 5-6 minutes. During this time, the moisture will be evenly distributed throughout the entire volume, and the smallest dry lumps of glue will completely disappear.
Step 4. The glue is applied to the wall with a spatula; the longer it is, the smoother the resulting surface is. Professionals work with spatulas up to 70 cm in size; beginners can initially use shorter ones.
Practical advice. If you are just learning how to apply glue to a surface, it is better to immediately get used to working with both hands. If one gets tired, use the other hand. Believe me, it is not so difficult, you just need to show a little endurance and patience.
Apply glue to the spatula with a trowel in the center of the tool. The quantity will be determined experimentally. While applying the layer, hold the spatula at an angle to the foam boards and press with medium force. Achieve a layer thickness of approximately 2–3 millimeters. Do not prepare a large amount of surface at once; for beginners, two meters in length is enough. If you do not have time to fix the mesh, the glue will harden, you will have to remove the old layer and make a new one.
Step 5. Try on the location of the plastic reinforcing mesh. If it does not fit into the window opening, trim the material.
Step 6. Glue one end of the mesh, align it horizontally to the length of the prepared section of the wall. Make sure that the mesh lies smoothly without distortions or bends; be guided by a pre-drawn line on the foam.
Practical advice. The mesh should overlap approximately ten centimeters. You may come across recommendations not to apply glue to the overlap of one line, but to do this simultaneously for two rows. We do not recommend doing this, it only complicates the work. Glue the first row of mesh along the entire width at once, including the overlap. The second line will be glued on top of the freshly applied glue. This method simplifies the fixation of the mesh and has a positive effect on quality.
We attach the mesh with overlapping fabrics
Step 7. Use your hand to press the mesh onto the fresh glue in several places and check its position again.
Cut off the excess
How is fiberglass mesh attached to polystyrene foam?
Step 8. Using a spatula, begin to press the mesh to the surface of the insulation. Make sure that the glue of the first layer extends over the entire surface and evenly covers the mesh cells on the front side. If there are areas where the adhesive is not thick enough, reapply it over the reinforcing mesh. Such omissions may appear in inexperienced craftsmen. Over time, you will learn to determine by eye the optimal thickness of the glue and there will be no more gaps. Spread excess solution over free surfaces. You shouldn’t try to immediately make the surface perfectly smooth, but you need to strive for this result.
Gluing the mesh
Gluing the mesh with a spatula
Step 9. Allow time for the glue to dry. It is better to leave it overnight; finishing grouting of surfaces is recommended the next day.
That’s all the technology is, the surface of the façade wall is prepared for painting or finishing with other materials. We remind you once again that plastic reinforcing mesh on insulated facades is not used to prevent cracks on the surface of the adhesive, but to prevent mechanical damage to the foam. Keep this in mind when making your decision.
Prices for popular types of putty
Putties
How to use
The reinforcing capabilities of painting grids are maximized when they are placed inside the processing layer intended for leveling. The probability of crack formation decreases in proportion to the approach of the mesh to the outer layer of the surface. Technological process for reinforcing the putty layer:
- Prime the plastered wall.
- After the primer has hardened, apply the putty base.
- While the putty is wet, place a fiberglass mesh on the wall and press it into the solution with a tool (trowel).
- Cover the network with an additional layer of putty, leveling it with a wide spatula.
When the reinforced layer has hardened, it is time to process it with a sanding mesh or sandpaper. In order to achieve an ideal aesthetic effect, a finishing compound is applied to the second layer of putty, which, after hardening, is sanded with fine-grain emery cloth. A completely flat plastered wall is coated with a finishing primer, after which it has hardened, painting can begin.
The technology for using mesh with an adhesive layer on drywall is somewhat different:
- The joining boundaries are expanded, cleaned and primed.
- Serpyanka is glued to the frozen joint.
- Putty strokes are applied with force so that the mass squeezes through the mesh and fills the space between the sheets of drywall.
- Without interruption, apply the second layer of putty, gradually leveling it with a spatula.
After sanding the surface and making sure that the primer has completely polymerized, you can begin painting and wallpapering.
The web is also initially glued to the primed surface: the glue is spread with a roller, the strips of fiberglass are leveled and pressed with the same adhesive roller. The putty mixture is applied after the glue has completely hardened. The following steps are identical to previous finishing technologies: sanding and priming.
Note! The next mesh for puttying fiberglass walls should overlap the previous one by at least 5 cm.
In order to reinforce the putty layer at the outer corners of the openings, you can use a specially designed corner with attached fiberglass. The corner forms an auxiliary barrier against careless chipping as a result of severe mechanical damage by a person carelessly leaning on these areas. Internal corners are often reinforced with a standard grille or fiberglass.
Facade mesh to protect construction sites
Compliance with safety regulations during construction work on multi-storey buildings is one of the main requirements for all developers. This is especially true for facilities built within cities. The façade mesh is fixed to scaffolding and prevents construction debris and tools from falling onto pedestrian walkways. For such purposes, the cheapest plastic reinforcing mesh is used; after dismantling, it is suitable for direct use.
Construction mesh
Facade mesh (half-sleeve mesh)
"Emerald" - a new mesh for scaffolding
APPLYING GLUE
Cement adhesive mortar is applied to the surface of insulation boards in different ways, depending on the unevenness of the base. Beacon is used for wall unevenness of 5 mm or more. The mixture is distributed around the perimeter of the slab and laid out with several beacons in the center. Solid is used on surfaces with unevenness up to 5 mm, using a notched trowel. In both cases, the surface of the mineral wool insulation is pre-primed with a thin layer of the same adhesive solution. After installing the element, excess glue extending beyond its contour is removed.
To create a protective reinforced layer, the glued insulation is covered with a plaster-adhesive composition 2-3 mm thick. Then the fiberglass mesh sheets are embedded in it and the mixture is applied again to a thickness of up to 3 mm, smoothing it so that the mesh is not visible. Surface unevenness is leveled with an abrasive float after 24 hours.
Work with the plaster-adhesive mixture is carried out at air and base temperatures from 5 to 30 °C. After installing the slab in the design position, the adhesive contact area must be at least 40% of the bonded surface
Question answer
Is it possible to repair peeled areas with façade reinforcement mesh? It is possible, but it is better to avoid such situations. Unfortunately, in most cases, peeling appears several months or years after finishing the insulated façade walls.
Repair of peelings
How is the repair done?
- Inspect the peeled area. Using your hand, check the strength of the mesh fixation next to the detached area. Prepare materials: glue and a piece of plastic reinforcing mesh. If the facade walls are painted, then you need to have the appropriate paint.
- Pull the peeled mesh towards you and use a sharp mounting knife to cut it around the perimeter. Work very carefully, do not damage the foam. If the sect continues to flake off during cutting, great. In this way you remove the entire problem area; in any case, it would peel off over time.
- Cut a new mesh for the patch, the size should be slightly larger than the cleared area for the overlap.
- Remove the layer of old glue from the surface of the foam.
- Using a spatula, carefully remove the top layer of glue from the surface of the remaining mesh to the width of the new overlap. Apply the first layer of glue, embed the mesh into it and apply the second layer of glue.
- After it dries, level it. Pay special attention to the docking area. It should be as smooth as possible without sudden changes in height.
Repair of a peeling area
How does the quality of plastic mesh depend on its price? Almost nothing. When choosing a mesh, pay attention to the thickness of the fabric and the size of the mesh cells. All other characteristics are nothing more than advertising gimmicks of the manufacturers.
Plastic mesh
What is better than a plastic anti-corrosion coating for metal reinforced mesh against galvanizing? Nothing, besides, the price of such a mesh is higher than with galvanized wire. You need to know that the adhesion of all cement mortars to plastics is significantly lower than to galvanized surfaces. As for the service life and load-bearing capacity, these indicators are absolutely identical.
Metal mesh with polymer coating
Is it possible to do without reinforcing mesh when plastering uneven façade walls? Not only is it possible, but it is necessary. We have already talked about simpler and more effective methods of working with such surfaces. Reinforcement with metal mesh is used not to prevent the appearance of cracks, but to increase the bearing capacity of cement-sand mortars. It is needed when screeding the floor. One more nuance. The indicators of linear thermal expansion of metal and solution differ significantly. This means that microcracks will certainly appear in the places where cement and metal mesh meet, because outside temperatures fluctuate within significant limits. In enclosed spaces there are no such fluctuations.
Should I use reinforcing mesh on the basement surfaces of façade walls? Use this technology only for foam-insulated bases. In all other cases it is not needed.
Photo - a cake made of insulation and mesh for reinforcement
How much does the cost of finishing facade walls increase due to the use of reinforcing mesh? The cost of finishing increases by no more than 3–5%. But if we take into account possible repairs due to mechanical damage to the foam, then a slight increase in cost is completely justified.
Tools for working with glue
Facade styles of private and country houses finishing and decor Photo and Video
When applying the adhesive composition, you should use two spatulas: a wide façade trowel and a regular metal trowel. A facade spatula with a width of about/more than 20 cm is convenient for evenly distributing the composition on the wall. Using a small metal tool, take the adhesive mass from the container and distribute it over the area of a wide spatula. All holes and cracks disappear, the surface becomes perfectly smooth.
It is especially convenient to work with two spatulas when processing corners; with strong pressure, the canvas can move and form waves. To eliminate mistakes, you should hold it with one tool and smooth it with the other.
Requirements
Due to the fact that PS is used for thermal insulation both outside and inside the building, the adhesive product for it must meet a number of requirements:
- Resistance to temperature changes - maintaining properties during sudden temperature fluctuations - from -60 °C to +40 °C. This is relevant for treating walls outdoors, since outside the house the material is affected by aggressive environmental factors.
- Immunity to chemical and biological agents.
- High adhesion.
- Lack of organic solvents (acetone, alcohol, ethers).
- Foam glue must be safe and not have an unpleasant toxic odor.
CASINGS FOR SEALING UNDERGROUND PIPES
Foamglas PC PITTWRAP SS 24” + 4” (KIT) (Belgium)
Description : Self-adhesive coating - the PITTWRAP® SELF-SEALING casing consists of a special bitumen resin reinforced with fiberglass, coated with aluminized Mylar (PET) film and protective paper. PITTWRAP® SELF-SEALING is a self-adhesive, non-metallic membrane for protecting FOAMGLAS® underground insulation systems. The casing is attached by simple manual pressure, without the use of heaters or torches. PITTWRAP® SELF-SEALING casing can be applied to insulation parts in the factory.
Packaging : Roll + 0.60x15.24x0.1x15.24 m / in a box
Foamglas PC PITTWRAP B100 (Belgium)
Description : PITTWRAP® B100 jacketing is a self-adhesive jacketing, aluminium-butyl laminate, used to protect above-ground FOAMGLAS® insulation systems of discharge piping under a protective finishing jacket. A protective cover must be installed over PITTWRAP® B100 to protect against UV rays. The jacket is manually applied by pressure without the use of a torch or heater. PITTWRAP® B100 jacketing consists of a 1.1mm thick high tack butyl adhesive with 25 micron aluminum film laminated top and bottom with 12 micron polyester film to provide a high level of resistance and protection (tear resistance and puncture). Polyester layers also protect the aluminum surface from corrosion.
Packaging : Roll 1m*150m (15 sq.m.)
Storage rules
All the rules are general, so you can describe them based on one glue and draw analogies with the others.
WEBER THERM S100 facade mesh adhesive is sold in a three-layer kraft paper bag (the inner layer of which is made of polyethylene). Each package weighs 25 kg.
Shelf life in packaging from production is 1 year. The storage place must be free of moisture. Such products are marked with a special mark in the form of a “snowflake”, which means that they can be used in winter. Tests have shown that this product is frost-resistant. This is evidenced by such data as: for the number of test cycles 75, the compressive strength is expressed as 18.9 MPa.
It is important to follow all conditions, both for work and storage, because if this is not done, the quality of the glue will suffer, no matter what company or brand it is.
Main properties
- Resistant to stretching and tearing.
- Protection from internal stresses that may be caused by external influences.
- It is not affected by acidic components.
- It protects the plaster layer, mainly from cracks that may appear in the climate in which we live.
- All properties will not change over time.
If you decide to buy facade adhesive, then you have probably already decided on the scope of its application. But we will describe all the places where it can be used. This will definitely be useful to you in the future, and perhaps you will change your current decision.
general information
Saving resources is always important, especially when the cold season comes. Thinking about alternative ways to conserve thermal energy, many decide to insulate themselves using heat-insulating boards. Not so long ago, an interesting type of insulation appeared on the market - polystyrene foam, which is a modernized version of the polystyrene foam we are familiar with. Possessing a more efficient heat transfer coefficient, it is used for external cladding, in foundation bases, and in the construction of roofs and ceilings. Expanded polystyrene (PPS) is a material for insulating facades. This is a polymer that is swollen/filled with gas. It has a closed granule structure. Almost one hundred percent gas content in the composition gives it impeccable heat-insulating and sound-absorbing properties. Choosing adhesive for polystyrene foam is not as easy a task as it might seem at first glance. The product you like may have contraindications and incompatibility in use. The main thing is that the glue does not contain substances that can dissolve the EPS structure:
- xylene
- acetone
- toluene
- drying oil
- formaldehyde
- epoxy resin
- polyester resin
- gasoline-kerosene-containing substances
If you are convinced that the composition of the glue does not threaten the integrity of the polystyrene foam, you can buy it.
Manufacturers
Particular attention should be paid to universal construction adhesive. This solution should be used only in the prescribed proportions, both water and dry mixture, as well as following the preparation order. This glue will work well if used within four hours of preparing it.
We will also consider other manufacturers and their products, which they present on the market in large quantities. So there is no shortage of glue.
We will list the options by manufacturer, taking into account price and other features.
