When designing a bathroom space, all items should be optimally combined and fit together. Such a detail as bath legs is no exception. These elements have long become an integral part of not only spacious “aristocratic” premises, but also ordinary apartments.
Today, a variety of options for the location of bathtubs are practiced. But do not forget that it should not only be beautiful, but also reliable.
Advantages and features of bath legs
The supports or legs of the bathtub perform the most important function - they ensure the safety of the person who is bathing and the reliability of the installation of the product. These four pieces are easy to install, even by hand, giving the bath a stunning appearance. Under the lower part of the product, mounted on supports, it is easy to equip a special place for storing detergents, body care items, and cleaning equipment.
The legs are very compact, but the most reliable, original, luxurious options are expensive.
Preliminary work
Removing an old bathtub
Don't forget to turn off the water supply first.
- If there is a screen, disassemble it first.
- Disconnect the siphon and water drain.
- Remove the faucet, mixer, shower.
- Use a knife or trowel to carefully remove the sealant.
- Frame structures are usually attached at the corners with self-tapping screws. Unscrew them and disconnect the bowl from the wall.
- Products standing on the podium are separated by gentle swinging.
- A cast iron or steel hot tub can be sawed to make it easier to remove. In some cases, the fastening points will have to be lubricated with a solution that destroys rust.
- The structure embedded in the wall is first dismantled from the outside. Then they place a soft cloth under it and “drop” it on the floor. The second side is removed using a crowbar or pry bar.
Instagram @tbrownplumbing
Preparing the site
Let's take as a basis a bathroom that needs a comprehensive renovation. You can skip those items that are not suitable for you - after all, sometimes you only need to replace the plumbing.
- Remove all unnecessary items from the premises. Even if they don't bother you, there is a risk of getting them very dirty.
- Shut off the water supply and remove old equipment.
- Clear the area where you will install the hot tub from any debris. If you removed the finishing, vacuum the corners and joints of the floor and walls from construction dust.
- Level the floor so that the differences are no more than one centimeter.
- If the bowl is cornered, align the corner well. It should be 90° so that the sides fit snugly against the wall. Otherwise, the fastening strips and acrylic will quickly deteriorate.
- Waterproof walls and floors. The walls are usually covered with coating or impregnation 20 cm above the level of the shower head. The floor is in the area where the font will be located.
- Lay tiles on the floor.
- Conduct communications. The difference in height of sewer pipes must be at least 1.5 cm for pipes Ф50 and 3 cm for Ф110. Otherwise, the water will drain slowly and blockages will appear. To connect to the siphon, use only rigid pipes, without right angles or corrugations.
- Seal all joints with sealant.
- Make sound and heat insulation of the bottom. It can be covered with polyurethane foam or isolon.
- Seal the edges of the walls with mounting film to avoid damaging them when moving plumbing fixtures from room to room.
Instagram @santehnik_gmr_krasnodar_krd
Instagram @santehnik_gmr_krasnodar_krd
Instagram @irgil
Instagram @imstavpro
This completes the preparatory work.
Wall covering
Tiling can be done before installing the product, or after. In the first case, it occupies the entire space up to the floor. The joint with the plumbing is sealed with silicone sealant. In the second case, the tiles are laid above the side - it turns out to be slightly recessed into the wall. You can start this finishing before installing the bowl, but then you need to accurately check the distance. This is not to say that it is correct to use only one of the options. It all depends on the specific situation.
Built-in Roca Hall 170×75
Installation of acrylic bathtubs is recommended by craftsmen to begin with tiling the walls. This sequence is due to the fragility of acrylic. In addition, structures made from this material are replaced more often than others, which means making a mortise side in the wall is impractical. After all, removing the cup will be more difficult.
If you had to install it later, protect the acrylic from damage and contamination as shown in the photo. Be sure to attach shock-absorbing material to the sides and a sheet of plywood on top.
Instagram @krio_stroy
Instagram @krio_stroy
When the selected area is cleaned, waterproofed and dried, begin to assemble the structure using one of the three methods that we have listed. Be sure to read the instructions - they usually indicate exactly how best to fix the support for the product. Let's start with the simplest option.
Be careful. Acrylic is easily damaged. Chips and scratches can appear from a heavy tool thrown to the bottom or from a slight fall. Place soft material under the product while it is lying on the floor.
Bath AQUATEK Mia
Purpose of the legs
The main purpose of the supports is to maintain the stability of the bathtub. The structure, standing firmly on four “legs”, can easily be placed both against the wall and in the center of the room. Correctly installed supporting elements can compensate for uneven floors - with their help you can give the bathhouse a slight slope towards the drain to quickly drain the water.
Interior decoration is a secondary function. In plumbing stores, legs of various sizes and types are sold both complete with the font and separately. Sometimes parts do not perform the main load-bearing “work”, but are an addition.
These days, modern bathtubs with graceful legs are no longer considered an exotic element; they can easily be purchased at a regular plumbing store.
Dimensions
A wide range of steel bathtubs allows you to choose a model that meets all basic requirements. Among modern models, you can easily choose a suitable bathtub for small apartments and spacious country houses. But do not forget that when choosing a suitable model, you must also take into account how much the bathtub weighs. When calculating, you need to additionally take into account the weight of the water in the filled bowl and the weight of the person.
A steel bathtub can have either a standard or the most bizarre shape.
Manufacturers offer steel bowls in various configurations.
- Rectangular is the standard and most common option. Such models often have rounded sides. A rectangular bathtub is an excellent option for small bathrooms.
- Round is an unusual and interesting option. Such models themselves can become an element of luxury in bathroom design. Depending on the dimensions, manufacturers offer one-, two- and even multi-seat bowls.
- Oval is an excellent option for a classic-style bathroom interior. Laconic and simple models have no corners and, depending on the size, can accommodate two people at the same time.
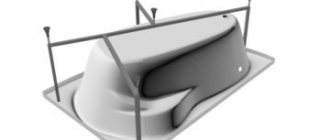
- Corner - can only be installed in large bathrooms. When choosing such a model, it is necessary to take into account that corner baths are left and right, symmetrical and asymmetrical. Such non-standard bowls visually free up the central part of the room.
- Hexagonal - bowls of complex shape can have different shapes. Such models can be installed both in the corner of the room and in the center.
Modern manufacturers produce classic models of standard sizes and symmetrical shapes. But some models can also have a curved and sophisticated shape, or give the interior a certain futuristic feel.
Based on dimensions, bathtubs can be divided into three categories:
- Small-sized ones can be installed in small rooms; their dimensions vary from 120x70 to 140x70 cm, while such bowls do not clutter up the space. Today, manufacturers produce models for people with limited mobility. So, for example, you can purchase a compact bowl 120x70x80 cm with a seat.
- Standard ones are considered a classic option; bowl sizes can range from 160x70 to 170x75 cm. Such models are suitable for installation in standard apartment buildings.
- Large-sized ones with dimensions from 180x80 and larger are designed specifically for spacious rooms. A bathtub of this size is only suitable for tall people. Those of average height will find it quite uncomfortable to be in a filled bowl.
In various models, the width can be in the range of 60-160 cm. The depth, as a rule, varies from 38 to 48 cm. But you can also purchase unusual options. For example, a steel bathtub can have an asymmetrical shape and have an original design. With its help you can complement a standard or non-standard layout. Its peculiarity lies in the fact that the bathtub has three sides, two of which are in contact with the walls, and the third has an oval or shaped shape.
Accessory characteristics
Supporting elements are distinguished according to several criteria. The main ones are size (height, thickness), material of manufacture, method of fastening, cost. The secondary ones include configuration, color, and the presence of decorative accessories.
A bathroom installed on stylish legs looks dignified, expensive and attractive.
Tip: sometimes the legs are covered with a translucent or “solid” screen, but more often they are left open.
If you liked the article, please share it
Previously on the topic:
- Mishustin: It is necessary to form a full-fledged Eurasian transport framework
- A vaccination bus will start operating in Lasnamäe today
- New Year's installations made from recycled materials appeared in the Nuremberg Russian Center
- More than 600 thousand schoolchildren took part in the Literature Olympiad
- Get your money ready: tires in Latvia can no longer be returned for free
- Where are fake shoes sold and who buys them: ways to distinguish a fake...
- Vacuum exercise, the correct technique for women and men,…
- How to drink coffee correctly with health benefits, how many times a day you can...
Share
Dimensions
Approximate sizes of non-adjustable items:
- short – 12-19 cm;
- medium – 20-29 cm;
- tall - 30-40 cm or more.
The height of the adjustable options varies widely. To decide at what level to install the font, it is measured and this value is subtracted from the desired height of the entire structure. Usually 12-15 cm are left from the floor to the font itself. The thickness of the supports depends on the total weight of the bathtub filled with water. The average height of the bowl is 50-65 cm.
The entire interior of the room with such decor is filled with an atmosphere of solemnity and beauty.
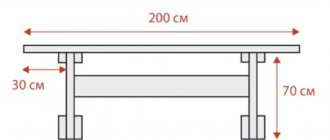
Homemade welded frame
The welded structure is made from a metal profiled pipe of rectangular cross-section. It is used when it is necessary to construct a support of increased strength.
Manufacturing technology:
- a frame drawing is drawn up corresponding to the dimensions and configuration of the bathtub;
- Profile sections are prepared according to sketch dimensions;
- the base of the structure is formed from 3 support pipes with 2 horizontal guides by welding;
- according to the markings, adjustable legs are welded to the profile sections in designated areas to adjust the bathtub horizontally and vertically;
- on the supporting base, vertical posts are fixed by welding, on which horizontal supports for the sides of the bathtub are fixed;
- if you plan to install a screen, front profiles are welded to the outer part of the structure;
- After leveling the frame, the bathtub is installed.
Covering with decorative panels is carried out after checking the operation of the drain-overflow system. Polyurethane or silicone sealant is used to glue the bathtub to the frame structure. Sealing is also required in the area where the edge meets the wall.
Fastening method
Installation of supporting elements is carried out in three main ways:
- Using double-sided adhesive tape - this option is the fastest of all, but is only suitable for lightweight acrylic structures. The level of reliability of the connection here is minimal, so the fastening is used only as a temporary one;
- For glue, it is advisable to use only special building compounds, but this is also not the most durable fastening;
- on brackets or self-tapping screws - the method is suitable for steel and cast iron bathtubs, the installation process is labor-intensive, this is the only reliable option to stabilize even the largest bathtub for many years;
- On wedges - they look like triangles with “ears” that are attached to protrusions with holes on the bottom of the bath. The fastening is movable, wedges are driven into the holes;
- Bolts are also reliable, adjustable, but if the nuts are not carefully tightened, it is easy to damage the fasteners and the bottom of the bowl itself;
- On the lugs - if there are lugs in the bottom, the supports are fixed with special pins. The fastening is reliable and does not deform even an acrylic bathtub.
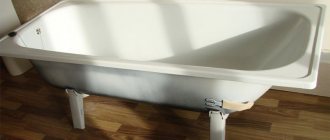
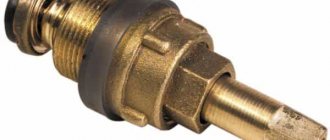
Bowl legs perform a very important function. They provide her with a reliable installation, and the person - safety when taking a bath.
Standard fasteners
Standard legs for a steel bathtub are connected in twos and bolted to the lugs at the beginning and end of the smooth section of its bottom. As a rule, installation kits are universal and suitable for the entire line of devices from a given manufacturer.
Legs for steel appliance.
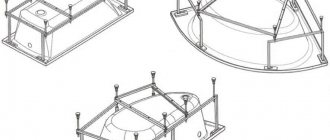
An installation kit for an acrylic bathtub usually consists of:
- A light frame or two paired legs designed for fastening to the thickened bottom of a plumbing fixture with galvanized screws;
- Plastic or galvanized corners are linings that are attached to the main wall and fix the side of the bathtub adjacent to it. The reliability of fastening the side with these corners raises, frankly speaking, serious doubts. In addition, often the bathtub is installed not to a solid wall, but to a light partition, onto which standard fasteners cannot be installed in principle.
Standard fastening element.
On sale you can find frames on which the bathtub rests not only on the bottom, but also on the sides. Such installation kits are the best option: a bathtub installed on a strong frame just needs to be moved close to the wall and ensure a tight connection.
This frame for an acrylic bathtub deserves all kinds of praise.
Variety of foot stand designs
To create the most harmonious design of the bathroom, the “legs” of the bathtub are selected to match the existing interior. For art deco or modern style, the parts are coated with silver-white paint; for a modern style, thin, tall, chrome-plated ones are suitable. Ecological, ethnic style is decorated with wooden or wood-imitating models. For industrial and brutalism, do-it-yourself welded structures are suitable.
Connecting to a wall
How to install a bathtub - we figured it out. However, I only briefly mentioned ways to seal its connection to the wall. I will hasten to correct this defect.
If the seam thickness is small, it is simply filled with silicone. This simple work, however, has several subtleties:
- It is preferable not to use a universal, but a sanitary sealant. It is distinguished by antifungal additives that do not allow the seam to darken in a damp room;
Sanitary sealant is highly resistant to mold.
Transparent sealant retains its original appearance much longer than white.
- The seam must be filled to its full depth. This ensures that there are no leaks along the wall even if the seal is partially damaged. In addition, silicone will reliably glue the side of the bathtub to the wall, again preventing it from moving;
- Before sealing with sealant, the shelf and wall are sealed with masking tape. It will save you from having to clean up the set silicone. The masking tape comes off immediately after filling the seam and removing excess caulk.
Sealing the junction with silicone sealant.
The surfaces of the bathtub and walls are protected with masking tape. What should I put on the wall if the seam is of significant thickness due to uneven walls? To solve this problem, decorative plastic corners are sold in finishing materials stores. The corner is glued over the junction using the same silicone sealant.
When gluing a corner, silicone is applied not to it, but to the bathtub shelf and wall. In this case, there is less chance of staining the bathtub.
The junction is closed with a decorative corner.
Types of bath bowl supports
Bathroom legs are distinguished according to the maximum load they can withstand, methods of fastening, and wear resistance. Parts are selected depending on the shape of the bottom - the tighter they fit, the more securely the object is held.
Plumbing stores offer the following options:
- load-bearing - they are entrusted with a supporting function. The weight of the swimsuit is evenly distributed over all four legs, eliminating deformation of the floor and curvature of the bottom of the bowl. This is the best option for heavy cast iron products. The fastening is rigid, the finished structure does not wobble or slip;
- auxiliary – used for installing a bathtub on uneven floors, which increases its level of stability. Such legs are used to temporarily raise the bath to a height, with subsequent installation on a podium made of brick or stone;
- adjustable - their heights can be easily changed using special screws. This option is also suitable for installing a hot tub on very “crooked” floors, but for independent (without supporting supports) installation of cast iron structures, this option is not suitable;
- decorative - beautiful-looking false legs that do not serve as a support. Such overhead parts are made of copper, porcelain, ceramics, and have the appearance of animal or bird paws, vines, various intricate weaves, pyramids, trees, masking unaesthetic-looking load-bearing structures.
The main thing is to correctly decide on the type, size and design of the legs, the bathtub itself and its components.
Tip: most manufacturers produce universal elements that combine all of the above functions.
Video instruction
Instructions
First, let's look at the material from which the bathtub is made; your further actions to secure it in place will depend on this.
If you have a bathtub, then its undeniable advantage is durability; it also retains heat for a long time. However, it is incredibly heavy and not every floor can support it, so it is advisable to build a podium for it.
If the bathtub is made of steel, then it is much lighter, cheaper, easier to install, but its service life is shorter than that of cast iron. The significant disadvantages of such a bath include the noise that the water makes when you fill it. Even your neighbors can hear it. Therefore, before installation, it must be coated on the outside. It will dampen sounds and help keep you warm longer. Also, a steel bathtub quickly loses its attractive appearance: the enamel easily falls off.
Another material from which bathtubs are made is acrylic. These baths are very comfortable, beautiful, non-slippery and retain heat well. But their main drawback is low strength. No matter how much manufacturers praise acrylic bathtubs, there have been cases when such a bathtub simply could not withstand the weight of an overweight person and its legs were pressed inward.
Most often, bathtubs are placed on legs. But the problem is that if you just place it on the floor, it will wobble while you take a bath, which is not very pleasant. What way out of this could there be? In the case of, build a podium in the place where it will be, so that the legs of the bath remain on the floor, and the podium supports only the bottom. The podium is made of brick and leveled using a bubble level. Then, together with an assistant, install the bathtub on the podium and, if necessary, adjust the height of the legs; this will be easier to do, since now the bathtub rests not on them, but on the podium.
The general principles for installing and securing the bathtub are as follows: * Place the bathtub on one side and mount an overflow pipe outside in case the bathtub overflows, and an outlet at the bottom of the bathtub;
* Connect the floor siphon to the outlet and overflow of the bathtub;
* Now attach the legs to the bathtub and the siphon is inserted into the sewer pipe.
* Move the bathtub close to the walls
* Caulk the joint between the siphon and the drain;
* Place wooden plates under the legs of the bathtub so that the bathtub is installed with a slight inclination towards the drain, otherwise water will constantly accumulate inside the bathtub;
* Once the bathtub is securely fixed and the height is adjusted, it is necessary to seal the gaps between the bathtub bots and the walls using cement or putty. It is better to place a ceramic rim on top of the sealing layer.
Varieties of legs according to bathtub material
For baths made of different materials and differing in weight, the legs are also mounted differently. Typically, parts are selected by color, and for large bathtubs with intricate shapes, sometimes six or more are installed instead of four “legs”.
A bowl mounted on legs has a number of important advantages. This explains the high demand for such designs.
Cast iron
Comfortable support legs for an antique cast-iron bathtub, which has a significant weight, are made of cast iron and are always load-bearing. Installation is carried out using wedges, bolts, brackets.
An additional supporting element will be a podium made of aerated blocks and bricks.
Steel
A steel object is a little lighter, much thinner than a cast iron one, so the supports are fixed in almost any way - with self-tapping screws, wedges, brackets, eyes. It is not necessary to choose the thickest “legs”, but most often, iron models with height adjustment are used.
Metal frames decorated with decorative overlays are acceptable.
Acrylic
It is also best to fasten acrylic structures using reliable methods, but with maximum care so as not to bend the bottom or scratch the enamel. As a temporary option, the adhesive method or the use of double-sided tape is allowed.
Decorative details for such a lightweight structure are also used as an addition to the load-bearing ones.
Universal
The universal option is suitable for any type of bathtub, except for corner ones. To install the latter, the legs are mounted on a special frame-cross, which can qualitatively support a non-standard structure.
The universal elements not only have a beautiful appearance, but also perform a high-quality load-bearing function and are height adjustable.
: Foam blowing and lining the bathtub niche
Despite the advantages, a steel bathtub has two main disadvantages: the water in it cools quickly and it creates increased noise when drawing water. A budget option for eliminating these problems is to blow with polyurethane foam. Installation of acrylic and cast iron bathtubs does not require this procedure. These materials have good noise insulation and low thermal conductivity. However, if you want to improve their quality characteristics, no one forbids you to blow off such baths. It is better to apply polyurethane foam to a moistened surface than to a dry one, in small areas. Leave a small gap around the technological holes, about 2 cm. Excess foam can be easily removed with a sharp blade.
Let's start assembling the frame from the ceiling profile. Here you again use the Knauf profile. We start by marking the depth and width of the niche. We mount the guides to the floor and secure them with dowel nails. We install the profile on the sides, deepening it into the niche to the thickness of the drywall sheets and tiles with glue. Together, this distance will be approximately 22–24 mm, taking into account that the thickness of the plasterboard sheet is about 12–13 mm, and the tiles with glue are 10–11 mm. It is better to take the distance with reserve. If the niche is slightly recessed, it’s not a big deal. But the bulging of the slab will look ugly. We connect the side strips with a wide ceiling profile, fixing them close to the side of the bathtub, foaming the gaps. We fix the vertical profiles in the middle using self-tapping screws.
Selection of high-quality ready-made supports
In order to select and purchase the highest quality support parts, before purchasing, check the fasteners and completeness of the products. They should be optimally combined with the existing bathroom in shape and size.
Heavy products require the most stable, durable supports made of steel, bronze, painted iron, cast iron.
Old, used parts are used only when they are completely intact and do not have cracks or deformations that are not typical for the item. Any necessary plumbing accessories are also selected according to their appearance, forming a single ensemble with supports.
All four legs must be equally strong, because the load is distributed evenly.
Tip: when the bathtub with legs is assembled, it is carefully placed on the floor, checking the stability of the structure.
If you need something special
Not all purchases come fully equipped with everything you need. In some cases, there is a desire or need to choose a different font mounting system, without using the provided add-on. On the site you can select any types of supporting structures of different types. You can find decorative types with designer shapes and colors. A huge selection of installation kits and fasteners will be a pleasant bonus. Preparation and planning With high-quality fastening of the supporting foundations, there is an exact guarantee of successful installation of plumbing equipment. It is difficult to evenly fix an already assembled structure if the floor surface is not prepared. What should be done:
How to make legs with your own hands
There can be many answers to the question of how to make beautiful legs for a bathtub with your own hands. The most important thing is that the finished product rests firmly on the floor, does not wobble, and cannot accidentally tip over during active use. When installing, you must try not to damage the floor covering, deform it, or scratch it with protruding parts of the structure. To ensure that the item stands on the floor as securely as possible, it is permissible to use special pads, moisture-resistant adhesives, and additional frames.
During installation, the bathtub is usually turned over or laid on its side to make the installation process more convenient.
Installation of siphon and overflow
These elements must be installed before installing the bathtub in place. In terms of their design and connection technology, all systems are the same, the only difference is in price and material of manufacture.
Step 1: Turn the bathtub upside down. To protect the enamel from mechanical damage when tipping over, place cardboard or soft cloth on the floor. Do not do such work yourself, call an assistant. Together, the process not only speeds up significantly, but also the quality of installation improves.
Step 2. Read the assembly instructions and check that the siphon is complete. Pay attention to the gaskets, they differ in appearance and size. Do not mix up the gaskets; each must be installed in its place.
Instructions for assembling the siphon on the package
Step 3. Assemble the siphon and secure it in the drain hole. Do not use too much force to avoid damaging the seals and gaskets. To make assembly easier, it is recommended to use petroleum jelly or moisten the surfaces with soapy water.
You need to put a nut and a cone gasket on the siphon elbow
We connect two elbows with a nut
Place the gasket in the plug cover
Screw on the plug
Place a pad on the side of the knee
Screw on the neck (the part that will be located under the drain hole)
We put a union nut and a cone gasket on the corrugation, connect the corrugation and the siphon
Siphon with corrugation
The upper part is attached inside the bathtub, the lower part is mounted under the bathtub drain hole
We use corrugation to connect the upper and lower overflow holes
Important. The drain gasket has a groove dividing it into parts of unequal thickness. The thin side should go inside the bathtub, the thick side should be on the back side. Don't change your position. Otherwise, the plastic element will protrude above the surface of the bathtub and the water will not be able to drain completely. The remaining part, after drying, forms yellow spots on the bottom; they will have to be removed frequently. All cleaning products contain compounds that have a negative effect on enamel. Even though their concentration is insignificant, with repeated use the thickness of the enamel decreases.
Step 4. Turn the bathtub on its side, install the gaskets one by one and screw on the plastic parts of the drain and overflow. It's much easier to do this together. One should hold the parts, and the second should tighten them with a mounting bolt. Do not apply too much force, the plastic may crack.
Siphon assembly
Check the connections for tightness. It is better to do this before installing the bathtub in place, this will make it easier to eliminate leaks. Everything is fine - you can install the legs.
Nuances when installing an old bathtub on supports
When installing an old bathtub on freshly purchased “legs”, it is advisable to follow the following rules:
- check the complete set of supporting parts;
- carefully select the installation location;
- decorate the junction with the bowl;
- install a brick structure that increases the stability of the structure;
- when installing near a wall, additional fastenings to the latter should be used;
- to avoid the appearance of mold and rust, all surfaces are treated with special means before installation;
- It is best to use universal legs that fit any, even the oldest, font.
It is important to pay attention to the appearance of the bathtub stands. They should be in harmony with the bowl itself, with the entire decoration of the bathroom.
Support Features
Based on the functions of the legs for a cast iron bowl, they are divided into types:
- decorative - the accessory is purchased exclusively to decorate the bathroom space. It has no other functions;
- supporting – play the role of a reliable support and do an excellent job of supporting the bathroom. Installing a font on support options is the most popular solution when installing bathtubs in a city apartment;
- intermediate - this is a special type that performs auxiliary functions in combination with another supporting structure.
Popular leg models
It is easy to find almost any support on sale. These are intricate “antique” models – “lion paws”, “dragon heads”, “waterfalls”. They are suitable for baroque, gothic, classicism interiors. Smooth, tall, shiny - the best option for hi-tech, simple and square - for minimalism. In country and Provence, parts painted in white and cream colors are used. Sometimes models made of stone, wood coated with a protective composition, structures with small shelves or steps are used. The most convenient designs are those where the height of the legs is adjustable within a relatively wide range - this is the best option for installation on slightly uneven floors.
Final works
The space below is often covered with a screen. You can make it yourself - from moisture-resistant plasterboard, MDF, plastic panels or brick. The materials are painted on top, tiled, mosaiced, covered with film, and covered with decorative plaster. If the screen is monolithic, not sliding, it is necessary to provide a technical hatch in it - in case you need to clean the siphon. The photo shows an example of such overlays.
Instagram @remont_sanyzel_krd
Instagram @remont_sanyzel_krd
Instagram @deniskorneliuk
Instagram @deniskorneliuk