The desire of developers of new types of plumbing fixtures to reduce their weight as much as possible is fully justified by the desire to facilitate installation and reduce the load on the base. Specialized markets offer a wide range of products, the installation of which you can easily handle yourself.
However, the lightness deprived the container of an important quality - stability. A bathtub frame that you can build with your own hands will help you avoid tipping over.
We will tell you in which cases you cannot do without additional support, indicate suitable materials for assembling the frame, and provide tips on choosing the type of structure. Step-by-step instructions with photo accompaniment will help you make a reliable frame for any bathtub.
When is it necessary to install a frame under the bathtub?
Standard bath frames.
The structure consists of several vertical supports with 2-3 horizontal strappings. Industrial production models are designed for statistical averages, taking into account human weight and the volume of liquid in the tank.
Some builders make the mistake of installing bathtubs too low. This prevents normal drainage of water. In such cases, due to the frame, the container rises to the required height.
The area of standard legs is 10 cm². Some people seek to create an additional supporting surface to stabilize the bathtub. For these purposes, a factory frame kit or a structure made independently is suitable.
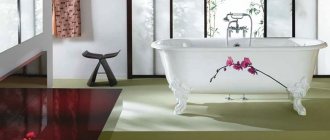
For bathtubs of a non-standard configuration, the support not only serves as a means of protection against tipping, but also performs a decorative function. The construction of a podium around the jacuzzi begins with the installation of a supporting device. If you want to assemble a screen to mask communications, you cannot do without a frame.
Advantages and disadvantages
- The water remains warm for a long time (loses 1 degree in half an hour), which is ensured by a high level of thermal insulation.
- The products perfectly absorb sounds, so drawing water does not cause discomfort.
- Low risk of injury due to non-slip surface.
- Acrylic has antibacterial properties that ensure hygiene.
- Possibility of installing additional massage attachments.
- Convenient price range (the cheapest models will cost from 5 thousand rubles).
- Light weight (the average product weighs from 15 to 45 kg).
The disadvantages of acrylic bathtubs include mechanical fragility (under the influence of heavy objects the surface can bend or crack); low resistance to high temperatures and heavy loads, which threatens deformation; sensitivity to abrasives and household cleaners.
Frame materials
Sometimes it can be difficult to choose the dimensions of a finished kit. In such cases, you can make a frame for an acrylic bathtub with your own hands.
Builders advise using the following materials for this:
- Rolled metal. Profiled pipes with a round or rectangular cross-section allow you to create an elegant, neat supporting frame of small dimensions. The disadvantage is the need to use a welding machine to connect individual elements, which requires knowledge and skills.
- Lumber. Cutting a square beam of wood with an edge length of 40-60 mm does not cause any difficulties even for a novice craftsman. Fixation of fragments and formation of knots are performed quickly with a minimal set of tools.
- Galvanized metal profile designed for creating plasterboard systems. Rigid, strong and durable strips simplify the installation of a frame system under acrylic and steel bathtubs. This material is used to construct screens. It is also possible to create supporting structures with its help.
Wooden frame.
When making a frame from lumber, it is easier to correct mistakes made during the work process. If it is necessary to purchase additional timber to redo defects, the costs are much lower than when replenishing the stock of metal products.
When using wooden elements, it is necessary to take into account the characteristics of wood as a material susceptible to decay. Before installation, you need to treat all parts with an antiseptic. Assembly is carried out using special corners or galvanized hardware. Master carpenters connect the elements with a notch.
Pipes made of metal profiles are also not resistant to the negative effects of dampness. Since the bathroom is a high humidity area, you need to consider protecting the material from corrosion. To do this, you can galvanize existing parts or buy new ones with a zinc coating. If it is not planned to finish the frame made of profiled pipes with decorative panels, painting with a powder composition will help protect the metal structure from rust.
Profiles made of aluminum or galvanized steel do not require additional processing. The material has anti-corrosion qualities. Subsequent sheathing with plasterboard sheets extends the service life of the frame by decades. PVC panels, mosaics or tiles are suitable for finishing.
Some craftsmen practice a combination of several materials. It is allowed to combine metal racks with wooden frames. Brick supports or foam concrete blocks are installed on the floors when it is necessary to raise the bathtub to improve the efficiency of water drainage.
How the shape of the bathtub affects the complexity of the frame structure
Structures are divided into the following types:
- Rectangular frame. Features a simplified installation diagram. It is used in the construction of a support system for containers installed in a niche or corner between adjacent walls.
- Triangular support. Mounted for additional stability of bathtubs with corner placement. The outer edge has a different configuration. The other two sides form the legs of a right triangle. In most cases, they are combined with the corners of the room. A frame of several connected frames is installed along the outer part of the structure.
- Oval. Complex structure, including a combination of 2-3 or more individual supports. It is built along the contour of the bathtub. It is allowed to use broken strapping technology.
Installation of a rectangular support system followed by finishing with plasterboard sheets makes it easier to arrange a frame for oval containers and non-standard plumbing fixtures. A hole is cut in the upper horizontal panel of the cladding material to the size of the bathtub. In this case, its sides should rest on the frame.
Finishing work
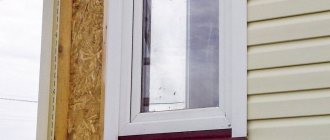
In order to reduce the noise level (the pillow partially performs this function) from water entering the bathtub, insulation, for example extruded polystyrene foam, can be inserted into the frame. It is cut to dimensions 2-3 mm larger than the frame cell and inserted flush with the outer edge of the beam. Don’t forget to leave room for an inspection window, which you can buy in a store or do it yourself. The inspection window should be located so as to provide access to all communications.
Let's start installation:
- As a base for ceramic tiles, you can use moisture-resistant plasterboard sheets (2 layers) or cement-bonded particle board, or other moisture-resistant sheet materials.
- We lay the tiles on the base using an adhesive mixture.
- We grout the tile joints using sealant.
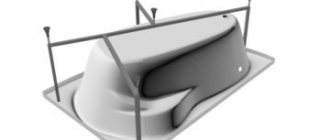
Assembling a factory kit for an acrylic bathtub
Installing a frame under an acrylic bathtub.
The factory package includes a prefabricated structure. It outperforms the homemade version in terms of the possibility of repeated dismantling and installation without damaging parts.
The assembly is performed according to the following algorithm:
- The welded frame is fixed to the bottom of the bath. The structural elements are laid out on the floor. The number and type of parts are checked against the list included with the kit.
- Vertical racks are installed. Studs with screwed nuts are inserted into the corner holes of the frame and screwed into the plastic legs. A small gap left during fastening between the frame and the supports will allow you to set the required height of the frame structure.
- The design is adjustable horizontally. The procedure is carried out at a building level.
- The frame is connected to the bathtub with self-tapping screws. First, a reinforced plate is fixed on the bottom of the container. After this, the embedded fragments located in the corners are fixed.
- Legs are mounted on the frame. Fastening is done with studs that are screwed into special holes. Use a ruler or tape to adjust the required height. Nuts are used for effective fixation.
- At the final stage, the bath is turned over to its original position and moved to the installation site. Areas for fixation are marked on the wall. The factory package of the acrylic bathtub includes several fastening plates that secure its sides. For plumbing products of standard shape, there are 4 clamps in length and 2 in width.
This is interesting: Installing a cast iron bathtub. Features and nuances of professional installation
In some cases, the finished structure is supplemented with homemade elements that increase the stability of the support. To create a reinforced frame, an additional stand is constructed from large-sized timber, brick or foam concrete blocks.
List of common mistakes
Considering that the bowl is installed for a long period, and sometimes “tightly” sits on the sealant or polyurethane foam, you need to carefully and carefully perform all stages of installation.
Here are the mistakes that residents encounter most often:
- Late installation of drain and overflow. If the bathtub is already fixed in place, the fittings are much more difficult to install, especially given the low seating of the bowl.
- Inaccurate leg height adjustment. It is very difficult to tighten the bolts when the bowl is already glued to the sealant. A special tool and additional effort will be required.
- No gap between the floor and the screen. It is very inconvenient to perform any actions while standing near a bathroom with a blank front wall.
- Loose leg fastenings. Loose nuts can cause the structure to weaken. The bathtub will not fall to the floor, but it may move to the side.
- Installation without taking into account the location of sewer pipes. If the outlet into the pipe is higher than the bottom of the bowl, draining the water will become difficult.
Some shortcomings lead to the fact that repairs have to be done unscheduled, and not only at home, but also at neighbors. Unpleasant moments are associated with inaccurate sealing of the gap between the bathtub and the wall and with poor waterproofing of the floor under the bowl.
Sometimes preliminary sound insulation is not performed. Not all steel bathtubs need it, but if the water jet makes a loud noise, the bottom of the bottom must be covered with polyurethane foam. This can also be done after installation.
DIY metal profile frame
Installation of a metal profile frame for plasterboard.
The profile used when installing plasterboard systems is suitable for self-manufacturing a frame device for a bathtub.
Equipment preparation and marking
The preparatory stage includes the following steps:
- the container is turned upside down;
- profiles to which the legs are screwed are fixed with self-tapping screws on the plywood-reinforced bottom;
- The drain and overflow system is being installed.
Upon completion of the preparatory work, the bath is brought into the room where the installation area is marked. To do this, the outline of the equipment is drawn on the floor.
The next step is to adjust the height by twisting the legs. For horizontal orientation, a laser level is used.
The final stage of preparatory work is marking the area of the frame wall mounts. To do this, mark a line on the wall corresponding to the location of the lower edge of the bathtub.
Frame installation
To perform the installation correctly, you must adhere to the following algorithm:
- holes are cut in the profile sections for subsequent fixation;
- According to the marks, dowels are inserted into partitions made of brick and concrete, onto which metal slats are fastened with self-tapping screws;
- installation of side support strips is carried out;
- After treating the outer shelves of the profiles with sealant, the bathtub is installed and connected to the communications.
Self-installation of the frame.
At the next stage, supports are created for the bottom. They are laid out of brick, cinder block or foam concrete using cement mortar. In this case, the bottom of the container should not come into contact with the masonry. Polyurethane foam fills the gap. After the composition has hardened, the installation of the frame is completed and a decorative screen made of plasterboard sheets is installed.
Instructions for arranging a frame made of wooden blocks
The technology is similar to the previous version.
The differences are due to the characteristics of the material:
- the preparatory stage consists of treating the lumber with an antiseptic or oil impregnation;
- during the preparation process, the walls are leveled and primed;
- horizontal bars are fixed on vertical supports, increasing the rigidity of the structure.
The final stage of installation is treating the wood with a waterproofing agent. The walls adjacent to the bathroom are coated with the same composition. If used for tile cladding, additional waterproofing is not required.
Homemade welded frame
The welded structure is made from a metal profiled pipe of rectangular cross-section. It is used when it is necessary to construct a support of increased strength.
Manufacturing technology:
- a frame drawing is drawn up corresponding to the dimensions and configuration of the bathtub;
- Profile sections are prepared according to sketch dimensions;
- the base of the structure is formed from 3 support pipes with 2 horizontal guides by welding;
- according to the markings, adjustable legs are welded to the profile sections in designated areas to adjust the bathtub horizontally and vertically;
- on the supporting base, vertical posts are fixed by welding, on which horizontal supports for the sides of the bathtub are fixed;
- if you plan to install a screen, front profiles are welded to the outer part of the structure;
- After leveling the frame, the bathtub is installed.
Covering with decorative panels is carried out after checking the operation of the drain-overflow system. Polyurethane or silicone sealant is used to glue the bathtub to the frame structure. Sealing is also required in the area where the edge meets the wall.
How to do a frameless installation yourself
Simplified installation technology allows you to complete the job without turning to a plumber for help.
Preparation
Frameless bathtub installation.
The first stage is turning the bowl over. The factory package of the acrylic bathtub includes metal slats. They are fixed horizontally across the bottom with self-tapping screws from the same set. By using longer hardware, you can pierce through a plumbing fixture.
Using nuts, legs, pre-adjusted in height, are installed on the transverse profiles. The inlet pipe of the sewer drain should be located below the siphon outlet.
If you plan to install a decorative screen that hides communications, a guide is fixed on the side to secure it. It is difficult to perform this procedure after the installation is complete.
The last stage of preparation is assembling and connecting the drain-overflow system.
Bath installation
For correct installation you need to follow the algorithm:
- in the bathroom the bathtub is connected to communications;
- diagnostics of the drainage and tightness of the drain pipe is carried out;
- the gap between the side and the wall is filled with sealant;
- the bath is weighted with water or several sandbags;
- a support cushion of brick or cinder block fixed with cement mortar is constructed under the bottom;
- the gap between the body and the masonry is filled with polyurethane foam.
A filled bathtub will not be able to rise due to the expanding foam that fills the intermediate surface, securing the support.
After the time required for the liquid compounds used in the frameless installation of the acrylic bath to harden, you can begin finishing. Most craftsmen install a screen made of plasterboard sheets, plastic panels or other materials with increased moisture resistance on the outside.
Summing up communications
The steel bathtub must be assembled according to the instructions supplied with it. When installing a bathtub, you need to attach a siphon, install an overflow funnel, attach taps and connect pipes for water outflow.
To do this, you need to connect the corrugated pipe and the piping. Main nuances when connecting:
- Rubber gaskets are treated with silicone before installation.
- The drain gasket is mounted externally.
- The gasket between the overflow and the hose is placed with a cone in the direction of the piping.
- If there are threaded connections, it is necessary to use fum tape.
The easiest way to determine if the connection is correct is to fill the container with water. If there are no leaks, the work was done correctly. If the plug is tightly closed, but the connection between the drain and the pipe is leaking, this indicates that the gasket was installed incorrectly.
Having connected the main elements of the system, before the sealant has hardened, use a fork wrench to carefully tighten all the joints, and after it hardens, check for leaks
Having made sure that there are no leaks, drain the collected water, checking at this moment the connection of the piping. If a leak occurs, carefully tighten the nut.
Having corrected all the shortcomings, you need to thoroughly wipe all the connections of the harness with a dry cloth. To perform a control check, cover the floor under the pipe with paper napkins or toilet paper. The drain hole is closed with a stopper, and the bath is half filled with hot water. After this, the plug is removed from the drain and the water is drained. If the paper remains dry during this time interval, the installation was completed correctly.
When installing metal structures, it is important to take care of grounding. In the event of a faulty electrical wiring, there is a high probability of life-threatening voltage appearing on the housing
To do this, a copper wire with a cross-section of 2.5 sq. mm is attached at one end to the bathtub, fixing it with a screw, and at the other to a metal structure. It is not allowed to ground the housing to the water supply pipes or heating system.
And let’s finish with some useful tips from the experts - watch the video:
Metal profile frame
The most popular option for a homemade frame when installing a bathtub is from a profile for plasterboard systems. Galvanized profiles have good strength, rigidity and durability, and are suitable for construction under steel and acrylic bathtubs.
The installation of the frame is carried out after preparatory work: leveling the walls, laying out sewer and water pipes.
Let's look at the main stages of constructing a frame using the example of installing an acrylic bathtub.
Equipment preparation and marking
At this stage, the bowl is turned over and profiles for attaching the legs are screwed to it, using the self-tapping screws included in the kit: for these purposes, the bottom is specially reinforced with plywood. Then screw legs are installed on the profiles. Also at this stage, the drain-overflow system is assembled and installed.
This is interesting: Built-in bathtub. Benefits and overview of the supply market
Next, the bathtub is brought into the bathroom and adjusted to the level by adjusting the legs. Marks are placed at the bottom edge of the side for mounting the frame.
Then the bowl is taken out of the room, after which they begin to assemble the frame structure.
Frame installation
The arrangement of a metal frame consists of the following operations:
- The profiles are cut into segments according to the markings, and holes are drilled in them for fastening to the wall.
- Sealant is applied to the shelf adjacent to the wall, after which the profiles are screwed to the wall according to the previously applied marks. In brick and concrete walls, holes are pre-drilled and dowels are inserted; in partitions made of gypsum boards, self-tapping screws hold well without dowels.
- Also at this stage, the side posts and the bottom guide for the screen are installed.
- Sealant is applied to the upper shelves of the profiles, after which the bathtub is brought in, installed and connected.
The next stage is the construction of a stand to support the bottom of the bathroom. For this purpose, bricks, cinder blocks, and lightweight concrete blocks are used. They are installed in several rows and secured with ordinary cement mortar.
Important! The bottom of the bathtub should not rest on bricks or other support: a gap of at least 5 mm is left, which is filled with polyurethane foam. To prevent the bowl from lifting when the foam expands, it is filled with water or loaded with improvised means.
When the foam hardens, install a frame structure for the screen and cover it with plasterboard.
Preparatory stage
The frame for an oval bathtub is made by attaching it to the wall on both sides. First, calculate the height of the platform. To do this, measure the distance from the lower edges of the side to the floor.
It is necessary to calculate the load on the structure. The weight of the product filled with water and the weight of the person are taken into account. The choice of material, the number of stiffeners, and wall thickness depend on this. Next, you need to do the following:
- Boards for the base are laid around the perimeter and screwed to the floor.
- Install the racks, attach them to the base and to the wall.
- Another board is placed on top of the racks.
- Lay a sheet of chipboard or plywood and screw it around the perimeter to the frame.
- A hole is cut in it for the bathtub.
- A template is used to mark the hole.
- Cut it out using an electric jigsaw or a hand saw.
Plywood is used with increased water resistance, 15 mm thick.
The racks are nailed to the bars, and not to the base, this will simplify installation. For convenience, metal corners are used.
Frame made of wooden blocks
Lumber is less suitable for use in conditions of high humidity than metal profiles, so it is recommended to pre-treat them with an antiseptic or oil-based impregnation. A wooden frame for a bathtub is assembled with your own hands from bars with a cross-section of 50×50 mm. Arrangement of a wooden frame and installation of a bathtub is carried out using a similar technology, let’s consider the main points:
- The frame is mounted on leveled, pre-primed walls.
- For additional rigidity and strength of the structure, horizontal slats are supported by vertical posts.
Wooden frame. - After constructing the frame, the timber is covered with a liquid waterproofing compound. If the walls behind the bathroom are not tiled, it is also recommended that they be treated with waterproofing.
Frame waterproofing.
After the waterproofing has dried, the bathtub is installed and connected. Under it, for greater stability, a support is built from brick or other piece of building material, while the junction with the bottom of the equipment is foamed. Then the frame under the screen is assembled and it is sewn up.
Choice
No one disputes that today there is a great variety of materials on the basis of which bathtubs are made. But so far they have not been able to displace the main leaders in the plumbing market - cast iron, steel and acrylic.
It is between them that the buyer often chooses a new bathtub.
- Cast iron. The choice in favor of cast iron plumbing is due to the fact that it is a traditional, durable, reliable material. But an important disadvantage of this option is the selection of a large amount of heat. In other words, the collected hot water cools down quickly enough. But if the installation of the bathtub on bricks is done correctly, the disadvantage can be leveled out.
- Steel. The current steel bathtubs have been transformed, improved their performance, received a variety of legs, a nice faucet, and original shapes. The material is durable and lightweight, but the product also has a drawback - relative uniformity. This will not allow you to add some zest to the interior. Plus, heat is not retained very effectively. It is strongly not recommended to allow impacts on the surface, since the enamel will not withstand this. At the same time, installing plumbing fixtures is incredibly simple - insert the legs, secure with wedges and you're done.
- Acrylic. Its main advantages include effective heat retention, variety from a design point of view, and lightness of construction. Installing a bathtub of this type is quite easy, since the manufacturer provides the necessary fasteners in the kit. But try to protect the product from severe mechanical damage, since it is not designed for such treatment.
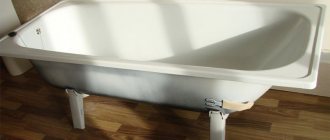
Frame functions
Steel bathtubs are called thin-walled because, compared to cast iron counterparts, the thickness of their bottom and sides is 2 times less. If the thickness of the metal used to make the washing container is less than 4 mm, it can be significantly deformed during operation.
Frame ensures even weight distribution
For this reason, installation of steel models by experienced craftsmen is carried out not on standard legs, but on a special frame, which is assembled from metal or wood with your own hands. It is a solid structure of vertical and horizontal supports, which performs the following functions:
- Uniform distribution of the weight of the bowl over the surface of the bathroom floor.
- Preventing deformation of the walls of the font under the influence of the weight of water and people.
- Preventing enamel peeling due to wall deformation.
Installation technology
When starting to assemble the frame for the bathtub with your own hands, the optimal height of the upper edge of the bathtub, recommended by sanitary standards, is 60-56 cm, and the minimum possible distance from the floor to the bottom of the product, sufficient to connect the siphon, is 15 cm. To work, the master will need a building level , tape measure, marker, saw, wooden beam, deep penetration antiseptic, hammer drill, dowel-nails and hammer. The structure is assembled according to the following scheme:
- First of all, you need to carefully take measurements from the bathtub. Determine the height, length and width of the frame, the number of vertical posts.
- Then the timber is cut. You can cut wood with a regular saw, grinder or circular saw. It’s easier to work if you have a frame diagram with all the dimensions in front of your eyes.
- The timber is impregnated several times with an antiseptic drug or coated with moisture-resistant paint.
- First, the bottom trim of the frame is made. To prevent the bathtub from moving around during operation, the timber is fixed to the floor using dowel nails.