A properly designed roof is the key to protecting the upper part of the facade from winds and rain. An important role in this matter is played by the wind bar. It is this that limits the intensity of exposure to winds and prevents the penetration of cold air, rain and snow under the cladding and sheathing. But the special role of this additional element is to decorate the roof and its ideal combination with the facade cladding.
Wind strip for corrugated sheets
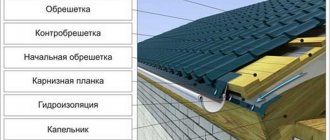
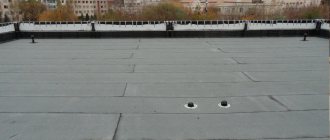
Roof scheme
What is a roof windbreak?
According to the classification of devices used for arranging roofing, a windshield or lath, in common parlance a board or plank, belongs to the category of additional roofing elements. With its help, the roof structure is retrofitted with auxiliary devices that make the roof more reliable and protected.
Roof wind bars are used to solve small but extremely important problems:
- Protect the end edge from moisture penetration, most of the water gets under the roofing through the end edge, so the wind deflector is installed on the roof of the house at the same time as the roofing, without delaying the installation of the protection for more than a couple of days;
- Fix the outer edge of the first roofing sheets, this avoids heat loss and mechanical damage to the vapor barrier film;
- Give the roofing and the entire structure an additional decorative look. With the correct installation of the roof wind board, photo, it is possible to close the joints, overlaps, waterproofing and insulation, which are clearly visible from the end of the roof.
For your information!
Roof wind barrier kits are offered by leading manufacturers as part of standard roof coverings. This simplifies the selection of protection, while you can get the best quality board from all possible options. After installing the wind strip, the roof slopes look like a single monolithic covering, without curved edges and corners. The flashing can increase the rigidity of the roofing sheet and at the same time protect the edge of the roof from annoying birds. It is known that jays, crows and jackdaws like to hide all kinds of supplies and bookmarks, moss, pieces of branches and wood chips under the edge of the roofing, creating considerable problems for the owners, including the spread of ticks and bark beetles.
General information
Goals
Through it, roof structures can be retrofitted with auxiliary devices that make the roof more secure and reliable. Wind slats for roofs are used to solve small but very important problems:
- Protect the end edge from moisture, most of the moisture will get under the roof covering through the edge of the end, and therefore the wind deflector is installed on the roof of the house at the same time as the roof covering, without delaying the installation of the protective mechanism for more than 2-3 days.
- Fix the outer part of the first roofing sheets, this makes it possible to avoid heat losses and mechanical damage to the vapor insulation film.
- Give the roof covering and the entire structure an additional look of decoration. With proper installation of roof wind boards, it is possible to cover overlaps, joints, insulation and waterproofing, which are clearly visible from the roof end.
Please note that roof wind barrier kits are offered by leading manufacturers as part of standard roof coverings. This will make it easier to choose protection while still getting the perfect board quality from all the different options.
After installing the wind strips, the roof slopes look like a homogeneous monolithic coating, without corners or curved edges. The overlay can increase the rigidity of the roofing sheet and at the same time protect the roofing edge from annoying birds. It is known that crows, jays and jackdaws love to hide various bookmarks and supplies, pieces of branches, chips, moss under the edge of the roof covering, creating small problems for the owners, including the spread of bark beetles and mites.
Types of wind slats for roofing
The design of the wind protection lining differs from the other 9 types of additional type end elements. The main difference will be that each of the structures used to protect the roof covering is profiled in a special way so as to protect its place on the roof as best as possible. The eaves strip along with the drip edges should be installed on the pitched edge, and the ridge corner should be installed on the roof top. Installation of the wind deflector on the house roof is carried out on the end roof extension above the gable. In order to effectively close the joints, and at the same time ensure the normal release of water vapor without the appearance of condensation, the board must be bent and profiled in a special way.
For each roofing type, they produce their own versions of wind-type planks:
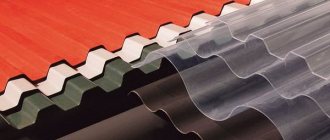
For a soft roof, a wind-type plank with a U-shaped profile is used.- For metal tiles, slate, profiled flooring and ondulin, the G-profile is used.
The thermal and mechanical load on a protective type lining is usually greater than on conventional roofing sheets, and therefore the part is either made of thin-sheet galvanized steel coated with a polymer or polyvinyl chloride, resistant to ultraviolet radiation and temperature changes.
Requirements
On sale you can find a fairly large number of wind slats of various designs, made of impact-resistant polyurethane or polycarbonate. They are not cheap, and their suitability as a protective board is questionable, and their suitability as a protective board is a huge question, because both types of plastic have a high thermal expansion coefficient, much greater than that of slate or galvanized metal.
Please note that the windproof plastic roof board must be resistant and ductile to the influence of solar ultraviolet radiation.
Both polycarbonate and polyurethane-type plastic quickly deteriorate under the rays of the sun, and therefore only polyvinyl chloride is suitable for roofing, ideally in the same tone as the main roofing shade.
Types of roof wind slats
The design of the windproof lining differs from nine other types of end additional elements. The main difference is that each of the structures used to protect the roof covering is profiled in a special way to better protect its place on the roof.
The eaves strip along with the drip edge is installed on the edge of the slope, the ridge corner is installed on the top of the roof. Installation of a windshield on the roof of a house is carried out at the end of the roof above the gable. To effectively close the joint, and at the same time ensure normal release of water vapor without the formation of condensation, the board is bent and profiled in a special way. For each type of roof, they produce their own version of the wind strip:
- For soft roofs, a wind strip with a U-shaped profile is used;
- For metal tiles, corrugated sheets, slate and ondulin, the G-profile is used.
The mechanical and thermal load on the protective lining is often greater than on ordinary roofing sheets, so the part is made either from galvanized sheet steel with a polymer coating, or from polyvinyl chloride, resistant to ultraviolet radiation and temperature changes.
Types of roofing element
End strips vary in shape, color, and material.
According to their shape, they are divided into two types - rectangular and curly. Rectangular ones look like straight corners without protrusions or bends. They are mounted if the slope is finished with flat material. Figured collectors are made with curves that drain water and serve as an additional decoration.
Based on material they are divided into:
- steel;
- aluminum;
- plastic;
- copper.
Steel parts are one of the most common. They are made from galvanized sheets. To withstand precipitation, sun, and temperature changes, in addition to zinc, steel is coated with a polymer - for example, polyester, pural, etc. Polymer coatings give parts the required color.
Aluminum strips cost almost the same as steel ones. They better resist the corrosive effects of the atmosphere, their weight is several times lighter than steel. To last long enough, they are also coated with polymers.
Plastic products are the lightest. They are distinguished by a variety of colors, low price, but not the best durability. PVC is subject to thermal expansion, and constant temperature changes have a detrimental effect on it. Also, heating cables cannot be laid under them.
Copper end strips are the most expensive installation. However, such elements last for centuries. Copper is coated with a layer of oxides, which only increase its protective properties and give the material a noble shade. Subsequently, the roof will require much less maintenance costs.
Requirements for a plastic wind board
On sale you can find a fairly large number of wind slats of various designs, made of impact-resistant polyurethane or polycarbonate. They are not cheap, and their suitability as a protective board is questionable, since both types of plastic have a high coefficient of thermal expansion, much greater than that of galvanized metal or slate.
For your information! Plastic roofing wind boards must be flexible and resistant to solar ultraviolet radiation.
Both polycarbonate and polyurethane plastic quickly deteriorate under sunlight, so only polyvinyl chloride is suitable for the roof, preferably in a similar color to the main color of the roof.
How to choose
If the wind strip is not included in the roofing kit, then you need to choose it taking into account the roof covering. So, for corrugated sheeting, metal parts are more appropriate, for metal tiles - products with characteristic curves, while rectangular corners are suitable for soft roofing.
It is advisable that the color of the extension matches the color of the roof covering. The surface of the plank can be glossy (shiny), fine-grained matte, coarse-grained matte, or simply matte, without grain.
The polymer layer can be applied on one or both sides. The second option is preferable because it is better protected from aggressive environmental influences.
Wind protection for soft roofs
For roofing felt, bitumen shingles or any other types of soft coverings, two types of profiles are used. In cross-section, the wind strip resembles an L profile with a small V-shaped spring shelf.
In addition to the standard profile bar, visors with the lower edge bent outward, performing the functions of a drip pan, are used for protection. The spring in the upper part of the lining tightly presses the horizontal shelf to the surface, thereby ensuring a reliable fit of the protection even in cases where the roof sag or “plays” due to gusts of wind.
It is advisable to choose the size of the horizontal shelf of the wind cover at least 80 mm, but you can find models with a standard size of 65 mm and a double width of 113 mm. Narrower models are used for the most even and flat roofing coverings; in other cases, the selection and installation of wind boards on the roof must be carried out according to the recommendations of the roofing manufacturer. Very wide planks are inconvenient to install, have mediocre flexibility and do not always fit smoothly to the surface of the flexible roof.
The vertical part of the wind bar shelf usually does not exceed 100 mm, the height of the spring side is 20-30 mm. For the most problematic bitumen shingles, it is recommended to use a wind protection with dimensions of 78x100 mm, with a spring height of 20 mm and a drip edge of 10 mm wide.
For your information! All models of wind slats must have a special polyvinyl chloride coating, this will provide reliable protection against moisture seeping into the fastening points.
Decor
Since the width of the eaves boards rarely exceeds 170 mm, well-known siding blanks can be used to decorate them. Standard sheets of material have very similar dimensions (from 170 to 200 mm).
Since the width of the wind board can be up to 190-200 mm, you can cover it all the way with a G-plank with an outer flange about 20 mm wide (including the vinyl sheet inserted into it).
Another approach to decorating the outer part of the board allows for its simple treatment with drying oil, which, due to its decorative appeal, will give the workpiece an ennobled appearance.
Additional Information! The well-polished surface of the front board appears varnished from a distance.
If desired, the roof element can be slightly tinted by diluting a small portion of dry stain in drying oil.
Pediment protective board for ondulin and metal tiles
The design of a windbreak for roof coverings with a wave-shaped or trapezoidal structure differs in design from the strips used for bitumen coverings. Most often, wind slats have an L-shaped profile with a small edge bent at an angle of 45°. There are no springs along the junction line of the horizontal and vertical flanges in slate and metal tile wind boards.
Dimensions of the end cap for wind protection of slate sheets:
- The width of the horizontal shelf is 100 mm;
- Vertical support shelf - 85-90mm;
- The upper edge is bent downwards on a horizontal line by 20 mm; in the lower part there is usually a drip of the same size, bent in the direction opposite to the edge.
The thickness of the metal is only 0.2-0.3 mm, so the wind strip is easily deformed, bent and cut with ordinary scissors. The standard profile length is 200 cm, which is convenient for installation, since the length of the profile has to be adjusted to the location where the wind board is installed, taking into account the overlap at the joints and the length of the roof.
Briefly about the main thing
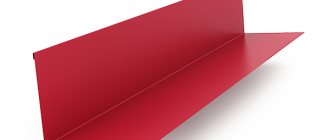
The wind strip is an additional element included in the kit for corrugated sheets or metal tiles.
A profile of a copper, aluminum or galvanized and painted steel plate is made, which is bent at a right angle along the longitudinal axis.
The shelf, which is attached to the front board, is slightly bent outward along the edge to drain water.
Standard dimensions of workpieces: length - 2 meters, width - 90-150 mm or 40-60 mm.
The shelf, which is fixed on top of the corrugated sheet, can be made flat or profiled in cross section.
To install the wind strip, roofing screws with a sealing washer are used.
The optimal distance between hardware is in the range from 300 to 500 mm.
Ratings 0
Installing wind bars on a metal roof
The protective cover itself, made of plastic or thin-sheet metal profiles, is too flexible and fragile, and can easily be damaged during installation. Therefore, even if a counter-lattice strip peeks out from under the metal tile along the edge, you cannot attach a wind strip to it. Even if you manage to nail the wind strip directly to the batten under the roofing, this can lead to deformation of the metal tile roof. Most likely, it will simply be torn off by a gust of wind from the gable edge of the roof.
Therefore, to attach the wind strip, you will need to first fill a backing board with a width of 80 mm and a thickness of 15-20 mm.
Advice! The lining is chosen from durable wood, it is best to choose oak or elm, while the board itself is nailed with oblique nails. Fasteners hammered at an angle to the surface of the board will withstand the strongest gusts of wind.
This part of the work is most conveniently performed at the stage of filling the counter-lattice slats onto the base of the future roof.
After the metal tile sheet is laid on the roof, the edge is fixed with a 20x20 mm pine strip, so the edge of the covering will be firmly fixed and will not squeeze out the wind cover when there is a large accumulation of snow on the roof.
Installation of the windproof lining begins with the eaves, while the horizontal shelf of the first section should go over the drip strip. For each subsequent section of the wind strip, an overlap of 40-50 mm is installed with the previous piece. In the upper part, the shelf is placed under the ridge overlay.
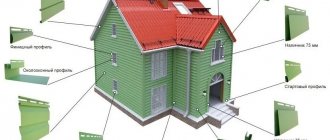
Place of the end strip in the family of additional elements
Additional elements are installed on the roof as a finishing touch. Only they give the roof a complete look and protect it from the aggressive influence of the external environment. To evaluate the importance of the end strip, you need to know about the functions and features of the remaining additional parts.
- The cornice strip is attached to the sheathing, to its starting board. It protects the wooden elements of the rafter system from melt and rain water and facilitates their drainage into the gutter.
- A triangular-shaped ridge strip protects the joints of a pitched roof on inclined ribs and on a horizontal ridge. Thanks to it, the under-roof space is protected from the penetration of moisture, wind, and debris from above. The upper edges of the roofing material are securely secured with a ridge strip and remain in place even in strong gusts of wind. A triangular ridge strip is installed on a roof whose slope exceeds 30 degrees, on a hipped roof.
- Flat ridge strip. It is installed instead of a triangular analogue on the roof if its angle of inclination is less than 30 degrees, as well as on roofs with broken slopes and a slight slope.
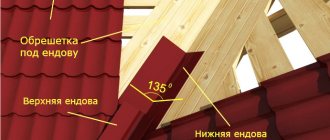
- Endova. The plank covers the internal corner, which is formed when two slopes are connected. It protects the space under the roof in this area from leakage and facilitates the removal of melt and rainwater.
- Junction strips. The parts protect areas adjacent to the wall and protruding vertical elements on the roof, including chimneys.
- Dropper. This element is often confused with the cornice strip, but the drip edge has its own unique characteristics and functions. It protects the end part of the sheathing from getting wet and directs moisture into the drain.
- Snow barriers. The parts are installed vertically to retain snow masses. They prevent them from causing an avalanche, which could result in injury to people and cars.
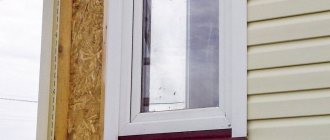
- Window tides. The elements protect windows from moisture penetration.
- Parapets protect the flat side surfaces of the roof.
- Ventilation shaft hoods. A dome installed above the pipe prevents rain from penetrating into the under-roof space.
- Gutters for gutters remove precipitation from the roof.
- End strip. This article is devoted to this part, so its characteristics and functions will be discussed in detail here. The shape of the plank is straight or angular. The second option is equipped with an additional stiffening rib, which not only strengthens, but also decorates.
All additional elements are made of thin sheets of steel or plastic. Steel parts have the advantage of being stronger and more durable. They are protected by a zinc layer, which protects against corrosion, and a polymer layer, which gives the desired color.
The choice of material (plastic or metal) depends on the type of roofing material. Since the end strip for metal tiles is described here, the preferred material for it is thin steel, coated with a polymer layer to match the color of the roof.
Varieties
The design of this product is simple. Many metal tile manufacturers provide the opportunity to purchase wind slats immediately with the roofing material. Wind strips for metal tiles are used in various places on the roof. Depending on their mounting location, there are 2 types of planks.
Cornice
These elements are fastened to a protective board called a frontal board. Cornice strips prevent moisture from entering directly under the metal tiles. This minimizes the risk of internal corrosion due to frequent condensation formation.
End
Pediment structures are installed directly on the side surfaces of the roof (along the slopes). Their main purpose is to protect the roof from strong winds. To strengthen such a system, they are supplemented with wooden elements that are located underneath them.
Both of these elements are almost identical. Sometimes they may vary slightly in shape or size.
When purchasing end strips, you should pay attention to the width of the corner sides. The wider they are, the better the product will resist external loads.
Prices for end strips
Different manufacturers set their own prices for additional elements, including the end strip. The cost varies from 200 to 600 rubles per piece, and installation requires several planks that will overlap.
The price depends on the following factors:
- Manufacturer and brand. The more famous the company's name, the more expensive its product.
- The amount of zinc used in the protective layer. The optimal volume here is 140 grams per 1 sq.m. surfaces.
- Plank thickness. A part that is too thin will become deformed when exposed to wind.
- Length of the bar. The standard here is 2 meters.
When choosing an end strip, you should not skimp. Only high quality elements can guarantee a long service life and reliable fastening.
For easy comparison, below are different wind strips for corrugated sheets and their prices. Keep in mind that in your city the cost may vary greatly, since it depends on the pricing policy of the local manufacturer and logistics difficulties.
Wind strip for corrugated roofing - price of three types
| View | Coating | Price per piece, rubles |
| Standard | Polyester | 175 |
| PVDF | 250 | |
| Reinforced | Polyester | 260 |
| PVDF | 380 | |
| With side | Polyester | 315 |
| PVDF | 410 |
A galvanized end strip for corrugated sheeting costs much less - the price of such material starts at 115 rubles. But in combination with a colored roof it will look bad, so it’s not worth buying it to save money: the difference in price will be minimal, and the appearance of the building will be greatly spoiled.
Installation of a wind strip for a corrugated roof
The method of attaching wind strips to a roof made of corrugated sheets is no different from installing a profile on the edge of a metal tile roof.
As in the previous method, the protective element is attached to a support wooden board, 70-80 mm wide, pre-sewn along the end of the roof. It is she who will absorb most of the loads associated with gusts of wind and deformation of the roof.
The second difference is the location of the edge of the roofing covering on the edge of the base.
For your information! The metal profile sheet is laid in such a way that the peak of the trapezoidal or rectangular profile is located directly above the seam line between the wind board and the counter batten.
All that remains is to apply sealant to the top of the wave, lay the wind strip on the edge and secure it with self-tapping screws and sealing washers.
Video description
In this video, a home craftsman demonstrates in detail the construction of a gable overhang with wind strips for corrugated sheeting:
Sealant is used to seal the joints between the wind strip and the corrugated sheet. An alternative to paste-like material can be sealing tape or foamed double-sided tape. Experts prefer a special seal that follows the profile of the roofing sheet. The main reason is the unlimited service life.
An example of a universal sealing tape for corrugated sheets Source nohoho.ru
In the case of cornice strips, installation with direct joining of individual elements is often observed. But this should be abandoned, since the ends quickly become unusable under the influence of natural phenomena. That is, it is better to maintain an overlap in the range from 100 to 500 mm. The direction is chosen according to the flow of water so that it does not flow under the profile. Hardware is located in increments of 200-300 mm. The planks are fastened from the center to the edges.
Installation of a wind strip for a soft roof
The sequence of assembling wind protection for bitumen types of coatings is somewhat different from the cases of metal tiles and profiled sheets. The main feature is that the wind strip is glued under the roof.
The first step is to lay a counter-lattice on the base of the future roof. For soft surfaces, treated plywood or OSB boards are traditionally used. The next step will be laying the end gable board. Since flexible roofing material does not have a profiled surface, there is no need to press the wave to the base of the roof. Therefore, there is no need to raise the wind bar above the base of the underlayment. It is enough just to seal the glued edge of the sheet or shingle.
To hold the protective metal strip on the edge of the roof, it is enough to nail a beam with a cross-section of 40x40 mm. This will need to be done at the stage of laying the roof sheathing.
After the shingle backing or the first layer of glass roofing material has been glued to the roof slope, the windshield is nailed. A layer of glue is applied under the horizontal shelf and secured with ties. Already at the stage of laying the roof covering, the canvas is glued to the wind protection at the level of the spring. In the places where the canvas joins the cornice overlay, the metal profile of the wind strip is laid on top of the cornice; in the upper part, the strip is run under the ridge triangle.
Functionality of the bar
So, installation of the end strip is required to:
- Protect the roof from wind, moisture, and debris. Dampness is equally dangerous for both the wood of the rafters with sheathing and the roofing material. Water quickly leads to corrosion of metal; one scratch on a metal sheet of flooring is enough for corrosion to begin. Wood also quickly deteriorates from moisture, swells, becomes overgrown with mold or mildew, and loses its load-bearing capacity. If the sheathing and rafters become damp, the attic will become much colder, since damp wood loses its thermal insulation properties. The atmosphere at home will also deteriorate and fungus will appear, which will negatively affect health.
- Prevent birds, insects and small animals from getting under the tiles. The end strip not only increases resistance to wind loads - it prevents damage to the roof by all kinds of rodents. Birds will not build nests under the tiled waves, wasps will not appear there, rodents and pests will not get stuck, which, if they are unable to get out, can cause unpleasant odors.
- Give the house a finished look by hiding the edges of metal tiles, corrugated sheets or other material.
Attaching the end strip is an important part of the decorative design of the building. This element can transform the facade if you install not a simple strip to cover the edge of the roof, but a detail with carvings or rich decor.
Tips and tricks
The main condition for successful installation of wind protection is to ensure rigidity of the edges of the roof overhangs. If the roof sheathing is made of thin edged boards, or the overhang is too large, then before installing the gable overlay, the lower surface of the overhang is lined with a pair of 40x60 mm beams.
The second condition is the correct splicing of the wind board. Usually, developers neglect joining the boards and stuff them onto the end of the counter-lattice, even without overlap. If it is not possible to connect the end boards into one element, then you need to at least knock them down at the ends with oblique nails.
Recruitment parameters
To produce end strips, a sheet of metal 0.4-0.5 millimeters is taken. The top shelf, extending to the top of the roof, is made with a width of 90-100 mm. The bottom shelf, also known as the overhang, has dimensions of 70-125 mm.
The standard part length is 1500–2500 mm. It may be less by 5%, which must be taken into account when calculating. It is possible to produce these additional collectors to order (most often steel ones are ordered) with personal parameters, for example, if the width of the mounting shelves is required up to 30 centimeters.