If this value is low, there is a risk of leaks, damage, or water stagnation in the coating.
With large slopes, there is a possibility of the structure overturning due to natural influences (strong wind). What are the accepted optimal slope inclination indicators? Let’s try to figure it out in this publication.
What does SNiP say?
The requirements regarding the roof slope are specified in SNiP-II-26-76. In case of minimizing the angle parameters, additional measures should be taken into account to ensure the waterproofness of the roof.
The required indicator ensures the inclination of the supporting structures:
- beams;
- rafters;
- upper belt of trusses.
It also affects the slope of the surface of the screed (leveling layer), monolithic or thermal insulation made of mineral slabs, and all kinds of bedding (sand, other fine-grained material) made under it.
Dependence on loads and other factors
Builders measure the angle of the roof slope relative to the horizon as a percentage or in degrees. Accurate measurements require the use of a surveying instrument. Approximately 0 degrees is an indicator of a completely flat roof; increasing the slope parameter makes the roof acute-angled.
Pitched roofs range from 11 to 45 degrees. During construction work, the required angle should be calculated. You definitely need to pay attention to some nuances.
Winds
In areas with strong gusts of wind, you should not use a project with a roof that is too sharp. High windage of a roof with a large angle of inclination will lead to its destruction.
In this case, a flatter design with a lower slope inclination, with strong reinforced rafters, is preferable. This option will cost more in terms of cost, but the roof will be better protected from the elements.
During the construction of the roof, another indicator is important - the direction of the wind. When choosing metal tiles as a covering material, you need to ensure that the wind is directed directly into the plane of the laid sheets. When exposed to gusts from the ends, there is a risk of tearing and bending of sheets. Taking into account these nuances (wind strength and direction), you need to choose the correct rotation of the slopes of the roofing structure.
Precipitation amounts
If you live in a climate zone with heavy snowfall, the roof should be pitched at a slope of 45 degrees.
This level will ensure better sliding of the snow cover down, which will eliminate its retention on the roof and pushing through the covering material.
When the roof has an angle of approximately 45 degrees, the rafters will not need to be reinforced. However, there is a possibility for such a model to increase wind loads. Taking into account all climatic conditions, it is important to choose the right design.
When calculating the slope, you should also take into account other natural phenomena - hail, rain and scorching sun exposure, which also affect the strength of the roof. In areas where there are many sunny days and little rainfall, you can use a flat model with a minimal slope.
Important! A flat roof should still have a minimum slope (1 degree or 1.7%).
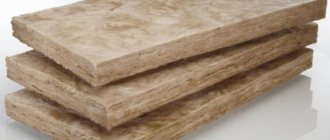
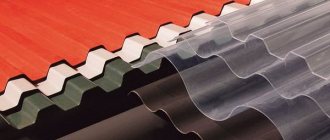
Roofing material
There are two types of roofing materials. They have a rough or smooth structure. In the first option, water drainage from the roof is worse. More liquid and snow will be retained here. A smooth coating will ensure immediate moisture drainage. There are other structural indicators that affect the minimum and maximum slope parameters.
Why do you need to know the angle of inclination?
The design documentation of buildings takes into account a huge number of individual factors, while specialists try to take into account the maximum number of customer requirements. But only under one condition - their wishes do not have a negative impact on the strength and reliability of structures and meet the existing regulatory requirements of state standards.
The roof is considered one of the most important elements of any building or structure; during its design, the first place is not design, but safety, reliability and durability. In modern buildings, the roof not only protects it from precipitation, but also prevents the loss of thermal energy.
Gable roof angle calculator
Go to calculations
Prices for timber
timber
Types of roofing taking into account slope
Roofs of residential and non-residential buildings are classified into 2 categories: pitched and flat. In areas where there is a temperate or continental climate, flat models are used in multi-story buildings, and in private households, preference is given to models with different slope angles.
Taking into account the magnitude of the slope, pitched roofs are found in three groups:
- Flat - from 10 to 30°.
- Average parameters - within 30–45°.
- With a high rate of slope - in the range of 45–60° between the slope and the ridge.
When the roof slope has a slope of less than 10°, it is also classified as a flat structure. It is important to calculate the slope of the roof slab in advance at the design stage of the rafter system. At this moment, the type of roof is selected taking into account the number of slopes. These indicators form the following characteristics:
- Single-pitch is the most affordable model. It has one plane located on the walls.
- Gable - a roof with two slopes of the same or different slopes and sizes.
- Tent - an economical option, consisting of a different number of triangular planes connected by vertices at one point.
- Hip - a sample with 4 slopes of triangular and trapezoidal shape.
- Multi-pincer - a design with any number of slopes located at different angles. They look quite beautiful and represent a complex architectural model.
The slope angles of the slopes on the same roof may differ.
On a note. When designing a truss system, it is necessary to take into account the characteristics of the operational characteristics of materials and control that the actual value of any of the slopes is not less than the minimum provided for by GOST.
Arkon
In Arkona, when designing the roof of a house at the initial stage, the user can choose the desired type of roof. After this, he can make the necessary changes and clarifications to the selected design. At the same time, there is no need to draw the rafter system from start to finish; it is already included in the software. You have the opportunity to choose one of the following roof shapes:
- single or double slope;
- free form;
- hip or half-hip design;
- attic with pediment at the ends;
- mansard-hip variety;
- spherical;
- flat roof;
- gable with a rail for fastening.
If you go into the editor, you can change the standard design. To do this, you need to set your numerical values in the window with the value of the angle of inclination of the slopes, the height of the gables, and the location of the gutters. By clicking on the view button, you will immediately see the result.
By going to the “Info” section, you will receive all the detailed information about the design you have developed, namely:
- rafter lengths;
- roof area;
- length of gutters;
- skates;
- wind gables;
- roof ribs;
- volumes of lumber;
- the data is displayed in several versions (without taking into account dormer windows, separately for these windows and general indicators);
- If necessary, you can get an indicative list of lumber by clicking on the “List” button.
It should be taken into account that all lengths are rounded to 5 cm. After rounding, lumber of the same type will be combined into one section. But in the catalog they will be divided by variety, size, and cross-section.
To determine the height of the attic floor with support, you need to use the “Assistant” button. If you go to the “General” section in the tab that opens, you can find out the height of the attic floor and other values. In addition, the software allows you to choose the type of roofing covering. You can choose the color, texture and material.
What is it measured in?
Many centuries ago, scientists around the world decided to measure the angle of inclination in ppm or degrees. Builders have recently come up with a new measurement value - percentages, arguing that such an indicator makes calculations easier. And yet, all cuts of rafter legs are made in degrees.
During the assembly of the rafter system, no one uses %. And there are no measuring instruments that measure angles in %. But there are tables for converting percentages to angles:
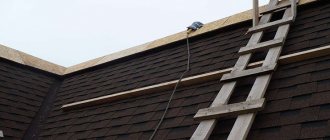
Work order
After the calculation is completed, we begin purchasing the material and assembling the structure.
- Treating elements with an antiseptic. This can be done after installation in the design position, but if you plan to store the wood, you need to process it immediately after purchase.
- Waterproofing areas of contact between materials with different properties. In the place where the mauerlats are laid on a brick or concrete wall, you need to lay a layer of roofing material, linochrome or waterproofing.
- Laying the Mauerlat and securing it to the wall. Can be done on wire, staples, studs, anchor bolts.
- Laying rafter legs. Fastening them to the Mauerlat. Can be fastened using staples, nails or corners with self-tapping screws.
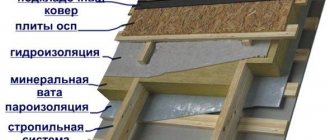
- Installation of waterproofing and sheathing.
- Laying insulation.
- Roofing covering.
- Installation of the bottom sheathing and ceiling trim.
Metering
Slope measurements are carried out using mathematical calculations or an inclinometer. The last option is a rail with a frame; between its bars there is a division scale, an axis and a fixed pendulum. The rod is located horizontally, it shows zero degrees on the scale.
To measure the slope of a roofing structure, the inclinometer rod should be held perpendicular to the ridge (in a vertical position). The pendulum on the instrument scale will show the existing slope of a given roof slope in degrees.
This type of measurement technique is no longer in demand, since modern geodetic instruments are available today. With their help, slope determination has become much more accessible.
Reference. There are also electronic and drop levels with inclinometers.
Mathematical calculation
Calculation of the slope of a roofing structure can be performed without the use of geodetic and other tools. This will require basic geometric formulas.
Any roof can be represented as a combination of right triangles, where:
- roof slope - the hypotenuse of the triangle;
- roof height - one of the legs;
- the horizontal distance between the ridge and the extreme point of the eaves of the slope is the second leg.
To calculate the slope, you need to use a tape measure to measure the height of the roof h to the top point of the ridge and the distance from the ridge to the eaves overhang l. The slope of the slope α is calculated using a simple formula:
α = (h/l) 100%.
This will give you the slope angle as a percentage.
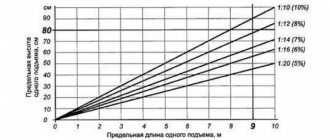
There is no simple formula to obtain the slope in degrees. But there is a simple scheme. To determine, find the desired % value on the vertical scale and see which angle on the protractor it corresponds to.
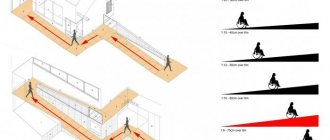
How does the angle of inclination affect the dimensions of the attic?
The larger the living area of the attic, the more comfortable it is to live in it, the more prestigious the building is considered. It is advisable for developers to first be guided by the dependence of these operational characteristics on the shape of the roof; knowledge will help them choose the optimal solution for the rafter system. It can be made convenient and cheap, suitable for the use of various roofing materials.
Dependence of the usable area of the attic on the angle of inclination of the roof
The diagram clearly shows how the area of the room changes with a change in the angle of inclination of the slopes. When determining the size of the attic, it must be borne in mind that making the height of the room less than two meters is impractical; such rooms have a depressing effect on the residents.
But there are also negative factors that arise when the angle of inclination increases.
- The amount of building materials will increase. The greater the angle of inclination, the greater the length of the rafter legs. Let's look at an example. The slope angle is 45°, the width of the house is 8 m.
With such data, the length of one rafter
The length of the two rafter legs, respectively, is 5.66 + 5.66 = 11.32 m. This despite the fact that the width of the building is only 8 m. In practice, this means that for such a roof you will have to buy 8:11.32 × 100 = 70 % more lumber and roofing than for a pitched flat roof.
- The estimated cost of roofing work is increasing. Not only due to an increase in the amount of necessary materials, but also due to an increase in the complexity of roofing work. Such tasks can only be performed by highly professional specialists, and their services are very expensive.
- Wind loads on the roof increase. The forces are of an overturning nature; additional special construction measures are required to increase the reliability of fixing the mauerlat to the facade walls and the rafter legs to the mauerlats.
Optimal values
The optimal values depend on the windage, snow load, type of roofing material, as well as the purpose of the under-roof space.
- To reduce the snow load on the slopes, you need to install steep roofs, with an angle of 60°. This option is not often found, for this reason the minimum required roof slope is calculated from the permissible load on the roof structure.
- To reduce windage, you need to use a small roof slope; this value conflicts with the thoughts described above. Due to this factor, in areas with normal wind loads, a roof slope of 30–45° is used.
- Also, for most roofing materials, both minimum and maximum permitted installation angles have been developed. The slope and the presence of an attic or conventional attic under the roof have a significant effect on the indicator.
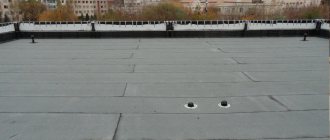
From a material point of view, the most budget option is a flat or flat roofing structure. However, there is a risk of problems arising during its use.
To avoid this, use this parameter:
- for regions with heavy precipitation (rain and snow) - 45–60°;
- in a climate zone with strong wind currents - 15–20°;
- if the area is subject to hurricane gusts of wind, as well as rainfall - 20–45°.
Advice. You can determine the indicators yourself, but there are various nuances and aspects that are familiar only to experienced specialists. It is advisable to trust the design, calculations and work on laying the roof only to professional roofers.
Why are our tools better?
Close cooperation with roof manufacturers
Highest detail in drawings and 3D models
Final report with a list of required materials
Ready-made estimate for the construction of the structure by the contractor
Technical support helps when working with the calculator
Positive feedback and a large number of completed projects
You can calculate the roof on any website and this is a fact, but you should be aware that, unlike other resources, our project has a long history, positive reviews, prompt technical support and regularly updates its work algorithms, eliminating the occurrence of errors. Feedback with users is established and works flawlessly; any visitor can ask a question, and KALK.PRO will try to answer it.
In addition, we would like to highlight the following:
- Constructor functionality . Our tools provide ample opportunities for designing a structure - you can adjust the characteristics of any element, and if you enter invalid values, the program will stop the calculation and indicate in which field the error was made.
- Cooperation with professionals . The KALK.PRO service actively cooperates with manufacturers and designers of roofing systems, so only here you can find such a detailed study of individual joint connections.
- Ready estimate . Upon completion of the calculation, the user receives not only a standard report with the parameters of structural elements and a set of drawings, but also a detailed estimate with the amount of materials required for manufacturing.
- Graphic arts . The main advantage of our service is high-quality detailed graphics, which are as close as possible to the standards of technical documentation. We also provide a free interactive 3D model , with which you can evaluate the advantages/disadvantages of the selected design.
- Technical support . If you experience difficulties using the calculator or have questions regarding the resulting calculation, we will look into the situation and try to answer any constructive questions 24/7.
- Personal Area . Our website also has a convenient personal account in which the results of roof calculations or any other structure are saved - you will never lose your project, and you can also download the download at any time, regardless of the time of the operation.
In the comments to each calculator and on the “Reviews” page, you can read messages from real people who use our tools. Check for yourself what users write about us.
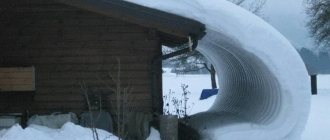
Formation of the house slope
The slope must be done on roofs with a slope angle of ≤10°. Slopes cannot be completely horizontal, because Slopes are required for water drainage. For pitched roofs this is not critical, but for flat roofs the lack of slope can cause water stagnation and leaks, leakage, premature failure of load-bearing units, etc.
The slope of such roofs can be done using several methods; let’s consider the simplest method.
Carry construction tools, equipment and materials to your home.
Prepare an electrical panel to which you will have to connect different current consumers. The shield should be placed taking into account the PUE, in compliance with the safety regulations.- Take a project, find where and how the storm drains are located.
Mark and drill holes using a special diamond bit with constant water cooling. The funnel size depends on the maximum design water flow. According to the data received, purchase the required funnel elements. - Using a laser level, you need to mark the location of the surface of the concrete layer on the roof parameters. It will become a conditional “zero”, from which upwards you need to mark all other roofing layers. You need to work carefully, carefully positioning the equipment, take measurements, taking into account every millimeter.
- Fill the area with polystyrene concrete.
The solution must be prepared on the roof and mixed on your own or use a special mixing device (equipment that supplies the finished working mixture from the ground to the top under pressure with hoses). Before starting work, you need to set up separate formwork and your own beacons on each site, taking into account the magnitude and direction of the slope of the slopes. - The next day you need to remove the film. When performing work using the technology, the strength of concrete will make it possible to safely walk on the roof surface. Don’t forget to check the deflection value, since existing errors can be corrected at this stage of work.
Important! When the weather is warm and windy, the finished areas after pouring the concrete mixture must be covered with polyethylene material to avoid rapid evaporation of moisture.
This phenomenon will not allow all necessary chemical reactions to fully occur due to the lack of liquid. The consequence of this process will be a decrease in the strength of the screed.
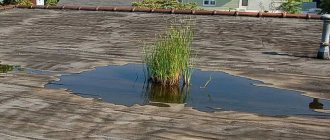
Consequences of non-compliance with standards
Roofs with a slight angle of inclination require the construction of the most complex rafter system capable of withstanding heavy snow loads. The lower the slope of the roof, the more additional support elements need to be installed .
If at the stage of roof design the provisions of SNiP were violated, which relate to the permissible minimum slope of the structure for corrugated sheets, the owners of the building will face serious tests: leaks against the background of heavy precipitation. They can penetrate under the screws through the holes.
conclusions
It is possible to calculate the angle of the roof yourself if you take into account all the relevant factors, including the climatic conditions in the region and the characteristics of the building.
However, experts advise not to miss the opportunity to first consult with professionals and order design and measurement services from them in order to guarantee high reliability, functionality and durability of the roofing system.
You can order the construction of a house from the Render House company. Typical options are presented on the website; we also build cottages based on individual projects.