What is the difficulty of arranging the junction?
Experienced roofers know well that one of the most difficult and critical stages is the connection of the pipe to the roof and its installation.
After all, several risk factors are at work here:
- high temperature of the pipe, which can heat almost any roofing material, especially wooden sheathing, to a critical temperature;
- technological gap between the pipe and the roofing, which must be completely sealed;
- a cap of snow that always accumulates on any obstacle it encounters on its way down.
Therefore, the main requirement for a chimney bypass is to be fireproof, durable and 100% airtight.
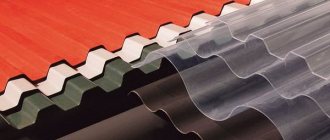
The chimney protective apron itself is made in two ways: from lead or aluminum flexible tape or steel sheet with a special coating.
The main thing is to do everything right:
The issue of the tightness of the junction of the roof to the chimney is usually solved with the help of an internal apron made of junction strips, and we will try to analyze this issue in detail with you.
Roof cutting of round pipes
To seal sandwich-type pipes made of stainless steel or round ceramic pipes, roof penetrations with a metal or polymer cap are used. In addition, to protect wooden structures from overheating, it is necessary to install a thermal insulating box made of non-combustible material at the place where the pipe passes through the roof, and fill the space between the walls of the box and the pipe with a non-flammable heat insulator. Stone or basalt wool is used as a heat insulator; their melting point is significantly higher than that of the chimney in operating mode.
Exiting the pipe to the roof and installing the cutting
Purchase or make your own pipe from thin-walled metal. Its dimensions must provide a fire-prevention distance from the pipe to flammable structures - at least 25 cm in any direction. The pipe has the form of a box with a lid, with holes on both sides equal to the diameter of the pipe. The pipe must be finished with fireproof insulation - the figure shows finishing with basalt wool with a heat-reflecting layer. You can secure it using heat-resistant sealant and metallized tape.
Pipe for passage through ceilings
Mark the place where the pipe passes through the ceilings and cut a hole in it to the size of the pipe using a jigsaw to cover the entire thickness of the heat-insulating “pie”. Install the pipe.
Hole in the ceiling for the pipe
The chimney is removed from sandwich-type pipes through a hole in the pipe, the gaps are treated with heat-resistant sealant with an operating temperature of up to 1000 degrees. Insulation – basalt wool – is placed between the walls of the box and the pipe. The passage is closed from below and above with lids and secured with self-tapping screws.
Installation of pipes in ceilings
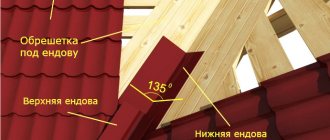
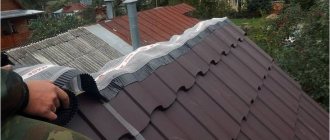
Mark the place where the pipe passes through the roof and cut it out in the same way. In this case, the hole will not have a square, but a rectangular shape due to the slope of the roof. Install the lower cutting apron. It is chosen depending on the slope of the roof - the steeper the slope, the more elongated the hole will be.
Hole for pipe exit to roof
Continue installing the pipe through the cut hole; the apron can be temporarily lowered down. The pipe must be tightened with clamps and secured to the roof structural elements with brackets.
Pipe outlet to the roof
Bring the pipe to the roof to the required height
In this case, it is important to follow the rule: the connection of the elements should not be located in the place of passage through the roof or ceiling; if the dimensions of the pipe do not allow it to be made, it is necessary to trim one or more elements. It is better to install clamps securing the pipe at the joints, and seal the joints - this ensures maximum stability of the pipe and fire safety
Roof pipe installation
After the pipe is installed and brought out, the lower apron is secured, and the roof groove of the selected type is put on the pipe. The figure shows a roof section with a metal apron laid on top of the roofing covering - corrugated sheeting. The upper edge of the apron is placed under the overlying sheet of corrugated sheet, and its side parts are cut so that they are in the upper part of the wave of the metal sheet. With such a design and a large roof slope, water will not flow under the apron.
Installation of apron and cutting
For other types of roofing, roof sections of a different type can be used, for example, metal-polymer or with a lead apron.
Different types of roof grooves for round pipes
When using a flexible cutting made of silicone or rubber, a hole is cut in the cap 1/5 smaller than its diameter. The cap is pulled over the pipe and the flexible apron is given the shape of a sheet. They are secured with self-tapping screws, having previously been coated with sealant. For a more durable fastening, it is sometimes necessary to strengthen the roof sheathing - this is done at the stage of cutting out a hole in it.
Installation of silicone groove
A flexible lead apron can also be bent to the shape of a roofing sheet, but when purchasing it, you should take into account the angle of inclination of the slope. The upper edge of the apron must be placed under the overlying sheet of slate or metal.
Cutting with flexible lead apron
What is an abutment strip?
Typically, additional elements occupy no more than 3% of the area of the pitched roof of a private house, however, the tightness and reliability of the structure depends on their correct selection and application.
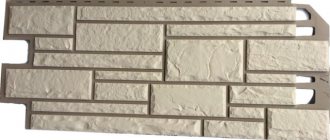
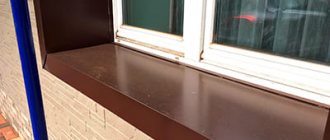
The abutment strip refers to additional roofing elements and is used where the area must be protected from moisture penetration due to the fact that it is adjacent to a vertical surface.
It is used where the roof is connected to a ventilation chimney, chimney, building wall, or eaves board. The bar physically covers the fracture site to prevent water from getting there. The additional elements of the junction strip have the following functions:
- Waterproofing . The abutment strip is laid at the junction of the roof with vertical surfaces, first of all, to protect this area from the flow of rain or melt moisture. It is in such places that the most snow and water accumulate, so without additional waterproofing, leaks are almost inevitable.
- Thermal insulation . The edges of the roofing material cannot fit tightly to the surface of the walls of the house or the pipes passing through the roof, so noticeable heat loss occurs through these cracks. To prevent the penetration of cold, you can use metal corners that will close the gaps.
- Aesthetic . Where pipes pass through the roof, a rather unaesthetic, sloppy joint remains; an abutment strip can eliminate this defect, improving the appearance of the finished roof.
Junction strip
Remember! Experienced roofing professionals claim that more than 90% of leaks after laying new generation roofing material occur due to improper organization of junction points. Although you can fix this problem using simple DIY corners, you will find tips on how to do this and a useful video in this article.
The need to connect the roof to the wall of the building
The junction must be made as airtight as possible
The need to connect two surfaces arises in the following cases:
- Construction of a half-hip roof, when the end slope is below the truncated pediment. The flooring is at right or obtuse angles to the vertical surface. The joint is clearly visible and should have an ideal appearance. Similar requirements apply to balconies.
- Arranging a canopy over the front door. The shape of the canopy can be any - flat, gable, arched, pyramidal. The connection of the roof to the wall should be adjusted to the configuration of the structure. If the joint is closed, more attention can be paid to the effectiveness of the connection, leaving its aesthetics in the background.
- The presence of chimneys and ventilation pipes on the roof. The place where they pass is in contact with the flooring and is in plain sight. Here you need to try to ensure that the docking point combines practicality and accuracy in execution.
- Parapet around the perimeter of the flat roof. If it is used as a recreation area, the roll covering is not placed on the top of the fences. Docking is carried out at a height of 10-20 cm from the floor. This ensures tightness and preserves the aesthetic component of the structure’s design.
The purpose of roofing materials is to seal the surface of the roof and give it a certain design, shape and color. Quite often, structures are erected where, according to the design, a soft, hard, even and shaped covering is attached to the wall.
Made from profiled metal
All coatings are made with a mandatory gap for ventilation.
- If the wall is steep: brick and plastered, then make a recess with a depth of up to 3 cm, parallel to the roof.
- When adjacent to a metal roof, a steel flashing is inserted into the recess. pre-treated with sealant.
The bar at the bottom is secured with self-tapping screws. You can install two aprons at once using the overlay method. In this case, the wall is not tapped:
- Reinforce the apron with dowels.
- Place the bottom bar and connect it with the top locking fastener.
- The lower strip is equipped with clamps and self-tapping screws; they are attached to the roof.
- Treat all joints with sealant.
From soft and ceramic roofing
Work begins:
- A fine is made, 300-500 mm high, from the surface layer.
- Along the entire perimeter, we strengthen the block, preferably with a triangular cross-section. This is necessary for a smooth transition and the formation of a barrier in case of future possible leakage of water.
- Remove all dirt from the area in contact with the roof and treat with Primer.
- A timber is placed on the soft components.
- They are glued with mastic (bitumen), but you can also use sealant to install a strip of the valley. This is a rolled material called valley carpet, with a width of up to one meter.
- It is installed starting from the fines on the wall. And the other end is laid on the horizontal plane of the roof, with a width of at least 200 mm.
- Press a little and smooth it well with a rubber roller. Large crumbs on glued joints can be cleaned well.
- At the end, they are fixed with a pressing bar (90-130 mm) with a bend, which fits into the groove when installed.
- Secure it with dowels and rubber washers to the wall.
From roll roofing
Can be performed using various technologies. Traditionally, it is placed with an obligatory overlap on a vertical plane, and secured with slats. This method is suitable for flat, pitched roofs. For durability we do:
- The roofing material is laid with a slight overlap on the wall of the building (height 20 cm).
- the slats are secured with dowels.
- All joints are coated with sealant.
Disadvantages: Possibility of damage when installing or cleaning the roof. To prevent this:
- The corners are filled with a triangular shaped block, or an additional layer of thermal insulation.
- They make a structure: one sheet of cotton insulation and a rectangular block are installed under the insulation. Such a roller will protect the roofing material from tearing and will slightly insulate the junction.
Metal tiles or corrugated sheets
The standard connection device is made into a 25x25 mm groove made in a brick wall at a height of 150 mm from the surface of the roofing; a profiled strip of coated galvanized metal is inserted into it.
We recommend: Draining a bathhouse: how to do it correctly, step-by-step guide, drainage systems, materials
This could be the PS-1 joint strip.
Joining a metal tile roof.
A wooden strip is secured to the groove with dowels, to which a profiled strip is attached with self-tapping screws. Fill the hole with cement mortar or roofing sealant. The other edge of the strip rests on the profiled roof covering.
If the roof is made with a waterproofing layer under the metal profile, then this layer is folded and glued with bitumen sealant to the wall under the strip. In this case, the fastening of the plank to the wall can be done not in a groove, but through a vertical shelf, securing it with self-tapping screws.
The connection of the roof with log walls is carried out in a similar way, in which it is not a fine that is made, but a cut of the logs to a flat surface.
You cannot make a fine in the walls of panel houses, since the panels are load-bearing structures, and the fine can weaken them.
Traditional methods of protecting the abutment area
There are two old technologies that for some reason are no longer used today. Although, as practice has shown, they justify themselves one hundred percent.
- In the process of laying a brick wall (or block wall), a protrusion is made at the junction of the roof along the entire length of the roof structure. The width of such a protrusion is half a brick. And this is enough to protect the junction of the roofing material and the wall from rain and other precipitation.
- At the junction, a slot is made in the wall . Its depth is 5-6 cm. Roofing material is inserted into this recess.
Repair of junctions
You can take bitumen and rolled materials for repairs. But you can also use more modern means: reinforcing geotextiles and mastic. Carrying out repair work, preparing the place:
- roll coating, clean well;
- concrete, treated with “Primer”;
- polyvinyl chloride, degreased;
- brick building, plaster, then dry.
Cover cracks and chips, apply mastic in two stages, when dry, apply reinforcing geotextiles.
Repair work of soft roofing: self-tapping screws, slats
The covering rises by (20 cm) and is fastened with a strip with self-tapping screws, but always with rubber washers. All joints should be thoroughly cleaned, primed and coated with sealant. Triangular bars soaked in antiseptic are placed. And lay a thermal insulation layer.
Damage to the internal drain funnel
- Remove the cap from the funnel cone.
- The roof sheet itself is heated with a blowtorch and folded back one by one.
- Remove the fiberglass fabric and take out the bowl.
- The hole is cleaned, the edges are coated with cement mortar and the funnel bowl is put back on.
- They are covered with new fiberglass fabric, pre-impregnated with glue and connected to the roofing.
Leaks in parapet areas
In places of damage, carefully heat with a lamp. Separate the sheets, dry them, glue them again, coat them with mastic on top. Immediately cover with an apron and secure the top. This is done with nails, driving them into a strip embedded in the wall.
Cracks, chips, in places of contact between exhaust pipes
Clean work area:
- apply a fillet from a polymer solution;
- apply a thin layer of mastic;
- stick a piece of fiberglass;
- coat the top again (1 mm).
Types of abutment strips
The abutment strips used for installation of metal roofing tiles are of the following types:
- Cornice. One plank reaches 2 meters in length and is available on the building materials market in any color variation. They are mainly made from stainless steel.
- End Strips for metal tiles that are attached to the wall. They are also produced up to 2 meters long, but are wider than cornice ones. Most often they are made of stainless steel, but with a polymer coating.
- Adjacent. The dimensions are the same as for the cornice or end - 2 meters in length. The material is stainless steel, painted in different colors to better match the roofing material.
Waterproofing and vapor barrier of walls
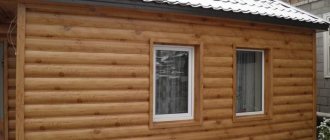
The word waterproofing often refers to vapor barrier and waterproofing films. All of them protect the insulation of walls and structures from moisture. When installing siding, both types of films or only waterproofing films are used - it depends on the design of the walls of the house. Proper installation of siding involves the use of sheathing. It helps to level the walls if there are uneven areas and makes installation easier. In this case, there remains free space between the siding and the wall. Additional insulation is installed in this space.
Sealing tapes
These unique materials appeared on the construction market relatively recently. Essentially, it is a bitumen-polymer mixture formed into a strip, which is coated on both sides with an adhesive composition. It is simply glued to the junction area, as shown in the photo below.
It should be noted that this material comes in two varieties: for interior and exterior use. It is clear that the second option is required on the roof. It is coated on one side with a protective UV layer, which protects the tape from the negative effects of sunlight.
Note that this option for sealing joints is quite reliable. The tapes are easy to work with and there is no need to use additional fasteners because they are self-adhesive. The only requirement is a clean surface to which it will stick. Therefore, the wall and roof covering must be thoroughly cleaned. If it is a soft roof with a coating, then the latter will have to be removed to the width of the gluing area.
Let us add that protective films for roof abutments are very popular today. Manufacturers offer a huge range of colors. Selecting the necessary tape to match the color of the roofing will not be difficult.
And one more advantage - self-adhesive tape made of bitumen-polymer composition is an excellent waterproofing material.
Some configurations
The images show some possible shapes of roof aprons:
Flat type with flange
Flat type with drip Curly type Gable type We also have the ability to produce any other type according to your individual configurations. Send us your drawings, and if technically possible, we will produce them. |
Types of elements
There are two types of planks:
- Upper connection bar;
- bottom abutment bar.
At this point there are discrepancies. Some sources define them as extensions installed under the roofing material (lower) or on top (upper).
Other sources indicate that the upper strip is an element for insulating the upper part of the chimney, and the lower one is for the lower part , since different angles are obtained there and the corresponding elements are required.
It is important to understand that both definitions are correct, it’s just that there are abutment strips both for laying under the bottom and on top of the roof and, at the same time, there are different strips for the upper and lower parts of the chimneys.
Upper (left) and lower (right) junction strip
Sometimes you can find descriptions where there is confusion in these concepts, which causes the meaning to be greatly distorted. The main reason lies in the large number of roofing materials, each of which produces its own additional elements, called the same, but having a different type of installation.
In addition, another classification option is used:
- Direct. They can be with an acute or obtuse mating angle, for different types of junction.
- Angular. These are rectangular strips for connecting the side surfaces along the slope line.
The installation of the abutment strips according to the design is carried out in such a way that the water flows in the given directions and is discharged outside. Additional insulation of the junction of the extension with a wall or other element using a sealant ensures the tightness of the seam and guarantees an impenetrable shutoff.
How to organize a chimney on the roof - general diagram
When installing a pipe, we must not forget that it is a potential cause of fire. Therefore, for its manufacture, a three-layer system is selected, which provides high-quality insulation. That is, there must be a layer of insulation between the outer and inner pipes.
The construction of a modern roof involves the use of a variety of materials, because it consists not only of roofing material. We need lumber for the construction of the supporting structure, rafters and sheathing, insulation to provide thermal insulation, as well as hydro- and vapor barrier films, which are the obligatory layers of the roofing “pie”.
Among the listed materials there are some that are quite susceptible to fire. That is why proper organization of the chimney is the key to the protection and fire safety of the house.
Advice Considering the importance of ensuring the safety of living in a house, it is recommended to buy components and materials for organizing a chimney in special stores where you can check the available quality certificates
Arrangement of roof junction units
Often there are abutments of the covering to architectural elements and building structures protruding from the roof. Various coatings and a variety of architectural solutions suggest a wealth of options for various connections. However, they are all grouped by type of coating and adjacent structure. A common occurrence is the junction of the roof to the wall, for example, at a house extension or porch. And the junctions of the roof with chimneys and pipes are considered complex in execution and are found almost everywhere.
End and side connections.
Traditional methods of protecting the junction
If 2 are old technologies that are no longer in use. But as practice has shown, they are 100% justified.
- When laying brick walls (or block walls) at the junction of the roof, a protrusion is made along the entire length of the roof structure. The width of this ledge is ½ brick. This is quite enough to protect the joints of roofing materials with the wall from precipitation.
- At the junction, it is worth making a slot in the wall along the entire length of the roof, and the depth is 5-6 cm. The roof material is inserted into such a recess.
Let's consider other methods.
Installation of the junction unit
Each coating has its own method and material for joining the roof to the wall. But for any option, the rule applies: the junction must be continuous, solid, made of high-quality materials . Most often during construction the following methods are used:
- installation of joint strips PS-1, PS-2, aprons with wide overlap fields;
Butt joint strips have different configurations - installation of tape made of corrugated aluminum or copper with subsequent sealing of the edges;
- installation in the corner between the roof and the wall of a wooden beam of triangular cross-section, which is then covered with soft rolled material that extends onto the wall (waterproofing lining);
Waterproofing at the junction of the roof and the wall is always carried out starting with the lower layers, and then the upper ones are laid, covering the lower joints with them - multi-layer mastic treatment with geotextile strip laying.
We recommend: Polyurethane self-leveling floors, their advantages and purpose
The main difficulty in arranging such a connection is to achieve structural strength. Indeed, due to the difference in temperature deformations of the roofing and wall materials, this unit collapses over time.
Vulnerability of junction nodes
These are quite vulnerable places because debris thrown by air currents accumulates on them. And if you add to this precipitation in the form of rain and snow, you get a rather unsightly picture. This has a detrimental effect on the coating and damages not only the waterproofing material, but also the roofing material.
Periodic freezing and then thawing of water first leads to deformation of building materials, and then to their complete destruction. Therefore, this is so important, and it is necessary to deal with this during the preparation of project documentation, for example:
- When you plan to build a brick house, the project will include a special canopy. It should be about half a brick long, this will protect the junction of the roof and the wall structure.
- Builders, already at the stage of laying bricks, can make a special excavation. At the end, sheets of roofing material are installed.
Sealing of the junction is carried out using various technologies and building materials.
Fire safety
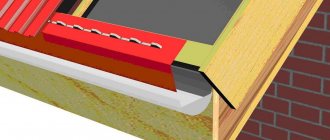
The wooden rafter system and some layers of the roofing pie (waterproofing, vapor barrier) cannot withstand heat and can ignite or melt. The safety of system elements that are not fire resistant is ensured by installing a special box around the perimeter of the hole in the roof.
The box is mounted from a wooden block; it should be located flush with the sheathing, on the outside of the roof. Along the perimeter of the box, on the outside, the edges of the vapor barrier are fixed - a carpet made of roofing felt or other waterproofing material, as well as the edges of the vapor barrier membrane on the room side, if we are talking about an insulated roof. In both cases, a cross-shaped cut is made in the panel and triangular fragments of material are tucked inside. For fastening, nails with wide heads or staples are used, and sealant or adhesive tape allows you to achieve a tight seal between the materials around the perimeter of the wooden box.
The passage through the roof of the chimney provides for thermal insulation of the chimney with basalt wool or other non-combustible materials. If possible, an air gap of 5–7 cm wide is left between the insulation layer and the chimney itself.
If the installation of a chimney involves the use of a special element - a penetration, when choosing it, first of all, make sure that the element is made of a material that is resistant to temperature changes.
Installation technology
Installing flashing strips is a fairly simple process that requires careful adherence to instructions and precision. To waterproof metal pipe passages through the roof surface made of metal tiles and corrugated sheets, a structure is used that has 2 parts - lower and upper.
The installation process is performed in the following order:
- Before laying the roofing material, an internal factor is installed, consisting of 4 separate corners.
- First, the upper edge of the junction is formed, that is, the strip located under the pipe. Then, using self-tapping screws, the end strips are overlapped. Lastly, the part located above the pipe is installed, that is, the lower roof abutment strip is installed.
- With the lower fastening shelves, the corners are attached to the sheathing using self-tapping screws, and with the upper ones they are pressed against the vertical surface of the pipe or wall.
- It is recommended that all joints be thoroughly sealed with fire-resistant sealant on a moisture-resistant basis to improve waterproofing.
- After this, the roofing covering is laid.
- When the roofing covering is laid, install the top apron, also on all sides in the same order, fixing its elements. The upper junction strips, unlike the lower ones, are a flat corner without bending the edges of the punk.
Installation technology
Note! If the structure is assembled correctly, the junction will be organized as tightly as possible, there will be no gaps or joints into which water can flow. If, in order to save money, you choose between two aprons, the inner one provides better protection against leaks.
Materials used
During its service life, the roof covering expands and contracts due to temperature changes and is exposed to various atmospheric influences, as well as other physical and chemical influences. Therefore, it is important not only to select the material for roofing, but also to install it correctly. The most suitable for sealing the junction of the roof and the wall are:
- silicone sealants and sealants based on organosilicon are elastic, have good adhesion to surfaces, are durable, their service life reaches 10 years;
- aluminum and copper corrugated tapes have a reserve of mobility and can withstand high temperatures. They stretch, repeating the topography of the roof, which allows you to reliably seal the junction with corrugated sheets, tiles, slate; Using corrugated tape, it is easy to connect a relief roof
- polyurethane and bitumen mastics are durable and make the connection strong. They are used to treat soft roofing and geotextile tapes;
- polymer and rubber seals - in some cases, indispensable for waterproofing planks and aprons at junction points. They are not very durable, as they do not tolerate temperature changes and exposure to solar radiation.
Chimney finishing: choice of materials
Negative factors affecting the chimney include
- atmospheric influences (wind, precipitation, ultraviolet radiation);
- difference in ambient temperatures;
- high temperature operating loads.
Due to the difference between the temperature of the working pipe and the air temperature in the chimney, condensation forms, which provokes destruction of the pipe during the combustion of heating oil
. To avoid the formation of condensation and protect the pipe from external influences, it is necessary to provide reliable insulation of the chimney through lining.
Various materials are used to cover the protruding part of the pipe. When choosing, you should consider
- resistance to external factors, wear resistance;
- appearance and color scheme (matching the roofing or wall decoration of the building).
It is recommended to line the chimney before laying the roofing material to avoid damage or contamination of the roof covering.
Finishing a chimney on the roof is most often done using
- clinker bricks or tiles;
- plasters;
- cement fiber boards;
- roofing material (corrugated sheeting, slate).
Characteristics of finishing materials
Clinker bricks or tiles are a practical option for finishing a chimney pipe, since dirt is not noticeable on such material. The advantages of clinker materials also include the aesthetics of the masonry; such a chimney goes well with any type of roofing. It is worth noting the resistance of tiles and bricks to weather conditions, temperature changes, as well as the strength of the material. For lining the chimney, exclusively solid clinker bricks are used, laid on a clinker mortar; special compounds are used for grouting joints. Thin, lightweight clinker tiles are usually used for lining tall pipes.
Finishing a chimney on the roof with plaster is characterized by
- affordable cost;
- simple installation;
- versatility (suitable for any roofing);
- the ability to implement any color schemes (plaster can be painted with silicone paint).
Plastering pipes is carried out using the same technology as finishing facade walls. Traditional cement or lime-cement mortar can be used, but a more durable option is to use mineral, silicone, silicate or acrylic plaster. Painting the dried surface increases the wear resistance and durability of the finish.
Small-format cement-fiber boards are durable, resistant to ultraviolet radiation, moisture, temperature fluctuations, and light in weight. This is an environmentally friendly, non-flammable material. Smooth or structured slabs can be used for lining the chimney; the material is available for sale in a wide range of colors.
If slate is used for roofing, the chimney lining on the roof is usually made of the same material. Slate slabs can be shaped like an arc, flake, rectangle or octagon. The color of this natural material depends on the deposit. This color is usually graphite, green or purple.
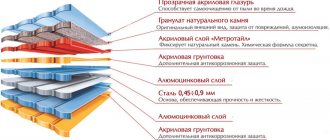
A fairly simple and inexpensive option for finishing a pipe is to use corrugated sheeting. It is used if the roof covering is made of the same material. The pipe, finished in the color of the roof, looks aesthetically attractive.
Manufactured in a factory, the chimney elements for the roof passage have an aesthetic appearance and are quite easy to install. They are equipped with a steel chimney duct and can have a ready-made external cladding made of any material, or be prepared for independent finishing so that the chimney is externally in harmony with the roof. The modular steel structure is not additionally finished; it is enough to install it at the point of passage through the roofing pie.
Flashing method
This method of arranging adjoining areas was invented relatively recently, but has managed to gain popularity in private and industrial construction.
Its essence lies in the integrated use of insulating materials, which results in a strong, elastic and durable joint that is resistant to almost all negative factors. The process is wet, so it needs to be carried out in clear weather and on well-dried surfaces. Sequence of arrangement of docking zones:
- Inspect the working area. Identify weak points, protruding fragments and areas with depressions.
- Level the surface of the facade, treat it with primers and primer. If a soft coating is used, a strip 20-30 cm wide is cleared from its edge of the powder.
- Cut geotextile fabric into strips 50 cm wide. Lay it out so that you can conveniently and safely take pieces for quick installation.
- Apply mastic to the wall and flooring using a wide paint brush.
- Apply a strip of reinforcing fabric to the smeared area, smooth it out so that there are no folds or sags left. Wait 3-6 hours until the mastic hardens.
- Apply a second layer, paying attention to the joints of the geotextile.
The completely cured coating remains to be treated with a primer and painted in the desired color.
Sealing
New modern roll materials with unique properties have appeared. They will not only significantly reduce labor costs, but will make it possible to unify the sealing of any of the most inaccessible junction areas. They are characterized by:
- stripes width: 270-300 mm;
- length: five meters.
Produced from corrugated foil: lead and aluminum. With subsequent application of the adhesive composition. Can be seen in stores under the brand name: Vakaflex, FlexStandart, Easy-form, etc.
They are used to repair old as well as new buildings. Metal corrugation may melt and therefore can seal all hard-to-reach connections on the roof in the same way:
- will serve more than 20 years;
- They also produce multi-colored coatings;
- if melted, it will increase by more than 50%.
- withstands large temperature changes: from -40 °C to +100 °C.
The upper edge of the tape is attached to the wall with a “Vaka” strip. It is made of aluminum, pre-painted. There is no need for a fine; the upper edge must be coated with sealant.
Waterproofing
Waterproofing becomes unusable more often than desired. When arranging it, liquid rubber is used, applying it manually if the area is small. Over large areas, a technique is used: cold airless spraying of rubber.
When covering a surface with it, it immediately accumulates the required thickness. And it forms an elastic, seamless, and very durable, monolithic coating. When dry, it adheres firmly to the base.
Is it necessary to waterproof walls from the inside?
The need to waterproof walls from the outside is beyond doubt: it is necessary to protect surfaces from moisture that enters from the outside. For basements and basements this is groundwater. For the first floors - rain water.
The importance of internal moisture protection is not so obvious. But the walls also need to be insulated from the inside. This is especially true for rooms with high humidity: bathrooms, kitchens. If moisture remains on the walls, over time this will lead to the appearance of mold, unpleasant odors, fungi and cracks.
Therefore, to reliably protect walls from any sources of moisture, comprehensive measures are needed:
Horizontal waterproofing of walls - to prevent moisture from penetrating the walls through the foundation
Vertical waterproofing of external walls - protection from groundwater and precipitation
Waterproofing from the inside - against moisture and condensation on the walls inside the house
Junction location
The SNiP standards relating to the installation of chimneys do not clearly regulate the location of the chimney pipe.
Only the parameters for determining the height of the chimney are specifically indicated:
- the chimney should rise above the ridge by at least 50 cm, if the pipe itself is located at a distance of up to 150 cm from it;
- if the chimney is located at a distance of 150-300 cm from the ridge, then its height can be equal to or higher than the level of the ridge;
- if the chimney is located more than 300 cm from the ridge, then the pipe on the chimney is placed level with the ridge or not lower than a line drawn from the ridge at an angle of 10 degrees relative to the horizon.
All other questions regarding how to bypass the pipe on the roof remain unregulated, and therefore in solving these problems you should rely on the experience and advice of professional builders. “How to seal a pipe on a roof made of corrugated sheets - important aspects of roof sealing.”
We recommend: How to paint galvanized steel so that the paint does not peel off: how to paint galvanized steel
Condensation may fall inside the pipe or on the inside surface of the protective umbrella. The main danger of the resulting moisture is that at subzero temperatures it forms ice, which negatively affects traction. In addition, condensate flows down into the walls of the chimney, thereby promoting the development of corrosion processes and reducing the service life of the chimney.
It is better to route the chimney through the roof as close to the ridge as possible. There are two reasons for this:
- in this place it is much easier to organize the connection of the pipe to the roof;
- Due to the small area of the slope above the pipe, the formation of snow pockets, which lead to leaks, is minimized.
Requirements for abutment strips
Internal and external waterproofing factors reliably protect against moisture penetration under the roofing material, dampening of thermal insulation and rotting of rafter frame elements.
Thus, additional elements, the purchase of which will cost less than 3 thousand rubles, can extend the life of the roof. However, for the system to be effective, the following requirements must be met:
- To make aprons last longer, you need to choose strips made of the same material as the roofing itself. That is, for roofs made of metal tiles and corrugated sheets, corners made of galvanized steel are used, for bitumen shingles and roofing felt - strips of the same rolled material on a self-adhesive basis.
- If you choose additional elements made of galvanized steel, give preference to products with a paint or polymer outer coating that protects the product from mechanical damage and corrosion.
- Pay attention to the width of the product’s mounting shelves. When choosing adjacent planks, the size must be taken into account. The wider the corners, the better they protect against moisture penetration.
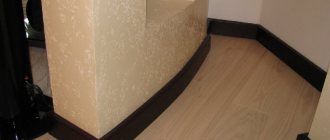
Dimensions of the junction strip
Important! The organization of the junction points of the soft roof is organized in a completely different way. In order not to make holes in the rolled material with self-tapping screws, the plank is glued to one side of the wall, and the other side - on top of the roofing material.
Corrugated sealing material
Roofs covered with asbestos slate, corrugated sheets or high-wave metal tiles, as well as ceramic tiles, are often found in private housing construction. The difficulty of sealing the abutment joint in this case lies in the fact that the wave of the roofing covering is large, which means that sealing difficulties may arise.
Today, this problem is solved simply - with the help of corrugated material covered with aluminum or lead foil. Its base is bitumen-polymer, self-adhesive.
Roof connection to other elements of the structure
If you need to seal the joints of the roofing with other surfaces of the entire structure, then the technology must be slightly different. For example, if the roof is adjacent to a parapet, then this element must be insulated. Insulation of walls with such sealing is carried out using mineral wool. In the area where the roof connects to the parapet, another layer should be fused.
Thermal insulation sheets must be covered with particle-cement boards or slate, usually flat. A dense slab of mineral wool serves as the basis for creating an inclined side, which is glued directly into the corner on top of the hot bitumen. The very first layer of roofing should bend onto a horizontal surface at a distance of 15 centimeters, and the second layer should overlap the previous one by a distance of 5 centimeters.
After this, you should begin arranging a steel apron, the main function of which is to drain rainwater. After this, the junction of the roof and the wall will have a reliable and long-term seal.
Joints in the area of the ceiling and attic can be treated with silicone sealant, and strips must be used where the chimney passes through the roof covering.
The stove pipe should be as close as possible to the ridge strip. It is forbidden to install the pipe in the valley, since with such an arrangement it will be almost impossible to ensure the roof is airtight in this place. If the roof is covered with bitumen-based tiles, then the best solution would be to use an adjacent strip that will firmly connect the units and will not let moisture into the structure.
The situation is more complicated with the end walls, since the roof adjoins them at an angle. In this case, sealing the seams of the end strip for the roof should be carried out especially carefully and accurately. To process the joints of ceramic tile coverings, experts advise using tapes based on corrugated aluminum. Thanks to the wavy shape of this material, it is able to repeat the shape of the coating itself, that is, the tiles, and the subsequent pouring of bitumen will finally give the joints complete tightness. Tapes of this kind can also be used on bitumen shingles. Another advantage is their rich range of colors, so choosing the right shade to match the color of the roofing will not be difficult.
If any questions arise regarding how the roof should be connected to the wall or other surfaces, detailed information with photos and videos of all work can always be found on the Internet.
Liquid rubber
Another reliable option. Essentially, it is a mastic based on bitumen-polymer components. Or rather, not mastic, but a water-based emulsion. It is applied manually or with a spray gun. It immediately hardens into a durable coating. The emulsion has high elasticity and looks very similar to a rubber base. Hence, in principle, the name of the material.
The junction itself is not treated with emulsion. It is usually applied as a roofing material, directly applied to the wall, creating a single waterproofing coating. The photo below shows how the material is applied to a flat roof of a house using a spray gun.
How to protect a wooden base from a hot chimney
As you remember, according to SNiP 41-03-01-2003 standards, the minimum distance from the chimney to any wooden structures starts from 140 mm. Sandwich elements are considered the most “advanced” in this regard, but even there the insulation has a maximum thickness of only 100 mm.
We conclude that all chimneys when passing through wooden roof structures or wooden interfloor ceilings must be protected.
The passage of a pipe through the ceiling of a bathhouse is the most striking illustration of this topic, since bathhouses in our great power are usually made of wood. It is worth adding to this that the temperature in sauna stoves is often higher than in conventional ones.
When arranging such transitions, you can go two ways: buy a special transition block or do it yourself.
Now the industry produces a variety of ceiling pass-through units (CPU). In expensive structures of this type, a special reinforced box is provided, which comes along with insulation, filler and other accessories. But as far as I have come across, our man does not want to pay money for such conveniences, and in this, I agree with him.
The fact is that the design itself is not particularly complicated and here, as often happens with us, it is cheaper to buy everything separately. First, I will tell you what the classic instructions for such an arrangement look like, and then I will tell you how I made the passage of the pipe through the ceiling of the bathhouse with my own hands:
- In almost any construction market you can now find special metal boxes with a hole already cut to a certain diameter of the chimney;
- In the horizontal plate of such a box, which is also part of the ceiling, mounting holes for self-tapping screws are made around the perimeter. But the structure cannot be immediately attached to a “bare” wooden ceiling. Its edges must first be covered with a non-flammable heat insulator. Most often, asbestos sheet is used for these purposes;
- The dimensions of the vertical walls of the box are selected in a similar way so that an asbestos sheet can be secured between them and the passage hole;
- The inside of the vertical walls of the box should be lined with foil-coated basalt wool 30 - 50 mm thick, it certainly costs more than usual, but these are the instructions;
- It is almost impossible to select the holes in the box for the chimney absolutely clearly without the slightest gap, although there will be at least a small gap. Here it is supposed to be covered with heat-resistant sealant;
- Next, the space between the foiled basalt wool and the chimney is filled with expanded clay or the same wool, only soft and uncoated. For a non-residential attic floor, this is enough, but if the bathhouse is an attic type, and there is a rest room on the second floor, then the box on top should be covered with a mineralite slab (a heat-resistant and safer analogue of asbestos) or the same stainless steel plate.
Now, as I promised, I will tell you about my own experience in arranging such a transition. The bathhouse was built a long time ago, and then these convenient devices simply did not exist. Sandwich designs at that time cost incredible amounts of money, so an abandoned cast iron pipe was installed as a chimney.
A square hole in the wooden ceiling was cut so that there was at least 250 mm between the chimney and the wood in all directions. I immediately filled the vertical walls of the niche with asbestos sheeting.
A three-millimeter stainless steel sheet was hemmed underneath. I wanted to hem a ten-millimeter asbestos-cement slab, but I was afraid that it would burst from the temperature, although my neighbor hemmed it and is still standing.
I wrapped the pipe in the box with asbestos cloth and caulked the gap with clay on top of it. And on top of this entire structure I covered it with expanded clay of medium diameter. On the second floor of the bathhouse, I decided to make a rest room, but at that time I did not have a second sheet of stainless steel of the same type.
Then I mixed a cement-lime mortar based on expanded clay sand and poured a thirty-millimeter wire-rod reinforced screed. Only the screed was not poured close to the cast iron pipe, but through a gasket made of asbestos sheet, otherwise it would simply crack with temperature fluctuations.
Useful tips
Although the work of decorating junctions with vertical surfaces and penetrations of ventilation and chimney pipes is quite simple, there are small tricks that allow you to complete it faster and with better quality. Experienced professionals give the following advice:
- To fasten the planks, galvanized self-tapping screws are used, resistant to corrosion, with rubber seals that protect the mounting hole from moisture leakage.
- There is no need to use too many screws, because each fastener reduces the tightness of the roof.
- When arranging an apron consisting of two parts, you can make the lower element from an elastic material, and the upper one from galvanized material.
- The sealant should only be applied to a dry, clean surface. In addition, silicone sealant is poorly applied to vertical polymer surfaces, this must be taken into account.
Different methods of arranging the contact areas of the roof with vertical surfaces
Please note that if you follow all the recommendations for arranging junction points on the roof, it will provide reliable protection from precipitation throughout its entire service life.
Characteristics of deposited materials
The technology of laying roll materials using the fusing method is a technologically complex process, for which special equipment is used. Welded waterproofing coatings differ from others in the method of fixation to the base, which is carried out by heating the lower layer of low-melting bitumen. The use of roll materials for roof waterproofing allows you to obtain an almost monolithic, airtight and weather-resistant coating that will last 10-25 years. Guided roofing has the following advantages compared to other roofing options:
- Tightness of the finishing layer of the roof. Thanks to a special technology for laying soft roofing using the fusing method, the seams between the layers of materials do not match, so the coating is airtight.
- High degree of thermal insulation and noise reduction ability. Fused roll coatings prevent heat loss through roof surfaces and also reduce noise levels during rain, hail, and wind.
- Durability. High-quality roll coatings based on fiberglass and modified bitumen last more than 20 years without cracking or damage.
Note! The only disadvantage of fused coatings is the high flammability of such materials, as well as the use of fire-hazardous gas equipment for installation
Creating a Project
The areas where the roof meets the wall create a high risk of leakage. In such places, debris often accumulates, which retains moisture, increasing the load on the protective coating.
The most efficient drainage of water can only be ensured by the correct arrangement of roof connections.
To form a roof junction at an obtuse angle (the slope is directed downwards from the wall), a strip made of the same material as the main roof is required. Installation is carried out on top of the coating.
The procedure is as follows:
- Using a grinder, a groove (groove) is passed along the wall to the height of the plank (usually 200 mm), about 2.5 cm deep, into which the curved edge of the vertical part of the plank is recessed.
- The inserted edge of the plank is treated with sealant and secured to the wall with roofing screws.
- The lower edge is attached to the main roof with roofing screws.
NOTE!
It should be remembered that there is a need for a gap of about 2 cm between the roof and the adjacent wall to ensure ventilation of the under-roof space.
The junction of the roof at an acute angle (the roof goes up from the obstacle) is done differently:
- The junction of the roof to the wall is attached to the wall with grooves until the roofing material is laid. As an option, it is slipped under the laid material, which is considered a forced step and, in general, incorrect, since proper waterproofing of the element is not ensured.
- The roof is being installed.
- A layer of universal sealant is required between the roof and the plank.
- Another plank is installed on top - the outer one. It is designed to eliminate accumulations of dust, debris or other foreign objects and to decorate the transition. Wall scoring is not required for this plank.
This is a special case of the design of connecting the roof to the wall of the house using a “double apron”.
When choosing a design project, it is worth deciding on the following parameters:
- dimensions and purpose of the structure;
- plot size;
- snow and wind loads;
- snow depth and expected annual precipitation;
- structural features of the main structure.
A pre-created project allows you to choose the best solution and select high-quality material
Before installation work, a drawing must be completed. Based on the size of the building, the required amount of material is determined.