The roof structure is a complex system that includes supporting elements, a waterproofing coating, insulation and vapor barrier. All roofing components are exposed to temporary and permanent loads, so they must have high load-bearing capacity to avoid deformation or even collapse of the roof. To guarantee strength and long service life, an accurate calculation is made that determines the composition of the frame, the distance between its elements, as well as their cross-section. As a rule, in private housing construction a layered rafter system is used, which allows covering structures up to 16 meters wide. In this article we will talk about its structure, features and main components.
Rafter options
Rafters are the basis for fastening the roof. According to the device, there are three types:
- Layered, considered one of the most reliable components used in structural work.
- Hanging rafters.
- Hanging trusses equipped with sleepers.
Each system has design features. Carrying out accurate calculations will allow you to create a strong and reliable structure.
Layered type
In structures that have several more rows of walls, which, by the way, serve as auxiliary supports, a layered rafter system is most often used.
If there are a couple of auxiliary components that can be used as a support, the building in size can reach 17-19 meters. The main thing is to make no more than 8 meters of space between adjacent supports. The rafter pitch sometimes reaches up to 120 centimeters in size; the main thing is to carry out the calculations correctly and take into account all the necessary features.
The lower parts of this type have a support consisting of rafter beams. The Mauerlat is also used in conjunction with them.
To separate the support posts and purlins, which should also not be forgotten, struts are used. Their main function is that they perform a relieving and supporting function, including for the legs of the rafter system, which increase the size of the structure. They themselves are larger than the normal lumber ratio and need to be harvested.
Hanging system
Hanging rafters are radically different from layered ones. Their lower ends are occupied by supporting walls. The rafter legs of this system are loaded in two parts of the entire mounted system.
The loads from the hanging structure push the walls, which are supporting in nature.
The material used for tightening is wood or alloys. In order to arrange it all, a line is generally chosen at a comfortable height. And also take into account that fastening to the rafter system depends on the height of the tightening.
The layered type is most often used to make it possible to install gable roofs over structures. Their walls should be no more than 5-6 meters long.
Construction of the rafter system
The main elements of a layered rafter system are inclined beams that must be placed along the roof slope. The element-by-element composition of a correct layered rafter system is as follows:
- rafter legs, which are the element to which the sheathing structure is mounted;
- purlins, which are elements of the rafter system, which are laid not only on main walls, but also on intermediate pillars;
- racks, struts, beams, mauerlats, which are used to strengthen the entire structure and make it possible to more evenly distribute the entire rafter load across the purlins and supporting type of structures.
Design and components of a layered rafter system
Design and components
Layered rafter systems have sufficient durability due to the fact that their operation occurs under the influence of various types of ventilation, for example, through. This prevents the wood material from rotting. The device is very simple. And this plays a significant role.
It's time to consider what structural components the layered rafter system is divided into:
- the rafter leg is an integral part of the structure;
- Of course, rafter components are used;
- don't forget about the sheathing.
Such a system, used in the construction of a roof with one slope, in its structure has structures that rest on opposite walls with opposite ends. When the roof already has two slopes, the rafter system will consist of several rafter legs resting on their different sides on the shoulder straps and racks.
You cannot increase the size of the span, as deflection may occur, or the rafter leg may be pulled out. To prevent this from happening, special components called racks and struts are used. Such components are also used when there is a need to join rafters consisting of a small number of boards so that the structure has even greater stability.
Specialized layered rafters are divided into two different types:
- non-thrust;
- spacer
The conditions for creating thrust on the wall are determined using nodal expansion.
Assembly technology for layered rafter legs
The roof structure with layered rafters is assembled at the location where the required elements are installed. In this case, usually all parts are ordered according to the manufactured project. But if necessary, adjustments are made at the installation site.
We will not delve deeply into the technology of assembling the roof, we will simply give the sequence of the assembly process and install a video below.
- The first to install is the Mauerlat . Essentially, this is a beam with a minimum cross-section of 100x100 mm, laid along the perimeter of the house on its walls.
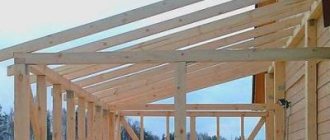
- Next, install the ridge beam . Under it you need to install vertical posts that are attached to the beam , this is a beam lying on the ceiling (wooden beams or concrete slab) or on the internal load-bearing wall of the house. The main task of the workman is to install the ridge girder strictly horizontally. Often ridge beams are laid on the gables of a building , as shown in the photo below.
Installation of ridge beams on the gable of a house Source www.remontnik.ru
- Next, the rafter legs are installed. Usually installation is carried out in pairs , that is, on each side of the ridge girder. Thus, the balance of the assembled structure as a whole is maintained.
- If it is necessary to increase the load-bearing capacity of the rafter system, then supports or are installed . In large roofs, both are used. In this regard, you cannot save money. The reliability of the roof ensures the reliable operation of the house as a whole.
Features of installation of the structure
At the top of the rafters we make a large cut and bevel it at a slight angle. Trimming at the ends of the rafters has different boundaries, characterized by depth. The main thing is that the size of the trim exceeds the size of the rafter section.
If it is not possible to trim the top of the rafters, artificial extension is used, fastening is carried out on both sides. Mounting plates are used.
When you carry out the installation, be sure to make sure that the top of the notch is as level as possible so that the system does not suddenly become spacer. Most often, the bottom of the rafter leg is attached to a slider.
The upper part is fixed using nails or, for example, bolting; the rafters can also be mutually abutted and connected with iron plates that have a jagged structure or wood overlays.
Rafters with braces
Such systems can be arranged using both spacer and non-spacer schemes. Their difference from the already considered options is the presence of a third supporting part under the rafter leg - a strut (rafter leg).
The strut changes the system. The rafter turns from a single-span beam into a continuous two-span beam. This allows you to increase the overlapped span, up to 14 m. And also reduce the cross-section of the rafters.
The brace is connected to the rafter in such a way as to prevent it from moving. This is done as follows: the strut is placed under the rafter and secured with wooden plates on the sides and bottom.
Severe pinching of the ridge area
It happens that the presence of strong pinching of the ridge section, if the upper part is firmly fixed and the base is placed in the slider, no expansion appears in the wall. In this case, an extreme bending period occurs in the firmly united ridge node, which should destroy the node, then the rafter legs acquire a significantly smaller deflection. By pinching the top of the rafters, we acquire a certain reserve of strength, which increases all characteristics.
All methods have a unifying feature: one area of the rafter is built on a hinge that uses only rotation, and the other area is constructed on a sliding support. She has the ability to afford a turn. It is attached in different ways. Sometimes nails are used or even fastening plates can be used.
It becomes bad if the purlin rests on special racks. In the other two options, static stability exists due to the fact that the load is evenly distributed on both sides of the roof, using the same angle of inclination.
But in reality, making the slope of the roof completely level is incredibly difficult. Melted snow is distributed unevenly across the roof, especially when strong gusts of wind intervene. The original method allows you to make different angular inclinations of the slopes. It also copes well with all loads only if the racks are absolutely vertical.
Preventing the consequences of house shrinkage
The installation of load-bearing roof structures must be carried out with special care in cases where the log buildings of the building have not yet dried properly.
It must be taken into account that with a 4-6 percent shrinkage coefficient of a three-meter-high log structure based on beams or logs, a shrinkage of 10-20 cm can occur in one year. As a result, the load-bearing parts of the roof, as well as carpentry inserts, are significantly damaged. This circumstance is the reason for including the dimensions of the house in the project in two versions: initial and after shrinkage.
One of the solutions to this problem is the use of hanging rafter systems. If this is not feasible, then some rules must be followed:
- wait for the structure to completely shrink;
- resort to the use of rafters equipped with sliding supports;
- implement measures to strengthen all supporting structures - in particular, place screw jacks under them as stacking compensators.
With the first option, the main disadvantage is the long waiting period, with the latter - the need for a high level of qualifications and accuracy in the process of carrying out work manually.
The use of sliding type fasteners, which are considered self-adjusting, provides a number of additional advantages.
For example, the designs of sliding models are able to perfectly compensate for the property of wood to shrink over time, as well as the ability to “breathe”, as a result of which they are subject to deformation (not very significant) throughout their entire service life.
The design is created as follows: a block is driven into the surface of the Mauerlat at the required angle or the desired shape is cut out. After this, a corner is fixed on it. One of the corner shelves is bent. A relief working plate is threaded under the formed bend. Its fastening is carried out in such a way that a fairly large distance is maintained in the direction of the ridge girder, ensuring free sliding that occurs in the direction of the outer side.
When purchasing a sliding connection, you must keep in mind that it comes in different working sizes - the supporting pads of the plates are located at different distances . When choosing, it is necessary to take into account the possible amount of shrinkage of the structure. In this case, it is necessary to pay attention to the fact that the total shrinkage rate will be distributed among the rafter beams of the two slopes.
The area where the rafter rests on the rafter beam is not the only movable unit of the rafter structure. It is also necessary to arrange a hinge joint of a certain type on the ridge. It is possible to connect layered rafters end-to-end using metal plates. At the same time, a fairly large angle is maintained at the end, thanks to which during the process of coming down the rafters will not rest against each other.
Another option is to connect the rafters overlay. In this case, holes must be made in two legs for the passage of the bolt.
Spacer system
We have the opportunity to create a spacer system by using several non-spacer rafter systems with different degrees of systems replaced in them. We get a hinged support for use as a spacer system, firmly fixed with nails. All components of the system remain unchanged, even the stress of the rafter systems and, accordingly, bending. But in this situation, a thrust is formed that pushes the walls of the building apart.
A system that includes different types of rafters is called mixed. But the spacer system is highly resistant to various loads; only the Mauerlat must be fixed to the surface of the wall of the structure.
To significantly reduce the thrust on the walls, it is recommended to install purlins, always rigid, which can be obtained by adding more racks or beams.
Conclusion
We found out what layered rafters are, and also figured out what components such a rafter system consists of. If I missed a point or you didn’t understand something, write comments and we will discuss all the nuances that interest you.
Did you like the article? Subscribe to our Yandex.Zen channel
December 12, 2022
Roofing, Structural elements
If you want to express gratitude, add a clarification or objection, or ask the author something, add a comment or say thank you!
Components of rafter structures
The system must have high stability. In order to achieve this, the inclined rafters need to be provided with a horizontal screed , the use of which will provide a little stability, but only a little. It should be attached where the scrum crosses the posts. It will definitely work in any circumstances. Their location should be oriented to the average human height. And if you take the end of the rafter outside, stability is guaranteed.
If an emergency occurs, this will ensure that the fight works at lightning speed and without error. If the goal is to increase the stability of the layered rafters and the system as a whole, firmly fix the racks. If the roofing of the attic is unsuccessful, then increasing stability will be impossible. Those buildings that contain 2 internal walls use through-through rafter structures. You need to choose all the components correctly; the quality of the work done and the reliability of the roof depend on this.
What is included in the rafter elements of the system?
Fastening layered rafters can be done in different ways depending on the chosen system. At the same time, it is important to study what rafter elements the structure is equipped with.
Important! Sub-rafter elements can be different, and when choosing them, it is taken into account whether a gable roof or some other structure is being created.
The most frequently chosen products are:
1. Horizontal fight. This element is used to increase the stability of the entire system. The reliability of the design increases, although not too much. This grip is fixed in the place where there is a crossing with the posts that ensure the support of the skate. If uniform loads occur on the roof, then a properly attached screed acts on compression. If subsidence or deflection of the girder occurs, then a tensile contraction works. The distance to which the contractions are attached is usually no less than 1.8 m, and this is due to the creation of optimal conditions for comfortable walking of people in the attic space. During fixation of contractions, holes will certainly be formed that will be less than or equal to 1 mm in diameter. Bolts or special studs are inserted into them. It is this kind of fixation that makes it possible for the contraction to work in the event of any emergency.
2. Rigid fixation of the lower elements of the racks. This leads to an increase in the strength of layered footers and the entire rafter system as a whole. The bottom of the posts is secured to provide support for the ridge girder. This element is used quite rarely, since for some structures it is simply impossible to fix the racks, so the possibility of their use is first assessed.
3. Using a strut. If this element is used, then all inclined parts of the system form a special continuous beam. It must be fixed at an angle that will not be less than 45 degrees. For this, different pads are used or a support block can be used.
4. Sub-rafter structures, consisting of through purlins pinned to the ground, are used for buildings in which there are 2 load-bearing walls. The bench in such a system certainly rests on the internal walls.
Video on the topic:
Thus, the correct choice of a system, which can be non-thrust or spacer, as well as the competent selection of all other elements ensures the creation of a truly strong, reliable and durable roof. The choice of the various elements available in the rafter system depends entirely on its design and the loads that act on it. If you plan to independently make a system consisting of layered rafters, then a lot of attention and time are first paid to competent calculations that allow you to correctly fix the different parts of the structure. To increase its strength and reliability, a variety of rafter elements are used, but they are selected in accordance with the characteristics of each system.
Features of use
A layered rafter structure is used when there is an urgent need to cover spans of the greatest length; there is a need to use racks that add stability.
A more suitable design feature seems to be the use of a sliding support, which allows the connection of various transition rafters to the mauerlat. There are practically no long spans in the construction of structures. It follows from this that the best of all options is to use specialized layered rafters. The main component of the construction technique is the support of construction legs on the mauerlat . When the structure is made of wood, this ability takes over.
This kind of connecting point seems more significant in the layered rafter concept. The use of a crossbar makes it possible to increase the span up to 8 meters, in the case of one support - up to 12 meters, and when using 2 supports - up to 16 meters.
A few words about fastenings
We found out what layered rafters are. Now let’s finally take a look at the mounting options for the main components, namely:
- CH to the Mauerlat;
- CH to the ridge run.
Attaching the rafters to the mauerlat
It must be said that there are a great many different mounting options. Therefore, next we will consider the most modern and common ones:
- In a groove way . In the Mauerlat, a groove is selected along the width of the leg, which is cut out at the angle of inclination of the slopes. Additionally, the leg is fixed with screws and metal corners;
Fixation of the leg in a groove way is carried out using a mounting angle
- By cutting . In this case, the edge of the rafter leg is cut so that it rests not only on the horizontal surface of the Mauerlat, but also on the vertical one, i.e. a right angle is cut in the leg;
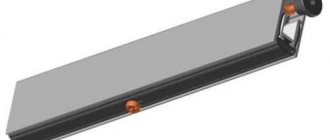
The slider provides a sliding leg attachment
- Using a slider . The slider is a fastening element consisting of a loop and a sliding support. Thanks to this fastening, the leg is provided with a certain degree of freedom.
Fastening legs in a similar way is usually used for log houses and log houses, which shrink significantly. The slider allows you to avoid roof distortions, but, at the same time, maintains the stability of the system.
In order to avoid cutting the CH at right angles, you can make the connection using a support block, which is placed on the lower edge of the rafters, as a result of which it rests against the vertical surface of the Mauerlat.
You can secure your leg to the Mauerlat either by sawing or using a support block
Skate attachment
Trusses can also be attached to the purlin in several ways:
- Overlay method. This is the simplest option, in which the edge of the leg is placed at the angle of the roof, i.e. in the CH working position, the cutting line must be vertical to ensure maximum contact area with the beam. Then the rafter is fixed to the beam with an angle;
Attaching to the purlin using the groove method requires cutting the legs
- By cutting. In this case, the edges of the legs are secured so that when they join with the counter leg, a groove is formed for the beam. Additional fixation is carried out with a corner and screws;
Rigid clamping is the simplest way to attach trusses to a purlin
- Pinching method. The principle of such fastening is extremely simple - tie rods are attached to the truss above and below the beam, resulting in rigid pinching of the purlin.
Here, in fact, are all the important points of the design of layered systems.
Practical advice
If you need to make an attic roof using layered rafters, a prerequisite is to install a timber frame at the bottom, and at the top the rafter legs should be hidden in the ridge girder.
If you need to connect the rafter leg to the mauerlat, use a pinch. You can connect it with metal material. There is a way to do this, which is to use a large end angle. In the future, it will provide the opportunity for the rafters to rest against each other.
A layered type is used, coupled with a connection that involves drilling holes for bolts.
Calculation of roof elements
Any configuration and structural features of the roofing system are decided at the building design stage. The design of the roof fundamentally affects the set of materials used in the installation process and the design of load-bearing walls. That is why the truss structure, which will serve as a support for the roof, as well as the sheathing frame, are the main subjects of roof calculations.
To correctly calculate the cross-section of rafter legs, the indicator of their length is taken as a basis.
If the span between the rafters is 100 centimeters:
- length less than three meters - bars 8x10 cm or logs 10 cm;
- length 3-3.6 meters - bars 8x13 cm or logs 13 cm;
- length 3.6-4.3 meters - bars 8x16 cm or logs 16 cm;
- length 4.3-5 meters - bars 8x18 cm or logs 18 cm;
- length 5-5.8 meters - bars 8x20 cm or logs 20 cm;
- length 5.8-6.3 meters - bars 10x20 cm or logs 20 cm.
If the span between the rafters is 140 centimeters:
- length less than three meters - bars 8x13 cm or logs 13 cm;
- length 3-3.6 meters - bars 8x16 cm or logs 16 cm;
- length 3.6-4.3 meters - bars 8x18 cm or logs 18 cm;
- length 4.3-5 meters - bars 8x20 cm or logs 20 cm;
- length 5-5.8 meters - bars 10x20 cm or logs 22 cm;
- length 5.8-6.3 meters - bars 12x22 cm or logs 24 cm.
If the span between the rafters is 175 centimeters:
- length less than three meters - bars 9x10 cm or logs 15 cm;
- length 3-3.6 meters - bars 8x18 cm or logs 18 cm;
- length 3.6-4.3 meters - bars 9x18 cm or logs 18 cm;
- length 4.3-5 meters - bars 10x20 cm or logs 20 cm.
If the span between the rafters is 213 centimeters:
- length less than three meters - bars 9x16 cm or logs 16 cm;
- length 3-3.6 meters - bars 9x18 cm or logs 18 cm;
- length 3.6-4.3 meters - bars 10x20 cm or logs 18 cm.
Find out more about rafter system designs:
- mansard roof;
- hipped roof;
- hip;
- gable.
Non-thrust layered rafter system
In a non-thrust layered system, the rafter leg works in bending and does not transmit the expanding horizontal force to the walls. There are three options for implementing non-thrust layered rafters:
- A support block is attached to the bottom of the rafter leg or a notch is made and rests against the mauerlat. At the top of the rafter, an enlarged horizontal cut (notch) is made with a bevel at a certain angle so that the side cheek does not rest on the purlin and resistance to bending of the rafter is not created. Although at the edges of the rafter the bending moment tends to zero, its trimming in these places is permissible, but has depth limits: with rafter height h≥180 mm no more than 0.3h, with height h=120-180 mm no more than 0.4h and with height h≤120 mm no more than 0.5h. For all options, the length of the trim (support area) should not exceed the height of the rafter section. When for some reason it is impossible to trim the top of the rafter, it is artificially extended by cutting the rafters and secured with mounting plates on both sides.
- The most common option is when the bottom of the layered rafter leg is made on a slider. The top is secured using nails or a bolted connection, or the rafters rest against each other and are combined with metal toothed plates or wooden overlays. In this option, when attaching the rafters to the mauerlat, it is necessary to pay attention to the calculated design step. The rafters can be secured using two nails driven at a certain angle into the side surfaces, or using one nail driven through the top, or using a flexible plate.
- When the ridge assembly is tightly pinched, when the top is rigidly fixed and the bottom is made on the slider, there is also no thrust on the walls. In this case, in a rigidly connected ridge unit, a maximum bending moment appears, tending to destroy the unit, and the rafter legs receive a much smaller deflection. By applying rigid pinching of the top of the rafters, we will obtain a certain margin of safety, which will increase their load-bearing capacity.
During installation, it is necessary to ensure that the surface of the top notch is as horizontal as possible, otherwise, if the type of support changes, the system will become spacer!
All options include a general principle: one edge of the rafter is made on a hinge, allowing only rotation, the other edge is made on a sliding support, allowing rotation. Fastening to rigid supports and sliders is carried out in various ways: nails, staples, fastening plates. All three options, when exposed to uneven loads and different angles of inclination of the roof slopes, have static stability if the ridge girder rests with its ends on the gables of the walls. If the ridge girder rests on the posts, the situation becomes worse.
In the second and third options, where the ridge girder rests on racks, static stability is ensured with a uniform load on both roof slopes and the same angle of inclination. In practice, achieving completely symmetrical roof slopes is problematic. The load is unevenly distributed along the roof slopes due to the progressive melting of snow or wind pressure from a certain direction. The first option allows different angles of inclination of the slopes and copes well with uneven loads only if the posts holding the ridge girder are absolutely vertical.