Vapor barrier for walls is a solution to the problem of protecting a structure from the direct action of water vapor. Steam can degrade the performance of many building materials. It provokes the appearance of mold on the walls and reduces the service life of structures. Therefore, laying a vapor barrier is an extremely important stage in the construction of various facilities.
Vapor barrier membrane - a modern material for effective vapor barrier
Vapor barrier of walls
Page navigation
Vapor barrier of walls during the construction and finishing of a house is one of the first tasks. Moisture protection will protect the building from destruction and bring warmth and comfort into the house. And also protection against fungus, which negatively affects the health of all household members.
Vapor barrier is carried out using various materials both outside and inside the room. Installation technology requires compliance with the stages of work, as well as compliance with the rules on which the quality of the work performed depends.
How to lay a vapor barrier
There are different technologies for installing vapor barriers on various building structures. However, they all require the implementation of several simple rules, without which the desired effect cannot be achieved.
General installation rules
Regardless of what type of vapor barrier and on what structures it is installed, the following nuances must be taken into account:
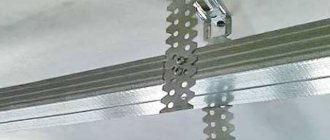
- The film or membrane must always be overlapped. Overlapping each other at least 15 cm;
- connecting seams are glued, preferably with the material specified by the manufacturer, since by saving on small things you can eliminate all costs for thermal insulation;
- all through damage (punctures, cuts) are sealed with the same material used to seal the seams;
- for all types of vapor barrier films it is necessary to leave (arrange) a ventilation gap;
- When applying film to an adjacent structure, for example, from the floor to the walls, you need to make small folds of 3-4 cm so that the film does not tear when stretched and does not leave air pockets in the corners.
Why do you need to install a vapor barrier inside and outside your home?
When finishing the walls of a house inside and outside, insulation materials are often used, which absorb moisture like breathable materials. As a result, a condensate collection point appears. This leads to destruction of the insulation, the appearance of fungus, deformation and damage to finishing materials (detachment of wallpaper, falling off of tiles, deformation of plasterboard sheets).
To create the desired microclimate in the room, a vapor barrier is used that can prevent moisture from reaching the insulation. At the same time, many of these components are breathable, which is necessary for both walls and finishing materials. This feature allows for ventilation, which is necessary for all elements on the walls.
Cases when vapor barrier is required:
- When the walls inside the room are insulated with mineral wool. It is breathable and breaks down when exposed to moisture.
- Walls covered with plasterboard and other cladding. Basically, condensation is created between the rough wall and the cladding, which negatively affects the finish.
- A vapor barrier layer is installed on the outside to protect the walls from external moisture. This is done when insulating the facade of a building.
To create the necessary climate in a room with a vapor barrier, a ventilation system is necessary.
Where vapor barrier is required
There are a number of situations in which it is necessary to install a vapor barrier.
These include the following:
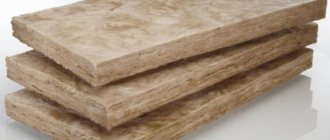
- Vapor barrier of walls from the inside, especially in situations where cotton wool materials are used as thermal insulation. Glass wool and mineral wool have excellent thermal insulation properties and are part of the range of materials that allow air to pass through well. Their disadvantage is the fear of high humidity. When exposed to liquid or steam, cotton materials become wet and lose their performance characteristics, and over time they completely collapse. Installing a vapor barrier will help avoid such consequences.
- Multilayer wall structures used in frame houses. Frame structures need to provide effective vapor barrier. The procedure for installing vapor barrier material in a frame house will be discussed in detail below.
- Ventilated facades and the surface of external walls require a vapor barrier to provide protection from the wind. Vapor barrier materials make the air flow softer and make it more metered. This allows you to protect the outer insulating layer from overload. An example is a brick wall, which is insulated with a cotton-type material and then covered with siding. Thanks to the vapor barrier, a reduction in wall blowing is achieved. The ventilation gap allows you to remove excess moisture from the windproof surface.
An important factor that allows you to ensure an acceptable microclimate in any room, except for steam and thermal insulation, is functioning ventilation.
Types of vapor barrier material: which one is better
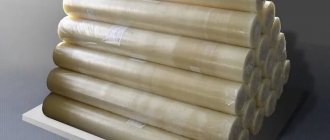
The construction market is overflowing with types of vapor barriers. It can be either liquid or in rolls. Each material has its own purpose and composition. Some are used for walls outside the house, others only indoors.
Mastic
The mastic has a bitumen-polymer base. It is applied to the surface, creating a layer that protects from moisture and allows the rough base to “breathe.” The mastic is applied to clean, dry walls made of various components (wood, brick, concrete) with a brush in 2 layers. The second time bitumen is applied to the dried first layer. The advantage is that the mixture is sold ready-made and does not require additional preparatory work for cutting or preparing. The service life of the mastic is more than 25 years.
Membranes
There is a large selection of membrane materials on the construction market. They have the following properties:
- laying on the outside of the insulation. The membrane protects the outer wall from precipitation and winds. Siding and lining are installed on top;
The membrane should fit tightly to the insulation and be firmly fixed. Because it can tear due to strong winds.
- For vapor barrier for walls inside the house, “Megaizol V” is used - polypropylene film in 2 layers with an “anti-condensation” surface. The film protects the walls from the appearance of dew points, which leads to the development of fungus and dampness;
- Izospan FD, FS, FX – reflective surfaces used in bathrooms, baths, saunas.
When choosing a wide range of membranes, you need to pay attention to what purposes they are intended for - for the street, a bathhouse or vapor barrier inside the house.
Vapor barrier film
For vapor barrier, a film with a thickness of less than 0.1 mm is used.
It is the most used of all listed. It has no perforation and does not allow air to pass through. However, recently breathable films have been produced. Vapor barrier film is applicable due to solutions to such problems:
- Micro-ventilation of walls and insulation occurs.
- The condensate collected when the outside temperature changes is partially removed.
- In saunas and baths, where there is high humidity and high temperature, which other vapor barriers cannot withstand.
The vapor barrier film does not allow small drops of water to pass through, but at the same time “breathes”, which allows you to solve problems.
Liquid rubber
This material is sold in the form of a bitumen-polymer liquid product. After application, a “rubber” covering appears on the surface, which follows all the recesses on the wall. The rubber surface prevents moisture from penetrating and provides hydro-thermal insulation protection.
Types of liquid rubber:
- Emulsion – applied by machine. Applicable on floors for vapor barrier.
- Emulsion applied to the floor manually.
Liquid rubber is also applicable to protect the foundation from the street side.
Why do you need a vapor barrier?
There is probably no person living in a region with a variable climate who would not encounter condensation on windows during the cold season (an explanation of the physical processes occurring is given in the work “Why do plastic windows fog up and what to do about it?”). The same processes occur in any other structural elements of the building. However, condensation does not form on their surface, because at the design stage the so-called “dew point” is hidden inside the wall, floor, and ceiling.
Calculated “dew point” at a wall without insulation.
When thermally insulating a house or apartment, the owner violates the calculated temperature distribution schedule inside the insulated structure. As a result, the “dew point”, at which steam molecules condense into a wet film or drops of water appears either inside the insulation or on the surface of the insulated structure. In both cases, there is nothing good: the thermal insulation properties of insulating materials are reduced, and a base appears for the growth of colonies of microorganisms: mold, fungus.
Insulating the wall from the outside changed the thermal balance in the thickness of the wall, moving the dew point into the insulation layer.
At the same time, it makes no difference on which side the insulation is carried out. In any case, the same processes occur.
It seems that a layer of insulation from the inside is a very bad solution, leading to a constantly wet wall.
The solution to the problem was suggested by heating engineers. Their argument is simple: steam turns into water at a certain ratio of humidity and temperature. If the access of steam molecules to the “dew point” is limited, then there will be no condensation. The builders instantly turned the theoretical hint into a practical solution. This is how vapor barrier materials appeared, the main function of which is to put a barrier to the movement of water in a vapor state.
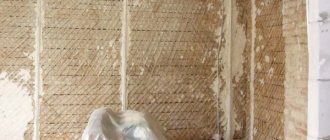
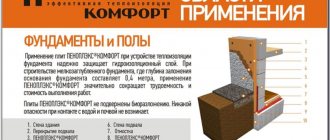
Installation of vapor barrier material for insulation inside a brick house
Vapor barrier of brick walls is made using several types of materials to choose from.
Indoors - these are films and membranes. Materials based on foil are also applicable. They have reflective properties. In this case, the foil side is placed inside the room.
If a brick wall is insulated from the inside with mineral wool, then it must be protected on both sides. On the wall side from condensation, and on the room side from vapors penetrating into the insulation.
Protective materials used include Aluf, Penotherm, and Penofol.
First of all, prepare the wall: it is cleaned of sharp protrusions and dust.
Afterwards, the vapor barrier is fixed, the insulation is placed in the created sheathing, and a vapor barrier is placed on top again. In this way, the mineral wool is protected on both sides.
Which side to lay to the insulation inside the building: how to lay
Depending on where the material is being installed, determine which side to lay it on:
- When laying insulation on the street side, the vapor barrier is fixed to the insulation on the street side.
- When treating ceilings and roofs, antioxidant materials are used. They are fixed to the insulation.
- If there is no additional fastening of the ceiling and roof insulation, then the material is attached to the bottom of the rafters.
- If there is thermal insulation on the inside of the walls, then fixation is done on the outside of the insulation.
Many materials are used that have the same surface on both sides. Therefore, it makes no difference which side the vapor barrier is attached to.
Which side to attach and nail?
When the question arises which side is used to fix the vapor barrier, nuances arise:
- There are materials that have the same sides. Their use does not affect the protective functions.
- The antioxidant insulator is placed with its smooth side facing the insulation.
- Foil membrane - fixed with a shiny surface inside the room.
- Film materials – smooth side to the insulation.
- When choosing a diffuse component, you need to study the instructions, since they can be double-sided.
The dark side of the material is the outer side.
What to glue
The vapor barrier is fixed in several ways:
- use nails with wide heads;
- use of a construction stapler;
- on top of the layer, wooden planks are fixed at a certain distance.
The joints are glued together with adhesive tape for vapor barrier.
Where should the vapor barrier be located in the insulation layer?
Many people confuse vapor barrier in a house with hydro-wind protection, and also, without understanding its properties, they install it “for show”, as necessary, and not where it is necessary. The impermeable film is always located on the side of the warm room, before the insulation, before rough or fine finishing. Manufacturers of adaptive films allow them to be laid on top of the first layer of insulation, if there are several of them, when it comes to attic renovation. Impermeable vapor barrier cannot be wrapped around wooden joists; it is only laid on top of them. If necessary, an adaptive film can be used to cover wooden elements, which is also important when carrying out repair work.
The biggest mistake, however, made not only by self-builders, but also by professionals, is laying an impermeable film not under the insulation, but on top of it, on the cold side or on both sides.
In both cases, the moisture is trapped in the insulation, but in the first, the process of wood rotting will go very, very quickly, especially if the ventilation is also tricky.
Another fairly common mistake is to swap the film and the diffusion membrane used as a water and wind barrier. The membrane is necessary to protect the insulation from moisture coming from outside (condensation on a metal roof, leaks, rain, snow), as well as from convective heat transfer. Without allowing water to pass through, it perfectly releases steam from the insulation, and condensation falls on its surface, where it dries thanks to the ventilation gap. Both the thermal insulation and the rafters or floor joists (cold attic) are kept dry. A diffusion membrane is laid on the insulation without a ventilation gap; if you mix up and lay the vapor barrier on top and the membrane on the bottom, intense moisture accumulation will begin. And it makes absolutely no difference which side you put the vapor barrier on when it’s in the wrong place.
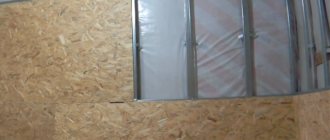
Features of vapor barrier of frame and wooden buildings
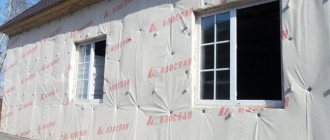
To protect the wooden walls of the house, a vapor barrier is made both outside and inside.
This is necessary, first of all, to protect the wooden beams, since after getting wet, slow drying occurs. During drying, the wood becomes deformed and rots. In a wooden house, it is imperative to fix a vapor barrier layer, because there is the possibility of temperature fluctuations and the appearance of humidity. Especially in the autumn-spring period.
Vapor barrier of walls in frame houses is carried out using a different method.
How to lay it correctly
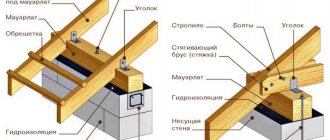
Vapor barrier of the walls of a wooden house from the street is carried out in the following sequence:
- Overlapping layers are fixed onto wooden beams. All joints are sealed with tape or foil tape.
- Next, the frame base for the insulation is installed.
- After attaching the mineral wool, a hydraulic barrier is attached to the beams on top.
- The last stage is finishing the house.
If the beams create a flat surface, then the vapor barrier must be mounted on wooden slats. This will create ventilation.
Vapor barrier inside the house:
- a gap should be made using slats for ventilation;
- material is attached to the slats;
- the next step is the construction of a frame base for the insulation.
- after laying the insulation, fix the hydrobarrier;
- the last stage is finishing.
When laying vapor barrier material for a frame house, you must follow these rules:
- use membranes to create a layer of ventilation;
- Installation of vapor barrier on both sides is not done.
The material is secured with a stapler, the borders are sewn up with tape.
Is additional protection needed?
In a wooden house, additional protection is not required. But in frame buildings, materials such as hydro- and wind protection are applicable. It is fixed to the exterior finish. Then OSB, thermal insulation, vapor barrier and finishing are applied.
Is it possible to lay several layers
This is not necessary, because the vapor barrier material is created in such a way that it fully performs its functions. In addition, in some cases, in addition to vapor barrier, additional materials are used to protect the insulation and walls (wind protection, waterproofing).
Attention. Some types of membranes are created from several layers. By using this material, there will be additional protection for walls in damp rooms.
Which side to lay the vapor barrier on?
After installation of insulation is completed, vapor barrier work is carried out. Surprisingly, not all builders know which side to lay the vapor barrier film against the insulation. What can we say about “home craftsmen” in this situation? There is a general rule - the film is always laid with the smooth side towards the insulating layer, and the rough side - inside the room (attic) or outside.
But you don’t have to bother at all - large manufacturers always supply each roll with instructions. And to make it clear which side is which, they put pictograms. The problem only arises if the film has already been cut from the roll and the instructions have fallen out. But there is a simple solution: take a photo of the instructions from another similar roll on your smartphone.
How to distinguish the inside from the outside
Experienced specialists use other tips:
- the outer side is fleecy, the inner side is smooth. Easily identified tactilely, by touch;
- if the sides are of different colors, the lighter one is placed next to the insulation;
- when rolling out a roll, the inner side always faces the floor;
- the logo is always at the top;
- foil materials are laid with foil facing towards themselves.
If there are no marks at all on the roll, then it is a vapor barrier film, not a membrane. It doesn't matter which way you lay it, as it creates a barrier to steam in both directions equally.
How to check which film you purchased
When purchasing several types of film, sometimes it becomes necessary to find out what type it is. To do this, cut off a piece of material and take two glasses (two mugs). Boiling water is poured into one. The second glass is placed on top of the first, with hot water, previously covered with film. If condensation does not appear on the walls, turn the film over and place the glass again.
A dry surface indicates type B - the classic type of vapor barrier. If the walls of the container got wet only once - type A, one-sided membrane. The appearance of condensation twice indicates that the film is a waterproofing material and has nothing to do with vapor barrier.
Features of laying specific vapor barrier materials
Theoretical recommendations for vapor protection devices are discussed above. Many site visitors are interested in which side to lay vapor barriers of different classes or specific manufacturers:
- “Izospan AM” - laid with the brown (dark) side out, the white side facing the insulation;
- “Izospan B” - the smooth side should fit tightly to the insulation, the rough coating should face the inside of the room;
- polyethylene film is laid on either side;
- foil reflective vapor barrier (“Penofol”) is mounted with the metallized side inside the room (baths, steam rooms, saunas);
- membranes are laid in accordance with the pictogram printed on their reverse side;
- polypropylene with one-sided lavsan coating, the smooth side is laid against the insulation, the wicker side is laid inside the room;
- foil films in rooms with standard temperature conditions are laid with the metallized side facing the insulation.
What happens if you lay it on the wrong side?
Among experts to this day there is no single point of view on the processes occurring inside the insulation when laying vapor barrier material on the wrong side.
Some believe that condensation will begin to form not on the outside of the film, but in the insulation, causing destructive processes in it, while others believe that nothing bad happened and there is no point in rushing to redo the thermal insulation if a mistake was made.
There is generally an original explanation for the rough side - this is the result of joining two strips of vapor barrier film during the production process. It is easier to glue to such a surface, but additionally sanding the second side costs money. To explain this technological technique to customers, a fairy tale was invented about different sides of the film with different functions.
If we take anti-condensation protection as a basis, then those who claim that nothing bad will happen are right. But here the debating parties are missing one important point. The film is called windproof. And here there is a very big difference in how it is laid.
To make it easier to understand what we are talking about, you need to conduct a simple experiment: take a fabric with a pile on one side and alternately on each side, placing it tightly to your mouth, and blow through it. From a smooth side there will be practically no resistance, since the fibers flutter freely in the wind. From the pile side, everything is not so simple. You will have to make an effort, since the villi, pressing against the fabric, clog the pores through which air passes.
A simple experiment shows that it is still worth following the manufacturers' recommendations.
How difficult is it to make a vapor barrier with your own hands?
Despite the fact that vapor barrier of walls in a house is an important point for protecting the structure from destruction, it can be done independently. To do this you need to follow the rules:
- You need to know how to carry out installation correctly in specific cases (high humidity, wooden walls).
- Before carrying out installation work, you should familiarize yourself with the technical characteristics of the selected material.
- The roll must be cut by clearly measuring the correct length. The fewer joints there are, the better for the building.
- Fixing the layer cannot be done simply with nails to the surface. Over time, the vapor barrier will tear and weaken. Be sure to use either wooden slats or a stapler.
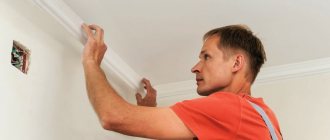
Installation of vapor barrier film on walls
Installation of vapor barrier on walls is used in cases where mineral materials are used as thermal insulation. It is important to follow the correct installation procedure for the vapor barrier film.
It includes the following stages of work:
- The vapor barrier film must be positioned on the desired side, and then carefully and securely fastened to the sheathing. In this case, you need to work carefully so as not to damage the film.
- Then you need to carefully glue any possible cracks, as well as punctures and overlaps.
- Next, you need to install the sheathing using beams to create acceptable ventilation.
- Then the structure is covered with plasterboard, wall panels, and other finishing materials.
Correct installation of the vapor barrier film will ensure a comfortable microclimate in the room.
Peculiarities
Before installing the vapor barrier, the following features must be taken into account:
- Material. By studying the technical characteristics of the material, you can understand how suitable it is for working indoors or outdoors.
- Correctness of work. In addition to the fact that the rolled material is laid with an overlap of at least 20 cm, you need to know which side and in what method: vertically, horizontally.
- The joints of the material must be glued to avoid moisture getting on the insulation.
- The material is fixed every 60 cm.
For quality work done, craftsmen recommend purchasing vapor barrier and its components from the same company. Let's say that the tape for the joints should be of the same brand as the material itself.
Vapor barrier of the walls of a house can be carried out not only when a new building is being built, but also during renovation work. The walls of the house are destroyed under the influence of moisture, so to preserve them, the material is installed outdoors and in the house. Only in some cases is work carried out on one side (frame house). Having studied all the nuances of installation, the vapor barrier will last a long time, and the microclimate in the house will not be disturbed by moisture.
Operating principle of vapor barrier
In the warm season, the air temperature and humidity outside and in the house are close in value. In this case, no negative processes occur inside or on the surface of the building’s structural elements.
The situation looks completely different in winter. When it’s cold outside, the humidity is much lower (if it rises, it will settle in the form of frost), but in an apartment (house) it’s much higher, as a result of which the partial pressure inside the room increases. When there is a pressure difference, the air always tends to where the pressure is lower. With it, steam molecules are released through the building structures to the street.
Passing through the walls, floor, and ceiling, the vapor cools down. At a certain point in the structure, a situation arises when humidity and temperature come into such a relationship that the process of transition of steam into a liquid state begins. This conditional place in the building rules (SP 50.13330) is called the “plane of maximum moisture”, and popularly – the “dew point”.
For information: if the calculations of the wall thickness are incorrect (underestimated), the dew point is as close as possible to the surface of the facade on the street side. The result is not long in coming: the wall freezes.
You can protect building structures from the harmful effects of humidified warm air with a barrier to steam molecules. This can be any material (metal, glass, plastic, etc.) that does not allow moisture to pass through. But air is not only vapor molecules, but also oxygen, nitrogen, carbon dioxide, etc. As a result, in a tightly clogged apartment or house, poorly functioning ventilation is not able to provide normal air exchange - mustiness appears.
But there is one nuance here - the vapor molecules in the air are among the largest. Therefore, in its path it is possible to place such protection that vaporous moisture does not pass through, but other components of the air freely penetrate through it.
This protective system is called a vapor barrier. This leads to another conclusion: vapor barrier is not a vapor barrier film, but the functional purpose of a protective layer.
Differences between vapor barrier films and waterproofing films
With the advent of new types of materials, not only “home craftsmen”, but also professional builders began to confuse the concepts of vapor barrier and waterproofing. To understand the difference between them, let's look at the terms in more detail.
Vapor barrier involves creating a barrier against water in any state of aggregation, liquid or vapor. This means that the vapor barrier material is also waterproofing.
The main task of waterproofing is to combat moisture, for which a large number of types of materials are used. Among them, a new product has appeared: diffusion membranes with microperforation, through which steam passes along with air.
In many cases, these membranes began to be used for other purposes: instead of vapor barriers. Laying films with changing attachment locations leads to a gross violation of the rules of operation of the building, which over time can lead to serious problems.
In order not to make a mistake with the place of installation of each type of film, you should remember that when insulating the roof and facade, the waterproofing membrane is always laid on the street side, and the vapor barrier film on the attic and wall side.
Types of vapor barrier:
Materials for arranging vapor barriers are produced in the form of rolls or sheets. Rolled insulation is rolled out vertically and secured with slats or profiles. Fasteners are placed horizontally. Ventilation holes are also required. To install a sheet vapor barrier, you need to install a base, a frame made of profiles. Sheet material is inserted into the finished frame and secured with self-tapping screws. This type of insulation is used for further surface covering.
During installation, special attention is paid to the correct placement of the insulating layer: the canvas is positioned with the inner surface facing the insulation. Mounting features
To firmly secure the insulating layer, self-tapping screws are used; nails are less commonly used.
Roll of vapor barrier
Which side is the material laid on?
There is a lot of confusion and substitution of concepts on this issue. The fact is that vapor barrier materials in their pure form do not have a working side as such. The protective material is completely impervious to moisture in any form, so it makes no difference how you unfold it. The only exception is anti-condensation films with a fleecy coating. They are designed to absorb settling moisture, therefore, to obtain the full effect, you must follow the general rule - the smooth side of the film is always laid towards the heat insulator. If the canvas is the same (one-sided), it can be laid in any way. The rule is simple, but installation errors most often relate to incorrectly deployed material.
If we are talking about membranes with one-way permeability, the same rule is followed. Usually, the side facing outward has a pattern, and the side that fits against the heat insulator is smooth and without a pattern.
What materials are used
The building materials market offers various types of water vapor barrier that have excellent characteristics. As a rule, breathable membranes and films are used to protect the walls of wooden houses from moisture, but there are other types of vapor and waterproofing. What materials are suitable for home insulation and vapor barrier:
- Ruberoid. The advantage of this type of material for waterproofing is its low cost, but roofing felt is more suitable for laying on the roofs of outbuildings than for protecting the walls of wooden houses. In addition, it is more appropriate to use such a product not as the main vapor barrier, but as an additional layer to more effective materials.
- Aluminium foil. The film is coated with metal on one side and has a reinforced mesh on the other. This device helps create a vapor barrier inside the room and a layer that reflects heat. To insulate a wooden house, a foil vapor barrier is spread with a metallized coating on the outside. Such material must be placed on the walls carefully so as not to damage its integrity. If you decide to foil your home, your home will not only be protected from corrosion, but also insulated.
- Diffusion membrane. Vapor-permeable material protects the home from moisture, regulates its amount, thanks to the ability to allow air to pass through (from two or one side). The vapor barrier membrane has a high vapor permeability coefficient, which is due to the microstructure of the material. A significant advantage of the diffuse film is the absence of a ventilation gap between the thermal insulation and the membrane, which ensures the most efficient use of space. Such a vapor barrier for the walls of a wooden house provides good insulation of the room. Unlike other types of vapor barriers, the membrane has a high price - this is its only drawback.
- Polyethylene or polypropylene film. Compared to polyethylene, polypropylene is more durable and weather-resistant. However, a vapor barrier film made from this material previously had a significant drawback - condensation formed on the insulation side of it, which led to a rapid loss of the performance characteristics of such a vapor barrier for walls. The modern type of material has a special layer of viscose containing cellulose. It absorbs a large amount of moisture, gradually drying under the influence of air ventilation. The main advantages of films for the walls of wooden buildings are their affordable cost, durability, and ease of installation.
Read with this
- Everything about installing heated floors
- Vapor barrier of walls of a wooden house: choice of material
- Vapor barrier for ceilings in wooden floors: materials and installation features
- Insulation of a veranda in a wooden house
- Hydro-vapor barrier “isospan b”. characteristics and instructions where and how to use insulating material
- Fum tape technical characteristics, how and how much to wind on the thread
- Subtleties of attic floor insulation
- How to update old tiles in the bathroom
- How to cut metal using a grinder
- How to quickly and easily unscrew a tightened nut on an angle grinder
Tips and tricks
The main purpose of a vapor barrier is to prevent water pores from leaving the room through the insulation and surfaces. This means that the vapors, one way or another, remain in the room, and in order to prevent the humidity from increasing and the microclimate from being disturbed, it is necessary to carry out natural or forced ventilation in a timely manner.
If you are interested in the question of what kind of overlap to make if parts of the membrane overlap each other, then we advise you to pay attention to the films themselves. There are markings along their edges - they indicate how exactly the overlap of the films should be.
Depending on the type and company, the value indicated there is no less than 10 cm and no more than 20.
For information on installing a roof vapor barrier and which side to lay the vapor barrier against the insulation, see the following video.