Among all the numerous types of wall decoration, PVC panels are one of the most budget-friendly. But in terms of performance characteristics, these materials meet most of the rather stringent requirements of modern consumers. Let's look at how to attach plastic panels to the wall, as well as the features of choosing and using such a finish.
How to attach plastic panels to the wall
Brief characteristics
Before making a final decision, each developer must know all the objective parameters of the selected material, because this is the only way to be sure that during operation there will be no disappointment in the chosen finish. We will look at both the positive and negative sides of plastic panels, since some of them have a direct impact on installation technology.
Types of plastic panels
Ensuring tightness and inserting sockets
If you are thinking about the question of how to cover the walls with plastic panels with your own hands, then you should also take care that the joints are as airtight as possible. To do this, before installing the product, the side edges are lightly coated with silicone. All subsequent elements must be installed according to the same principle.
Holes are cut in the panels for sockets and switches using a sharp knife. After installation, these areas are covered with plastic boxes. The last panel will most likely have to be cut to width. First, they try it on the wall and mark the cutting line, then cut off the excess with a hacksaw.
Advantages of PVC panels
There are quite a lot of them, these are objective data that you can trust.
- Light weight. The additional load is so insignificant that it is not taken into account during the design of the building. Finishing can be done on fragile surfaces; the coating is not afraid of minor temperature fluctuations in the linear dimensions of the room.
- Manufacturability. Plastic panels are very quickly mounted on metal or wooden frames. The former are more expensive, the latter are much cheaper. When it comes to quality and durability, there is no practical difference. An important advantage is that the panels can be installed on uneven and unplastered walls. Finishing masonry materials to level them requires a lot of time and money. Another quality related to manufacturability is that when decorating walls with PVC panels, there is no need to use special expensive devices and tools. The complexity of the installation is accessible to beginners.
Fastening the panels does not require much effort
- Low cost. It is important to know that not only panels have a low price - the cost of installing them is also much cheaper than finishing walls with other materials.
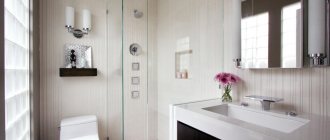
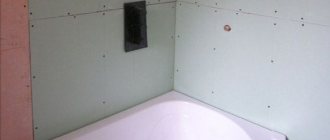
- Moisture resistance. This is a significant advantage if there is a need to finish walls in rooms with high humidity. Moreover, the material does not react at all to direct contact with water.
PVC panels are often used in bathroom decoration
Installation of plastic
In general, wall cladding with PVC panels is carried out in the following order:
- Arrange the sheathing;
- Install starting, finishing and guide profiles;
- The first board is inserted into the lower installation profile, and then, bent in an arc, into the upper one, the small fastening shelf should be facing the starting profile;
- With a mallet, as a rule, the board is brought into the starting profile to the place;
- Attach the board to the sheathing through a large fastening shelf in one way or another;
- The remaining boards are mounted in the same way, including the penultimate one;
- The last board is cut from the side of the LARGE mounting shelf to the width; you need to allow for thermal expansion, see the example above;
- Having bent the shelf of the finishing profile (if it is non-separable) with a spatula, insert the lower end of the last board into the groove of the installation profile and into the finishing profile; this work requires a skilled assistant, or better yet, two;
- Alternately bending sections of the narrow flange of the finishing profile with spatulas, insert the board into it to the upper corner;
- In the upper corner, the shelves of the finishing and mounting profiles are simultaneously bent with two spatulas, and the board is finally installed;
- Also, alternately bending the shelf of the finishing profile, attach the board together with the profile to the sheathing;
- install skirting boards.
Notes:
- When using a special finishing profile, all the difficulties of operations 8-11 are reduced to applying and snapping its flange.
- A cheap profile from all these manipulations sometimes remains bent or cracks along the edge of the corner. You can correct the defect simply - warm up the damaged area with a household hairdryer and immediately iron it with pressure with a COLD iron with a Teflon sole.
- For the sake of beauty, the profiles are cut exactly to size along the wall, and then their ends are cut at 45 degrees in a miter box. An option is to fill the cracks with PVC putty or a homemade compound. For this, plastic sawdust is kneaded in dichloroethane until the dough becomes thick. Prepare in small portions as needed; the mixture is not stored.
- If the sheathing was aligned carelessly, the last board will immediately show this - its edge will bend outward. The result was a “finish”.
Disadvantages of PVC panels
Each building material has its drawbacks, and panels are no exception.
- Low physical strength. The panels are made of thin plastic and have a hollow structure. They hold static and dynamic forces very poorly. Moreover, the damage cannot be repaired; the coating has to be completely replaced.
- Evaporation of harmful chemical compounds. There is a particularly high concentration of unlicensed goods. In addition, during combustion, toxic smoke is released, a person loses consciousness even after two or three breaths.
- Negative reaction to hard ultraviolet radiation. Under the influence of UV rays, the intermolecular bonds of polymer plastics are significantly weakened and they become brittle. Even with little effort they crack.
The panel can be damaged by a sharp blow
Unfortunately, the domestic building materials market is oversaturated with fakes. Low-quality PVC panels are almost completely devoid of real advantages, and the negative sides appear even more noticeably.
Panel fastening methods
- glue method,
- using self-tapping screws,
- kleimers.
How to glue plastic panels to the wall? On smooth walls, you can attach the trim with special universal adhesives or use so-called “liquid nails.” This technique has its pros and cons. It's cheap, but you can't replace any part.
It is reliable and convenient to fasten the panels with self-tapping screws, which require a wooden frame. There is no need to level the surface. To perform the work, a screwdriver is used to speed up the fastening process.
The best option is to use clamps.
It's convenient, fast and reliable. Wall covering can be easily installed on a metal grid. This method allows you to replace lamellas and is easy to dismantle.
Tips for choosing
Universal advice is to ask the seller for a package of accompanying documents. But it always works: either the seller does not show invoices and certificates, then substandard goods are sold under the guise of one batch of good goods, or the consumer is embarrassed to defend his rights. There are several external signs by which you can most likely distinguish a counterfeit from a licensed product.
It is best to buy PVC panels in large construction stores, where all products are licensed
Table. The main differences between high-quality and low-quality panels
| Name of criterion | Quality panels | Low grade panels |
| Number of stiffeners | 29 pieces at perfectly equal distances from each other | 20 pieces, you can notice the unevenness of the step by eye |
| PVC thickness | 2 mm | 1.5 mm |
| Linearity Options | All surfaces are smooth, the planes do not have depressions or bumps | Traces of shrinkage are clearly visible on the surface. Excessive shrinkage is explained by the use of low-quality secondary raw materials for production. |
| Mechanical strength indicators | The panels bend and can withstand relatively heavy physical loads. After removing the stress, the panels completely restore their original performance. | The strength of the panels does not allow them to bend; the thin side strips for fixing the lamellas are very fragile and often crack when driving in staples. The plasticity of the panel surface is minimal. |
Good quality panels have a uniform pattern, straight cuts, stiffeners are located at the same distance from each other
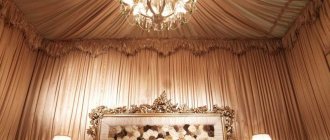
Creating suspended ceilings from PVC panels: photo models and technologies
PVC panels are excellent for suspended structures. This material can be used for kitchens, toilets, and showers. Panels that imitate lining are often used for ceilings.
Below are the ceiling finishing options.
The following design options are used for finishing:
- glossy and matte surfaces;
- imitation of natural stone and wood;
- with ornaments and plain;
- with thermal film and with printing.
Before installing the ceiling, you need to carry out calculations. In this case, there is no need to take into account openings. The material is taken with a margin of 15%. To design suspended ceilings, the lathing parameters are calculated, and the lighting design features are also taken into account.
If you follow the recommendations for installing the panels, you can perform a high-quality finish with your own hands.
Stages of work production
None of the professional builders begins work without prior preparation. What activities are included in this list?
- Careful inspection of the premises. Pay attention to the condition of the walls, the purpose of the room, microclimate parameters and operating conditions of the building. Decide on the fastening method, prepare tools and devices taking into account the fastening technology.
- Counting the number of panels and additional elements. In addition to the surface area, you need to know the footage of starting, connecting and end profiles, baseboards, internal and external corners. Some manufacturers of plastic panels produce universal profiles, but in practice they do not live up to consumer expectations; professionals do not recommend using them.
Accessories for PVC panels
- Preparing rooms and surfaces for installation. It is necessary to remove construction debris, furniture and other objects that interfere with the master’s free access to the site.
- Installation of panels. It also consists of several stages, each of which has a significant impact on the final quality of the work.
How to calculate the number of PVC panels
If you have made the final decision to install plastic panels, we recommend that you study the instructions and advice of professional builders.
Tool
Installation of PVC panels on walls requires a set of special tools:
- A jigsaw or, better yet, a circular saw.
Both with a “clean cut” saw (disc), fine-toothed. A saw is preferable because the flexible jigsaw file, when bumping into stiffening ribs, can play back, and the cut turns out wavy. Staple gun (stapler) for mounting plastic panels - A miter box for a jigsaw, at least a simple one, non-adjustable, with angles of 90 and 45 degrees.
- Staple gun (stapler; construction stapler), see fig. Needed if the cladding goes over a wooden sheathing.
- A rubber mallet with a hook rule, the same as for laminate, for pulling the panels into place. By tearing out a panel wedged in the grooves with your hands, you can not only tear off the installation profile, but also damage the sheathing.
- Plaster spatula 80-120 mm, or better two. Use spatulas to bend the shelf of the finishing profile, if it is non-removable, when installing the last board.
Note: when choosing a stapler for plastic, you need to make sure that the slot through which the staples are squeezed out is located as close as possible to its toe. This will make installing the last board much easier.
Step-by-step installation instructions
The installation process is divided into several stages, pay due attention to each of them.
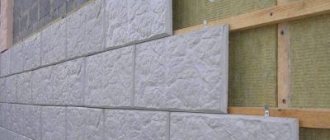
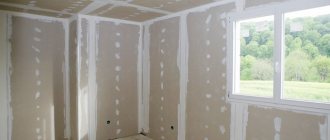
Step 1. Installation of the sheathing. The structure is made of wooden slats with a cross-section of 20×40 mm, the walls are lined with foil polypropylene foam insulation 4 mm thick. By using this layer, it is possible to reduce heat loss from the premises and provide additional sound insulation. Additionally, the foil reliably protects the wooden elements of the sheathing from the negative effects of high humidity.
Lath lathing is mounted on top of foil insulation
During the manufacture of the sheathing, the following rules should be followed.
- The slats are fixed to the wall with self-tapping screws or dowels; the specific choice depends on the material of manufacture.
- The sheathing must have a perpendicular direction to the location of the plastic panels. In our case, they are vertical; the slats should be fixed horizontally.
- The distance between the elements of the sheathing is no more than 50 cm; the thinner the lamellas, the smaller the distance should be. The fact is that the lamellas cannot withstand significant forces and, under their influence, are greatly deformed, and this causes a violation of the fixation strength.
- Before starting work, the horizontalness of the wall is checked; if necessary, wedges are placed under the slats to level the position. Each wall is checked with a bubble level.
The slats are fixed with self-tapping screws
At the bottom, the slats are nailed at a height of no more than five centimeters from the floor; not only panels, but also baseboards will be fixed to them. The same slats are installed at the top for attaching ceiling decorative elements. All window and door openings around the perimeter are also covered with lathing; this is a mandatory installation requirement; the slats should not sag.
Slats are also placed around the perimeter of the openings
Practical advice. For wet rooms, it is strongly recommended to impregnate the wooden elements of the sheathing with antiseptics; they quite effectively protect them from the negative effects of moisture. The specific names of the impregnations do not matter; they all meet existing requirements.
Step 2. Installation of the first panel. This is a very crucial moment; if the starting lamella is incorrectly laid, the accuracy of finishing the entire surface of the room is disrupted.
- Replace the inner or outer corner depending on the location of the first panel.
- Push the lamella into it and very carefully check the vertical position using the level.
- Secure the panel with a self-tapping screw with a press washer, a nail or a stapler. The latter option is preferable to the former; it is much simpler, lighter and faster.
Attaching the first panel
Step 3. Installation of row panels. After attaching the first one, you can easily put the next ones in place. If the lathing is made according to the requirements of the instructions, then no problems should arise during installation work. The panels are snapped into a special groove along their entire length, and the connection to the sheathing is made in a similar way.
The edge of the panel is inserted into the groove and snaps into place
Step 4. Finishing windows and doors. In these places the panel must be cut. This is done in several steps.
- Take exact measurements, draw on the panel the area that needs to be cut.
- Using a sharp mounting knife, carefully cut the panel along the contour, do not allow burrs, work carefully.
- Using a hacksaw, cut off the selected section of the lamella and remove it. Experienced craftsmen often use a grinder instead of a saw; it speeds up the process much more. But for this you need to have practical experience; if you lack it, you can not only completely ruin the panel, but also get very serious injuries.
Carry out panel cutting
Place the prepared panel in place and attach it. If everything is done correctly, it will fit the first time, no final adjustment is required.
Installing the finished panel in place
Step 5. Installation of the corner profile. This element is used to improve the appearance of the wall. The wide side is inserted under the panel, the narrow side is located on the front surface. Next, the profile is fixed on one side with self-tapping screws and press washers. Continue inserting panels into the attached element and completely finish the adjacent wall of the room.
Installation of the final profile
Step 6. Installing the last panel. Most often, it needs to be cut to width; this is done with an ordinary mounting knife under a metal ruler or wooden strip.
The last panel can be cut if necessary
Carefully snap it into the groove of the previous lamella, constantly monitoring the position.
Step 7. Installation of the F-profile. It is used at the junction of slopes with panels and covers uneven open honeycombs. The profile is placed on the skin and pressed until it stops.
A profile is installed around the perimeter of the openings
This completes the wall paneling. Check the strength and correctness of fixation again.
Plastic: truth and fiction
True facts
- Plastic is harmless. Modern technologies have reached the point where PVC panels used for interior decoration have become completely harmless to human health. If previously chemical compounds such as cadmium, asbestos and other toxic substances were used in production, now all these toxic elements have been abandoned. Such production makes this material safer and cheaper.
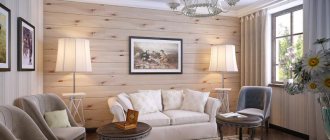
- Beauty. Initially, plastic finishing was faceless and suitable for finishing offices or other non-residential premises, but time passed and everything changed. Now a wall covered with plastic panels can look very beautiful and “personal”. Thanks to photo printing, any design can be applied to plastic , even with a three-dimensional effect. Therefore, covering the wall of a house with plastic panels and making it very original in terms of design is quite possible.
- Plastic is convenient to use where other materials are very difficult to use. Due to the structure of plastic panels and the ease of their installation, plastic can be used in any difficult place, for example, when covering various niches, irregularly shaped walls and other architectural delights and tricks.
- Many people believe that plastic panels are not very reliable, this is not true. They can withstand a certain weight and hang a TV, picture or lamp on plastic quite realistically.
- The plastic matches the technology. No matter how refined the surface of the plastic panels is, ventilation grilles, sockets or a split system will look organic on it. Therefore, fears that a wall covered with plastic panels will be completely bare are unfounded.
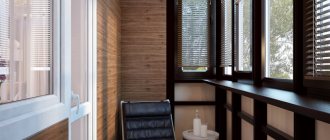
- The durability and reliability of plastic is truly real. Yes, plastic is a soft material and it is quite possible to pierce or break it, but with proper care this material can last from ten to twelve years. Moreover, plastic can be used in different temperature conditions - bath, toilet, balcony.
"Plastic" myths
- Plastic does not require special conditions from the walls being sheathed. This fact is partly true, but lathing under plastic requires special conditions. After all, if you simply remove the old materials and do not level the walls, the plastic sheathing will float. Therefore, the walls will still have to be leveled.
- Sheathing walls with plastic is very easy and does not require any special skills. This is not so, covering the walls with plastic is really not a problem, but you will have to make an effort, attentiveness and a certain skill, otherwise you won’t be able to get beautiful wall covering with plastic panels. Any amateur can handle the sheathing, but not every amateur can do this job efficiently.
- Hygiene of plastic. Almost every “plastic” advertisement is replete with messages that plastic is hygienic. It is not true. Plastic panels do not have proper vapor permeability and moisture resistance , which means that walls lined with plastic do not breathe, which is bad for bedrooms. For them, covering walls with plastic is only partially suitable. In addition, plastic leaves glare and polarizes light; medicine prohibits the use of such materials in children's rooms. And lastly, the plastic is hollow inside, that is, some insects may well settle there. However, PVC panels are hermetically sealed; if you do not damage the integrity of the material, then nothing bad will happen. Before covering walls with plastic panels in regions with high humidity and hot climates, it is worth thinking about what may appear on such walls. There are quite a few videos that show spiders emerging from damaged plastic panels.
- The flammability of plastic is another myth. Plastic does not ignite from heat or a match, so it is stupid to be afraid that an incandescent lamp will set fire to a plastic panel. However, if the room is already on fire, then you should not expect that the sheathed walls will remain untouched. When exposed to high heat, PVC panels burn and, moreover, release toxic substances.
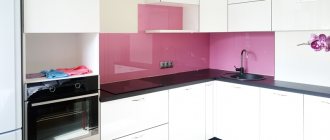
Installation of plastic panels in the kitchen
Such elements are very beneficial to use for kitchen aprons. These areas have previously only used ceramic tiles, but installation of such materials requires experience. In addition, the tiles are installed for many years, and the panels can be changed at any time, this can be done using simple technology. It does not require the use of fasteners; the low height of the apron makes it possible to save installation time.
An apron made of plastic panels looks no worse than tiles
How to install slats?
- Accurately measure the distance between the tabletop and wall cabinets.
- Add 2-3 cm to it and cut the required number of panels.
- Place the lower end of the lamella on the desktop, bend it slightly and place the upper end under the hanging bedside tables. They need to be tilted; after installing all the slats, the bedside tables are put in place.
- Screw the plinth onto the table.
Installation of an apron made of plastic panels
This simple installation technology allows you to remove outdated panels at any time and replace them with new, more fashionable and beautiful ones. To guarantee, the lamellas can be glued, but this technology does not have any noticeable advantages. But there are several disadvantages: the complexity of the technology, the impossibility of performing repair work and increased cost.
Preliminary calculations of the amount of material needed
In order to avoid purchasing surplus and repeated visits to the store, the first thing you should do is determine the optimal number of linings needed for finishing. The material can be mounted in a vertical or horizontal position depending on personal wishes.
In the first case, calculations are carried out as follows: the elongation of the room along the perimeter is measured, from which the width of the openings is subtracted, and the resulting indicators are divided by the width of one plastic panel. To the resulting number you should add 2-3 products as spare ones.
When performing a horizontal installation, the area of the room is measured with the openings of windows and doors taken away. The resulting number must be divided by the area of 1 panel. In this case, at least 10% of spare products should be purchased, since the amount of scraps increases. In addition, it is necessary to count the number of slats that will be used for arranging the sheathing and as fasteners. First of all, the height of the walls must be divided by the pitch of the frame. Basically, this figure reaches 50 cm, after which it needs to be multiplied by the perimeter of the room. The resulting value indicates the length of the slats in linear meters. By measuring the height of the corners and multiplying the resulting number by their number, the full footage of the corner profiles will be obtained. To this indicator you should also add the perimeter of the openings of windows and doors.
How to process the material
One of the advantages of PVC panels is manufacturability. You can cut the material in one of three simple ways in two directions.
Method 1. Using a mounting knife. Use only new inserts, the tip should be as sharp as possible.
How to cut and bend PVC panels
| Cutting direction | Execution method |
| Along the panels | Place the panel on a flat place and mark the cut location. When cutting, you need to use a long, even blade. Press it firmly against the surface of the panel and use the end of a knife to cut the lamella on one side along the entire length. Then turn the panel over and bend the cut area. Cut the remaining plane in a bent position. |
| Across the panels | A more complex case requires certain skills. Mark the location of the cut. Using the tip of a knife, carefully cut the jumpers between the planes one by one. After the entire width has been passed under the ruler, make a continuous cut of one plane. Bend the cut part and cut the second plane from the opposite side. |
Method 2. Grinder. You need to work with a disk for cutting metals. The disc thickness is minimal. Cutting is very easy and quick; the only requirement is that you have minimal experience working with an angle grinder. Be sure to follow all safety rules; injuries from an angle grinder are very dangerous. The burrs on the opposite side of the cut break off easily after cooling.
Bulgarian
Method 3. Using a hacksaw. Undesirable option, work is difficult and long. But in extreme cases you can use it.
With a jigsaw you can make any cut on a plastic panel
It is worth using a file with a minimum tooth
Cutting a panel with a saw
The quality of the cut depends on practical skills. But don’t be upset if the cut edge is not very smooth; additional elements allow you to hide problems up to one centimeter in width. The cut can rarely be worse, the panel will be suitable for installation.
How to cut several PVC panels at once
How to install wall panels in a bathroom
It is recommended to choose panels that do not have a very pronounced textured surface. Otherwise, fungus and mold will appear on the material, which will be difficult to remove. Additionally, textured surfaces make cleaning more difficult.
Here, too, one cannot do without careful preparation of the foundation. It is carried out in the same order as already described above. With the frameless fastening method, glue is applied only to completely dry surfaces. The compositions are distributed using a point method, observing a step of 25-35 centimeters. The last stage includes wall mounting of the panel. After this, the interior of the apartment will be transformed. At the corner junctions of the panels, plastic corners can be secured with silicone. The last to be installed are the baseboards on the floor and ceiling. To do this, use self-tapping screws or special glue.
Ceiling finishing: installation of lathing
You can choose different materials for the frame, but markings for its fastening are carried out according to the same principle. On opposite sides of the room, the ceiling is marked into equal sections. Then, using painted twine, straight lines are marked on the ceiling along which the guides for the frame will be attached. Lines also need to be cut along the perimeter of the ceiling, since profiles and bars will be attached in these areas first. Here it is important to pay attention to the fact that if the ceiling is lowered on suspensions, markings for the outer profiles are made below the joint line at the distance by which it is planned to lower the structure.
When the lathing is mounted not on the ceiling surface, but in a suspended state, you need to make marks along which the hangers will be fixed. To attach the frame, you can use one of the existing methods. The system can be lowered a certain distance by strengthening the suspensions at certain points. To do this, holes are drilled through a plumb line using a drill into which several dowels need to be driven. This will allow you to fix the hangers on the entire surface.
A metal profile is attached to the walls along the marked lines. Holes are drilled through it at a distance of 300 mm. Dowels are driven into them. A profile is installed in the hangers at the required height, and then everything is fixed with metal screws. The ends of the profile must be installed in the guide profile and secured with two self-tapping screws. Instead of a suspended profile, you can use wooden beams.
In those places where the lamps will be attached, the slats or profile are reinforced with jumpers. They are secured using crabs. Another option for attaching a wooden frame is to install beams on the ceiling or linings that replace suspensions. The edges of the timber on the walls are installed and fixed in metal profiles. The latter is installed on the wall and fixed with metal corners. The timber can be nailed to the ceiling with dowels through holes that are drilled in advance.
The dowels must be of such length that they enter the ceiling 60 mm. If wooden pads are installed between the frame and the ceiling, they are attached to the ceiling, and timber is installed on them using self-tapping screws. After completing the installation of the frame, you can stretch wiring for lighting fixtures between its elements.