What kind of drill for a 6 x 40 dowel?
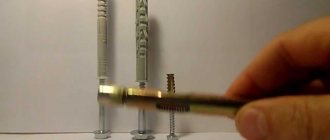
Additional information: If it is necessary to fasten light objects, it is recommended to use dowels 6 (mm) thick, 40-60 (mm) long with a drill with a diameter of 5-6 (mm). If you need to attach heavy elements, you should use dowels 10 (mm) thick, 60-80 (mm) long with a drill with a diameter of 9-10 (mm).
Interesting materials:
How to change the start page in the browser? How do I change my home page in Microsoft Edge? How do I change the page numbering in the footer? How do I change the page numbering? How to change the orientation of one page in Word 2022? How to change page orientation in Libre Office? How to change page settings in Word? How to change margins on one page? How to change page margins in Google Docs? How to change the page numbering order in Word?
Using an electric jigsaw
If there is no crown, a cut in the drywall can be made using a jigsaw, but it should be borne in mind that in this case the work becomes a little more difficult.
The first step is to mark the surface of the finishing material using a ruler and pencil. At the next stage, use a drill to make a hole in the center of the drawn circle. The diameter of the drill used should slightly exceed the width of the file that will be used to make the cut. After obtaining a hole, which is considered the starting point, you need to install an electric jigsaw blade in it.
Then they need to make turns in a circular motion along the contour of the marking.
This tool allows you to achieve high evenness of the holes being made, which in most cases do not require further processing. If necessary, the inner edges of the resulting circle can be trimmed using sandpaper.
Note! When cutting a hole, it is more comfortable to use a narrow file with small teeth. Circular movements should be carried out slowly, but at the same time the tool should work at almost maximum power, which will allow creating the most possible level of evenness of circles.
In addition, it should be borne in mind that this method has several disadvantages:
- Using an electric jigsaw you will not be able to make holes with a diameter of less than 30 mm.
- Using this tool, it will not be possible to cut glued drywall.
If these restrictions can prevent making a hole, then you can use other options.
Types of crowns
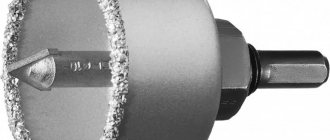
Core drills can be divided into two types: solid and split.
- Solid crowns are basically a drill bit with a single metal toothed cylinder on it;
- The collapsible crown device contains a universal disk into which cylinders of different diameters can be inserted. The cylinders themselves have an open shape and come complete with a disk. Like solid crowns, the collapsible edge is serrated.
The diameter of the cylinders can vary from 33 to 150 mm.
Both wood and metal drill bits are suitable for making holes in drywall. There are universal - bimetallic crowns that can be used to drill metal, wood, gypsum plasterboard, of course they are more expensive, but if you use them only for drywall, then we can say that they are eternal. When purchasing a bimetallic crown, you should pay attention to the fact that they are usually sold without a holder and a centering drill. In the assembly this is called an adapter, which will have to be purchased separately.
Fastening technology
Like any other work, fixing something with a dowel is done in a certain sequence.
- Drill a hole.
- Install the dowel.
- Tighten the screw.
- Fix the desired item.
It would be a good idea to first mark with a pencil the point where you plan to make such an installation. It would be absolutely ideal to make a small hole in this place (with a knife, nail, pin, etc.), which will allow you to position the drill for the job as accurately and correctly as possible. The drill or hammer drill must be kept strictly perpendicular to the surface during operation! Under no circumstances should they be tilted at an angle. It is advisable to clean the resulting hole from dust and cement (brick, etc.) chips, either as shown in the video above, or with a vacuum cleaner. If they are not removed, they will prevent the fastener from fitting properly.
Selection rule
This rule is simple and sounds like this: the diameter of the drill is equal to the diameter of the dowel. Relative to its length, it is 3–5 mm longer than the fastening element. This ratio will be optimal. All instruments are marked accordingly. If you want to measure manually - with a caliper, for example - remember that you need to measure the soldering from pobedit, the tool itself is narrower.
Read also: How a semiconductor diode works
Why do we take a drill longer than the fastener? It's simple - we leave space for dust and crumbs formed during drilling. You also need the screw or self-tapping screw to go beyond the dowel. Then the grip will be maximum and your skill will be at its highest level.
In the video you can see how to insert the fastener into the wall and remove the dust generated during the work.
Tile, glass
To drill small holes of 4–25 mm, special cone-shaped drills with diamond coating are used. The main task is to go through the surface of the tile and its base. After this, you need to switch to a drill suitable for the wall material and continue drilling with it (a drill for metal or wood will win).
It is especially difficult to start drilling in a strictly defined position. You need to stick tape over the mark or mark a point along the mark, carefully knocking off part of the glaze or polished surface so that the drill does not “walk” along the surface.
Large diameter holes for the socket are drilled with a ballerina drill. It contains a sprayed support cone on the main axis. An adjustable arm with a fixed cutting tip is moved away from it. It is better to start at low speeds until the surface of the tile is passed. When the surface has been covered by 2–3 mm, you need to move on to a crown for the corresponding wall material.
Expert advice
- It is better to install electrical wiring long before covering the walls with plasterboard panels.
- Before starting electrical installation work, a frame is assembled from a metal profile, which will need to be fixed to the load-bearing surface.
- To protect the wires going to the switches, a metal corrugated pipe is used.
- To supply current to electrical outlets, a three-core cable in a double insulating winding is used.
- Securing the cables to the frame inside the plasterboard wall will give the structure increased reliability. For this purpose, pieces of copper wire are used.
As you can see, installing a socket in drywall is a simple process and quite feasible at home. If you want to gain experience in electrical installation work and save on calling a specialist, you can use these recommendations.
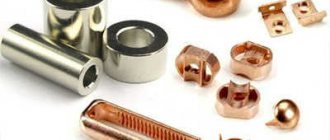
Components and design features
Regardless of the material used, the working bushings, all types of dowels consist of the following structural parts:
- a working sleeve, which is driven into a hole pre-drilled in the building material;
- fastening element, in the form of a self-tapping screw, threaded bolt or screw, screwed into the plug.
The body of the sleeve itself includes two sections:
- the upper part, which maintains the diameter when screwing the hardware. The non-expandable section of the plug retains its original shape, directing the fastening element deep into the channel;
- the working part, which is also called the spacer. A screw-on self-tapping screw pushes the sleeve segments apart. They are pressed against the building material, creating a persistent knot.
Metal butterfly dowel for plasterboardThe size of the non-expandable section is determined by the fastening features:
- the reduced length is used if it is necessary to ensure the operation of the collet mechanism over the entire channel area;
- the enlarged non-expandable section allows you to install fasteners through cavities or a layer of thermal insulation.
Structural parts of the spacer mechanism:
- locking elements in the form of spikes, bosses or corrugations. They make it difficult to rotate the sleeve when screwing in a screw or bolt;
- spacer teeth and spikes. They increase the efficiency of contact with the channel walls, preventing the sleeve from falling out;
- slots located parallel to the longitudinal axis. They divide the body into separate segments that alleviate deformation and equalize pressure.
Cutting a Rectangular Hole
If you need a rectangular cut on an old wall, you will need a narrow drywall saw. In addition, during the work you will need a number of the following tools:
- construction knife;
- roulette;
- pencil;
- drill with drill bit;
- square
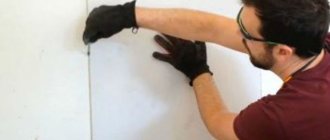
To make holes on new plasterboard sheets, instead of a hacksaw, you can use an electric jigsaw, which is more convenient for this task and allows you to achieve the most even cut. An equally important step to obtain the final result is to take correct measurements and cut accurately. Using a square and a ruler (tape measure), you should mark the left and right sides of the future hole (the distance from its beginning and end to one of the edges of the slab). Next, you need to draw all the lines at the required distance from the other edge of the sheet.
Note! Measurements should be taken and checked at least twice to avoid possible errors in the future.
At the next stage, it is necessary to combine all the edges of the drawn stripes, forming a square or rectangular figure. After this, a drill is used, into which you first need to install a large-diameter drill. Using this tool, you should make 4 holes in the center of the marked stripes in the inner area of the drawn figure, through which you can make the initial installation of an electric jigsaw blade or a hacksaw.
Important! It is necessary to drill in drywall as close as possible to the lines of the rectangle, since in this case it will be much easier to cut along the drawn lines.
After making the holes, you need to remove the resulting debris using a broom or vacuum cleaner. Next, you need to unfold the plasterboard sheet with the front side up and fix it so that it remains motionless while using the tool. The next step is to install a jigsaw blade or a narrow hacksaw into one of the holes made.
During cutting, it is necessary to hold the tool firmly in your hands perpendicular to the plane of the sheet, making a movement in strict compliance with the intended stripes. It is quite difficult to make an even cut of a rectangular shape, moving continuously along the perimeter of the drawn lines, and it is for this reason that 4 holes must first be made using a drill. Having cut to one of the edges of the rectangle, you need to stop cutting to move the blade to another drilled place. There is no need to rush while cutting, being careful, and you will be able to achieve a perfect or close to it result.
Note! When making holes, a fairly large amount of dust is generated, so to protect the respiratory tract and eyesight, it is imperative to wear a respirator and special glasses.
Having become familiar with what and how to make a hole in drywall, you will be able not only to understand the correct principle of performing the work, but also to do it with your own hands in the most suitable way for yourself.
Video:
Crown for installing mounting boxes
The most common need to drill round holes in drywall is to install electrical outlets. The invisible part of the socket, the plastic round mounting box that is mounted in the wall, is called the socket box. There are socket boxes for concrete, wood and plasterboard.
The socket box for drywall is a plastic cup with adjustable plates made of plastic or metal. Thanks to these “claws,” the socket box is fixed to the back of the plasterboard sheet. The depth of the installation box can be 40, 50, 60 or 73 mm. As for the diameter, for a standard socket box it is usually 68-70 mm.
If you only need to drill holes to mount sockets, you will only need one hole saw. In this case, you should not purchase a set of dismountable crowns. It is enough to buy one special core drill, with a diameter of 68 or 70 mm (depending on the size of your socket boxes).
Today, the diameter of a core drill for drywall 68 mm is the most popular standard size.
Optimal choice
It is for this reason that an increasing number of users, especially in houses with high ceilings, are making the right decision - to finish the ceiling with plasterboard. Gyprok ideally and quickly levels any surface and, after minimal finishing, allows you to obtain a flat, smooth surface. How to finish such a surface is decided by the developer, taking into account the developed design project, as well as personal preferences.
Another task facing builders is organizing lighting in an apartment, room, country house, or in a room where the ceiling was leveled using plasterboard. Despite all its positive qualities (light weight, affordable price, ease of use), plasterboard has a significant drawback - the material is extremely fragile and can be damaged, broken, crumbled, etc. with the slightest careless mechanical impact.
How to make a hole in drywall for a lamp and keep the surface intact, avoiding the slightest damage? What tools should be used for this, and in what order should the work be done? Let's try to figure it out!
Spotlights
Spotlights, so-called spots, which represent a point source of light, have become widespread these days. In most cases, spots are installed in plasterboard ceilings or boxes. For installation, it is necessary to cut a hole with a diameter corresponding to the diameter of the ceiling lamp. Usually, the required diameter for cutting is written on the packaging of the lamp or in the instructions for it, but it happens that there are no instructions, then you should measure the diameter yourself. This can also be done simply to check the specified information, so as not to accidentally make a hole of the wrong diameter, because nothing can be corrected later.
The most common diameters of holes for spots are 60 and 75 mm. To get a hole of the required diameter, you should use a special drill - a plasterboard crown. The main thing when you choose the size of the crown for drilling a hole for a spotlight is that the drilled diameter is smaller than the diameter of the spot, that is, the lamp must completely cover the lamp during installation.
Cutting a sheet of drywall
#1. Gypsum board consists of two layers of paper that cover both sides with a thick layer of gypsum. This combination creates a relatively durable building material that is also fire resistant. Therefore, in order to get an accurate and high-quality cut, it is enough to walk along the slab with a sharp knife and then break it in this place. To make a cut, run a knife along the plasterboard sheet from top to bottom several times. To make the correct cut, you need to move the knife confidently, without jerking and exactly along the marked line. When cutting through the paper layer, you need to hold the bar firmly in one position, otherwise the cut may turn out uneven.
The same procedure must be performed if you rarely use drywall not on the floor, but leaning it against the wall. Holding the strip down with your foot, run the knife along the drywall several times from top to bottom. There is no need to cut many times, as this will only dull the knife blade.
A sheet with a cut paper base.
As you can see in the picture, the cut should be completely even. Otherwise, you will not be able to break the slab evenly. The goal is to completely cut through the paper layer and lightly grab the plaster.
#2. Now you need to break the slab along the cut. If you followed the previous steps correctly, the drywall sheet should break along the cut. Hold the sheet with your feet and simply fold it.
Of course, there are a lot of options for how you can make the break yourself. It is quite difficult to explain all these procedures in two sentences, but we assure you: in practice it is very easy to do. The most important thing is to make the right cut. How you break it is not important.
But if you find it difficult to grab a large sheet of paper with your hands to bend it, then press it down with your knee. If you are not confident that you can cut a slab well, then practice on scrap sheets first.
We break the plasterboard board.
#3. After the sheet is broken with a utility knife, cut the paper layer from the back side of the plasterboard. If you have broken the plasterboard correctly, you should have no problem cutting off the paper layer from the back.
We trim the cardboard layer from the outside.
#4. Place the cut slab against the mounting location to see how accurate the cut is. If the cut slab is a little larger, use a rasp to remove excess material. Remember that when working with a rasp, you will create a lot of dust. Therefore, try to make accurate markings.
Cut sheets.
Cut with a jigsaw
Using a jigsaw, you can make a hole of any geometric shape and size, if necessary, get a hole as close as possible to a round one; the side surface of the gypsum board is sanded with sandpaper.
If you need to make a hole with a very small diameter (20-30 mm), then it is better to use a narrow saw for cutting holes in the chipboard. There are just limitations: you can’t make a hole on a glued gypsum board with a jigsaw, and if the distance between the base of the wall or ceiling and the front surface of the plasterboard sheet is less than the height of the jigsaw file at the maximum output of the file, then the jigsaw won’t help here either. But it’s not over yet, there are other ways:
Organization of the drilling process
Everyone uses different bits depending on their needs, but no matter what drill you use, there are general instructions for how to use them.
The whole process can be divided into several stages:
- determining the location of holes on drywall;
- marking the surface material;
- attaching a core drill to a power tool;
- direct drilling.
At the first stage, you should decide where, how many, and what diameter the holes will be. It is better if you already have the elements to be mounted (lamps, socket boxes, etc.), then it will be easier to determine all the required hole diameters and thereby avoid unnecessary mistakes. Ideal if there is a clear layout diagram.
Next, the surface is marked. Measurements are taken and the center points of the holes are marked on the surface of the drywall, where the centering drill subsequently enters. Be careful that the hole does not hit the location of the metal profile, in which case you will be forced to cut the metal as well. If, for example, it is not clear from the heads of the screws where the profile is located, and you did not fasten the drywall, then you should find out where the metal goes before drilling; you may need to ask the team involved in the wrapping in advance to put some marks. There is another way to find out the location of the profile - use a search magnet. If you plan to place several elements nearby, then when marking, you need to monitor the level.
At the third stage, a crown of the required diameter is taken and installed on the power tool. This could be a drill or a screwdriver. To use a hammer drill, you need to purchase an adapter chuck and remember to turn off the impact mode.
Next, after you have made the calculations and markings, you can proceed directly to drilling. The centering drill of the crown is placed on the center of the future hole and the power tool is gently turned on. In this process, large tool power is not needed. The main thing is to hold the tool straight so as not to get a beveled cut. The drilling process can be carried out both on already fixed drywall, and on sheets that are not yet mounted, without using strong pressure on the plasterboard.
Drywall is a fairly soft material, and having a cutter of the right size and quality, it is not difficult to make a smooth hole, but still, if you doubt your abilities, trust the professionals.
We attach to an unreliable surface
Concrete monolith and solid brick are increasingly giving way to materials that do not have the same strength and hardness. Plasterboard partitions and tongue-and-groove slabs, cellular and aerated concrete, although they provide quick construction of buildings, are greatly inferior in reliability. When drilling holes, such a wall can crumble or crack, especially when it comes to hollow elements. To prevent this from happening, you must act according to certain rules.
- Choose lightweight fasteners made of nylon and other polymers, giving preference to a diameter of at least 10 mm. This will allow you to better secure it to the wall. For very porous walls, metal molly dowels are intended.
- Select a drill 1-2 mm smaller than the dowel. The pobedit version is suitable - quite versatile and reliable. When drilling tiles in a bathroom on a plasterboard partition, it is better to replace it with a diamond drill.
- Carry out work in 1 stage. You need to drill in a non-impact mode, choosing the entire required length per pass.
- Prefer dowels specially designed for hollow walls and weak foundations. First of all, these include “butterflies”, which, when installing a self-tapping screw or self-tapping screw, reveal their side edges. It is much more reliable to fit a dowel with already cut edges directly into the drywall - no preliminary drilling is required for it, you just need to wrap the product into the wall. The load-bearing capacity of such fasteners is small, but it is enough to hang a watch or a small picture.
- If the drill diameter is incorrectly selected, it is recommended to change the dowel. If this is not possible, compounds such as “liquid nails” will help strengthen the fixation. They are also used when turning the installed fastening. 30-120 minutes are enough for the dowel to be ready for installation of the self-tapping screw.
- If the fastener rests against a partition or other obstacle, and part of the sleeve remains outside, it can be carefully removed. When working on walls with a decorative coating, they are first protected with a circle of sandpaper, putting it on a dowel. Then the excess edge is simply filed off, a self-tapping screw or screw is installed as usual.
The following video describes the rules for choosing dowels and anchors.
Possible options
When deciding how to cut a hole for a lamp, you need to know that this work can be done in two ways:
- Using special professional tools, as well as special equipment.
- Use the available materials in the house.
Obviously, the first option is more acceptable. Moreover, now it is easy and simple to buy a set of crowns or one drill of the required diameter, and such a tool is inexpensive. Of course, you can try to do the work with improvised materials - use a knife, a metal file, etc. But it’s impossible to guarantee the quality of such work. Moreover, if any inaccuracy is made, an entire sheet of drywall will have to be replaced. And this is difficult and will require additional time and financial expenses.
Making holes with a circular drill
First of all, the “ballerina” is intended for making holes in ceramic tiles, but if it is available, it can be used for this task, since with its help it will be possible to increase or decrease the diameter with an accuracy of a millimeter. Having achieved the correct dimensions, you will be able to drill a slot into which you can install any required fasteners, socket box or lighting source.
The cost of this cutting element ranges from 2 to 10 dollars, corresponding to the price of a set of crowns. The nozzle can be adjusted within certain limits, so purchasing it will be a universal solution.
One of the key advantages is the ability to make holes with a circular drill in drywall that has already been installed, while being glued on a concrete wall or ceiling, although in the second case it is not recommended to make a cut using this attachment. This feature is achieved thanks to the presence of a pobedite tip.
The maximum permissible diameter of the hole produced by the ballerina is limited solely by her shoulder.
Using a knife
Among other things, you can use this tool, but before cutting drywall with a knife, you should take into account that this method is more dangerous and labor-intensive. In this case, the first thing you need to do is select a suitable product that is designed for this task.
At the next stage, you need to accurately draw a circle on the plasterboard sheet, and after completing this procedure, begin to carefully cut it out.
Note! Due to its small dimensions, the use of a knife allows you to conveniently make holes in hard-to-reach places.
Using a blade for metal
Almost every owner has this cutting tool in their home. The cut must be made using a replaceable hacksaw blade. The process itself largely repeats the steps used when using an electric jigsaw.
In the sheet, you need to drill several holes in advance along a marked circle, in one of which you will then need to install a cutting element and make a cut. If there is a need for numerous slots, you can buy a special handle, which allows you to insert the blade and make the cutting process more convenient and simpler.
Note! When using the blade, extreme care should be taken to avoid injury. To avoid this, you can take certain precautions, for example, by wrapping several layers of electrical tape on one side or placing heat-shrink tubing over it.
Installation of socket boxes: how to install socket boxes in concrete and plasterboard
A socket is not only a mandatory functional element of electrical wiring, used to connect electrical household appliances, but also a significant interior detail.
The trouble-free operation of the outlet, as well as its neat appearance, depend to a large extent on how well the installation is done, right? To make the correct installation, it is necessary to take into account a number of nuances that are present in this work, one of which is the correct installation of socket boxes.
Have you never installed a socket box and are afraid of making mistakes? We will help you understand all the features - the article discusses in detail the types of installation boxes and the intricacies of installing each of them.
Attention is also paid to the installation of socket boxes in common types of bases - concrete, plasterboard, tiled wall. The material is supplemented with visual photos and useful videos.
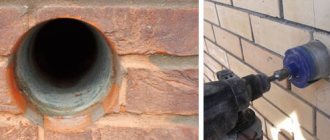
What is a crown
How to cut an even round hole in drywall of the required diameter? To do this, use a cylinder-shaped cutter with a serrated cutting edge on one side and a “tail” for attaching the cutter to the drill on the other. A drill is located in the center of this cylinder. This whole structure is called a plasterboard crown, or a core drill. How it works: the drill is the first to enter the drywall and sets the center of the future hole, while the nozzle is fixed in the desired position, the edge of the cutter enters the surface and makes a cut of the circle.
How to drill holes in the wall?
For drilling to great depths, for example for drilling through a wall, a drill is used. Drills for drilling brick and concrete walls are up to one meter long and are designed for drilling holes only with a hammer drill.
Interesting materials:
What's the funniest cartoon? What is a good men's deodorant? What does enterofuril taste like? Which nation is a small nation? What nationality is Hamali? What Internet do you need for a smart TV? What kind of rice is needed for crumbly pilaf? How much free storage does Gmail have? What is the engine size of the Zil 131? What ocean washes the Seychelles?
Concrete, brick, stone
You will need a drill with a carbide insert. The plate is welded at the end of the working area of the drill, made of an alloy of cobalt, tungsten carbide and a number of other elements, which together give it strength and abrasion resistance. The name of the alloy is “win”, firmly entrenched in everyday life and the technical environment.
When choosing a Pobedit drill in a store, you should pay attention to how smoothly the nozzle is welded. Often there are drills from nameless manufacturers with poor-quality alignment, which is easy to determine even by eye.
The process of drilling holes in concrete or stone is based on the crushing process, so a hammer drill is used as the main tool. An impact drill is suitable for brick. Depending on the selected tool, the type of drill shank is determined.
- SDS, SDS-plus - mount with a diameter of 10 mm and a part inserted into the chuck 40 mm for quick change of drill used in rotary hammers. Drill diameter 4–26 mm, length from 110 to 1000 mm.
- SDS-max - mount for large drills used with powerful hammer drills. Shank diameter 18 mm, used for concrete drills with a diameter over 20 mm.
For an impact drill, the shank is cylindrical. Drill diameter - 4–11 mm, length - up to 110 mm.
For drilling holes with a diameter of 4–10 mm and a depth of up to 100 mm for a dowel or anchor, drills with SDS-plus mounts or drills with a cylindrical shank are suitable.
For holes with a diameter of up to 42 mm and a depth of up to a meter or through holes for laying communications, pipes or connecting an air conditioner, drills with an SDS-plus, SDS-max shank are used.
When drilling deep holes with a diameter of over 10 mm, it is advisable to perform the work in two or three passes, selecting drills from smaller to larger diameters, the same applies to the length of the drill. First, short 110 mm drills are used, and then half a meter or meter drills are used to reduce the risk of damaging a larger drill and ensure a smooth edge at the hole.
To drill holes in a wall with a diameter of over 42 mm, crowns are used, for example, to install a socket box. This is a cutting tool with a ring cutting edge, often mounted on a cylindrical base with an SDS-plus, SDS-max shank. The cutting edge is formed by a series of teeth made of Victory alloy or coated with diamond.
Special drill attachment
You can make a round hole in drywall using a special drill attachment on a drill. This option can be considered the simplest and most convenient for independent implementation. To do this, you need to purchase crowns (round drill bits) from a specialized store that will correspond to the required dimensions. The element is clamped in the drill chuck, and the required holes are drilled using pre-applied markings. Such drills are most often sold in sets, so there should be no problems with selecting the right size.
One of the most convenient ways to make a hole in drywall is with a hole saw.