Brick has been around for thousands of years and its popularity has not waned. During this time, it was constantly transformed and changed. People love it so much that not only its properties are important to them, but also its appearance. Sometimes the beautiful appearance of brickwork is even more important than its properties. For these reasons, decorative brick-like plaster appeared. A special technique for applying the mortar and its further processing made it possible to create an imitation of brick. If you like the appearance of brickwork, then you don’t have to buy heavy and expensive bricks, because they can be replaced with decorative plaster.
Scope of application and benefits
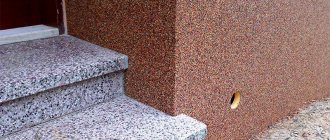
In fact, you can create a brick effect using decorative plaster wherever you want. However, this technology is rarely used for exterior decoration. In an apartment, imitation brickwork looks good on small areas of the wall. You should not imitate brick on all four walls of any room. But the corridor wall, finished in the form of brickwork, looks very impressive. The same can be said about the kitchen or hallway. The “brickwork” on the corners also looks interesting.
When talking about decorative brick plaster, we do not mean a special mixture from some eminent manufacturer, but a certain technique for performing the work. The chosen decorative plaster is also important in this process, but not as important as the technique of its application.
Imitation brickwork has the following advantages:
- Decorative plaster is an environmentally friendly material that does not contain harmful components.
- Creating a brick effect does not require special skills, high costs or a lot of time.
- Imitation of brick can be done by hand, which means that you do not need to look for a specialist and pay for his work.
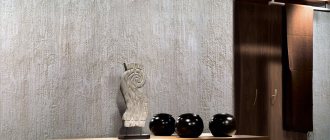
- The aesthetics of the finished coating is beyond doubt.
- "Brickwork" doesn't steal space. Unlike real brick, the mortar used is applied in a thin layer, so there will be no less space in the apartment.
Is it possible to plaster with Rotband?
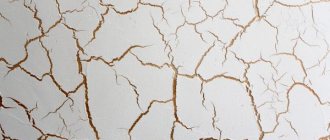
Experts answer this question categorically - no. Such protection will quickly turn yellow and crack. The basis of this plaster is gypsum, which goes into a semi-aqueous state when the temperature reaches 1300. Such a layer will simply fall off the wall.
Therefore, it is better to use a proven method of preparing a solution from clay and sand, even if it takes several days to prepare it, than to end up with cracked walls.
In general, the most worthy option is to line the stove with ceramic tiles, which will serve for a long time and reliably. The main thing is to choose a good glue or solution and do the job well.
But it all depends on the choice of the home master
It is important for us to answer the main question of the article - what mortar should I use to plaster the stove? The TOP 10 mixtures from leading manufacturers of heat-resistant plaster will help you solve the problem of choice
Preparation of the solution
Decorative plaster for brick is done using a solution that you need to prepare yourself. You, of course, can find a ready-made solution, but it is better for this purpose to buy dry mixtures and dilute them with water yourself. There are many different solutions that can be used to imitate brick.
You can use the simplest option - cement-sand mortar. However, this is not the best choice when it comes to decorative plaster. You can also choose a clay mortar or a lime-sand mixture. However, the best option you should choose is gypsum mortar. It is the most flexible of all the above options. It is also the easiest to work with, not to mention its aesthetic appearance.
The solution is mixed using a drill and a special attachment. You want a thick, lump-free texture. The kneading process itself should last at least 15 minutes. It is advisable to buy a mixture that already contains additives and plasticizers, which will make the solution more resistant to various types of influences.
Basic requirements for a stamp
In order for a polyurethane stamp for plaster to be released for sale, it must meet modern requirements for building materials and tools. These include the following:
- high resistance to alkaline solutions;
- resistance to abrasive wear;
- plastic;
- eliminating the possibility of rupture;
- multi-use;
- wide selection of preparations.
Round stamps
Such characteristics allow you to obtain high-quality results in the form of a clear pattern on the surface that can please the eye for a long time.
Tools used
We will look at the standard set of tools that will be required when creating a brick effect using gypsum plaster. For other plaster mixtures, the set of tools will be slightly different. We are interested in decorative brick-like plaster using gypsum mortar, as the most popular for such work. So, the list of tools:
- Putty knife
- Trowel
- Masking tape
- Wand
- Brush
- Roller
- Paint tray
- Level (ruler)
In addition to the tools, we will need the gypsum decorative plaster itself, an acrylic primer, as well as paint or color.
How to prepare a mixture for plastering stoves
The main materials for preparing stove plaster are clay and lime, the most popular solutions are lime-clay, lime-gypsum, cement-clay sand. To strengthen the plaster, some kind of reinforcing material is usually added to the solution: asbestos, fiberglass, straw, hemp. For some reason, salt is popular because it supposedly gives strength to plaster - but its usefulness has not been proven by anyone, so many craftsmen are skeptical about this method. On the other hand, the danger of asbestos to human health is widely known. In general, the question of the best reinforcing material still remains open.
Preparing the wall
When preparing a wall to create the effect of brickwork, we go through standard steps that are also typical for other decorative imitations. The first step is to remove everything unnecessary from the wall, be it old paint, wallpaper or loose plaster. The surface must be clean and durable. After this, it needs to be leveled. Decorative plaster to look like brick is only possible on a flat wall that is not beveled. Otherwise, our masonry will look crooked and not aesthetically pleasing. Level the wall with cement mortar, making it level. We don't need holes, humps or elevation changes.
If not the entire wall, but only part of it, is being treated as a brick, then you need to mark the wall to know where to apply the mortar. To do this, just draw a pattern with a pencil, and then cover the edges with masking tape. This will mark the end of the work area. The solution that gets on the edges of the markings will then be removed along with the tape.
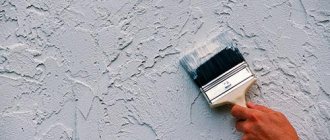
After the leveled wall has dried, it must be coated with an acrylic primer. The primer is applied with a foam roller. The primer serves as a fastening link between the wall and the decorative plaster. Thanks to it, the applied solution will hold firmly and cracks will not appear on it. The standard drying time for acrylic primer is 4 hours.
Stamp for brick-like plaster, polyurethane impression “Bristol”
Show wholesale prices
- +380950081116
- +380988908318 WhatsApp, Viber
- +380503308709 WhatsApp, Viber
- +37369693223 Roman Moldova, Chișinău
- +380950081116
- +380988908318 WhatsApp, Viber
- +380503308709 WhatsApp, Viber
- +37369693223 Roman Moldova, Chișinău
| Day | Working hours | Break |
| Monday | 09:00 — 18:00 | |
| Tuesday | 09:00 — 18:00 | |
| Wednesday | 09:00 — 18:00 | |
| Thursday | 09:00 — 18:00 | |
| Friday | 09:00 — 18:00 | |
| Saturday | Day off | |
| Sunday | Day off |
* Time specified for the region: Ukraine, Kyiv
Applying mortar and creating a brick effect
Immediately before applying the solution, you need to mix it (you can use a drill, you can use a trowel). Decorative brick plaster is done using a thick mortar. When applied to the wall, it should not slide down. The mortar can be pre-tinted to the desired color to better imitate brick. You can also apply the white mass and paint it after drying. The option of adding color to the wall depends on your desires and working technique (however, the seams should differ in color from the brick).
Do not immediately cover the entire wall with mortar. Gypsum plaster is very difficult to clean after drying, so all work is carried out before it is completely dry. Fortunately, when applying decorative plaster under brick, we create a texture in which the joints and transitions look natural. Therefore, at first it is better to work with areas not exceeding 1 m2 in area.
It is convenient to scoop up the solution with a trowel, transfer it to a spatula, and then onto the wall. Immediately level the material along the wall, making a flat surface. We don't need a perfectly smooth effect. The brick is not perfectly smooth, so the imitation should not be either. The thickness of the applied layer can be up to 2 cm, but should not be less than 0.5 cm. If the layer thickness is greater, then we will already have a three-dimensional texture, and if it is less, then it will not be possible to make normal gaps between the bricks.
Next, we create the bricks themselves by creating gaps between them. A stick is suitable for this. It draws horizontal lines, removing a layer of plaster. Then vertical lines are drawn, creating the effect of bricks. You need to understand in advance what size bricks you want to make so that they all come out the same.
It is advisable to draw lines under the level, under the ruler. However, you can do everything by eye, the main thing is that there are no strong bevels, and the last brick in the row is not half the size of the first. You can apply decorative plaster to match the brick perfectly evenly, or you can create the effect of chipped façade bricks. It all depends on your imagination. The main thing is to hurry before the plaster dries.
Process Features
So, when you have decided on the choice of plaster, and the necessary tools are already at the ready, all that remains is to start creating. However, in order to properly plaster the stove, you need to follow a certain technology and sequence of processing steps.
Surface preparation
Preparatory work is an important process that ensures the quality and durability of plastering. So that all your work does not turn out to be in vain, first of all, you need to perform the following actions:
- Remove old layers of cladding using a hammer and chisel, and then clean the surface of dirt and remaining substances with a brush.
- If the stove is new, you should also clean the masonry.
- Deepen all seams by 0.5–1 cm and remove dust from them.
- Prime the walls, including the seams.
It is very important not to start cladding a structure if it has just been built. You need to wait at least 3 months for the stove to “settle” and for the materials from which it consists to adapt to operating conditions
Preparing the mixture
The solution must be prepared after all the preparatory measures have been completed, otherwise the plaster may harden and become unusable.
Before mixing all the ingredients, the sand must be sifted and cleaned of foreign impurities. The same applies to clay - it is crushed and all debris in the form of particles of rocks and plants is removed. Next, the clay is soaked in water until the liquid covers it by 10–15 cm. On average, this process takes 2–3 days. When the base is ready, it is combined with the remaining components and stirred with a mixer. In some cases, it is permissible to add water, since the consistency of the finished solution should be similar to sour cream.
Warp finishing
Sometimes old age, damage or unscrupulous work of builders can cause distortions in the walls of the stove. You can fix this this way:
- focusing on the building level, set up beacons for alignment;
- heat the stove so that it is warm;
- moisten the slanting wall with a roller or brush;
- the surface is primed and left to dry;
- the first layer of plaster is applied using the “spray” method so that the mixture covers all the seams;
- after the first layer has dried, apply the second - it should protrude about 1 cm above the beacons. Start work from the bottom, leveling the rule every half meter of the layer;
- the wet solution is polished with grout;
- To level the corners, use a special corner spatula.
Application of mesh
The use of this mesh in cladding allows not only to level and hide surface defects, but also makes the plaster coating more uniform and durable. To plaster the stove, you need:
- install the mesh near the work surface at a distance of no more than 2.5 cm;
- “spray” apply the plaster and wait for it to harden;
- cover everything with the next leveling layer;
- rub out;
- decorate.
Light plaster
The need for such work usually arises if the stove has no obvious defects or distortions, but needs cosmetic repairs. Plaster it like this:
- guide elements are fixed on a previously prepared surface so that the coating is uniform;
- apply the solution from bottom to top with a wide spatula, which is immediately leveled using the rule;
- the corners of the structure are plastered with an angle spatula;
- the result is neatly erased.
The final stage of finishing
Once you have applied the mortar to the entire wall and created an imitation of brickwork, it's time to move on to the next step. When the plaster is completely dry, you need to sand it with sandpaper. This will allow you to remove everything unnecessary that stands out above the texture. This polishing will also make the bricks more beautiful. Moreover, the wall will become smooth to the touch, although outwardly it will seem different. Don’t forget to then walk with a damp cloth over the entire surface of the wall to collect small grains of dust.
If decorative brick plaster was done without preliminary tinting, then you will need to paint the wall now. You can go two ways: paint over the bricks with seams or paint them separately. Some people prefer to paint over the entire wall with seams and stop there. This work is done using a roller and does not take much time. You can take a more complicated path - paint each brick separately, without touching the seams. In this case, a paint brush is used. Moreover, the seams will also have to be painted over, but with a different paint.
For such work, it is optimal to use acrylic paint. If you apply two layers of paint (after the first layer, the second is applied immediately), then the appearance of the brickwork will be much more natural. The color of the bricks will not be uniform. Of course, in this case you need paint of different tones. The seams themselves must be painted a darker color than the bricks themselves.
Painting is not always the final stage of decorative plaster for brick. The fact is that for greater strength and durability of the coating, it is often treated with varnish or wax. This additional protection allows you to wash the coating and not be afraid that it will become dirty. In this case, a protective layer is applied using a foam sponge.
The need to plaster the stove
A stove without external decoration has a number of negative qualities:
- The appearance of the structure cannot be called pleasant;
- Dust and various debris gradually accumulate in the gaps of the brickwork;
- The oven is very difficult to clean;
- A working stove emits a rather unpleasant odor;
- Through microcracks present in insufficiently high-quality masonry, smoke and carbon dioxide will leak into the room - a mixture quite harmful to human health.
Furnace finishing is used to level out these problems. The choice of finishing materials is purely individual - tiles, concrete coating or a suitable plaster mixture for the stove will be equally effective. However, preference is often given to plaster - it is much cheaper.
To decide how to plaster the stove in the house, you need to choose a finishing coating, which can be made of:
- Evenly laid ordinary brick;
- Facing brick.
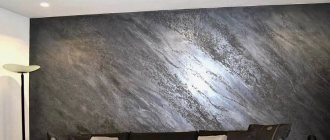
Both materials, with proper quality of work and competently carried out jointing, make it possible to achieve a good appearance of the stove even without plaster. To enhance the visual quality of the structure, you can use a water-based varnish that creates the effect of wet stone. All this will prevent peeling of the plaster, which sometimes occurs over time.
The situation is much more complicated with an existing stove, especially if it is laid out crookedly and from uneven bricks. In this case, you will have to decide very carefully what is the best way to plaster the stove, because a mistake will certainly lead to cracking of the coating.
Before plastering a Russian stove, you need to understand the main reasons for peeling of the coating, which come down to the following list:
- Incorrect choice of thickness of masonry joints;
- Violations of the furnace order;
- Regular overheating of the oven.
To prevent these problems, you can use a reinforcing metal mesh with a cell size of no more than 1 centimeter. This mesh is laid on top of the stove and attached to it with 3 mm wire, which is inserted into each row of brickwork during the construction of the structure.
Using tape to create a brick effect
Not everyone may like to use a stick, a thick pin, or other tools to make dividing strips on bricks. There is an easier and more accurate way. For this we will need regular masking tape.
Before applying plaster, mark the wall. We just draw straight horizontal lines with a pencil, and then vertical ones. Vertical lines are drawn in such a way as to form a brickwork pattern. Next, we paste horizontal strips of tape along the markings along the entire length. Place vertical pieces of tape on top. The order should be exactly such that it would be easier to remove everything later.
Keep in mind that the thickness of the tape is the thickness of the seam, and it is clearly greater than the line drawn with a pencil. When the tape is pasted, decorative plaster is simply applied under the brick, as described above. Only the seams are made not with a stick, but by removing the tape. It must be removed after the solution has dried a little. If you do it too early, you can remove a lot of solution; if you do it too late, then nothing will be removed.
If the tape doesn't come off well, you can help yourself with a wallpaper knife. After creating the bricks, you may need to trim the design a little. Further, the entire procedure is the same as described above.