Installing a floor in a bathroom is one of the most important and difficult stages in a renovation. The presence of numerous communication pipes and high humidity make the task more time-consuming and responsible. In the bathroom, you need to install the drain correctly, this will prevent the appearance of mold, as well as fungal plaque. The floor level in the bathroom must be done exactly down to the smallest detail. To properly perform this difficult work, you need to choose the right composition of materials and tools for repair, as well as strictly follow the instructions and recommendations. Usually the process begins with the question of how to level the floor in the bathroom, because this is the initial task; the quality of the final result largely depends on the success of this enterprise.
Flooring in the bathroom
The problem with laying flooring in a bathroom is as follows:
- it is necessary to take care of pipelines that occupy a certain space in the floor structure;
- take into account high humidity in the room, which special building materials will help combat.
If the installation work is carried out independently, then it is important to achieve the durability and aesthetics of the coating, so that in the photo or during a visual inspection of the floor there is no doubt about the quality of the work performed.
Features of flooring in the bathroom
Most often, the bathroom floor design has a traditional structure. Its variations arise due to the fact that a variety of finishing coatings are used. In fact, the floor in the bathroom is a multi-layer “pie”, where the quality of each layer forms the highest characteristics of the entire coating. It is also worth knowing how to make a threshold in the bathroom correctly.
If the owner is thinking about which floors are best to install in the bathroom, then it is worth knowing that in any case, installation will be done in a certain sequence.
The installation order is approximately as follows:
- concrete floor slab;
- bitumen waterproofing layer or any other;
- cement-sand screed about 5 centimeters thick;
- an additional waterproofing layer of special lubricant or paint;
- finishing surface screed using one of the popular methods;
- flooring (suitable for a bathroom).
You can also install a heated floor system, create a water drain, or radically change the location of the plumbing, but you should decide on this in advance, since such types of installation are carried out in parallel with the application of the finishing screed (more details: “How to make a heated floor in the bathroom with your own hands”)
.
DIY bathroom floor
If the work is carried out without the participation of specialists, then you should be patient, since this process is not the easiest and takes a lot of time. It is very important to follow technology at every stage, as well as follow practical advice from professionals. Strength and long service life of the floor can only be achieved if the materials for each layer are of high quality and laid with absolute precision.
After laying each layer, you must wait until it dries and hardens. More detailed information about exactly how long you will have to wait is available on the packaging of many of the materials used. Next, we’ll look at a detailed algorithm on how to properly lay the floor in a bathroom with your own hands and do it no worse than the experts.
Primary requirements
Before you start choosing the final coating, you need to find out the quality of the base on which the entire cake will be mounted, including screed and waterproofing.
It is also important to decide which systems you plan to use for heating.
What requirements must materials for floor repairs meet:
- environmental friendliness;
- safety;
- durability;
- simple maintenance;
- simple installation process;
- high-quality insulation;
- resistance to mechanical stress, aggressive environments and temperature conditions;
- beauty.
It’s quite easy to do all the steps yourself if you strictly adhere to the technological process, rationally select materials and take into account their combination.
Preparatory stage
Before deciding what to lay on the floor in the bathroom and how much it will cost, you should understand that it is impossible to do without carefully preparing the base for the construction of a floor structure. There are two main areas of work that arise depending on the condition of the floor at the time of repair: newly built or already inhabited living space.
If the bathroom floor has already been finished, work will be required to dismantle the existing coating. Then a screed is poured onto the cleaned base (more details: “How to make a screed in the bathroom - types and methods of arrangement”).
The most popular facing materials are tiles and mosaics for the floor. To remove it, you will need a hammer drill, which will break the ceramics, but the previously created screed will also be subject to deformation. It is recommended not to try to restore the screed, but simply remove it. If the owner decides to replace the floor, then, most likely, the apartment was rebuilt in the 20th or early 21st centuries, which does not reflect the best quality of the work performed at that time.
If the floor covering in the bathroom is not tiled, then the dismantling process looks slightly different:
- linoleum can simply be torn off by first prying the edge of the sheet with a sharp object;
- the boardwalk should be sawed down on one side of the room, and then manually or using a crowbar, remove the remaining boards, etc.
As for work on the subfloor, everything is much simpler. Initially, the surface should be cleaned of dust, dirt and construction debris. It is best to vacuum the base after thoroughly cleaning it. Any gaps should be sealed using tile adhesive, as such cavities tend to increase over time. As soon as the mixture poured into the cracks dries, you can move on to the next stage.
Floor arrangement
The technology for installing a floor using the wet screed method with simultaneous waterproofing and insulation consists of several steps, which are shown in the diagram:
Stages of arranging a bathroom floor.
I will try to describe each of these stages in as much detail as possible.
Step 1 - Preparation
So, it all starts with surface preparation. The strength and durability of the screed largely depends on how well the work is done at this stage.
I work according to the following scheme:
- I am dismantling the old decorative covering. In the case described here we are talking about ceramic tiles.
- The tiles are easy to knock down with a chisel and a hammer drill. But you need to remove not only the material itself, but also the glue on which it was glued. At the end you should be left with only a clean floor slab without traces of other building materials.
- It must be said (since there were precedents) that old tiles and tiles cannot be thrown into public trash cans; separate transport must be hired for removal.
Removing tiles using a hammer drill.
- I repair defects in the slab surface. Since the house was built quite a long time ago, and during dismantling the slab could have received some damage, it is necessary to eliminate all cracks, chips and bumps before waterproofing is carried out. The sequence of actions and technology depends on the nature of the defect:
- Protrusions and bumps must be knocked down with a hammer drill, otherwise difficulties will arise in coating the floor with bitumen mastic for waterproofing.
- I recommend widening small cracks a little by cutting them with a diamond wheel on a grinder, and then filling them with polyurethane foam. The remaining material after hardening can be cut off flush with the surface of the slab with a sharp blade.
Sealing cracks with foam.
- Large cracks must be sealed with cement mortar. To do this, use a chisel to knock down the edges of the recess so that there are no pieces of crumbling concrete. Then the surface is coated with a primer and, after it dries, filled with a solution.
- If slab reinforcement is found in any place, it must be cleaned of traces of corrosion before sealing with mortar.
The reinforcement should not protrude from the floor slab.
- I hit the zero mark (leveling the base). The point is to draw a line along the entire perimeter of the bathroom walls, which will be located absolutely horizontally. This will serve as a guide for aligning the screed. This is done as follows:
- A mark is made on the wall at a height of about 30-40 cm from the floor with a marker.
- After this, using a water level attached to the notch, a horizontal line is drawn. And so on along all the walls of the plumbing room.
- You can use a laser level. In this case, the device will project a red line onto all surfaces and you will only have to draw a line on the walls. By the way, a laser level also helps a lot when installing beacons, so I advise you to rent it while the work is being done.
A horizontal line on a wall projected by a laser.
- Ground surface. I immediately bought a primer with antiseptic properties, so I will not perform a fungicidal treatment of the floor slab. If you have a regular primer, then you need to pre-treat the surface with an antiseptic to destroy any mold and mildew present there and prevent their occurrence in the future. I acted as follows:
- Cleaned the surface of debris and small stones. This is especially important if you use a film or something like roofing material for waterproofing. Sharp objects can break the seal of the waterproof layer.
- I removed dust from the surface by vacuuming the base with a vacuum cleaner.
- I primed the surface of the slab with Dufa primer in one layer. A brush or roller is great for this.
- After the first layer had dried, I re-primed the surface to ensure better adhesion of the bitumen mastic to the base.
Prime the floor using a roller.
After the primer has completely dried, you can move on to the next stage of work.
Step 2 - Waterproofing
As I already said, bitumen mastic will be used as waterproofing. It can be applied with a brush. If your composition is thick, you can spread it with a spatula. As for membrane materials, you can read about methods of working with them in my other articles on this site.
I proceed as follows.
- Applying the first layer of mastic to the concrete surface.Features of the work are as follows:
- It is necessary to smear the material with a brush so that the strokes are located in the same direction.
- Make sure that there are no areas that have not been treated.
- The composition should cover the surface with a layer of approximately the same thickness. In my case - about 1-2 mm, but it all depends on the consistency of the waterproofing (the thicker, the thicker each layer).
- You need to cover not only the floor, but also the walls to a height of about 20 cm. You should get some kind of bath that prevents moisture from seeping down into the interfloor slab.
Waterproofing the floor with bitumen mastic.
- I glue waterproofing tape. It is glued to mastic at the junction of the floor slab and wall slab. During operation, the building gradually shrinks and in this place parts may shift relative to each other, which breaks the waterproofing layer. The elastic tape will not tear, maintaining the tightness of the membrane.
Gluing waterproofing tape.
- I apply a second layer of mastic. You need to proceed in the same way as described in point 1, but place the strokes perpendicular to the previous layer. You also need to completely cover the elastic tape with mastic so that it appears inside two layers of bitumen waterproofing.
- I glue the damper tape. It is necessary to compensate for the thermal expansion of the screed. It is especially important to use it when you are going to make heated floors. It should rise 1-2 cm above the level to which the screed will reach after finishing the pouring.
Installation of compensating tape.
There has long been a debate among experts about where waterproofing should be installed - under or above the screed. Both options have a right to exist, but in this case I decided to do as I described above. Other options are described in articles on this site.
In the meantime, you can move on to thermal insulation.
Step 3 - Insulation
As you already understand, for insulation I will use extruded polystyrene foam (penoplex). Although its price is quite high, it is entirely justified by its high performance characteristics. The main thing is that it does not allow water to pass through (the water absorption coefficient is no more than 1% of the volume) and has sufficient strength (compressive strength at 10% deformation is at least 0.5 MPa).
As an alternative, I can recommend regular polystyrene foam or mineral wool.
So, the floor in the bathroom is insulated as follows:
- I'm laying the first layer of slabs. This process will not cause you any difficulties, I will only focus on some small nuances:
- There is no need to glue the slabs to the floor surface. They will be firmly held in place by a layer of cement screed.
- The plates fit tightly together due to the fact that the end of the insulation has a special L-shaped protrusion, which eliminates the appearance of cold bridges.
- It is better to place the seams of adjacent rows staggered, staggered, with an offset of at least 20 cm.
Laying the first layer of insulation on the prepared base.
- I lay the second layer of penoplex. In principle, this is not necessary. But in my case, the apartment is located above the basement, so for reliability, the owner decided to use two layers. The exact thickness of the insulation in each specific case can be calculated by a heating engineer. Be sure to ensure that the seams of the first and second rows of penoplex are not on top of each other.
Two-layer insulation using penoplex.
- If necessary, I trim the slabs. This is done using a knife or file with small teeth. Thanks to its dense structure, the insulation does not crumble during processing. This is another quality for which I like him.
Penoplex is easily cut with a sharp knife.
There is no need to seal the seams between the foam sheets with polyurethane foam. The special shape of the edges of the material will not allow cold to penetrate inside and thermal energy to escape outside, reducing the efficiency of the insulating layer.
Now you can move on to the next step.
Step 4 - Reinforcement
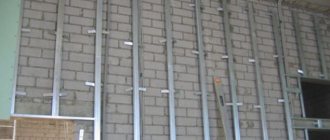
In order for the base of the floor to be sufficiently strong and level, it is necessary to install a reinforcing mesh, as well as beacons, which in the future will serve as a guide for leveling the mortar.
I work like this:
- I install reinforcing mesh. It should not just lie on the penoplex, but rise slightly above it. To install it, I will use plastic legs. The scheme is like this:
- A mesh is laid out on the surface of the insulation so that an overlap of 10 cm (the size of one cell) is formed between the individual sheets.
- Individual sheets of mesh are connected to each other using metal wire.
- The legs are placed under the net at a distance of approximately 20-30 cm from each other. There are special cross-shaped cutouts that make work easier.
The photo shows a reinforcing mesh installed on special legs.
General diagram of the installation of reinforcing mesh and beacons on legs.
- I install beacons for subsequent alignment of the screed. To do this, I will use special perforated corners and legs with threaded screws that are screwed into the foam. The scheme is like this:
- The first beacon is installed at a distance of 5-10 cm from the wall. It must be set strictly horizontally. To do this, you need to turn on the laser level and apply a tape measure to the surface of the beacon. The red laser mark must be at the same height along the entire length of the beacon.
- After this, a beacon is installed in the same way against the opposite wall. Leveling is also done using a laser level, although you can replace it with a water level.
- After this, white strings are stretched between the two beacons, which will become a guide for aligning other beacons. The distance between adjacent parts is about a meter, but no longer than the aluminum rule you use.
Beacons on penoplex (in the photo, alabaster mortar was used for their installation).
Having finished installing the beacons, you can proceed directly to pouring the screed.
Step 5 - Pouring the solution
In this section I will tell you about the main stage of the work. The scheme is as follows:
- Preparing a screed solution from a dry mixture. It, as I already said, can be replaced with a mixture of cement and sand, but I do not recommend doing this, since the quality of the screed will deteriorate. The solution should be prepared as follows:
- Pour a strictly defined amount of water into a clean bucket or basin, indicated on the label of the package with dry powder (usually 5-6 liters).
- After this, with a mixer inserted into a low-speed drill, you need to stir the powder until smooth.
- Then you should take a 5-minute technological pause, during which the plasticizers, modifiers and other additives included in the solution will interact.
- At the end, you need to mix the solution again. Its consistency should resemble rich sour cream.
- You need to prepare such an amount of solution that you can use within about 40 minutes. After this time, the liquid screed begins to lose its characteristics and partially sets.
Mixing the screed mortar using a mixer.
- I fill the space between two adjacent lighthouses with the resulting composition. The solution can be applied with a trowel or shovel. The layer should be such that it rises above the surface of the beacons to a height of about 2 cm. Subsequently, the excess will be used for leveling.
Filling the space between the beacons with mortar.
- I level the mixture using an aluminum rule. To do this, the tool must be placed against the wall (or on an already leveled area), and then, moving towards you, level the mixture in the space between the beacons so that it fills the entire gap. Minor defects, if necessary, are repaired using a trowel.
Leveling the screed using the rule (the photo shows floor heating pipes, which I will talk about another time).
- I level the screed areas. Those areas of the floor that are located near walls and architectural elements (protrusions, boxes, niches, columns) need to be leveled with a regular trowel or float. As a rule, it will be difficult to operate in these places.
Leveling the screed with a plaster float (the damper tape is visible in the photo).
- I leave the screed to dry. To avoid cracking, it is important to ensure that the screed is properly dehydrated. If the work is carried out in summer in hot weather, then the floor surface can be covered with plastic film or moistened several times with water using a sprayer. The approximate pre-setting time is several days, complete drying takes up to 3-4 weeks.
Screed in the bathroom in the process of drying.
The next stage of work is required only for floors that will subsequently experience significant loads or be decorated with thin and elastic decorative compounds (for example, polymer self-leveling flooring).
However, I still advise you to resort to it in all cases, since as a result you get a smooth and durable subfloor surface, suitable for further decorative finishing.
Step 6 - Grouting the Surface
As you may have guessed, we are talking about grouting the surface. You need to resort to it after the screed has set. You need to stand on the floor and if the sole of the shoe sinks no more than 3 mm, you can start grouting. This usually happens 3-7 hours after pouring the mixture.
It is better to work using a special blade machine, which is shown in the figure below.
Blade machine for grouting concrete screed.
But no one forbids, of course, doing this manually using a grater. The scheme is like this.
- I spread the topping over the floor surface. You need to scatter two-thirds of the total amount of powder so that it evenly covers the entire bathroom floor. After this, wait until it gets wet (the powder will change color to a darker one), and then start grouting.
- I rub the surface in the corners. In places where the screed adjoins walls, columns, ledges and other architectural elements, it dries faster. Therefore, you need to start work from these areas of the floor.
Grouting the floor near the walls.
- I rub the screed over the entire surface. After processing the corners and areas near the walls, the entire surface of the concrete is rubbed in the same way. After finishing the work, the screed will gain strength to such an extent that the sole of a person’s shoe of average build will sink into the floor to a depth of no more than 1 mm.
- I rub the screed with a second layer. To do this, use the remaining topping, which is crumbled and rubbed in using the same grater or “fan” in the same way as described in the previous paragraphs.
Grouting the second layer of topping.
- I impregnate the concrete with a dust-removing compound. You can use, for example, Ashford Formula. It has a consistency similar to water and is applied using a sprayer, saturating the screed to a depth of 4 mm.
After finishing the grouting and hardening of the surface, the screed is ready for decorative finishing. By the way, you can add another layer of waterproofing on top, preventing the layered insulated screed from getting wet during use of the bathroom.
Step 7 - Surface Decoration
Now you know how to level the floor in the bathroom. It remains to decide what to lay as a decorative covering. I have written about this more than once on this site. You can stick to the classics - tiles or use cheaper options - laminate or linoleum.
And if you want something unique, then the strength of the screed allows you to do it. I have seen cork and glass floors, teak surfaces and so on. It all depends only on your imagination and financial capabilities.
Glass floor.
Waterproofing layer
Before you start laying your bathroom floor yourself, it is very important to prime the base. You can apply the primer in several layers. To apply each layer you will have to wait until the previous one dries. After completing this procedure, you can begin laying waterproofing.
Existing types of waterproofing:
- built-up – designed for application to concrete floor slabs. Apply approximately 25 cm onto the walls. Allows you to pour a concrete floor on top, onto which it is recommended to apply another waterproofing layer of the same or more modern type;
- roll - copes well with protecting walls in those places where they come into contact with the shower or bathtub;
- painting - has a short service life (3-5 years), but is very easy to apply. Using a brush or roller you can cover even the largest areas very quickly. The layer is represented by an ordinary solution like a paint and varnish material, which is applied to the concrete base with a slight approach to the walls (10 centimeters);
- coating - has the best characteristics and the longest service life.
If you need to decide how to cover the floor in the bathroom and there are no financial restrictions, then it will be more effective to use coating waterproofing.
It is performed according to the following algorithm:
- it is necessary to add the dry prepared mixture to the water and mix thoroughly. The proportions of water and powder should be 1:1. It is best to mix using a power tool: a construction mixer, a drill with a special attachment, etc. The mixture that looks like a homogeneous mass without lumps can be considered ready;
- the resulting mixture should be applied to the entire surface of the base using a roller or brush, and hard-to-reach areas are best treated with a spatula. The layer thickness can be calculated based on the permissible consumption per square meter. This parameter is indicated on the package with the dry mixture;
- joints between the floor and walls must be taped with waterproofing tape;
- A supply of waterproofing of 10-15 centimeters is also applied on top of the tape directly on top of the tape. Thus, the waterproofing layer will take the shape of a “trough” and will reliably protect even the weakest areas from leakage. If all recommendations are followed, then not only the owner, but also his neighbors will be satisfied with the absence of leaks;
- the composition should be applied in two layers with a time difference of 4-6 hours;
- As soon as the coating is completely dry, you can proceed to the next stage.
Structural changes in the room
After waterproofing, you can begin pouring the leveling screed, but it is at this stage that you should think about whether the owner has any significant wishes regarding adding functional parts to the bathroom. After creating the screed, it will no longer be possible to return to the previous floor level in the bathroom and carry out work there.
We are talking about the installation of the following systems:
- warm floor;
- water drain;
- moving the toilet, etc.
Let's consider the features of installing such systems:
- heated floors are especially relevant in the bathroom, since in conditions of high air humidity this room also warms up very little. The floors in the bathroom will always be cold and this problem cannot be solved without heating. You can install two types of underfloor heating: electric and water. Moreover, the electric option is absolutely safe, despite the high humidity and active use of liquid in the room. Choosing between two varieties is purely for economic reasons, since in the first case, work will require the consumption of electrical energy, and a water-heated floor can easily be connected to the heating system of the entire house or apartment;
- A water drain is a useful way of laying bathroom floors where the flooring is positioned at an angle to a specific point in the room where the drain is located. In this case, any liquid spilled on the floor or that gets there during the flooding process will flow straight into the sewer. However, it is worth understanding that the floor level must be at least 10 centimeters higher. The pipe going into the sewer must constantly protrude above the layer being laid, and so that it does not become clogged with construction waste, it can be clogged;
- If you are thinking about moving the toilet, you will also need to make significant changes to the structure of the floor. The toilet must be connected to the sewer pipe in such a way that the drain channel enters it at an angle. There are two ways to hide the drain: raise the floor level or build an individual pedestal for the toilet.
It is also very important to protect your own home from flooding. To do this, it is very important to make the floor level in the bathroom and the hallway different so that water cannot spread into other rooms. Naturally, this will not save you from complete flooding, but it will stop the water for a certain time.
Naturally, any types of communications must also be installed before the leveling screed is poured.
Laying tiles - a classic of the genre
Recommendation. Before installation, tiles that have been unpacked and checked for defects must be laid out over the floor area without gluing. This procedure will help you find the optimal place to start work and eliminate the location of cut fragments at the entrance.
Any tile on the bathroom floor is laid according to a single pattern. The performer will need a standard set of tools and devices, including a level, a container for adhesive solution, plastic crosses, a trowel and a special spatula equipped with teeth, the size of which depends on the size of the elements and the degree of unevenness of the floor.
A spatula with teeth, the size of which depends on the degree of unevenness of the floor and the dimensions of the tiles
In order not to buy excess tiles and not to suddenly buy additional material that runs out during the work process, study the rules for calculating the required amount of tiles: .
The technological sequence of the process of laying floor tiles includes:
- determining the most appropriate direction of the rows, choosing a rational location of the starting point;
- preparation of the adhesive solution, carried out according to the instructions attached to the material;
Important. After the first batch, the adhesive composition needs to sit for approximately 10 minutes. Then secondary mixing is carried out, which is required to obtain a homogeneous mass. Excessively liquid consistency of the glue (signaled by spreading grooves) is corrected by adding a dry mixture to the solution and then kneading.
- applying the adhesive composition to the surface, the glue must be evenly distributed over an area of 1 m² with a notched trowel; it is not recommended to apply the adhesive solution over a large area, since the composition hardens quickly;
You should know. The adhesive solution can be directly applied to the tile if the contractor considers that this method is more convenient and economical.
The use of plastic spacer crosses will ensure that the direction is followed and the formation of beautiful, even seams
- to ensure the identity of all butt seams, spaced plastic crosses are used; they are placed at the cross intersections of the rows of tiles between four adjacent elements;
Important. Excess binder material must be removed immediately so that hardened stains and sagging do not spoil the aesthetic properties.
- gluing of the cut elements is carried out after laying the main mass; they are placed in areas least susceptible to dynamic loads and in areas that are not “conspicuous”;
- Filling the joints with grouting compounds is carried out no earlier than one day after gluing the tiles; the grout is applied with a rubber spatula.
Important. Before laying tiles over the “warm floor” system, the heating equipment must be turned off and not turned on until the consumables used have completely hardened.
Filling the screed
The quality of laying the flooring depends on how smooth the base is. It is important to carry out filling work without deviating from the technology, since any violation may appear later during operation. The simplest leveling method is to pour a cement-sand screed. An alternative option is a self-leveling mixture, but it is not suitable for floors with large uneven surfaces. It is best used as a finishing coat.
Concrete screed is carried out as follows:
- Along the perimeter of the room on the walls it is necessary to mark the horizon line at the level of which the screed will be poured. You can use a laser or liquid construction level for marking;
- For high-quality leveling deep into the room, it is worth installing beacon marks, securing them to small slides of the same solution that will be used for the screed, but with the addition of alabaster. The upper part of the lighthouse should correspond in level to the horizon line;
- the solution is mixed using a drill with a special attachment;
- The solution is poured clearly along the horizon line and the level of the beacons. To avoid difficulties, it is best to install beacons with an interval of 1 meter;
- It is necessary to level the flooded areas using the rule - slats 20-30 centimeters larger than the distance between adjacent beacons. By stretching a perfectly flat strip over the surface, you can evenly distribute the mixture over all cracks and dents;
- the screed must be completely dry. To do this, it is necessary to maintain the temperature regime in the room and avoid drafts for a certain time. In the case of a cement coating, you will have to wait about a month.
If a heated floor is being installed, the screed is poured in two layers. After pouring the first layer, you should wait until it dries. Then you need to lay the thermal insulation layer and heating elements of the system. A second layer of mortar must be poured on top of the laid structure.
Types of mixtures for floor screed
As a rule, leveling mortars for floors are made from gypsum or cement. The latter are preferable for bathrooms and bathrooms. Pouring mixtures are produced in special paper bags with a polyethylene backing. It protects the material from moisture penetration.
Mixture for dry floor screed
Water should not be allowed to get into the packaging, since damp solutions are absolutely unsuitable for creating a strong and even screed.
It is also important to check the expiration date of products. Each mixture is designed for a specific period of use. Stale material can deteriorate the quality of the finished floor mortar.
Manufacturers often include various modifying components in leveling mixtures. Such additives can make the coating better and also make the finished solution more flexible, which is important in the repair process.
For example, special synthetic fibers reduce the likelihood of cracking when the screed hardens. A screed made from a solution with such substances can even be used as a finishing floor covering.
The following types of mixtures are distinguished:
- Leveling.
- Self-leveling.
Self-leveling floor screed
The first type of solution is used as external surface finishing. They allow you to get rid of defects and protrusions of the coating. The mixture must be applied in a thick layer, which makes it possible to ultimately obtain a smooth base.
The screed itself is also classified in a certain way according to the property and condition of the material:
- Dry screeds.
- Semi-dry.
- Wet.
So, wet screed is considered the easiest to perform. It consists of concrete and sand. The composition prepared in this way is poured onto the subfloor and distributed over its surface.
Pouring the mixture for the screed
However, this fill takes a long time to dry.
A wet screed is made on thermal insulation or waterproofing material. The heat-insulating layer is used for finishing in country houses and apartments on the first floors of buildings. A wet screed with two leveling layers is also used. This option is necessary if you plan to finish it with linoleum or parquet. The so-called knitted screed is suitable for residential premises.
Semi-dry screed also includes sand and cement. However, unlike wet pouring, plasticizers and other components are added to these mixtures. Thanks to the presence of these additives, the semi-dry screed dries faster and with its help you can easily level the base, removing all the bumps and protrusions.
Leveling the base with a semi-dry mixture
In addition, mixing such a solution will require less water. This will make the floor structure lighter and stronger.
The dry type of screed is a composite product of several layers. Crushed stone or expanded clay is placed at the lower level, and gypsum fiber is placed on top. Laying such a floor is not difficult, and there is not much dirt left behind. However, dry finishing of the base has a significant drawback: it is not able to withstand heavy loads.
Bathroom Flooring Options
Let's consider how to cover the floor in the bathroom other than tiles, so that its operation does not cause discomfort due to non-standard conditions in the room. Naturally, the choice must be based on personal preferences, finances and the operating characteristics of a particular material.
It is worth noting the most common materials:
- cork is a warm material with a pleasant to the touch structure. It does not rot, is springy, resists moisture well, and also has protection against the formation of fungi and the proliferation of various bacteria. This coating is natural and will delight owners, as it is absolutely safe for human health. If you decide to buy just such a coating, then it is recommended to use a cork array with a thickness of 4 to 6 millimeters, which is fixed to the base;
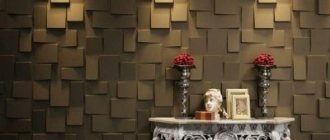
- It was already mentioned above that it is more effective than finishing the bathroom floor with one of the facing materials, pouring the floor using self-leveling floor technology. Its popularity is not yet as great as that of ceramic tiles, but the design inspires many owners. This coating can be considered problematic at the pouring stage, since the mixture is highly flammable. The variety of shades and patterns is such that any owner will find something to show off to guests or in photos on social networks;
- wooden floors in sanitary facilities are very rare, but if you use a moisture-resistant laminate, then it is quite possible that such a coating will last quite a long time. Externally, a wooden floor in a bathroom, of course, looks very aesthetically pleasing;
- A cheap material with good performance is linoleum, but it wears out very quickly and its presentability decreases. Typically, linoleum is used as a temporary covering or in the absence of funds to purchase a more reliable and durable material.