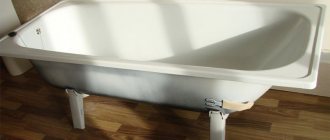
An acrylic bathtub is a structure that requires reliable, rigid support, as it has thin, plastic walls. There are several ways to install it, but the most reliable and practical is a metal frame. Sometimes a combined fastening method is used. If the bottom is thin and bends underfoot, the frame is combined with brickwork that supports the bottom. How to install an acrylic bathtub with your own hands is detailed in this article.
Required Tools
At the first stage of installing the structure, you should prepare all the necessary fixtures and tools, namely:
- a hammer drill with a drill of the required cross-section and length - for making holes in the wall;
- screwdriver - for tightening fasteners when assembling the structure; in addition, it can be used to drill holes in the bathtub itself, if necessary;
- an open-end wrench of the appropriate size - to adjust the height of the legs of the bathroom frame;
- construction corner - inspect corners;
- roulette;
- building level - to level the structure horizontally;
- pencil or construction marker - for marking.
It is also worth taking care of additional consumables in advance: sealing tape or a plumbing corner - to seal the joints between the wall and the bathroom. But you can also use simple silicone sealant if the walls in the room are perfectly smooth.
Pros of why consumers choose cast iron
- The first and perhaps main reason is durability. The mechanical strength of the material used plus the chemical resistance of the enamel to almost all types of cleaning agents make this choice attractive. If treated with care, a cast iron bathtub will last as long as you want.
- The second reason is that the low thermal conductivity of cast iron and its high heat capacity keep water poured into a cast iron bathtub hot for a long time. Thick walls accumulate the heat of hot water and then gradually release it back, allowing the bather to soak longer.
- The enamel used to coat cast iron is highly durable, smooth, its colors are rich and bright, the enameled surface is shiny and gives the structure an overall elegant look. The absence of pores on the enamel surface makes it easier to remove dirt.
- Another distinctive feature of cast iron bathtubs is their large mass. Even the most modern lightweight models weigh at least 100 kg. This is not always convenient, but such a large weight also has positive aspects - cast iron bathtubs are extremely stable and usually do not require any additional strengthening measures during installation. In addition, thick walls muffle the sounds of flowing water, without requiring additional sound insulation.
Advantages over mounting on legs - which method is better?
Let's start with the fact that all manufacturers of this product recommend using specialized frame-shaped frames during installation, on which acrylic bathtubs are installed.
This design 100% evenly distributes the load on the bowl exerted by water and the weight of a person, preventing breakage and sagging of the body. At the moment, all manufacturers produce serial frames designed for specific models - there are no universal ones.
What is a frame? The frame itself is a structure made of a square profiled pipe, which is coated with a special powder composition, which prevents its corrosion in a damp room.
The skeleton consists of special stiffening ribs, supports for each corner of the bathtub and legs that can be adjusted by twisting. Despite the fact that high-strength fibers are used in the production of acrylic bathtubs, it is impossible to install the structure reliably without a rigid frame.
Frame advantages:
- uniform distribution of load on the structure;
- the bottom of the bathtub does not “play” under your feet;
- reliable and durable installation;
- when mounted on a frame, fastening to the wall plays a purely symbolic function - so that the bath does not tip over. But such incidents do not happen in practice.
Flaws:
- are expensive;
- complicate installation.
As we see, the advantages of the frame are obvious.
As for the legs, their main advantage is considered to be only their low cost. The design is flimsy and unreliable - two crossbars are attached to the bottom of the bathtub on different sides, and then the legs are screwed to them. Assembling and installing an acrylic bathtub on legs is not difficult, but you should understand that if the bottom of the bowl is thin, you will have to install a brick frame underneath it. Otherwise, the weight of an adult can bend it.
The advantages of this design:
- low price;
- ease of installation;
- ease of transportation.
Flaws:
- uneven load distribution, since the bathtub does not rest on anything in front;
- side mounting to the wall is required;
- the need to additionally construct a brick frame under the bottom of the bowl.
As you can see, there are many more disadvantages, besides this, no one will give you a guarantee that such a structure cannot simply tip over if the fastening to the wall turns out to be unreliable.
How the shape of the bathtub affects the complexity of the frame structure
Structures are divided into the following types:
- Rectangular frame. Features a simplified installation diagram. It is used in the construction of a support system for containers installed in a niche or corner between adjacent walls.
- Triangular support. Mounted for additional stability of bathtubs with corner placement. The outer edge has a different configuration. The other two sides form the legs of a right triangle. In most cases, they are combined with the corners of the room. A frame of several connected frames is installed along the outer part of the structure.
- Oval. Complex structure, including a combination of 2-3 or more individual supports. It is built along the contour of the bathtub. It is allowed to use broken strapping technology.
Installation of a rectangular support system followed by finishing with plasterboard sheets makes it easier to arrange a frame for oval containers and non-standard plumbing fixtures. A hole is cut in the upper horizontal panel of the cladding material to the size of the bathtub. In this case, its sides should rest on the frame.
Choosing the optimal metal frame
There are several types of frames used depending on the quality of the material used to make the acrylic bowl;
- Frame without side supports for heavy-duty bowls . Included with such products there are no side supports, there is only the frame itself and legs. Bathtubs with high quality characteristics are installed on a frame that matches the shape of the bowl. The bottom of the frame is designed in such a way that the load is distributed as evenly as possible. In this case, the sides do not need to be fixed to the wall; they are made of durable acrylic and act as a reinforced upper frame. This type of support should in no case be chosen for cheap models, since their sides are not designed to withstand high loads on their own.
- Rigid structure with side supports , which also supports the sides of the bathtub. Despite the fact that such a frame is difficult to install, it is considered the most reliable and versatile at the moment.
- Frames for corner bathtubs with hydromassage , made of square reinforced profile with a high degree of reliability and stability. They are much more expensive, but you don’t have to choose. Hot tubs are heavy and require strong support.
If the frame is not provided in the bathtub, and the manufacturer included only legs in the kit to reduce the cost of the product, it can be purchased separately. The main thing here is to know exactly the size of your font, the most popular: 170x70 , 160x70 , 150x70 , 140x70 .
It is worth saying that to save money, you can make a frame for an acrylic bathtub yourself, but the work is dirty, labor-intensive and complex.
When is it necessary to install a frame under the bathtub?
Standard bath frames.
The structure consists of several vertical supports with 2-3 horizontal strappings. Industrial production models are designed for statistical averages, taking into account human weight and the volume of liquid in the tank.
Some builders make the mistake of installing bathtubs too low. This prevents normal drainage of water. In such cases, due to the frame, the container rises to the required height.
The area of standard legs is 10 cm². Some people seek to create an additional supporting surface to stabilize the bathtub. For these purposes, a factory frame kit or a structure made independently is suitable.
For bathtubs of a non-standard configuration, the support not only serves as a means of protection against tipping, but also performs a decorative function. The construction of a podium around the jacuzzi begins with the installation of a supporting device. If you want to assemble a screen to mask communications, you cannot do without a frame.
How to assemble and install correctly - step-by-step instructions
The process of installing an acrylic bathtub is not complicated, and you can easily do it yourself in a few hours, without the involvement of plumbers.
What is included:
- Metal profile with ready-made holes, cut to the required sizes;
- adjustable legs;
- thrust bearings;
- self-tapping screws;
- racks;
- nuts;
- locknuts;
- washers;
- wall stops;
- assembly instructions.
Before installation, you need to check the package contents, and if you find out that something is missing, contact the seller.
Instructions for arranging a frame made of wooden blocks
The technology is similar to the previous version.
The differences are due to the characteristics of the material:
- the preparatory stage consists of treating the lumber with an antiseptic or oil impregnation;
- during the preparation process, the walls are leveled and primed;
- horizontal bars are fixed on vertical supports, increasing the rigidity of the structure.
The final stage of installation is treating the wood with a waterproofing agent. The walls adjacent to the bathroom are coated with the same composition. If used for tile cladding, additional waterproofing is not required.
How to secure and adjust the legs?
So, all the tools have been collected, the equipment has been checked, you can begin installation:
STEP 1. Unpack the bathtub and place all the components in one place for easy assembly.
STEP 2. Cover the floor with a soft rag or cardboard from the packaging to avoid chips and scratches , and carefully turn the bathtub upside down. We put it in the middle of the room so that it can be walked around from any side.
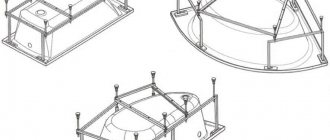
STEP 3. We assemble the bathtub frame according to the instructions supplied by the manufacturer: we observe all the indentations and fastening points specified by the manufacturer. You need to put the two longest profile slats on the bottom and screw the horizontal strips for the legs to them with bolts.
Be sure to check with a square that all planks are perpendicular to each other and the angles between them are 90 degrees. Only then can the bolts be finally tightened.
STEP 4. Assembling the legs. You need to screw plastic stops and washers with nuts onto the studs in the order shown in the picture.
STEP 5. We thread the pins with the free end up into the holes of the short profile.
Use your fingers to tighten the nut so that the distance between the stop and the bathtub body is 1-2 mm .
STEP 6. We screw onto the protruding end of the stud: a washer, 2 nuts, a washer and a leg - in exactly that order. Steps 5 and 6 must be repeated for all other supports.
STEP 7. Using a screwdriver and self-tapping screws, screw the longitudinal profiles to the bottom of the acrylic bowl, checking that all the indentations specified in the instructions are observed.
Be sure to use the screws included in the kit, otherwise you can easily damage the bottom of the bathtub if the fasteners are longer.
STEP 8. Adjust the length of all legs and carefully tighten all nuts on the studs using a wrench.
STEP 9. Turn the bathtub over and place it on legs. By twisting, we adjust the height from the floor; it should not be more than 65 cm - the most optimal and safest. You can check the horizon using a building level, and if there is a distortion, it should be eliminated.
If you want the water in the bowl not to stagnate, then you can make a small technological slope towards the drain, just half a centimeter is enough. To do this, after installing the structure in its permanent place, slightly raise the edge opposite to the drain by unscrewing the support leg.
Features of mounting a support for a corner and asymmetrical font
The process of installing a frame on a corner bathtub is practically no different from installing it on a rectangular one, the only difference is that the number of profiles and fasteners varies slightly, it all depends on the specific manufacturer, so it is worth studying the instructions in detail.
It is worth noting that corner and asymmetrical fonts have a fairly large volume, and the frame for them must be reliable and durable. It is highly undesirable to install such a font only on the legs, even if they are included with the product. Spare no expense and buy a bathtub frame made of profiled pipe.
Acrylic, steel or cast iron: which bath is better?
Many people wonder: is the bathtub acrylic, cast iron or steel? Let's compare the advantages and disadvantages of each type. For convenience, they are presented in table form.
| Cast iron | Steel | Acrylic | |
| pros | 1. Durability. 2. Sustainability. 3. They don’t make much noise when filling. 4. Low thermal conductivity (water cools slowly). 5. They wash well. | 1. Light weight (30–50 kg). 2. Very durable and beautiful smooth enamel. 3. Ergonomics. 4. Extensive range of sizes. 5. Variety of shapes. 6. Easy to care for. | 1. Light weight (30–40 kg). 2. Warm to the touch. 3. They hold heat well (6 times longer than cast iron). 4. Smooth, shiny surface. 5. Hygiene. 6. Abrasion resistance. 7. Not subject to corrosion. 8. Restored at home. 9. Large size range. 10. Any depth. 11. Design variety of models. 12. Ideal for equipping with a hydromassage system. 13. Easy to care for. |
| Minuses | 1. Very large mass (130 kg). 2. They take a long time to warm up. 3. Enamel can be chipped. 4. Cannot be restored. 5. Small selection of shapes and sizes. 6. Over time, the enamel wears off. 7. As a rule, they are not equipped with hydromassage. | 1. Thin-walled ones are deformed. 2. Very noisy. 3. They need sound insulation. 4. The water cools down quickly. | 1. The surface is easy to scratch. 2. They are afraid of very hot water (100 °C). 3. Do not soak or wash clothes. 4. It is not advisable to bathe animals. |
After analyzing the data provided, it is easier to make a choice. A cast iron, acrylic or steel bowl must fully meet the owner’s expectations.
How to attach to the wall?
If your frame provides additional supports for mounting to the wall, you must use the following instructions:
STEP 1. Place marks on the wall with a marker on the underside of the sides.
STEP 2. We remove the structure and, using a building level and a marker, draw a line for the side of the bathtub.
STEP 3. Place the side supports as shown in the picture and mark the drilling locations.
STEP 4. Using a hammer drill and an 8mm drill (depending on the size of the dowels, but usually used, we drill holes to the depth specified in the instructions.
STEP 5. Attach the side supports to the wall using dowels and self-tapping screws.
STEP 6. For a better fastening effect, coat the support areas of the bathtub sides with sealant.
STEP 7. Place the bathtub and frame on supports. Press well, fill with water and coat the joint with the wall with sealant or cover it with a corner.
Now you can work on sewerage and screen installation.
Siphon assembly
Step 1. Check the completeness of the siphon spare parts and their technical condition. Carefully inspect the rubber rings and gaskets; their surfaces should be smooth, without depressions, sagging or burrs. If the plastic elements show signs of shrinkage of the material during cooling, you are dealing with an unscrupulous manufacturer; never buy such products. Lay out all the elements on a clean surface and study their purpose. Before doing this, read the instructions and familiarize yourself with the attached assembly diagram.
Siphon kit
Step 2. Start assembling the kit from the largest part - a flask or other siphon seal
Pay attention to which side the cone seals should be placed; when tightening, they should enter the pipe and increase in diameter, and not be pressed against the end of the tube
Step 3. Attach the overflow tube and replace the drain grate. Make all connections by hand, do not clamp the elements too tightly. Before installing the drain and overflow grilles, remove the protective film around the openings. Let the rest of the surface remain protected; the film is completely removed only after all installation work is completed.
Siphon assembly diagram
Now you can install the acrylic bathtub and connect the drain.
Characteristics
There are many options for round baths, each of which has its own characteristics, ranging from size to internal arrangement. Thus, after going through all the possible options, you can choose your “ideal” barrel sauna.
The smallest bathhouse, located horizontally, is 2 meters long. Its design implies the presence of 1-2 rooms. You can undress here at the entrance if the bathhouse has a porch with a canopy. The weight of such a building is about 1.5 tons.
The largest barrels reach a little over 6 meters. There can already be up to 3 rooms: a dressing room (with a well-thought-out resting place, a table, clothes hangers, benches), a wash room (with a shower or water containers), a steam room (with comfortable benches and loungers); or in the case of a sauna, the washing room can become a relaxation room. On average, the length of each room will be 1-2 meters.
Classic round baths can be of the following sizes - up to 2, 3, 4, 5, 6 meters in length, about 2 meters in diameter (1.95 m is the internal diameter). Quad and oval baths may have slightly different parameters: 4x4, 3x6. Almost any bathhouse can accommodate comfortable sun loungers with a width of 500 mm.
In two-meter baths there is only one room. In the three- to four-meter ones there are already two – a small locker room and a steam room. The largest ones have space for three rooms.
As for height, even tall people can take a steam bath in this type of baths. The ceiling height is more than 2 meters.
The classic shape of a barrel bath is a circle, or rather a cylinder, located horizontally.
Less common are oval, square or rectangle shapes with rounded corners. In addition, there are options for baths with a semicircular top and rectangular bottom.
The entrance to both oval and quad baths can be from the front or the side. The entrance can be framed by a canopy or equipped with a gazebo. And the barrel sauna can be additionally enclosed in the frame of a gable roof.
Double-rounded baths have a rectangular outline. Vertical barrel baths are most often round-shaped buildings, less often oval or rectangular with rounded corners.
The main performance characteristics of a bathhouse depend on the materials from which it is made. The bathhouse is built from wood, or rather, specially processed profiled timber with a moongroove or tongue-and-groove fastening. The following types of wood are usually used for construction:
- Oak is a very high-quality material that becomes even stronger when exposed to water. It has excellent properties and can serve for many years. It has a beautiful structure, but is very expensive.
- Linden is an excellent material for a bathhouse. Known for its medicinal properties. Unfortunately, poorly treated wood of this species is easily susceptible to rotting and other negative effects.
- Aspen is an analogue of linden. With its help you can also create a favorable microclimate. But unlike linden, it is more resistant to harmful effects.
- Larch is a material that does not rot, and therefore will last a very long time. True, the price for round timber of this breed is quite high.
- Cedar is the only conifer that is highly recommended as a building material. It can also be used to create a healing microclimate. It has a beautiful unique structure. It has one drawback - it is quite expensive.
- Spruce, pine and other conifers are not recommended as building materials for baths. This is due to the fact that when exposed to high temperatures, wood is capable of releasing resins, which can cause burns. However, this effect only occurs from temperatures exceeding 100 degrees. Moreover, if such wood has undergone good chamber drying, then this process is minimal.
- Alder and birch are not suitable for building a barrel sauna, as they get very hot.
It is worth noting that it is possible to use several tree species in construction. For example, the floor is larch, the top is linden, and the trim is aspen. This solution will help save a little on construction.
In addition to wooden elements, you will need ties, which are made from iron tape (strip), or steel hoops. Of course, metal corners, screws and other fasteners will be needed.
Some “pre-installation” rules
You can begin installing a steel bathtub yourself only after completing the floor installation work. By this time, waterproofing should be completed, the floor level should be leveled and the floor covering should be laid.
In old houses, the floor in the bathroom was made with a slope of 1-2% from the door, referring to the current Construction Norms and Regulations, according to which the direction of the slope was placed in such a way that wastewater, when discharged into channels, did not cross the passages.
Modern current standards only require the presence of a threshold between the bathroom and the corridor, which must be at least 2 cm. Such an obstacle with a room area of 3-4 square meters can hold up to 50 liters of water.
Ideally, it is still better to arrange the floor in the bathroom, providing a uniform level difference, which is 2 mm for every meter of length
Before installing a steel bathtub, it is necessary to check the condition of the sewer system. By detecting and correcting problems, you will prevent yourself from troubles after installation is completed, which can only be eliminated by dismantling the system.
The structure must be placed in such a way that it can easily connect to all necessary communications.
Rectangular steel bathtubs are most often installed on stands included in the product package, the material for their manufacture is galvanized steel, which has increased resistance to moisture.
Models of non-standard curved shape require more reliable fixation, the role of which can be fulfilled by the included supports and an additionally constructed frame.
Preparing the base
If you decide to install the bathtub on an additional base, the bathtub must be removed after the steps described above. After this, the base itself is laid out. It can be made of different materials, but brick (see installation on bricks) and foam blocks are considered the most durable and reliable in this regard . The height of the base should be slightly lower than what you measured at the previous stage. If necessary, it should also be laid along the walls. The masonry is formed using ordinary cement mortar. After the base has been prepared, it must be left for 12 hours - this time will be enough for the solution to harden and you can continue to work.
Sealing joints
The use of silicone sealant to process the joints between the acrylic edge of the product and the wall is not reliable enough. No matter how tightly the bathtub fits against the wall, gaps still remain. In building materials stores you can purchase a special tape that is attached to the joints using silicone. In addition to tightness, it will give a more aesthetic and complete overall appearance of the structure.
Plastic corners with rubber inserts on the edges will help improve the tightness of joints. They prevent water from entering and also hide unevenness and minor defects. A large assortment of skirting boards of different shapes and colors is available for sale, so you can easily choose an additional element to any bathroom design.
There is one peculiarity of the interaction of acrylic containers with sealant - before applying it, the bath must be filled with water and wait until the substance hardens. Otherwise, when the sides of the product are subject to loads, the silicone will become covered with microcracks, into which water will constantly penetrate.