Acrylic bathtubs are preferred by many today for their versatility, aesthetic appearance, affordable cost, light weight and many other advantages. They appeared on the Russian market at the end of the last century and today have firmly occupied their niche on it, acquiring an army of thousands of admirers. Acrylic is reliable and environmentally friendly, maintains water temperature for a long time, bathtubs made from it are easy to clean, varied in style, shape and color. Even for a cramped bathroom, it is not difficult to choose an acrylic bathtub that is convenient and comfortable for bathing and other hygiene procedures.
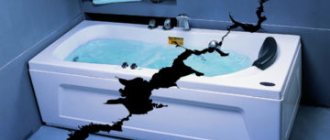
But the bathtub, like any plumbing fixture, is used intensively every day, and no matter how carefully we treat it, it does not pass without a trace. Gradually, the appearance of an acrylic bathtub deteriorates and loses its presentability. Spots and chips appear on its surface, the coating darkens, cracks form, which increase over time, and with them the risks of creating a favorable environment for the proliferation of pathogenic microorganisms that are dangerous to human health grow.
What can be done in such a situation to restore the acrylic bathtub to its former attractiveness and functionality? Here are three possible solutions to the problem:
- dismantle the old bathtub and buy a new one;
- invite specialists to eliminate defects;
- purchase a suitable repair kit and carry out the repair yourself.
Replacing plumbing fixtures entails large expenses. You need to purchase and deliver a bathtub, dismantle old equipment, and install new equipment. All this will cost you a pretty penny, and will also require time spent on all these actions. The second option - inviting professional repairmen - will require less expenses (but still considerable), and there is no guarantee that you will not run into an unscrupulous or insufficiently qualified and experienced repairman.
If you are not satisfied with the options for solving the problem by replacing the bathtub or professionally restoring the coating, then you can restore worn-out acrylic plumbing fixtures yourself, using repair kits offered on the market.
Methods for eliminating cracks in an acrylic bathtub
Acrylic bathtubs have long been an excellent alternative to steel and cast iron structures, and, judging by the characteristics, acrylic has a lot of advantages. This material can withstand mechanical damage and direct sunlight. In addition, acrylic is environmentally friendly and hygienic, as it has a non-porous structure that prevents the accumulation of dirt and the proliferation of harmful bacteria.
Read also: What is Iman, Islam and Ihsan
However, despite all the positive qualities, cracks may appear on acrylic bathtubs. The reasons may be different: a fall of a heavy object with sharp corners onto the surface, a long service life and, as a result, wear and tear of the product, or the manufacturer was simply dishonest in the manufacture of the bathtub. In any case, you can repair an acrylic bathtub on your own without spending a lot of money.
So, what should you do if your acrylic bathtub is cracked? There are at least three ways to solve the problem.
How to prevent breakdown
To avoid the need to carry out the repair work described above, you should evaluate the condition of the bathtub, both external and internal, in advance. Details that prevent an emerging defect:
- Creaking indicates improper installation of plumbing fixtures or thinness of the coating;
- If there are deflections in the base, then you can place reliable materials under it, for example, bricks, to hide such an addition, cover the area with a plastic screen;
- In the light you will notice gaps, which indicates the unreliability of the coating, then use latex paint and strengthen the base using the pouring method.
In the light you will notice gaps, which indicates the unreliability of the coating, then use latex paint and strengthen the base using the pouring method.
It is possible to repair an acrylic bathtub at home. The process is not very complicated, the main thing is to prepare the surface and tools. It’s better to strengthen the coating in advance, which has become unreliable.
Repair of serious defects
Damage that leads to a leak in the bathtub and water constantly appears in the room after taking a shower is considered serious. To fix the problem you need fiberglass. Proceed as follows:
- The edges are cleaned with a knife.
- The problem area is sanded with sandpaper.
- Treat with an alcohol solution.
- Epoxy resin is applied.
- Wait for the layer to harden.
- Treat the area again with sandpaper.
- The smooth coating is wiped with alcohol.
- Polish is applied.
Damage that leads to a leak in the bathtub and water constantly appears in the room after taking a shower is considered serious.
Operation of acrylic models
Acrylic is a polymer material that has high performance characteristics. It is durable, wear-resistant and lightweight. Bathtubs made of this material have low thermal conductivity and a beautiful glossy shine. Acrylic models are produced in rectangular, oval, round, angular shapes, the width of which is 70-170 cm, and the length is 120-190 cm. The operation of acrylic products requires compliance with special conditions, if ignored, repair of acrylic bathtubs may be necessary:
- Acrylic melts at a temperature of 150 degrees, so it is not allowed to pour boiling water into bathtubs made of this material to avoid deformation.
Types of defects, their elimination
There are many ways to damage an acrylic bathtub. All defects can be grouped according to the severity of damage:
- minor defects (roughness, small scratches);
- small cracks, large scratches, chips;
- large cracks;
- through holes.
A separate type can be called stratification.
Universal glue will not be suitable for repairing an acrylic bathtub, since acrylic has low adhesion (the ability to firmly adhere to other surfaces). You need to purchase glue of a special composition with moisture- and heat-resistant characteristics.
Types of 2-component adhesive for acrylic bathtubs:
- Contact.
Removing shallow scratches
The use of multi-component cleaning products, cleaning the contaminated surface with a stiff brush, careless handling of metal objects during repairs - all this leads to the formation of shallow scratches.
Such scratches must be eliminated immediately, since the penetration of moisture and caustic chemicals into the resulting gap leads to the formation of rust, the proliferation of moisture-loving microorganisms and an increase in the size of the scratch. Which will lead to further destruction of the bathtub surface.
The factory enamel on the bowl of a cast iron bathtub is very durable, so a screwdriver is needed to remove shallow scratches. If it has already been restored with acrylic or epoxy enamel, sanding paper will be suitable for treating micro-scratches.
In addition, to treat microdamages you will need:
- fine-grained sandpaper marked P1200, P1500 or a screwdriver with an attachment for attaching an abrasive wheel;
- fine abrasive car polish - economical polishes for one-time use are pastes from WILLSON and RUNWAY;
- wax polish without abrasive, for example, Golden Wax.
At the first stage, it is necessary to wash the surface with Pemolux, Comet, Sorti or baking soda to degrease. After removing the product, you need to dry the bath.
Next, the surface is polished with fine-grained sandpaper or a screwdriver with an abrasive wheel - zero, until leveled. When processing a scratch with a screwdriver, the minimum speed is set.
The treatment area must be constantly damp to prevent cracks from appearing when heated. Therefore, during the entire stage of primary polishing, it is necessary to pour a thin stream of water onto the damage.
After the treated surface becomes smooth and matte, it is necessary to apply a grainy polish. Treatment with a low-abrasive composition is carried out vertically, then horizontally, until a smooth, uniform surface is obtained.
The final stage of eliminating minor scratches is finishing the coating with car polish and wax. Wax-containing polishes are water-repellent and add a sparkling shine to any surface.
Repair of minor defects
Minor defects can be quickly and easily eliminated by expanding the size of the crack, degreasing the area, preparing paint and applying it to the damaged area. Cover the top with masking tape, leave it on for 5-6 hours, then remove the tape. Treat with alcohol and polish. The seal is completed with a coating of polish.
The seal is completed with a coating of polish.
How to remove a crack on an acrylic bathtub. Step-by-step instruction
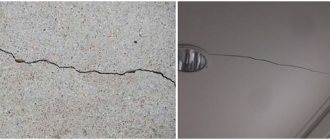
Cracks on the acrylic surface of a bathtub form for various reasons. For example, while bathing, a person might drop the shower head or a heavy soap dish. The repair process will take longer than eliminating scratches, since cracks are serious defects and special repair kits will not be necessary.
Step by step guide:
- The area around the crack and inside it is treated with sandpaper.
- Artificially enlarge a crack. To do this, use a drill with the smallest attachment (no more than 1 mm). The process is required because the crack will subsequently grow on its own, so all the repairs performed will be in vain.
- Rinse the surface. It is advisable to use pressurized water to remove all the smallest particles. It is also important to allow time for the crack to dry completely.
- Use alcohol or formic acid to degrease the surface. Otherwise, the restoring composition will not be securely attached to the surface of the bathtub and will begin to crumble after a couple of days of use.
- Apply acrylic composition. It includes 2 components, and they must be mixed immediately before use. When the crack is deep, a multi-layer application of the composition will be required.
- Wait until the solution dries completely. It will take several hours, and during this period it is important to ensure that the bathroom is not used or the water is turned on.
- Sand the composition with fine-grained sandpaper.
- Polish the surface until it is as smooth as the rest of the acrylic tub.
What damage occurs and why?
It is necessary to classify them to select a repair technology. All reasons for violating the integrity of the top layer of the surface of acrylic bathtubs can be divided into two large groups by nature - mechanical and chemical. The first is caused by careless use of the bathtub. They can be applied by dropping any heavy or sharp object, especially metal, into the bowl, or by regularly washing by hand in a basin standing at the bottom of the bathtub. Regular bathing of a dog or cat does not go away without a trace. All these actions entail the formation of chips and cracks, the appearance of scratches, deep and not so deep. Intensive use can thin the top layer, and the network of small cracks that appears on it will begin to grow. This also includes the illiterate use of cleaning agents and the use of compositions with abrasive particles.
Chemical damage occurs when the acrylic surface comes into contact with aggressive substances. They can be incorrectly selected cleaning products, stain removers, or even active laundry detergents if you soak your laundry with them directly in the bath. It happens that a chemically aggressive liquid is spilled onto an acrylic surface by accident. Chemical damage is manifested by a change in the color of the coating, the appearance of stains, peeling of acrylic, burns, in the worst case, through.
Cleaning agent SANFOR Acrylight d/acrylic. pov liquid 0.92l
Surface preparation
The preparatory stage is required when the defect is already old and operating conditions have caused the problem to worsen. If you decide to fix the chip right away, the process will be shorter, without preparation. But, if the crack is old, then carry out the steps described below:
- Remove the rust layer using a knife, needle or screwdriver. You can use a special solution.
- Wash the surface so that no dirt remains, use detergents without abrasive elements.
- Get a clean base, then dry it with a hairdryer.
- Use acetone to degrease the base, then dry it with a hairdryer.
The preparatory stage is required when the defect is already old and operating conditions have caused the problem to worsen.
Ready repair kit
A repair kit is the simplest and most effective method of restoring a bathtub. Different manufacturers have different price categories, as well as operating instructions. The kit may include a putty mixture, a spatula for mixing, sandpaper for acrylic and enamels, and a spray for finishing coat. Typically repairs include the following steps.
- Cleaning up the chip. Dirt and rust must be thoroughly removed. Then degrease the surface with baking soda and dry it or treat the chip with acetone.
- Preparation of putty. Putty and hardener usually come in different bottles. It is necessary to combine them in proportions according to the instructions, mix thoroughly with a spatula, apply evenly to the chip and wait the time specified by the manufacturer (usually 30 minutes).
- Leveling the surface. After the putty has hardened, it will need to be cleaned with sandpaper. Ideally, you should not feel a transition between the grout and enamel.
- Painting. The dye is sprayed onto the chip site with aerosol paint from a distance of 15-20 cm. It is better to do this in several stages with an interval of 2 minutes. After you have applied several layers and you see that the colors of the enamel and the patch match completely, let the paint dry. After two hours the chipped area can be touched, and after four days the bathtub will be ready for use.
Using a repair kit, you can almost completely recreate the enamel coating of a white acrylic, cast iron, or ceramic bathtub. The disadvantage of this method is that a good set cannot be purchased at every hardware store. In addition, the color of the enamel of the bath and the aerosol may not completely match, which happens in 90% of cases.
We repair chips
Chips on an acrylic bathtub are a common occurrence. They are formed as a result of careless use, accidental impacts with massive metal objects, etc. The choice of repair method depends on the size of the chip.
If it is minimal, try to solve the problem of restoring the surface by simply polishing. Before performing this, the chip must be rubbed with coarse sandpaper, and then polished with fine-grained sandpaper. You can speed up the work by using a drill equipped with a polishing attachment. Having completed polishing, you need to remove dust and wash the restored area of the coating with a soap solution.
ABRAforce sandpaper, fabric 100mm x 5m, (P60), art.500024839
If the size of the chip is significant, then again you cannot do without a repair kit. When restoring chips, you need to proceed in the same way as when eliminating cracks. First, the working area is cleaned with sandpaper of different grain sizes, after which the chipped area is washed and degreased. Then follow the same steps as when sealing cracks. Liquid acrylic must be applied carefully and just enough to level the surface. Excess applied restoration mass must be removed immediately, avoiding the formation of a tubercle at the chip site. The restored bathtub should be dried for 6-12 hours, depending on the temperature and humidity in the room, after which the working area is polished and washed off with water.
Required materials and tools
To repair cracked acrylic bathtubs yourself, the first step is to prepare the material, as well as the tools that will be required for the process. Acrylic substance in liquid form, degreasing agents, cleaning agents. You will also need:
- Grinder/drill;
- Nozzle in the form of a whisk;
- Sandpaper of different grain sizes;
- Pliers;
- Rubber spatula;
- Sponge;
- Flashlight;
- Film coating.
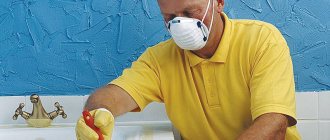
To protect the master, prepare gloves and a respirator.
To repair cracked acrylic bathtubs yourself, the first step is to prepare the material, as well as the tools that will be required for the process.
Means for sealing cracks, potholes and chips
You can renovate a bathroom using different means. The choice of substance also depends on the nature of the damage, whether the coating is cracked, whether a gap or hole has appeared, etc. For chips and cracks, car putty is suitable. If there are only small flaws on the surface, then you can quickly eliminate them with the help of enamel, which is applied with a brush to the defective areas.
The surface can be filled, this helps to completely renew the coating. There is a product on sale called Stakryl, which creates a new thick layer that covers all defects in the base.
Stakryl creates a new thick layer that covers all base defects.
Acrylic peels off, what to do
If peeling of the coating occurs, such areas should be glued together using glue for polymer bases. A hole is made in these areas, then the adhesive is poured into it. After drying, the process of sealing the cracks, which was described above, is carried out.
If peeling of the coating occurs, such areas should be glued together using glue for polymer bases.
How to repair an acrylic bathtub?
There is no need to rush to quickly get rid of the plumbing fixtures if a crack has just appeared in the acrylic bathtub. Most often, such damage can be easily repaired. If the acrylic bathtub bursts or small defects appear on its surface, the instructions for restoring plumbing will help to eliminate them; for more serious damage, a slightly different approach will be required.
Repair of minor defects. First, you need to understand how to repair an acrylic bathtub that has chips and small scratches on the surface. To do this you will need the following materials:
- two-component acrylic;
- epoxy adhesive;
- sandpaper;
- special tape.
Using epoxy glue, you can repair the surface if it has a crack up to 3 mm in size. For larger defects, tape must be used. In this case, the repair will begin with degreasing the surface of the plumbing fixtures. After that, a special tape is glued to the crack, from which the film must first be removed.
An acrylic bathtub with minor defects, the length of which does not exceed 5 mm, can be repaired using only the specified materials.
Recovery instructions:
- in order to improve the adhesion of the surface of the plumbing fixtures to the glue, it is necessary to slightly expand the boundaries of the cracks with a knife;
- the surface is degreased;
- acrylic paint must be diluted with a hardener;
- the area that needs to be repaired must be treated with a small amount of the resulting composition;
- We seal the treated areas with tape for five to six hours;
- after which it is necessary to remove the film, after which the plumbing must be treated with alcohol and sanded;
- The restored area is coated with polish to obtain a shiny finish.
Acrylic peels off. Most people who purchase acrylic sanitary ware are faced with the problem of bathtub bloating. Sometimes the acrylic comes away from the fiberglass, i.e. swells. This happens for a number of reasons:
- The acrylic bathtub wobbles and the load on the surface is not distributed evenly, which creates a high probability that the acrylic may lag behind the walls of the plumbing fixtures.
- The reason may lie in low-quality products made from cheap materials.
In order to glue polymer materials you will need special glue. In the place of the swelling, you need to make holes in order to introduce glue there; after the layers are glued together, you can begin work on eliminating a regular crack. This work process was described above.
Large defects are cleaned with a special tool, after which a new protective layer of enamel is applied to them. Details in the article - Liquid acrylic will return the bathtub to its original appearance. If an acrylic bathtub is leaking, this means that it has serious through damage. In this case, the usual cosmetic elimination of defects will not help; reinforcement will be necessary. If the acrylic bathtub is not level, it is better to reinstall it, otherwise it will leak sooner or later.
How to repair a crack with your own hands?
What to do if the coating of an acrylic bathtub cracks during use, how to repair the crack? It is important to understand that it needs to be eliminated as quickly as possible to avoid further spread. Indeed, under the influence of constant load and temperature difference, it can grow significantly.
Such repairs can be easily done with your own hands using a special repair kit , according to the instructions presented below.
As a rule,
a repair kit contains all the components necessary for restoration; in addition to it, you only need a drill or screwdriver and masking tape .
STEP 1. First you need to drill out the crack along the edges, this will help it not to grow in the future. 5mm diameter works great ) and at high speed make small holes at the very ends of the crack.
It is very important not to drill deeply, you only need to dive
2-3 mm into the surface of the acrylic, this is usually enough.
STEP 2. Next, you can begin to expand the crack. This is necessary to ensure that the repair composition completely fills the damage. Run the same drill along the entire length of the crack, creating a 1-2 mm .
STEP 3. Now you need to cover the area around with molar tape so as not to damage the entire coating, and begin to give it a slight roughness. 1000 - 1200 sandpaper and start “shuffling” the coating in a circular motion. Remove all shavings and thoroughly wipe the surface of the defect with a soap solution.
STEP 4. Mix liquid acrylic and hardener in the proportions recommended by the manufacturer.
Apply the mixture to the damage, smoothing it out with a plastic or rubber spatula. It will take about 24 hours to dry.
Acrylic bathtubs have completely different shades of white and therefore, when renovating, getting exactly the same tone can be very problematic. Manufacturers of repair kits produce acrylic for warm and cold tones of white, so it is important to know which one you need.
STEP 5. Now it's time to polish. Cover the surface around it with molar tape. Take a set of sandpaper and, starting with the coarsest grit (the smaller the number on the back, the larger it is), “sand” the surface, gradually moving to a smaller one. After the acrylic bump has completely disappeared and the surface has become homogeneous to the touch, wipe it thoroughly with a soap solution.
Next, you need to take the polish from the kit and apply it to a fleece napkin. Rub the paste in a circular motion to bring the coating to a mirror shine.
What to do if the shower stall bursts?
Shower bowls are created using exactly the same technologies as acrylic bathtubs. Therefore, all the information provided about the restoration of acrylic bathtubs also applies to shower cabins.
When to repair damage
Before you begin to decide what to do if the enamel on the bathtub has chipped, you need to understand whether such measures are required.
There are several opinions on this matter:
- There is no need to repair the chip, since a quality result will still not be achieved.
- If you repair the chip, the bathtub will begin to rust under the patch.
- It is necessary to repair the damage, but this procedure is quite complicated and will take a lot of time.
We can say with confidence that it is imperative to take action to restore the enamel if a way to solve such a problem is known. Of course, a perfect restoration will not work, since such events are carried out at a special temperature and under certain conditions, but you can make the bathtub attractive with your own hands.
It is worth mentioning one mistake that some home craftsmen make when repairing chipped bathtubs. To eliminate chips on an enamel container, they heat the problem area using a gas torch or blowtorch. According to such craftsmen, the patch will be better fused with the main coating. Professional plumbing equipment repairers do not recommend performing such measures, as in the future this may cause the entire enamel coating to peel off.
As for the pockets of corrosion that can form in the damaged area, they can form if the question of how to repair a chip in the bathroom is incorrectly decided. In most cases, rust forms when using a regular sealant on stains. This situation leads to the need to solve the problem of removing rust stains.
Bathtub enamel
The most inexpensive way is to cover the bathtub with new enamel. It is suitable for cast iron and steel bathtubs. This is painting the bathtub using a brush with a special waterproof composition. Enamel helps remove roughness, yellowness, rust, small scratches, cracks and chips, but cannot cope with larger damage and deformation. It is important to choose enamel specifically for baths, because other types of enamel release toxic substances when in contact with hot water.
The specialist completes this work in an average of two hours, but then the bath will dry for at least another 24 hours (the exact period depends on the quality of the enamel and ventilation in the bathroom) - during this period you cannot use it, but it is better to leave the house altogether: while the bath dries, a pungent smell spreads throughout the apartment.
The renewed coating will last for about 5 more years if you do not rub it with abrasives and do not expose it to impacts, to which the enamel is sensitive.
Pros:
- low price;
- a thin layer that does not particularly “eat up” the volume of the bath;
- no need to dismantle the siphon during restoration;
- if the tiles extend onto the sides of the bathtub, they also do not need to be removed.
Minuses:
- low strength;
- There may be streaks left from the brush if done unprofessionally;
- takes a long time to dry;
- pungent odor during operation and drying;
- does not remove large damage;
- relatively low service life of the coating.
What materials to use for repairs
When restoring an acrylic bathtub yourself, the correct choice of repair materials is very important. If you use substances for this that are similar in appearance to acrylic, but differ in technical characteristics and performance properties from the material used to make the bathtub, then all efforts will be unsuccessful. Very quickly, the repaired defects will appear again, cracks will begin to grow, and the new coating will peel off and chip.
The main factor that dictates the choice of material for carrying out restoration work on the surface of an acrylic bathtub is its production technology. Manufacturers of this type of plumbing use two technologies:
- vacuum-type molding from acrylic sheet;
- spraying an acrylic coating onto a base made of ABS plastic.
Determining how your bathtub was made is very simple. If upon purchase it was wrapped in a protective film package, then it was made by molding. If there is no polyethylene protective film, then you are dealing with acrylic-coated plumbing fixtures. If you didn’t buy the bathtub, then you can use another method to determine the technology for its manufacture. To do this, carefully inspect the cut of the side, especially the white top layer. If its thickness is 5-6 mm, this indicates that the bathtub is molded from an acrylic sheet. If the layer of white coating does not exceed 2 mm, your bathtub is made of ABS plastic. After clarifying these technological features, you can take care of the materials for the restoration. For a molded bathtub you need to buy liquid acrylic; for a sprayed bathtub you need to use a special repair kit, which can often be included with the sanitary ware when sold.
Restoration of the enamel layer
We carry out our own repairs of chipped enamel of metal bathtubs made of cast iron and steel using the following technology:
cleaning the metal in the defective area with coarse sandpaper;
- removing dust with a vacuum cleaner or washing with a cleaning agent without abrasive impurities;
- solvent degreasing;
- preparing an acrylic mixture or epoxy enamel;
- layer-by-layer application of enamel paint or filling the cavity with self-leveling acrylic in one step.
After laying the repair mixture on the chip site, it should protrude like a bump above the factory coating adjacent to this area. After the composition has hardened, this tubercle is polished with abrasive materials with a change in grain size from larger to smaller. Next, polishing is carried out with a special paste.
To avoid getting new scratches with sandpaper, cover the chipped area around the perimeter with masking tape.
Small chip
Repairing a chip on a small bathtub with your own hands is quite simple. The main nuances of restoration work in this case are:
- cleaning of cast iron and steel is impossible due to the microscopic size of the defect;
- instead, rinsing is done with a chlorine-free cleaning agent;
- It is economically feasible to use repair kits in small packaging (syringes, cans, barcode correctors);
- application in one go.
Preparation of the mixture according to the manufacturer's instructions.
The product can be applied with a brush; it is more convenient to level the material on the surface with a spatula.
Applying acrylic reducing agent with a homemade wooden spatula made from wood chips.
Manufacturers of some bathtubs open their inner surface with varnish. Therefore, after repairing a defective area, it may be necessary to apply one or two layers of varnish.
Large chip
To restore areas of plumbing with large chips, the repair solution must be applied in stages over several steps. This is due to the low viscosity of the product and the complex geometry of the bath.
In order to remove the required amount of “patch” with sandpaper without grinding off the structural material in the areas adjacent to it, you can shade the treated area with a dark marker.
As soon as the abrasive material removes the last traces of the marker, the surface at the site of the former chip will take on the design outline.
This technique is discussed in more detail in the video below:
Thus, a chip in the enamel coating of a cast iron or steel bowl, or the very structural material of an acrylic bathtub, can be repaired on your own. For this purpose, the industry produces one, two and three-component repair compositions of self-leveling acrylic, enamel paint, and acrylic restorer with special properties.
How to remove a chip on an acrylic bathtub
First of all, you should understand that a chip is not a scratch and simply polishing the damaged area will not work. In addition, deep defects often become breeding grounds for fungus, mold and bacteria, so restoration work must be completed.
Surface preparation
First of all, the area where the defect is found needs to be prepared. Otherwise, no one can guarantee you that the chip will not appear again in a short time. Surface preparation is as follows:
- Sand the area with sandpaper, starting with a coarse grit and ending with a finer one.
- The chip should be washed thoroughly using detergents with a disinfecting effect. This is done in order to completely remove dirt.
- Next, the area should be degreased to remove fat from the surface. If you ignore this preparation stage, then it is likely that the putty that you will apply simply will not “adhere” to the acrylic.
- At the end of all preparatory work, the surface of the bathtub must be dried very well. To speed things up, you can use a hair dryer or dry rag.
Once you have completed all the steps, you can proceed directly to removing the chip on the acrylic bathtub.
Removing chips on the surface of an acrylic bathtub
A masking pencil is not suitable for removing this type of damage, since it will not be able to repair the pothole itself. To restore the evenness of the surface, you will need special repair kits. As a rule, they all have the same equipment, and it includes:
- liquid acrylic (varies in shade);
- hardener - added to acrylic to increase hardening properties;
- sandpaper for grouting;
- polishing paper;
- degreasing agent;
- epoxy glue for fixing small scratches.
Of course, the repair kit may differ in content, but, as a rule, it is a standard set that includes all the necessary components. Additionally, the repair kit includes a special rubber spatula for easy application of liquid acrylic.
Further, the principle of work is as follows:
- dilute acrylic with hardener according to the instructions;
- apply the mixture to the damaged area flush with the surface of the bath, distributing it evenly with a spatula;
- level the mixture as much as possible;
- cover with film (ordinary food film secured to the wall with tape is suitable);
- leave until completely dry, but not less than 24 hours;
- remove the film and degrease the surface (for example, with alcohol);
- polish the area.
In conclusion, we can say that removing a chip on an acrylic bathtub is certainly not an easy task. However, if you approach this issue correctly and responsibly, you can restore the appearance of the bathtub in less than three hours.
Using traditional methods
If you suddenly don’t have a special putty on hand, and the store is closed and you can’t purchase a repair kit, then you need to use improvised means. There are folk methods that still successfully repair defects in the form of chips on bathtubs.
- First method: make a mixture of BF-2 glue and chalk powder. In the place where the enamel has broken off, apply glue and sprinkle with fine powder, after which the excess is removed with a spatula. The procedure is repeated until the surface of the chip is equal to the enamel. This is a fairly durable component that will last about 5-6 months. The surface restored in this way needs to dry for 4 days.
- The second method is to use a mixture of epoxy resin and porcelain chips. The application method is the same as for chalk glue. Cover the damaged area of enamel with resin and sprinkle with crumbs. This is a more durable version of the “patch” that will last about a year.
Please remember that these methods are temporary and must be reworked using factory components. But if you urgently need to restore a chip, then you should use them. But the most effective way is to seal chips with epoxy enamel.
Restoration of an old bathtub (2 videos)
Different ways (24 photos)
Damage Prevention
To avoid having to renovate your bathtub too often, it is recommended to take advantage of practical expert advice on maintenance. Firstly, for cleaning you cannot use products with an abrasive base (powders, soda, etc.). They quickly scratch the surface, and the cracks become clogged with dirt and germs. Therefore, the product becomes not only unaesthetic, but also unhygienic.
Secondly, you cannot use household chemicals based on ammonia. Such a chemical substance greatly damages the acrylic surface, and the first defects may appear after the first contact.
To clean an acrylic bathtub, it is recommended to buy detergents designed specifically for such surfaces in specialized stores. These products are made on the basis of synthetic formic acid, which perfectly cleans acrylic, but at the same time does not spoil it.
Which exit?
Of course, you can purchase new plumbing fixtures, especially since today’s market offers a large selection. But a new bathtub is quite expensive.
Add to this the worries and costs of dismantling the outdated system, transporting it and installing a new one.
It is much easier to try to do the repairs yourself. Like we said, it's easy.
After reading the individual recommendations, you will very easily be able to carry out repair work on various acrylic bathtubs with your own hands, and you will have a great idea of how to repair a crack in an acrylic bathtub, how to make a completely invisible chip, and how to polish the surface. (See also: acrylic bathtub insert)