Epoxy resin has long been transformed from a two-component adhesive into a unique ornamental material used in the manufacture of original tabletops and jewelry. The quality of products depends on the degree of transparency of the resin and the technique of processing the surface layer. Epoxy polishing is carried out with various compositions and materials. Each master has his own secrets. The review presents the best technologies.
Where is resin used?
Epoxy resin is a universal adhesive that hardens to a monolithic state. This material is familiar to many. Fiberglass impregnated with epoxy reinforces the bottoms of small boats and large ships. In the industrial sector, resin is used as a binding component in the manufacture of composite finishing tiles, slats, and deck boards.
In its pure form, the resin is used to create glossy transparent surfaces. After polymerization it acquires high density.
After grinding and polishing, ordinary resin takes on a resemblance to amber. Manufacturers have improved the composition and are producing colorless compositions that can be tinted to obtain the desired shade.
In its pure form, the resin is used to create glossy transparent surfaces.
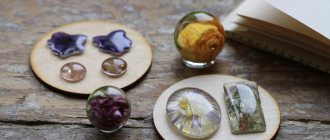
In jewelry, polishing makes it possible to create real works of art. During processing, it acquires a noble appearance and retains its decorative effect for a long time. The two-component adhesive composition firmly adheres to the base, the resulting layer does not crack when drying due to changes in the internal structure.
Epoxy resin, poured into molds, after polymerization lends itself well to mechanical processing: cutting, grinding. In its solid state, the surface of a table filled with epoxy is comparable to artificial stone. The floors are poured with a polymer adhesive mixture. After processing, the resulting layer becomes transparent, through which the structure of the solid wood is clearly visible. The surface quality of finished products depends on what the epoxy resin is polished with.
The surface structure of a wooden epoxy countertop depends on the wood texture and fiber. There are fewer defects on cuts of dense tree species.
In jewelry, polishing makes it possible to create real works of art.
GOI paste: what is green mass?
The name stands for: State Optical Institute. This is where this cleaning material was created in the 30s. last century. It looks like a greenish mass, sold in the form of a smooth block and in a sealed jar.
Composition of the cleaning product
The main component in the composition is chromium oxide. The grain size of the preparation and its characteristics directly depend on its concentration. The higher the percentage of chromium oxide, the rougher the composition (variation can be from 60 to 85%).
Pasta varieties differ in grain size. Each of them is given a special number:
- No. 4 - rude. It contains: chromium oxide - 81%, stearin - 10, fat - 5, kerosene - 2, silica gel - 2. Light green tint, best scrapes the top layer of the material. Cleans out large scratches left after using other abrasives.
- No. 3 - average. Chromium oxide - 76 parts, fats - 10, stearin - 10, kerosene - 10, silica gel - 2. Pure green hue. Cleans out minor irregularities and scratches and gives the material a matte finish.
- No. 2 - thin. Chromium oxide - 74 parts, stearin - 10, fat - 10, oleic acid - 2.8, kerosene - 2, silica gel - 1, baking soda - 0.2. This composition is characterized by a dark green color. Used for polishing most products.
- No. 1 - thin. Nitric oxide - 65-70%, stearin - 10, fat - 10, kerosene - 10, silica gel - 1.8, soda - 0.2. It is distinguished by a dark color with a tint of green. Goi pastes 1 and 2 are designed for grinding or final finishing of the material, and give it shine and shine.
Dried green mixture can be "reanimated" so that it becomes soft again. This is done using machine oil. Add 3-4 drops of machine or any other technical oil to a small piece, ground into fine crumbs. Place in the microwave for 30 seconds and grind the ingredients into a homogeneous mass.
Required tools and materials
Surfaces made from high-quality epoxy compounds acquire a marketable appearance after preliminary grinding and final polishing. The technology is very different from the process of processing glass, stone, and plastic.
Costume jewelry is mainly brought to condition manually using:
- Diamond nail file;
- Fine-grained sandpaper from “three” to “00”;
- Foam rubber or special troweling sponges with a glued layer of abrasive of various grain sizes;
- Polishes, various polishing compounds or GOI paste.
A soft finishing abrasive can be toothpaste applied to a soft cloth.
Surfaces made from high-quality epoxy compounds acquire a marketable appearance after preliminary grinding and final polishing.
The manual method is used in the manufacture of delicate products with fine finishing. It is inconvenient to treat tables in this way. Sanding large areas by hand is too tedious and time-consuming.
To speed up the process, use the following tools:
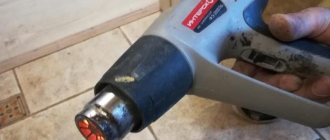
- A Dremel is a kind of drill with a rotating rod on which all kinds of attachments for grinding are attached (the downside of using a Dremel is that the rotation speed of the attachment is too high; beginners can damage the surface being processed with careless movement);
- The drill is used for sawing off large beads and rollers formed during the restoration of damaged epoxy coatings”;
- A mobile milling cutter for manicure is a tool similar to a Dremel, but with a lower number of revolutions, used when performing fine work; the diameter of the disk attachments varies from 10 to 100 mm.
Sanding large areas by hand is too tedious and time-consuming.
Features of consumables:
- The grain size of the nozzles is reduced gradually; the smaller the grain size, the smoother the epoxy layer is sanded;
- GOI paste is chosen by color: coarse-grained light green, medium-grained - gray, fine-grained - brown (the smallest is almost black), only green and gray are used for grinding;
- Automotive polishing paste 5041-3M, sold by weight, is cleaner than GOI paste and applies more smoothly to the nozzles;
- Polishing wax for finishing removes too thin a layer, the polishing process is delayed;
- Polishing pastes produced under the MIRKA brand give good results; they create a mirror shine (Polarshine 35 is a grinding product, creates a uniform matte finish; Polarshine 20 paste is used for finishing).
Polishes containing silicone quickly create a pleasant shine, but the effect is short-lived and disappears after treatment with a damp cloth.
Polishes containing silicone quickly create a pleasant shine, but the effect is short-lived.
Important Safety Instructions
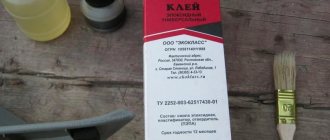
Remember that epoxy glue becomes completely safe for humans only after the complete polymerization process. This requires 1.5–2 days. When working with a liquid resinous substance, you must use personal protective equipment: a respirator mask, gloves and goggles. Such protective measures will also be needed during subsequent (finishing) processing of finished products.
Do not inhale small particles of abrasive; such dust is very harmful. And after finishing the work, the room should be thoroughly ventilated, clothes should be washed, and all working tools should be washed. The place where polishing work was carried out is first covered with plastic film, which can be thrown away after finishing the work or thoroughly wiped with a damp cloth.
Surface preparation
In the manufacture of epoxy products, smudges and sagging of resin often occur; upon inspection, other defects are revealed:
- Excess leaked beyond the contour during pouring;
- Whitish spots caused by exposure to water vapor;
- Small chips, scuffs;
- Folds, shrinkage depressions;
- Rough edges, too sharp edges.
All these defects are eliminated with hard abrasives before grinding. Properly sanded resin looks unattractive, epoxy turns matte, this is normal.
Properly sanded resin looks unattractive, while epoxy turns out matte.
Before you start polishing the epoxy, you need to remove dust and degrease the surface (remove traces of hands and sanding paste). Without preliminary preparation, it will not be possible to thoroughly polish the resin to a mirror shine.
A few recommendations:
- When pouring the epoxy layer, it is important to pay great attention to the formation of the edges;
- If water gets into the resin, perfect transparency cannot be achieved by polishing; milky traces will remain;
- Epoxy is applied in several stages, allowing the previous layer to polymerize. Then the shrinkage of the material will be uniform, no cracks, dips, or waviness will appear;
- Before processing, all surfaces are subjected to test edge turning.
Before you start polishing the epoxy, you need to remove dust and degrease the surface.
When is it necessary to polish a product with epoxy?
Epoxy compound is currently very often used by needlewomen to create various costume jewelry.
Professional jewelers know that working with such material is not easy; when the product is removed from the mold, a groove is often formed on the pouring side.
This is because epoxy shrinks in size as it hardens. Additional polishing is also necessary for smooth crystals. Stains, smudges and growths may form on the reverse side.
The first step is to treat the surface if the product has the following damage:
- depressions
- protruding edge
- uneven edges
- pointed edges
- scratches or chips
If you encounter a defect, no problem. You will need to polish the piece well and then coat it with another layer of epoxy. This way the defect is removed without loss of quality. However, in any case, polishing and polishing is the final stage in any operation with jewelry.
This gives everything a finished and aesthetically beautiful look.
Grinding and polishing process
For the initial stage, it is recommended to use a tape nozzle, which covers a large area. For finishing jewelry and countertops, it is better to use eccentric ones of various sizes. When using a drill, it is important to correctly regulate the speed of rotation of the nozzle so that developments do not appear.
If there are large defects, they are eliminated by rough processing. The recommended rotation speed is up to 1000 rpm, the initial abrasive grain size is 80. When waves, sagging and other irregularities are eliminated, further grinding begins. The grain size is reduced smoothly: 80 is replaced by 100, then the next increase is made until the 2000 marking is reached.
For finishing jewelry and countertops, it is better to use eccentric ones of various sizes.
Not all resins sand and polish equally. Thanks to additives, manufacturers are able to create a wide range of epoxy products.
It is not advisable to use felt; it creates scratches. Grinding and polishing pastes are rubbed with a soft cloth. For better glide, add grease or Vaseline. The oily film formed is easily removed with water. Epoxy resin is polished to a lasting shine.
To make the resin transparent, wood sanders operating in rotation mode are often used. A rubber funnel or a nozzle made of elastic foam impregnated with polish is attached to the shaft.
Polishing compounds eliminate even slight roughness on the surface of the resin, the layer becomes transparent and acquires a noble appearance. It is necessary to ensure that all defects are eliminated, then you will get a high-quality tabletop or jewelry. By using professional tools and fine-grained pastes, it is possible to avoid scratches and dullness.
It is necessary to ensure that all defects are eliminated, then you will get a high-quality tabletop or jewelry.
After finishing, products with colored resin compositions are recommended to be coated with a special varnish that protects the pigments from UV radiation. Colorless epoxy layers after such an operation will not turn yellow, and the color of the poured base will not be distorted.
Some craftsmen recommend using soapy water after finishing finishing. Moisten a fine-grain polishing pad in a solution of dishwashing detergent and run the tool over the entire surface. All the shortcomings that could not be eliminated immediately become visible. Soap is also used as a type of polish for finishing fine jewelry.
After finishing, products with colored resin compositions are recommended to be coated with a special varnish.
Causes of defects after painting
There are several main reasons why certain defects appear after painting a car.
Dusty room
Among all paintwork defects, debris adhesion during operation occurs in 70% of cases. The reason for this: dust in the garage, a poorly washed car, insufficient ventilation of the room. Painting defects are eliminated by “wet” or “dry” sanding. Sandpaper with an abrasiveness of at least 2000 grit is used if sanding is done by hand. You can use a grinder. Polishing of the ground surface is required.
Shagreen
The reason for the appearance of “orange skin” on the body, instead of a beautiful shiny surface, is simple:
- Using too thick varnish or paint. Often a defect occurs due to the driver’s carelessness; each paintwork has an individual application technology, number of layers, and dilution parameters.
- Wrong choice of spray gun for painting. With low air pressure in the gun nozzle, the paint is sprayed unevenly on the surface of the body, and the density and thickness of the coating is not maintained.
Matte
The defect of a matte surface instead of gloss will be noticeable only on the fifth day after painting. If you wet the body with water, it will sparkle in the sun, showing the color that the driver would always like to see on his car. A defect appears if:
- High room humidity with complete lack of ventilation. If painting is done in winter, the garage should be well heated, the temperature should not fluctuate, falling below 15 degrees and not rising above 25.
- High pressure in the gun nozzle if painting is carried out with a spray gun (not a production paint cylinder).
- Incorrectly selected thinner with high cooling parameters and low drying class.
Air droplet breakthrough
The defect appears a few days after painting. Causes:
- Unsuitable brand of thinner that evaporates quickly;
- Applying thick layers of paint;
- Painting with a second or third layer occurs on an insufficiently dried first layer;
- High drying temperatures or using a hot fan.
Polished surface treatment
Over time, countertops and other epoxy resin products fade due to natural wear and mechanical damage to the surface. Irregularities and barely noticeable dents appear. The appearance of the layer deteriorates - the former luxurious shine disappears. Treatment with water-based parquet varnish followed by polishing with a piece of soft felt or wool will help restore presentability. The varnish will harden faster if you use a hairdryer or ultraviolet lamp to dry it. After rubbing, the original gloss returns.
Treatment with water-based parquet varnish followed by polishing with a piece of soft felt or wool will help restore presentability.
Surface care
Features of epoxy resin are low heat resistance. Do not place anything hot on the table or use aggressive detergents containing acids and alkalis for washing. Chemical exposure can cause the resinous layer to become cloudy.
Do not place anything hot on the table or use aggressive detergents for washing.
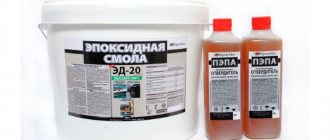
Epoxy has taken a well-deserved place on construction sites and in everyday life due to its universal consumer properties, translucency, and low shrinkage coefficient. A synthetic oligomer, consisting of a hardener and a base, forms a waterproof film comparable to many building materials.
Sanding plastic from deep scratches
Deep scratches are difficult to repair with putty, as burrs and the elasticity of the grout itself interfere with this. In addition, it is not always possible to choose a material of the desired color, which will not be visible after hardening. It should be taken into account that polymer plastic is soft and easily grinds off. The main condition is to maintain a low surface temperature of the product during the restoration process. Strong friction with a high amplitude of movement causes heating and melting of the synthetic mass.
To work you will need the following tools and equipment:
- sandpaper of different grain sizes;
- handmade grater;
- grinding machine of any operating principle;
- soft brush;
- soap;
- rags.
It is recommended to grind plastic using the following method:
- Secure the product to a solid and stable base. You can use a vice, clamps and self-tapping screws.
- Attach the coarsest sandpaper to a hand or power tool.
- Moisten the surface to be treated with soapy water. This will reduce friction and prevent it from overheating.
- Using gentle pressure, use circular movements to treat the damaged area, covering 1-2 cm of the clean area.
- As the polymer grinds down, change the nozzles, gradually reducing the grain size. Perform the final stage with zero.
- Rinse off the liquid and check the quality of the work performed. If necessary, repeat the procedure.
The result should be a smooth matte surface with a uniform texture. After this, the material is brought to the desired state using more delicate means.