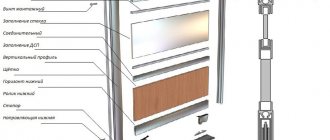
Most often, the socket for an electric stove is structurally different from standard devices, since it is designed to connect devices of maximum power. In such cases, a separate line is required for connection, which is led directly to the main panel. If it was not carried out when the electrical wiring was installed, then you need to be prepared for additional work.
Distinctive features
Regardless of whether the outlet will be installed for the hob or oven, a power outlet must be installed for them. There are quite a few varieties of them - each manufacturer can make a design at its own discretion, while complying with the requirements of GOST or PUE. Its main difference from household ones is the ability to work with high power currents, which is reflected in the thickness of the conductive contacts.
The vast majority of electric stoves, hobs and ovens have external metal parts that, under unfavorable circumstances, can become live. To protect people and equipment from electric shock in such cases, grounding is used, the contacts of which in ordinary sockets have the form of clamping antennae. The oven socket cannot be equipped with such protection, since it is insufficient for high amperage currents. As a result, the socket grounding contact is located on the plug itself with a separate pin. Some people confuse a three-prong plug with a three-phase one, but in fact it is phase, neutral and ground.
Connection via junction box
Sleeving is inconvenient because, firstly, the connection is not dismountable, and secondly, crimping requires a special tool. Not everyone has a press, and you cannot crimp such connections with pliers.
In this case, the KlK-5S mounting box will come to the rescue. Apart from a screwdriver, you don’t need anything here, and the outgoing cable can be disconnected at any time.
True, its contacts can be quite delicate, so do not overdo it with the tightening force.
In addition, its overall dimensions, unlike powerful sockets, are small and the whole thing can be conveniently mounted behind kitchen cabinets.
The connection is made traditionally:
zero via screw terminal N (blue wires)
the ground is indicated by the “grounding” icon - yellow-green conductor
There are three phase connectors on top. If you have 220V, remove the extra phases and isolate them.
Wiring Requirements
If the wiring on which the oven socket will be installed does not meet the following requirements, then it must be changed, and it is advisable to clarify this issue before purchasing the device:
Separate line. The standard wire and outlet are rated at 16 amps. The voltage in the network is always 220 Volts, so you can calculate the maximum power of the socket for an electric stove and what you can connect through it. Power is equal to the product of current and voltage - 16 times 220 equals 3520 watts or 3.52 kW. This means that if the socket for the purchased hob and oven is connected to a common kitchen circuit, then these devices can only be used one at a time, turning off everything else - the microwave, kettle, etc. If you connect an oven to one outlet, and to another, on the same line, for example, a hob or other fairly powerful device, then the wiring will heat up and will soon fail if it does not close immediately.- Wire section. In closed-type wiring, a copper cable with a cross-section of 2.5 mm² can withstand connecting devices with a power of up to 4.6 kW. If the device is more powerful, then you need to select the wire according to the following table:
Using this data, you can calculate not only all the wires in the kitchen, but also which socket is needed for the connected hob. It is clear that if the cross-section of the wire is selected end-to-end, then it will not be possible to connect more than one device to one socket, even a double one, therefore, in case such a need arises, the wiring in the kitchen should be selected with reserve.
How to properly connect an electric stove to a 220V outlet with your own hands
Installing an electric stove yourself is an extremely important undertaking; every detail is important. Therefore, without experience and a clear idea of how to do it, it is better to turn to specialists. In any case, the installation diagram is something like this:
- Select the necessary materials and tools so that everything is at hand.
- Open the electrical panel and equip it with an electronic circuit breaker; if you don’t already have one, you can already pull the cable from it to the electrical appliance.
- Install the socket.
- Taking into account the features of the tile layout, it is necessary to connect it using the appropriate method.
- Perform a test run of the system.
Connecting directly is considered the safest, because the absence of unnecessary cables significantly reduces the risk of device overheating.
If questions arise during the selection and connection process, the answers to most of them can be found in the operating instructions. There is a step-by-step explanation in different languages, using tables, graphs, images and diagrams. This information is designed to be accessible to different categories of people.
Via terminal block
It involves connection without an outlet, directly to the panel, where all this equipment is controlled. That is, the cable originates in the electrical panel, runs along the wall perpendicular to the floor and parallel to the ceiling, immediately entering the connector.
This is a reliable option, especially if there are issues with updating outdated wiring in the building as a whole.
Through a regular outlet
To connect to a socket, you need to check whether it conducts current; for this, a special screwdriver is used and inserted into the hole. If the light comes on, it means there is a phase, you can continue connecting.
If there is no signal about the presence of current supply, the equipment will not work from it.
Connecting the wire
Typically, wiring allows you to connect the cable of an electrical appliance to the socket box, rather than through a plug, since then the network can be used additionally. Although you will have to turn off the stove in another way, you won’t be able to simply get the wire.
If there is no point in creating wiring, then the mounted socket simply needs to be checked with a special device to find out the phase.
Plug installation
If there is enough space for other household appliances, and periodically you need to unplug the device from the outlet, you can connect it using a plug. You just need to purchase it in advance and, following the instructions, connect it to the device cable. Then many manipulations become easier, but this can only be done with 220V devices.
To make the connection, as already mentioned, you will need to have a 3-core cable, 3-pin power sockets and a plug with a rated current of at least 32 amperes.
Selecting an outlet based on the number of phases and grounding
Since the manufacturer does not know which socket will be used for a specific electric stove, most devices are sold without them. It’s not even that the sockets are different - it’s just that most devices can be connected to both a single-phase household network and a three-phase source. Accordingly, only after determining the type of device that will be purchased, it is decided which outlet to choose.
A single-phase power socket is larger than a regular one and can supply a phase, working zero and grounding to the device. If the apartment does not have grounding, then one contact remains empty.
A three-phase socket for an electric oven or under a hob is a power outlet by definition - even the weakest of them is designed for a current of 32 Amps. Depending on the presence or absence of grounding, it may have 4, 5 or 7 contacts. The last option is rare, since it is a way to install additional protection and is not used in the vast majority of cases.
As a result, the main choice of an outlet for electrical equipment comes down to determining the power for which it should be designed, the number of phases from which it will operate, and the presence of grounding.
Kinds
It should be said that power sockets are different. They are usually classified according to several criteria.
Purpose
There are several types of sockets that differ in purpose.
- A connector that does not have a ground connection. Such a solution will be the technically simplest type of power sockets for connecting electric stoves. It is usually used in conjunction with a plug that does not have grounding protection.
- Built-in power socket, which is equipped with grounding. In addition to holes for pins, a similar solution also has a special plug-pin of category F. There are also similar solutions, but with contacts on the sides. This option makes a connection to the grounding contacts even before the moment when the plug plugs come into contact with the power-type contacts.
- Connectors with protective shutters. In such options, the holes for power-type contacts are simply covered with plastic plates. The curtains can be opened in a version where the fork pins touch both contacts at once.
- Socket with ejector. It has a special device in the body for pushing out the plug, which is activated when you press the corresponding key.
- Connector with timer. Here you can simply program the socket for the time it is connected and turned off.
- Solutions with RCD. Such options will be an excellent solution in places where there are serious security risks.
Operating time
The duration of operation and reliability of the contacts will depend on the value specified by the manufacturer regarding the maximum number of switches on and off of the device. If the socket is of high quality, then it can withstand about hundreds of thousands of on and off cycles.
Installation method
According to this criterion, power sockets are divided into closed and open. The second option is used in appropriate wiring and is mounted directly in the wall as an overlay. Typically, wiring of this type is used in loggias, wooden houses, on the street, and so on.
If the installation is of a closed type, the power connector cuts into the socket box. Then the wiring will also be inside the wall. It is the second method that is considered the most common and is done in most categories of residential premises.
Resistance to external influences
Usually this moment is recognized by the markings that are indicated on each product. It usually consists of a special letter code, namely the letters IP, as well as various numbers. The letters indicate the presence of intrusion protection, and the numbers from 0 to 8 indicate the degree of this protection.
When choosing, you should pay attention to the following factors:
- the presence of a spring contact mechanism - it is better if the device has a pair of contact tabs;
- clamping category - as a rule, it can be either a double or quick-clamping design;
- diameter of the fork hole - according to the European standard, its size should be 4.8 millimeters, in post-Soviet countries this figure is 4 millimeters.
Tips for choosing a design
When you know what type of outlet the stove you are purchasing should have in terms of power and number of phases, you can evaluate the secondary characteristics that will affect the comfort of its use.
internal socket for electric stove
External or internal. The first option allows you to install a socket for an electric stove directly on the wall surface - in some cases, a stand is first installed for this, but more often it is attached with ordinary dowels. In the second case, the installation of a power outlet for an electric stove is done inside the wall, for which you will have to cut out a socket in it. This is more convenient because the hob plug will not protrude so much above the surface, and from a safety point of view, such a connection is more reliable.
Presence of a lock. If it exists, then this is very good, since electric current, especially high power, creates a vibration effect on the contacts. In most cases, contact clamps cope with this, but it will never be superfluous to play it safe with powerful devices. Fixation occurs due to the latch, which is raised with a button or threaded - with a union nut.
power socket with protective shutter
Safety curtains. Most often, sockets are installed low, which poses a potential danger if there is a child in the house. The curtains in the power socket under the oven are made in such a way that you cannot insert anything into them except a plug.
Degree of protection. In documents and on the outlet itself they are designated as IPXX. Instead of XX, a digital code is placed, indicating the degree of protection of the contacts from foreign objects and moisture. The minimum value is IP00, and the maximum is IP68. The fully protected socket and plug for the electric stove prevent water from entering the contacts even when their housings are immersed in water. In the kitchen, it is allowed to use devices with a protection class of at least IP24 - this means that the housing protects the contacts from direct contact with splashes of water, regardless of which side they come from.
socket with built-in RCD
There are also models with built-in RCDs and other additional protection, but how justified their use is and whether it is worth overpaying for such “goodies” should be assessed in each case separately, depending on the overall quality of the device.
For more information about choosing an outlet for an electric stove, watch this video:
Installation Rules
The process of carrying out electrical work with a socket is not difficult. All you need is basic knowledge of electrical engineering and certain functional skills to handle the working tool.
Blackout
First of all, de-energize the room. To do this, turn off the apartment or house circuit breaker. This is done by moving the flag to a certain position. Exactly what position this will be depends on how the machine is configured. In any case, you need to see “0”, which is proof of a power outage.
Selecting a location
The location for installing the connector is chosen based on convenience and common sense. Sockets are placed behind the electric stove on top, behind the folding panel (or below the panel). It is also possible to install the connector outside the area where the stove is located (used for built-in stoves), if it is not possible to place it next to household appliances.
Cabling
First, select the correct power cable for the task at hand. To do this, use a physical formula, according to which the sum of the powers of all burners and heating surfaces, ovens (measured in watts) must be divided by the voltage involved (in volts). If the indicators are indicated in kilowatts, they should be converted to watts (dividing the value in kilowatts by a thousand).
As an example, let's take a situation where the voltage is 220 volts. The result obtained from the calculations is the amount of current passing through the power cable at full load. The cable is selected based on the result obtained and taking into account the relationship with the current. For electric stoves, a three-core cable with a cross-section of up to 4 square millimeters is most often used. This limitation is caused by the fact that the total power consumption (regardless of the manufacturer) does not exceed 7 thousand watts. This corresponds to 32 amperes.
After purchasing a cable of the required length, installation of protective equipment begins.
Installation of protective equipment
To protect against too high current flow and short circuits, a power circuit breaker is used. Based on the maximum current in household electric stoves (32 amperes), the machine is selected with the same load current.
Connecting the stove
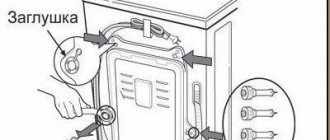
Before connecting the electric stove, you need to prepare the tools and all the necessary equipment. The list of necessary items includes pliers, screwdrivers, a knife, a socket for an electric stove and a plug.
Connections are made as follows:
- Open the connection unit of the electric stove. It's on the back panel.
- Unscrew the screws to loosen the contacts in the connecting block.
- The cable is stripped. All veins are cut.
- Connect the wires to the contacts. The rule here is: red - phase, blue - zero; yellow - earth.
Connecting wires
This task is performed in the following sequence:
- Open the plug. To do this, unscrew the fixing screw on the plug body. Remove the upper part of the housing.
- At the bottom there are contact surfaces with terminals. Connect all three wires coming from the electric stove to the terminals.
Connecting the socket
The socket is installed in several stages:
- Mark the location for installation.
- Make holes in the wall using a hammer drill.
- Connect the wires. To do this, loosen the fastening elements of the contacts, and then attach each core to the desired clamp.
- Place the socket panel in its place and secure it with screws.
Connecting the circuit breaker
The location of the 32 amp power breaker is selected based on the possibility of quick shutdown in the future if such a need arises.
Installation takes approximately 5–10 minutes. The process consists of installing a base for fixing the machine - a DIN rail, as well as connecting conductors. For an electric stove, a machine only for the phase core will be quite sufficient.
The work is done like this:
- Remove the cable braid with a knife.
- We look for the red wire. We cut the conductor and strip its ends.
- In accordance with the connection diagram (it is on the circuit breaker), we connect the wires to the contacts.
Note! When installing a 32-amp machine, you should adhere to a certain length of stripped wires. Such conductors should not be separated from the contact group.
When the machine is connected, it is moved to the zero position. Then connect the conductor (which comes from the circuit breaker) to the electric meter. They take him into the junction box.
System testing
To check the performance of the system, you need to test each of its components. When the connector is installed, the circuit breaker is installed and the conductors are connected, the test voltage is applied. Until this point, check once again that all elements are installed correctly and that the contacts are sufficiently tightened. If the voltage testing passed without any unpleasant surprises, proceed to the next stage.
Using an indicator screwdriver, check the presence of voltage on the contacts. If it is missing, look at the correct connection, as well as the strength of the conductors. After this, the electricity will be transferred directly to the electric stove.
The circuit breaker is switched to the “on” position. If such a designation is missing, it is replaced by the “|” icon. After turning on the machine, check that it is working correctly.
The final test consists of testing the circuit breaker, connector and conductors to ensure they remain functional under maximum load. The check is carried out by turning all the knobs of the electric stove to maximum. The cable and socket should not heat up, and the machine should not cut off.
Connecting the socket
In general, connecting a power outlet for an electric stove in a sequence of operations is no different from installing a regular household one. The most important feature is the strictly defined connection of contacts. If for a household outlet there is no difference in how to connect phase and zero, then mixing up the contacts of the power ones, under the hob or for the oven, is fraught with a short circuit or the appearance of a phase on the metal parts of the device, regardless of whether the device is connected to a single or three-phase device. Power sockets are made in such a way that it is impossible to insert the plug into them incorrectly, but you must be careful when connecting.
Single phase sockets
It would seem that the only important thing in them is how to connect the grounding wire - the rest are ordinary phase and zero. In practice, the hob and oven are connected to certain contacts, since many models are designed to operate from one or three phases - you just need to remove or install a special jumper in the right place.
In order not to confuse what and where to connect, there are marks on the body on the inside of the socket and often on its cover indicating which contact should have a phase, where is zero and ground. All you have to do is watch carefully so that each installed wire is in its place.
Three-phase sockets
It is necessary to install and connect a three-phase outlet in the same way as a single-phase one, with the difference that there are some liberties with connecting the phases. If the neutral and ground wires must be installed strictly in their place, then the phases can be attached to the remaining contacts in any order - there is no difference.
Since the neutral and phase wires must be connected to a specific place, each contact is marked - phases with alphanumeric designations L1, L2, L3, neutral wire with the letter N, and grounding with three horizontal lines, each of which is shorter than the previous one.
A special point concerns the cable that will power the outlet. Depending on the number of phases, devices of different power can be connected to wires of the same cross-section, and the difference can be 50-80%. In this case, it is still advisable to choose the wires of such a cross-section as if the connection would be made in a single-phase way. The fact is that if, for example, we take a three-burner electric stove, then each of them can be connected to its own phase. Accordingly, when one of them is turned on, then only one phase wire is in operation. Most often, this does not matter, since the power of one burner is 1.5-2 kW, which can be handled by a thin wire of 0.5-1 mm², but once again it would not hurt to find out what connection diagram it is, or even better, just take the cross-section wires with reserve.
Installation procedure
Connecting kitchen appliances is usually carried out at the final stage of renovating a room. This means that the finishing work has already been completed in the room, power wires have been laid, and furniture may be in place. All that remains is to figure out how to properly connect the device and what is needed for this.
In order for everything to be done correctly, it is recommended to be puzzled by the relevant issue at the initial stage of design, drawing up a communications laying diagram. At this stage, it becomes clear what kind of socket is needed, whether it will be built-in or surface-mounted, and you also need to decide on the height of its placement.
Preparatory work
First you need to determine the installation location for an electric stove or built-in hob. Ideally, you need to know the model and technical characteristics of the device. It is possible that you will need to provide a direct connection.
This means that you can do without sockets and plugs. In addition, the emphasis is on the power of the equipment, based on which the choice of fittings, wires, circuit breaker with a nominal value of 32A and an RCD with a nominal value of 40A is made.
Typically a cable with a cross section of 6 mm2 is selected. If we are talking about a three-phase 380V network, then it will be a cable with 5 cores (possibly of a smaller cross-section), single-phase 220V - with 3 cores.
It is best to purchase copper wire from a trusted manufacturer, then it will comply with current state standards. This point should be given special attention, since not only the longevity of the wiring and the device, but also your personal safety depends on it.
Additionally, it would be useful to study the rules SP_31_110_2003, clause 9.2, which states that it is strictly forbidden to “hang” additional consumers, sockets, switches, etc. on the supply line.
If you cannot connect the stove without an outlet, the next step is to select fittings with the required characteristics. It is important to pay attention to the rated current parameter. It is also necessary to take into account the type of installation of power fittings: for hidden installation or for open design.
Accordingly, you will need to select a plug for it, unless, of course, it comes with the household appliance. It is also worth taking into account that a number of foreign-made products are incompatible with domestic sockets and may require the use of an adapter, which is advisable to avoid.
Determining the installation location
In this matter, you must be guided exclusively by electrical safety rules. The dimensions of the socket should not interfere with the placement of the stove relative to the working wall.
It should not be mounted directly on the work surface or in hidden places where access to maintenance would be difficult. It is strictly forbidden to install power accessories in the following areas:
- near the location of the sink;
- next to the washing machine;
- near the dishwasher.
If the stove is installed on legs, or if the hob is built into the kitchen unit, the ideal place is at a height of 10–15 cm from the floor level. The electrical point should be kept away from water and fire. Taking into account current standards, it is better to connect the stove directly through an outlet or directly to the power cable.
The use of extension cords is contraindicated. It is allowed to install an outlet behind the stove if it is easy enough to remove from the niche. A good option is to place the point in the adjacent lower cabinet.
Installation features and installation sequence
If the previous steps have been completed, you can begin connecting the stove. The work is easy to do on your own, but if you have any doubts, it is better to call a specialist. The connection is made on a de-energized line. This fact should additionally be checked using an indicator screwdriver.
Regardless of the type of outlet, it can be installed after finishing work. If the choice fell on built-in fittings, you will need to use a crown to drill the corresponding mounting cup.
We have already written about how to install the outlet itself in one of our articles. About installing sockets in an apron - here.
The power cable is inserted into the socket box. Using a special tool - a stripper - the protective braiding is removed by 8–10 mm.
The ends of the wires are connected to the socket mechanism, according to the pinout. It should be noted that the yellow-green wire is responsible for grounding (usually connected to the central terminal), white or brown for phase, blue for zero. The contact should be as reliable as possible, but you should not “pinch” the wires, as you can damage the terminal or conductors.
To check the quality of the connection, make sure the contacts are securely fastened. Fixing the socket box to the wall is usually done using gypsum mortar or alabaster. After the mixture has completely dried, the mechanism itself is fixed with screws, then an insulating outer cover is installed.
Next, check what voltage is in the outlet and whether there is grounding. This is done using a tester. If everything is normal, you can proceed to the stage of connecting the hob or stove.
Connecting contacts to the stove
Most stoves and electric stoves have a standard connection diagram, which shows whether the device can be connected to only one or three phases. If the device has a universal circuit, then it consists of 6 contacts, three of which are for connecting phases, two for zero and the last one for grounding. The markings are exactly the same as on sockets - phase contacts are L1, L2, L3, zero is designated as N, and grounding is indicated by a standard symbol.
single phase electric stove connection diagram
If a three-phase connection is made, then all wires are simply connected to the corresponding contacts. In the case of a single-phase network, you need to look for jumpers in the device kit - one of them closes the phase terminals with each other, and the second is neutral. Accordingly, the phase wire can now be connected to any of the first three terminals, zero to any of the next two, and ground to the last. If suddenly there are no jumpers, then you need to make them yourself, for which a piece of wire will do, the same one that was used to install the socket.
Important! On some devices, jumpers are already installed from the factory - if they are to be used in a three-phase network, then the jumpers must be removed. Otherwise, a non-warranty malfunction will occur immediately after connecting to the network.
Some devices do not have contacts, but instead simply have a wire that must be connected to a plug. Regardless of the number of phases, the insulation colors of the grounding wire will be yellow-green, the neutral wire will be blue, and the phase wires will be any other.
In any case, before connecting, you need to study the instructions - if the device is from a normal manufacturer, then it should have a diagram that is understandable even to a layman.
Very detailed instructions for connecting an electric stove are contained in this video:
and short instructions can be found here:
Cable used to power an electric stove
It is advisable to connect a household electric stove to the power supply via a separate line, which is connected to the distribution board. Usually such a line already exists. If it is not there, then we first carry out work on installing the cable line:
- We are laying a cable channel.
- We install on the distribution board an RCD (residual current device) corresponding to the power of the connected equipment (at least 32A).
- We draw the power line with a cable with optimal parameters.
The parameters can be as follows:
- PVS 3x4 - connection to a single-phase electric stove at 220V.
- PVS 4x4 - single-phase connection at 380V.
- PVS 5x4 - three-phase connection at 380 V.
Traditionally, cable cores are distinguished based on the color of their insulation:
- yellow-green – grounding;
- blue – zero;
- phase - all other colors.
Attention! If you decide to connect the electric stove to the general network of the apartment, then, taking into account the total power of all electrical appliances, the rating of the RCD on the distribution board must be at least 40A.
The cross-sectional area of the power cable core is calculated taking into account the power of the consuming device. This is exactly the case when big is not small: the power reserve will not be superfluous. You should calculate the parameters of the electric cable yourself in accordance with the standards of PUE 7 clauses 1. 3. 10 - 1. 3. 11. Modern standards dictate the use of cables with copper conductors in residential premises. If it is necessary to connect a copper wire with an aluminum one, all work should be done carefully and carefully so that in the future there is no overheating zone of the wires at the junction site, which leads to the danger of short circuits and fire. Connecting such wires by twisting is not allowed. There are several reliable ways to connect copper and aluminum wires. The most common one today is a terminal block connection.
The length of the cable line is determined by the position of the socket installation point. The choice of location for its location must meet certain requirements:
- distance from sources of moisture;
- distance from fire sources;
- accessibility for control and maintenance;
- inaccessibility for children.
Attention! We advise you to draw up a plan for placing sockets in your kitchen only after the design project has been approved. Otherwise, you may encounter the problem of their unavailability.
We have prepared the cable line, we go to the store to choose sockets for connecting the stove.
A few words about safety
The above instructions are enough for a person with at least some knowledge of electrical engineering or who wants to figure out what to do and how to do it to connect the electric stove. Otherwise, it is better to include in the purchase budget the funds to invite a professional for this purpose, especially if you need to carry out grounding or cut grooves in the wall for cable supply.
Despite the fact that installing a socket for a kitchen tile or oven can be compared to assembling a construction set, you should remember that electricity never forgives mistakes and requires not only respect, but also sufficient skills when handling it.