In a good renovation you will no longer see white plastic hatches; professional craftsmen always make secret hatches under the tiles. They do not spoil the appearance of the finish, but at the same time allow convenient access to meters, taps or pipes. In this lesson you will learn how to install invisible inspection hatches under tiles with your own hands.
It’s worth mentioning their disadvantages right away: the difficulty of installation for beginners and the high price. For example, a hatch measuring 30x60 cm from a good manufacturer will cost about 3,500 rubles. You can also find cheaper options; they will cost about 2,000 rubles.
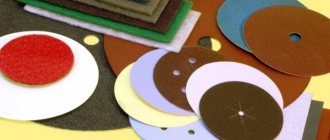
The cheapest options for removable bobby pins can be found in plastic (1,300-2,000 rubles). They consist of two parts: a base that is glued to the tile and latches that are screwed into the opening (see photo below).
Of the quality manufacturers, I can recommend Hummer, their price is more expensive than usual, but they are worth the money. They open without play, the trajectory of the door opening is well thought out so as not to chip the tiles. You can even order custom sizes.
Rational installation of the inspection hatch
The inspection hatch is a device made of frame binding and one or two sashes. The product is intended to mask a technological opening, which is formed to provide open access to node connections, shut-off valves, and metering devices in the system of certain utilities. In this case, the networks are mounted according to a hidden principle in niches of structures or behind cladding materials or separate boxes.
The convenience of installing inspection hatches is that for preventive inspection of communications, repairs or taking readings from metering equipment, it is not necessary to violate the integrity of structures and decorative finishes. There are several varieties of finished products that do not require additional decoration. This does not exclude the possibility of using lightweight covering or painting materials. Another group of devices is intended for subsequent cladding with tiles, panels, lining and other samples that fit into the overall interior of a particular room.
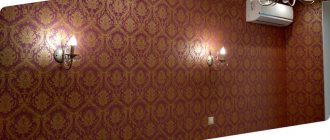
Masking the technological opening against the background of the general cladding Source prom.st
How to make a plasterboard hatch with your own hands: basic options for completing the work
make
plasterboard hatches yourself or buy ready-made ones, like any plasterboard product; its finishing can be anything: wallpaper, paint, decorative plaster. The availability and good performance characteristics of plasterboard allow it to be used for a wide range of installation and finishing work.
One option for using this material is to create profile structures, for example a plasterboard hatch, which you can make yourself. Some of the features of carrying out such work will be discussed further. After the markings have been applied, you can begin cutting out the space for installing the hatch. For these purposes, you can use either a simple hand tool, such as a utility knife or a hacksaw blade, or a jigsaw. In the case of the second option, you first need to drill a hole, the diameter of which will correspond to the width of the tool blade. After which the drywall is simply cut out along the marked perimeter. When carrying out repairs, an important point is free access to various types of communications: ventilation, piping systems, electrical equipment and others.
Hatches in drywall, installed correctly, remain completely invisible to prying eyes. So such a device will not affect the design and interior of the room if you want it. Like any other structure, a plasterboard ceiling hatch requires certain materials and tools, as well as skillful hands, for its installation. The required list includes:
Types of plumbing hatches and their sizes
When choosing an inspection hatch, you need to take several parameters into account. These include dimensions, material, design, purpose and rules of installation and use. Let's take a closer look at each of the criteria.
One of the first signs by which a hatch is selected is the material. There are only three types of popular solutions:
- Plastic . A budget solution with low weight and neutral white color. Due to the ease of manufacturing of swing models, the sizes of plastic hatches are presented in a wide range: from 10*10 mm to 800*500 mm. Installation is carried out by inserting the frame into the seat and fixing it with self-tapping screws and liquid nails. Swinging most often occurs after pressing the lower corner of the door.
- Metal . For production, as a rule, alloys with aluminum as a base or thin sheet steel are used. In order to protect products from corrosion, they are coated on the outside with powder paint and on the inside with anti-corrosion primer in the same tone. The designs and dimensions of the samples are similar to plastic models. The disadvantages include the relatively high cost, but it is compensated by the durability of the metal, a wide selection of paint and varnish products to update the protection and appearance of the hatch.
Sample of a simple metal hatch for plumbing Source mtk65.ru
See also: Catalog of companies that specialize in engineering systems (heating, water supply, sewerage and others) and related work
- Combination of materials . There are two fundamentally different compositions: a door leaf made of gypsum fiber sheet for gluing tiles, two frames (on the leaf and for installing the hatch in the seat). The frame design can be made of an alloy containing aluminum or reinforced steel. The former are lighter, but more massive due to their low load-bearing capacity. The latter are heavy, but cope with greater pressure with smaller dimensions.
The third option for inspection hatches is often called invisible. This is justified by masking the opening with the facing material of the main part of the wall, ceiling or floor. The main thing is to choose the right type of mechanism so that you don’t have to replace an expensive (compared to other models) hatch with a new one. It is also worth noting that the manufacturer’s warranty does not apply to the mechanical part of the products.
The table below provides an overview of the design solutions of various types of hatches.
| Constructive | general characteristics |
| Swing | The traditional solution is a device similar to a regular sash on a window, interior or entrance door. Installation is possible almost anywhere where there are no obstacles to opening the hatch to the extent necessary for access to communications. The door is controlled by a slot or a handle attached to the outer surface, rubber or plastic suction cups, or latches. There may also be different fasteners: magnets, locking mechanisms with matching slots on the frame binding. |
| Push | As a rule, such a sample has a similar solution to the swing version. The hinges can be located on either side - depending on the degree of ease of use. The shutter is controlled by pressing it. This solution is relevant for installing an invisible hatch for subsequent cladding with tiles or panels. |
| Sliding | Here the door moves along the main plane with a slight extension from its seat. This solution is relevant for small rooms, hard-to-reach places where it is impossible or irrational to provide space for a swing model. Given space limitations, a clamping mechanism with locking magnets is often installed here. For convenience, you can also use suction cups to open and close the opening. |
| Folding | The best option in conditions where movement of the sash in the lower part of the inspection opening is unacceptable. Typically the sash deflection angle is maintained at 45 degrees. In addition, there are chains with carabiners for fixing the door in the desired position. There are varieties that are not secured at the bottom with screws and self-tapping screws in order to completely remove the cover for maintenance or repair work. |
| With two doors | As a rule, such products are installed in large openings for access to utility connections and equipment. Here the dimensions are often close to or exceed 1 meter. Installing a two-door hatch in this case is the optimal solution, since any single-leaf option will look too massive or not withstand its own load (especially with cladding). |
Stages of work execution
To achieve the highest quality work result, the actions should be divided into several separate stages and performed sequentially.
Preparation
At the preparation stage, it is necessary to make initial measurements, as well as prepare the necessary tools. In this case, you will need measuring and control devices, such as a tape measure, a building level and a pencil. When taking measurements, it is important to monitor the exact orientation of the lines in space, for which you will need a level. Accuracy is also important here because for the most presentable appearance of the hatch, the gaps between the components should be minimal. It is worth adding that if such an inspection hatch is planned to be made in the room, then this should be taken into account at the stage of installing the sheathing before finishing the walls. In the place where the work is proposed, the structure should be further strengthened with additional slats.
Sawing
After the markings have been applied, you can begin cutting out the space for installing the hatch. For these purposes, you can use either a simple hand tool, such as a utility knife or a hacksaw blade, or a jigsaw. In the case of the second option, you first need to drill a hole, the diameter of which will correspond to the width of the tool blade. After which the drywall is simply cut out along the marked perimeter.
Frame installation
If a ready-made frame is used, the work is simplified as much as possible. The element, in accordance with the attached instructions, is mounted inside the previously obtained hole and secured to the pre-assembled elements of the wall sheathing. However, if special decorativeness is not required or the skill level allows you to freely handle the tool, then the hatch frame can be made independently.
As the simplest option, you can consider installing a tilting hatch with magnets.
- To do this, the frame of the hatch itself is first made. You can use simple metal profile slats fastened with self-tapping screws. Since intense mechanical loads on the element are not expected, several fastening points will be sufficient.
- Magnetic holders are installed in several places of the supporting frame. These can be used, for example, those that are installed in kitchen furniture. Additional metal elements from the same holders are attached to the hatch frame, which will provide additional reliability of fixation. Small self-tapping screws are suitable for fastening magnets, but the plates can also be glued with hot glue.
- Next, the sawn part of the drywall is secured to the frame. Self-tapping screws are also used here. It is worth remembering that in order for the folding part to move inside the frame, there must be a small gap of 1 - 2 mm between the elements.
After this, the finished hatch is finished in accordance with the general design direction. As can be seen from the above, there are quite a lot of options for how to install an inspection hatch in drywall, and everyone can choose the method that is suitable for a particular case to solve the problem. In any case, the main thing is to respect safety rules and carry out work with care.
Features of installation of inspection hatches under tiles
Before installing an inspection hatch under a tile or a finished sample, it is necessary to correctly form the technological opening. A reliable support base made of wooden beams, boards or metal profiles is assembled under the supporting frame. The exception is the block design. Here you may need additional leveling of the side walls with durable cement plaster.
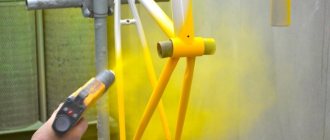
Installing a hatch on a metal profile frame before covering the walls with plasterboard Source cstor.nn2.ru
The next step is to install the main frame. Here it is more convenient to complete the task after removing the sash from the binding. It is important to carefully adjust the position of the “box” taking into account the horizontal and vertical levels. If the diagonals between opposite corners are different, then the door will not fit freely into the opening, and the fittings and door leaf will quickly fail. The frame for loaded doors must also be aligned in the longitudinal plane to prevent damage to the decorative finish and control mechanisms.
Plastic hatches are often fixed with liquid nails. Craftsmen recommend not focusing on the lightness of finished products. For any model, the “box” must be additionally secured with self-tapping screws, and, if necessary, with dowel nails. After this, you can assemble the structure and check the entire installation for correctness.
Joints between tiles
In order to make the inspection hatch under the tile as inconspicuous as possible, you need to pay attention to this nuance. After the installation of the structure into the surface is completed, the tiles on the hatch cover are glued and processed, and the hatch is closed. Then the seams that are located between it and other tiles must be filled with silicone. This is done to ensure maximum invisibility. Before application, you first need to cover the contours of the adjacent tiles with masking tape, and then only fill the seams with silicone. After it hardens, you need to carefully draw a sharp object along the contour of the tape, and then peel it off. You will get a neat inner seam.
To ensure access, the following is done. Using a utility knife, the silicone is cut at an angle along all sides of the structure. Please note that cutting must be done as carefully as possible, as there is a high risk of ruining the seam and scratching the tile.
Briefly about the main thing
An inspection hatch is a structure made of a frame and a door to mask the technological opening.
There are ready-to-use samples made of plastic or metal, blanks with a sash for subsequent cladding with tiles or other materials.
Hatches differ according to several criteria: material, dimensions, opening methods, purpose.
When it comes to door control, there are classic options, folding (removable) or retractable options.
By opening, samples with shut-off valves, push-type or with magnets differ.
The hatch is installed after a reliable, durable seat has been formed.
The supporting frame is attached to liquid nails and hardware, taking into account compliance with the horizontal and vertical levels.
Ratings 0
What to look for when choosing a hatch
The first important issue is the location of the hatch. Based on this, the design and materials that are most suitable are selected. If you intend to install it under a bathtub or sink, you need to choose aluminum structures, as they are the most resistant to corrosion.
The second issue is the free space available for opening. If it is limited, you should give preference to a model with a sliding opening.
The seal plays an important role in this design. If the hatch is located where water regularly enters, it is necessary to install one of the types of seals.
Plasterboard cladding
Drywall is attached so as to connect the hatch frame and the riser profile. As a result, the revision and the drywall should be in the same plane.
A building level will help check the quality of work, which will show whether the structure is in the same plane. You need to adjust the position of the door; for this, use the hex key that comes with the revision.
Before installing the tiles, you need to lock the inspection lock. A push-open hatch may open accidentally while laying tiles. You open the hatch, close the lock and lock it with a clip.
Seam cutting
In order for the revision to actually be invisible, you need to think about the seams. The seams are filled with white silicone sealant. To dispense the sealant, use a gun and a tube of silicone.
To avoid staining the ceramics, cover the contours of the revision with masking tape. Dried sealant is not easy to remove from ceramics and requires special care and careful work.
To prevent the sealant from sticking to the tape, it is coated with vegetable oil. The tape must be removed immediately after sealing the seams.
What to follow
When starting to install a bathtub hatch under the tiles, you should carefully study the numerous instructions and recommendations on this issue available on the Internet. A video that shows in detail the sequence of installation of hatches and specifies the requirements for choosing a design can be especially useful.
Having some metalworking and plumbing skills, you can completely cope with the independent installation of this simple device. However, you can become a professional only by gradually acquiring certain experience in performing work. Only in this case can you begin work with confidence, without fear for the quality of installation, the absence of distortions and deformations of the installed object.
Recommendations:
Various methods are used to secure a hatch in a wall opening. A hatch located near the wall can be fixed directly to the wall using dowels and self-tapping screws. Fastening with anchor bolts is used if the hatch is installed in a wall on which ceramic tiles are laid.