The best way to draw on plastic
How to paint plastic?
Anton Gusakov answers. Friends, today I will tell you a little something new about painting plastic. The question of painting plastic comes up infrequently, but this is where its insidiousness lies - rarely will someone be able to paint plastic correctly without searching for additional information, because he has not yet encountered this! The tips that I will give here will help you paint new pipes, window sills, plastic parts of the car, and even paint a plastic system unit with Khokhloma! (if, of course, such a desire arises ;))
Plastic is a plastic mass of organic natural or artificial polymers.
Plastics include the following materials:
— Polyethylene, — Polypropylene, — Polystyrene, — Fluoroplastic, — Polyvinyl chloride,
There are international designations for plastics, from which we will understand how and whether it is possible to paint plastic at all.
Usually colored in the mass (by adding pigment to the plastic mass during its preparation).
PEHD/ HDPE – low-density polyethylene (HDPE), which is used for: containers, bags, packaging,
Usually colored in the mass (by adding pigment to the plastic mass during its preparation).
PVC – polyvinyl chloride (PVC), which is used for: pipes, floor coverings, window profiles, window sills, electrical tape, containers, plastic furniture, wire insulation, finishing panels,
It is painted both in the mass (by adding pigment to the plastic mass during its preparation) and on top after appropriate preparation.
It is painted both in the mass (by adding pigment to the plastic mass during its preparation) and on top after appropriate preparation.
PP – polypropylene (PP), which is used for: electronic device housings, plastic car parts, toys, water pipes, packaging,
It is painted both in the mass (by adding pigment to the plastic mass during its preparation) and on top after appropriate preparation.
PS – polystyrene (PS), used for: thermal insulation, decorative elements (cornices, baguettes), food packaging, cutlery and glasses, CD boxes, packaging, toys, pen housings,
Foamed PS is colored both in the mass (by adding pigment to the plastic mass during its preparation) and on top after appropriate preparation.
Full-bodied PS is usually stained in a mass.
OTHER/ O – others, which are used for: polycarbonate, fluoroplastic, etc.
Usually colored in the mass (by adding pigment to the plastic mass during its preparation).
Appropriate preparation of plastic.
Before applying the base coat of paint/primer, sand the surface until it is rough. Remove dust with soap solution. Thus, by increasing the adhesion area of the paint film to the surface, we improve paint adhesion.
To prevent “picking up” of the second layer of paint, try to paint either in one layer, then ensuring prolonged drying, or in two layers with prolonged drying between layers (at least double the drying time between layers indicated on the label).
Source
We prime plastic for painting
Author: Elena Karnaukh
First of all, we go to a car store (not to be confused with a car dealership!). It is there that what we need is sold inexpensively (compared to Artists’ Stalls)!
As a rule, plastics are divided into two types: those that require special priming before painting and those that do not.
If you need to prime, then the steps are as follows: Degrease the surface using White Spirit and clean with an anti-silicone compound.
We prime the plastic with primer. Usually this is a one-component primer, transparent in color. It dries quickly, but may cause smudges if watered excessively. Apply 1-2 layers. No need to sand. We prime with acrylic primer and sand with fine sandpaper for painting. We degrease and paint again. If the task is to do a high-quality painting, then it is necessary to add plasticizer (another name for “Elasticator”) to the primer and paint. This is a liquid in a bottle that gives the coating some plasticity. As a result, during further use, the paint will remain in place and will not become covered with a network of chips and will not fly off like fallen leaves. Plasticizer is sold in the same stores where car paints are sold.
All operations in order:
When painting the contours of small surfaces that will not be seriously used (such as spectacle cases, mirrors, combs or small boxes), I make everything simpler: I cover it with acrylic varnish once, paint it, and then paint on top a couple of times more (just to calm myself down). ).
Source
What varnish should you choose to fix?
Gouache is a water-based paint. To fix the color and texture, use varnish - aerosol or standard. It is important to exclude water-based products: during processing, the paint will begin to leak and smear, and the fixative will act as an ordinary thinner. The composition should be based on oil, acrylic or other similar components.
Works done on cardboard or wood can be fixed with acrylic-based construction aerosol varnish - the color will not fade, will remain bright, and will not be washed off with water. Craftswomen also recommend car aerosol varnishes (not water-based). The varnish used to cover parquet is inexpensive, the surface is glossy, and dries quickly (no more than a day).
Attention! It is best to carry out varnish treatment using personal protective equipment - a protective mask, gloves, a special robe or apron. It is unacceptable to use the products in enclosed spaces - varnishes are quite volatile and toxic.
How to paint a bottle: 5 painting techniques
Glass and plastic bottles are an excellent material for making various original crafts that you can easily make with your own hands. With such unique, stylish and very beautiful things you can decorate the interior of any apartment or house, making them even more comfortable:. And such crafts will be a wonderful gift for loved ones. To create various original gizmos from glass or plastic bottles, you can leave them in their original form, but they will look much more advantageous if the bottle is pre-painted.
What can be made from these bottles:
When will these beautiful bottles come in handy:
Following all the links you will find Master Classes on how to do this!
Using the same technique you can paint any glass: glasses, jars and wine glasses.
Decor with shells
A fresh and light marine style involves details directly related to this theme. Among them are decorative shells. Bottles decorated with their help will become an inexpensive but beautiful addition to your interior.
Clean the container and remove any labels. After that, cover it with glue and wrap it with twine. Leave it to dry for a while. Then apply glue to the rope and attach shells and stones to it. The particles must be pressed until they are fixed. To hide gaps between shells, sprinkle sand particles or shell fragments over them. After drying, fix the work with varnish; it will give the product brightness and shine.
This is a simple and quick technique, but the decoration can be more sophisticated. You can use modeling mass as an auxiliary material, painting it or leaving it in its original form. The whole process is very similar to the previous method. After preparing the container, it must be finished with modeling mass and the shells quickly distributed on it. Carefully remove the shells and other parts, apply glue, secure them and let dry. Gaps can be removed with paint or sand. When the accessory is ready, cover it with a thin layer of varnish.
In order to bring a little originality and creativity into the everyday atmosphere of life and your home, all you need is a little imagination, free time and a small set of available tools. Any type of handmade is now at the peak of popularity - on the Internet you can find many master classes on making a wide variety of decorative items that can be used to decorate the interior. A masterpiece of applied art can literally be born from unnecessary leftovers and scraps of various materials. In this publication, we would like to draw your attention to this type of decorative and applied art, such as bottle decoration. We hope that our selection of 100 different ideas for decorating bottles will inspire you to take action to decorate your home, make a gift, or create a practical, yet beautiful household item.
Important information about paint
Most paints classified as polyvinyl chloride floor paints use a urethane-acrylate dispersion as a base.
This type of paint can be thinned with water and may contain additional hardeners (otherwise you should purchase additional hardener to optimize the result).
In addition, there are special paints called polyurethane varnishes, which are practical, quick-drying options.
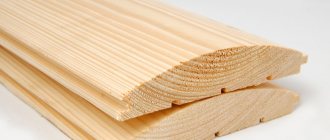
Types of plastic
Understanding exactly what type of material you need to tidy up is very important. After all, not all plastic, in principle, can be painted. For example, if you decide to change the appearance of heating pipes, then you will fail. The complexity of this process is that it is plastic such as polypropylene or polyethylene, and it cannot be painted.
Car products can be divided into two types:
In order to determine which type you need to change, you need to:
Once you have decided on the type that needs to be processed, it’s time to figure out how to clean the plastic from the paint that was previously coated on the product.
What are silicones and liquid plastics?
Both types of materials belong to the two-component category. This means that before starting work, both plastic and silicone must be prepared by mixing the components in the proportions established by the manufacturer. After pouring the finished composition, the process of polymerization or, as the masters say, hardening begins. Despite the similar operating technology, the scope and properties of the two products are far from the same.
Features of liquid plastic
This material is a polyurethane-based mixture that polymerizes at room temperature. After hardening, objects made of liquid plastic acquire mechanical strength and resistance to moisture. The scope of application of the compound is extensive. Craftsmen use it to make furniture decor, all kinds of jewelry, sculptures and models. In industry, liquid plastic is used to produce prototype parts. Such polymers do not have a pungent odor.
Buy liquid plastic
What do we know about silicone?
If liquid plastic is used to make finished products, then silicone is most often used to create molds. As a rule, silicone molds are used for casting objects from epoxy resin, ceramics, gypsum, various types of wax, etc. The properties of silicone molds largely depend on the components they contain. Thus, compositions based on a platinum catalyst have a longer service life. It is prohibited to use silicone on tin for food products.
Buy liquid silicone
How to decorate champagne for a wedding. Master Class.
To decorate champagne for a wedding with your own hands, we will need:
We paint the bottle in several layers (at intervals of an hour or two) so that the paint has time to dry and does not cause smudges. Then we lay out flowers and beads on a napkin as they should be on the bottle. Use a pencil to mark the location of the design on the bottle.
I made flowers of different sizes, starting and ending with the smallest ones so that the middle of the bottle did not seem empty. And we begin to glue the decor. I started from the bottom up, it’s so convenient for me.
After all the decor has been glued and the glue has completely dried, we begin painting the bottle. Thus, we fill the voids.
This is such an elegant bottle! In classic wedding colors.
Painting process
Degreasing
Understanding the question of how to remove paint from plastic is not enough to carry out the procedure efficiently. It is necessary to carry out a number of mandatory actions after cleaning. First of all, it is necessary to thoroughly degrease all parts.
For this you will need:
Advice! If after the degreasing procedure the part still seems greasy to you, try sanding it.
Primer
Everything is simple here - choose the primer based on what material the surface is made of, and apply it in an even layer. Let it dry and repeat the procedure again. After the last coat of primer has dried, don't forget to apply an acrylic-based primer.
Advice! If the surface of your part is perfectly flat, or you decide to paint a new part, then the priming process can be neglected. In this case, you can only use acrylic primer.
And finally, the last step is sanding the soil. In order to properly complete the priming process, take sandpaper and carefully clean the entire surface.
After we have figured out how to remove paint from plastic and prepare it for painting, we can proceed to the most important, final stage.
Silicone coloring procedure
If you choose the subsurface tinting method, remember that it is advisable to use it when making silicone decor, and not molds for the production of epoxy resin products. The work will have to be carried out in two stages. First, silicone tinted with pigment is applied in a thin layer to the surface of the mold, after which the tinted silicone mass is poured there.
Have you decided to paint the finished product? To do this, you will need to prepare a mixture of colorless silicone and silicone tinting paste. If necessary, the resulting composition can be slightly diluted with a solvent. The amount of the resulting mixture should be small, as it quickly loses its properties. After you have used up the received portion, you can start preparing a new one.
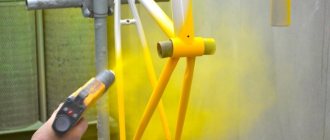
Painting plastic with chrome
Recently, it has become fashionable among car owners to repaint plastic interior elements to look like chrome. Basically, this painting is not much different from the usual one. This especially applies to the surface preparation process. There are two methods of chrome plating. The first of them involves performing the following sequential steps:
Important! Chrome plating is done using a spray gun with a small amount of paint applied under high pressure.
The second method involves initially using a regular varnish coating. After 15 minutes of drying you need to:
Today, there are also various ways to paint car plastic like wood and metal, aluminum and gold, crocodile and snakeskin.
Source
Types of acrylic paints
Acrylic paints are water-dispersed and have a paste-like consistency. They can be diluted with water, a special diluent, or not done so and written as is. In any case, the paint lays down well in an even layer and forms a strong and durable coating.
Acrylic is suitable for both volumetric exterior and decorative interior work. After drying, a polymer film is formed on the paint layer, which is not afraid of moisture and temperature changes. At the same time, the colors remain as bright and fresh as if you had just finished your painting.
They do not have a strong unpleasant odor, do not emit toxic substances, and do not require the use of thinners, so they are excellent for children's creativity. They can be used by pregnant women and people with allergies or diseases of the respiratory system, without fear that this will lead to a deterioration in well-being or harm their health. In addition, the paints contain no flammable components.
Thanks to the wide variety of acrylic paints, you can achieve amazingly beautiful painterly effects. For example, paints differ in color composition.
Acrylic paints also differ in the types of work for which they are intended:
According to the release form, acrylic paints come either in tubes or in jars. In tubes, the paint is more viscous and dense; this form of release is convenient for the impasto technique, when painting with thick textured strokes. Acrylic paints in cans are more liquid. They are convenient for filling large areas and are easier to spread.
What painting techniques are used?
There are two main techniques used for painting: interior and exterior painting. Painting the interior space allows you to achieve a beautiful glow, but you won’t be able to play with color combinations and textures with this technique. Outdoor technology does not limit your imagination and gives you the opportunity to use templates, allows you to make smooth transitions, and expands texture solutions. How to paint the internal and external surfaces of a container?
Method No. 1: Internal painting
Let's start decorating a plastic container from the inside by preparing the tools necessary to complete our task. We need to take:
Let's move on to coloring:
Method No. 2: External painting
External painting is attractive in decorative terms. When covering the outer surface, you can paint it not only in one tone, but also create a pattern, draw stripes, or use a stencil. To work you need to take:
To create circular or vertical stripes, apply electrical tape to the walls. Free parts are painted in two layers. When the coating has dried well, the electrical tape can be removed. We follow the same technique when using stencils, which are best made from adhesive paper or tape. If you have the skills of an artist, you can easily decorate the bottle with a fancy pattern.
Method No. 3: Spray painting
Using a spray can at home is unacceptable; you will have to go outside. To carry out the work you will need:
Everything follows a well-known scheme: with any dyeing method, we start by washing and drying the container. Then you should treat the surface with an alcohol solution. We place the bottle on the newspaper and begin to paint, spraying the contents of the can at a distance of 30cm from it. If several colors are used in the work, first cover with a dark shade, then apply lighter tones.
Method number 4: Sparkling glitter
Glitter is a coloring composition with sparkles. The technique of painting with glitter is no different from painting using acrylic paints. It is used to give bottles a festive look; champagne bottles are often decorated in this way at weddings and anniversaries.
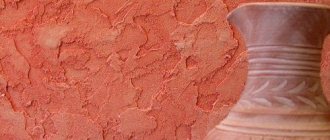
Method No. 5: Textured painting
A visual demonstration of textured coloring is shown in the photo of champagne bottles. The custom of placing a couple of bottles of champagne in front of the newlyweds at a wedding has existed for a long time: one bottle is opened exactly one year after the wedding, the second - at the birth of the first child. How to perform this technique:
The textured technique is also suitable for decorating large plastic containers used as flower pots. If you have a summer house, then crafts made from plastic or glass containers are perfect for decorating it. Now that you know how and with what you can paint them, the set of decorative elements for your home or garden will expand significantly. In addition, you can involve children or other family members in the process, which will create a warm, creative atmosphere in the house.
Thus, we have mastered a set of tools that allows us to create miracles in the truest sense of the word. Like a wizard, bottles can be used to create a bird feeder, an adorable pig or a proud eagle. Go for it!
Source
How to use acrylic paints for painting on different materials
First, let's figure out what acrylic paint is made from. It includes:
Acrylic is widely used for crafts and other types of creative work, as it dries well, and the color is always bright, does not fade in the sun and does not darken over time. Acrylic paints are completely safe, so they can even be used for painting children's toys.
Acrylic paints are easy to work with. They dry fairly quickly and can be diluted to the desired viscosity or used straight from the package. The paints mix well with each other, which allows you to get the desired shade even from a small set of colors.
Such paints are sold in specialized departments and in simple stationery stores. You can find products from both natural and foreign manufacturers.
We study the scope of application of acrylic paints
Acrylic paints on cardboard and paper. Acrylic paints are widely used for batik and painting on fabric and leather.
Paint is also used for painting on wood products, metal, glass, plastic and much more. An interesting option for declaration could be painting on stones. You can make a panel, a painting, a souvenir, or even a decoration like those shown in the photo.
Consider the use of acrylic paints for painting plastic
To paint plastic, like any material, it must be cleaned and degreased. The product must be absolutely free of stains of grease, oil and bitumen.
It is better to carefully go over uneven places or rough surfaces with sandpaper or fine sandpaper. It is recommended to carry out this process underwater. If the plastic has already been painted, treat it with a solvent and remove the old surface.
It would be a good idea to use an antistatic agent for plastic, since plastic accumulates static voltage and during the painting process, lint and dust can be attracted to the surface.
If the product is damaged, it is wise to use a special putty to level the surface.
Next we start priming. Usually three layers are applied, they should be quite thin and it is important to let them dry. After this, sandpaper or sandpaper is applied again.
It is recommended to add a plasticizer to the acrylic paint used and paint using a spray gun. You can use special ready-made cans.
The use of a brush is not excluded. In this case, it is important to prevent lint from getting on the surface. Remember that a brush is convenient for working with small details, but it is difficult if you need to paint a large surface. Also, paint applied with a brush takes longer to dry, which increases the risk of contamination. Therefore, care must be taken to protect the product from dust.
The paint is applied in several layers, depending on the desired result. Remember to let the layers dry, usually 20 minutes is enough.
Varnish is applied last to consolidate the result, but only after the surface has dried.
We use acrylic paints to decorate glass products
Acrylic paints are also good for painting on glass. Manufacturers produce special sets and individual tubes. Let's consider this type of creativity with the help of a small dot painting master class.
For this you will need:
First you need to prepare the surface; to do this, completely clean the glass. Using hot water, remove the label if there is one. Remains of glue can be removed with a hard sponge; for a better effect, add soda. Be sure to degrease the glass. To do this, you can use special products, alcohol or even nail polish remover. Wait until the surface is completely dry and start painting.
If the process is new to you, practice drawing dots on paper. You need to ensure that their size is the same and only then proceed to the product itself.
If desired, the glass can be left transparent or painted. In the latter case, wait until the surface is completely dry.
All that remains is to show your imagination and produce a masterpiece.
To make the drawing look more textured, alternate dots of different sizes.
To make drawing easier, you can place a stencil under the glass.
As a result, you will receive very unusual handmade products that will wonderfully decorate your interior.
Not everyone knows that acrylic can be used not only as paint, but, for example, as glue. Yes, it is glue when creating a collage, if a not very heavy object is glued.
And also as a primer for decoupage, so that the background does not show through the napkin. To do this, the surface is covered with white paint. After such preparation, the drawing looks brighter and more colorful, and does not seem transparent after varnishing.
Covering and fastening rules
Before coating a product with varnish, it is important to familiarize yourself with the main points, rules, and recommendations of needlewomen. Experts advise preparing the paint before application - mixing it with PVA glue, for example. It won’t hurt to paint the addition, and the colors won’t “bleed away” or fade for many years. Before final treatment with a fixing agent, you can fix the work with regular hairspray - lightly spray the surface and dry.
It is important to consider the surface on which the gouache is applied. For example, if you apply paint to an untreated canvas, the material may begin to crumble even under a layer of fixative. Before starting work, it is better to apply a primer layer - the design will last longer.
Attention! When coating with non-aerosol varnish, craftsmen advise using not an ordinary brush, but a small roller (the size depends on the surface).
Gouache is an affordable, inexpensive paint that makes it a pleasure to create on your own, with children and friends. In order for the work to delight you with the brightness and richness of colors for a long time, the surface must be treated with a special varnish. A colorless, quick-drying product is suitable for furniture or construction treatment (parquet, for example). It is important to carefully read the instructions for each component of working with the product - paint, varnish, primer and others.
Source