An uneven floor is not only not the best appearance, but also a huge number of disadvantages associated with its operation. If the floor screed in the apartment is uneven, then this promises you the following in the future: difficult installation of almost any floor covering, reduced service life of the covering, problems with installing large-sized furniture. That is why, while repairs are underway, a high-quality floor screed must be made. Today we will talk about different methods and try to identify the best one for premises in an apartment building.
Floor screed in an apartment
Types of screeds
The floor screed is a layer of rough finishing. Below it is an interfloor ceiling or soil, and on top is a floor covering in the form of linoleum, parquet, ceramic tiles, etc. A screed is made for:
You can make a screed yourself in several ways. And the choice of method largely depends on the requirements for the loads that will then appear on the floor. When deciding how to connect the washing machine drain to the sewer, you just have to follow the instructions for the plumbing fixture.
In the case of a screed, everything is much more complicated. Each technology for its implementation has its own pros and cons. First, you need to clearly define your existing needs.
There are three main types of floor screeds:
- Dry team.
- Wet (classic version).
- Semi-dry.
The first technology involves laying wood and gypsum boards. This method eliminates the use of a liquid mortar of gypsum or cement and is characterized by a high speed of screed installation. Plus, due to the low weight of the materials, it places the least load among analogues on the floor from below. However, in terms of price, this option is the most expensive. And he is afraid of moisture.
Features of expanded clay screed with insulation
The second method is based on pouring liquid concrete from cement and sand. This screed is characterized by the greatest strength, durability and resistance to moisture. However, due to its large mass, it is not allowed to be used everywhere. If the floor in an apartment in a new building is being leveled, then this option is quite acceptable. Just don’t pour too thick a layer of concrete. But for an old house with wooden floors, this technology will not work.
Wet screed
The third method is an improved variation of the second. A cement-sand mixture is also used here. However, the amount of water used for mixing it is several times less than when preparing conventional concrete. As a result, the hardening time of the floor screed and the volume of construction dirt generated during the work are significantly reduced. But this comes at the price of having to use grinding equipment and strict adherence to technology.
Semi-dry screed
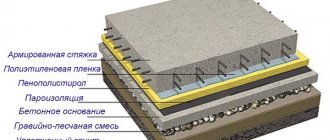
In addition to this, screeds are:
- related;
- floating;
- on the separating layer.
The first ones are the strongest and imply a rigid adhesion of the poured solution to the underlying base. The latter have a heat- and sound-insulating substrate made of mineral wool, foamed polystyrene, wood or cork boards. They do not come into contact with the ceiling and are not rigidly coupled to it, like ties of the connected variety.
The third option also has a separating substrate. But in this case it is thin and serves exclusively as waterproofing. Usually this is oiled or bitumen paper or polyethylene. Unlike its floating counterpart, this floor screed in an apartment can be made in a thinner layer. Plus it turns out to be more durable.
Types of screeds
A separate line includes self-leveling mixtures of the “self-leveling floor” type. They come in cement and gypsum, but all have polymer plasticizers for quick hardening.
Their main purpose is to create a perfectly flat surface up to 10 mm thick without much effort on the part of the performer. Often this option is used in conjunction with other types of floor screed as a top leveling layer. Then the overall design of the rough coating is called a combined two-layer one.
Private questions
There are many questions on the forums with conflicting answers. I will answer some of them using my experience.
How long does it take for a semi-dry 7 cm screed to dry? A semi-dry screed dries according to slightly different rules than a regular CPR. In the latter, with increasing thickness of the poured layer, the amount of time for full strength gains increases. A semi-dry mortar has one standard: it takes about 10 days to gain 70% strength, and 28-30 days for maximum strength.
Minimum and maximum thickness. The minimum thickness is 4 cm. With a smaller layer, the water will leave faster than the solution gains strength. The maximum is limited by the following factors:
- weight - must withstand the ceiling;
- speed of pouring - the entire thickness must be laid and compacted in several layers within one day;
- financial capabilities of the owners - a screed thicker than 7-8 cm is ruinous.
In fact, the maximum thickness is 10-15 cm. The most common is 7 cm.
Does it need to be reinforced? A mesh on a floating screed is a must. Fiber fiber - optional. In extreme cases, it can be replaced with a “helicopter” (iron coating of the surface with cement dust).
In what cases is a semi-dry screed not suitable? Weak floors are not suitable for semi-dry screeds due to their high specific gravity.
How long will it take to dry? Full strength gain lasts 28-30 days. But you can start working much earlier:
- walk after 12 hours;
- lay the tiles after 3 days;
- lay linoleum every other week;
- Laminate and parquet work in a month. Previously this was not possible due to the high humidity of the screed.
Semi-dry or regular screed. Semi-dry and “wet” screeds have their own strengths and weaknesses. It is difficult to give preference to any method. Even the comparative analysis carried out (can be viewed here) did not allow us to give an unambiguous answer. Recommendations only.
What you might need, materials
To make a floor screed, the tools you will need are:
- beacons for setting the horizontal;
- building level;
- concrete mixer;
- rule;
- trowel and/or shovel;
- grinding machine (for semi-dry screed);
- roller (for self-leveling mixture);
- a bucket and a drill with a nozzle for mixing the solution;
- tape measure and pencil.
Materials and tools for screed
The mixture for making mortar for floor screed is best taken immediately ready-made with the required proportions of components. This way there is less chance of making mistakes when mixing cement, sand and other ingredients. But you can also purchase these components separately and do the kneading yourself. Only for a self-leveling composition you should not do this; it is extremely difficult to prepare it yourself with the proper ratio of ingredients.
Possible mistakes
A good floor is one that is smooth and reliable. It is pleasant to walk on and is also a suitable base for laying any surface. Self-leveling mixtures are now very popular. They are easy to prepare and quickly fill the space of the room, forming a flat surface. Everything seems simple, but many people make serious mistakes that ruin all their efforts.
| Cause | Consequences |
| Incorrect material selected. | Since each repair has its own conditions, the materials used must be selected based on these aspects. There are no absolutely universal mixtures, so each manufacturer has a whole range of products for floor leveling, which differ in composition, quality, mechanical characteristics, etc. For example, for parquet it is better to use mixtures with a cement base, because the parquet will have to be glued, and the mixture is gypsum-based not suitable for this. |
| Avoid using primer. | Many people refuse to prime surfaces because... it takes time and increases repair costs. But the primer is not just a liquid - it is a special composition that protects the base from excess moisture. In addition, impregnation increases adhesion and contains antifungal additives that prevent the appearance of mold. |
| Independent work. | What we mean here is that you cannot pour a high-quality floor alone, doing the job for the first time. After all, there are a lot of processes that need to be done almost simultaneously: pouring the floor and preparing the next portion of the mixture, for example. When significant time passes between pouring portions, the old portions already lose their plasticity, and such a floor will never be sufficiently level. Preparing the right solution is also a job for two: one person stirs the water, and the second gradually pours the mixture, and nothing else. |
| Poor coverage. | Many people, when starting a renovation, want to fill the floor at the same height, and only then select and lay the finishing coating. But this is also the wrong decision, because each coating has its own requirements and parameters: material height, substrate, insulation, etc. There is a difference even in the same type of materials from different manufacturers, so it is necessary to select the finishing coating for each room in advance, and only then, having decided on floor height, leveling and raising the floor level. |
| Technological break. | Repairs take a lot of time and everyone tries to speed it up. This is where another mistake people make lies. They forget that any solution needs time to dry and harden, and this time can take more than one week. Only after this time has elapsed should the finishing coating be applied, because during this time the solution not only dries, it hardens throughout the entire volume. Otherwise, displacements of the internal layers will occur and, as a result, deformation of the floor surface. |
| Ventilation and direct sunlight. | When the pouring is completed and the floor surface is leveled, many people think about how to speed up this process. Some people open windows so that excess moisture is removed faster and the sun's rays evaporate the moisture. This is all wrong; on the contrary, before pouring the floor you need to make sure that there is no draft and no direct sunlight in the room. Because of such a small oversight or oversight, cracks will begin to appear on the surface, and the screed will begin to peel off. This also applies to the use of heat guns, which should be aimed at the ceiling and not the floor. It is also important that the room does not overheat. At what temperature can work be done? 25 degrees Celsius is quite enough. |
| Poor foundation preparation. | You need to know how to properly prepare the base for future work - remove dirt, dust, in general, everything that can lead to a deterioration in the adhesion of the leveler and the base. Poor adhesion can lead to material peeling and cracking. Most often, all this can be repaired, but why the extra work if everything can be done efficiently? If the screed is poured onto a wooden floor, then we can say with confidence that this is not the best idea. Such a base is very mobile, which will lead to cracking of the poured screed layer. True, there are circumstances when it won’t work out any other way. In this case, the wooden base must be prepared accordingly, and it is better to entrust the pouring of the floor screed to specialists in this field. |
Features of surface preparation
When preparing the surface for screeding, it is necessary to remove existing skirting boards, old flooring and joists (if they were used). As a result, a wooden or concrete floor should remain without any extraneous construction debris.
Next, the cleaned base is repaired in case of deep cracks or ragged potholes and primed. Defects are sealed with concrete mortar after preliminary priming of repair areas. There is no point in leaving flaws unfixed. If you screed the floor over such weak points, they will then continue to collapse. As a result, inevitable damage to the new top layer will occur.
Preparing the floor before screeding
If there is an old screed on the floor, it should be carefully checked for integrity and reliability. In most cases, it is recommended to completely remove such concrete. But if it is still strong and does not peel off from the base, then pouring a new leveling layer on it is quite acceptable.
Final stage
The screed dries quickly enough, so within a day you can easily step on the surface without fear of leaving footprints. Then unused beacons are removed and the grooves are sealed (the optimal time is two days after pouring). This is done using a dried solution (gartsovka), which is rubbed with a wooden polisher. The seal adheres reliably to the main coating if rubbing is carried out within a week after the completion of the main work.
Removing beacons and repairing seams with mortar
Finally, the screed is cleaned. Surely, there are traces left from using the rule - they are removed using a simple sand-lime brick.
After finishing the work, it is necessary to check its quality. Experts suggest quality control through the following measures:
- external inspection, checking for cracks;
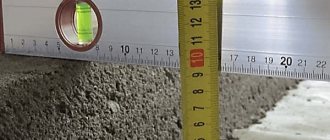
- measuring the floor level using building and water levels;
- tapping. If the sound is dull, it means that the solution has peeled off, but a ringing sound allows you to judge that the work was done with high quality and such a floor will last a long time.
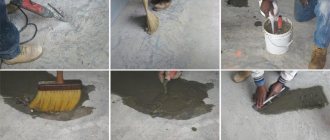
Step-by-step instructions - how to make a floor screed
The general step-by-step instructions for a proper durable screed are as follows:
- Preparing the base.
- Laying or filling of underlying materials.
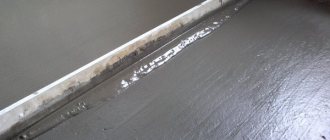
- Placing beacons and laying out edge damper tape.
- Reinforcement with mesh (if necessary) and mixing the solution.
- Pouring and leveling the prepared mixture.
If dry floor screed is being done in an apartment or private house, then the last two points come down to laying and fastening wood or gypsum fiber boards. There are no particular difficulties. Figuring out how to connect a toilet is often more problematic than leveling it to the floor covering.
The main stages of floor screed work
Dry
A prefabricated structure made from sheets of OSB, chipboard or gypsum fiber board is not particularly strong and is prone to delamination during a flood. But these disadvantages are offset by the speed of installation, as well as excellent heat and sound insulation.
The floor screed is usually made using this technology over a backfill of perlite or expanded clay. Then the waterproofing is spread. Direct adhesion of the stacked sheets to each other is done using glue and self-tapping screws. In this case, the latter should be carefully selected in length so that when screwed in, they do not rest against a dense base and do not lift the covering being laid.
The backfill is made with a height of 3–5 cm. If more is required (for example, to hide pipes), then the screed should be made in two overlapping layers in slabs. One will not be enough to provide the strength required by the standards.
How to make a dry floor screed with beacons inside
Wet
When screeding using the wet method, the main thing is to fill the entire volume of mortar in one go. You cannot allow one layer to harden and pour another on top of it; they will inevitably separate later.
It takes about one week to harden 1 cm of concrete in a screed. In this case, the screed is usually done at a distance of 3–5 cm - as a result, you will have to wait at least a month until it is completely ready for further work. This is the main disadvantage of this technology.
The second important point is lighthouses. They are easiest to make from drywall profiles. You can also use pin tripods. The more accurately these horizontal guides are set, the smoother the surface will be.
How to make a wet screed
Semi-dry
The use of semi-dry technology is recommended if there is a danger of liquid solution leaking through the ceiling to the floor below. This DIY floor screed is done in approximately the same time as the wet counterpart. However, it dries 5–6 times faster.
The mortar is mixed from a cement-sand mixture with minimal addition of water. There should be just enough moisture to ensure the cement and sand set. But when you squeeze them into a ball with your hand, water should not be released. It cannot be added to the mixture beyond what is specified in the instructions.
Semi-dry screed design
Useful tips and general recommendations
Key recommendations for the pouring process and care:
- You can replace the damper tape with roofing material.
- For weak floors, it is best to use a dry screed.
- A layer less than 3 cm thick will be more even and durable if the amount of sand is reduced.
- Do not install decorative flooring earlier than 28 days.
- It is better not to use artificial ventilation for drying.
- Optimal hardening temperatures: +5…+20ºС.
If you strictly follow the algorithm and do not neglect the nuances and details, then the process of creating a screed layer will not cause difficulties.