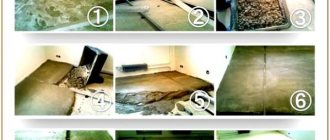
Before you begin laying any type of flooring, you should consider carrying out a high-quality leveling of the base. This is precisely why the technology of screeding in an apartment was created. It involves the implementation of sequential activities, the quality of which will determine the final result. After completing the installation work, you should think about installing expansion joints, which can be of various types. Each of them performs specific functions.
Preparation
All work on installing floors in an apartment must begin with preparatory activities. After a thorough inspection, all points must be completed on the surface so that you can begin installing the floor screed.
First of all, it concerns the removal of excess debris and dust. This is carried out in parallel with the removal of irregularities and protruding elements that may interfere with the pouring of the solution.
If there are cracks, potholes, holes, they all must be sealed with a specially prepared mixture. Large defects in the base are filled with a solution of sand and cement, which are prepared in strict proportions of the components.
Preparatory activities
The initial measures include setting the “zero” level and all other points relative to the horizontal line. The quality of this work will affect the evenness of the future concrete floor. At the same time, the technology for installing floors in the apartment must be fully observed. Any deviations will have a negative impact on the outcome. The installation of a concrete floor in an apartment requires sequential work.
A certain set of tools and materials will be useful in the work. Everything will depend on the specific situation of installing the concrete floor, as well as on the desired quality and strength of the solution. Each of the items can be purchased without any problems at a hardware store. If desired, you can use the services of special construction equipment, which is rented for a certain period together with the contractor.
Required tools and materials
To avoid interrupting the work process while searching for the right tool, everything you need must be prepared in advance:
- perforator;
- scrap;
- solution container;
- trowel;
- construction and water levels;
- roulette;
- beating cord;
- picking shovel;
- rule;
- screws;
- drill.
Some tools for the job
When concreting an earthen foundation, for example in a private house, additional compaction will be required. Materials for work are purchased with a small reserve, because it is very difficult to accurately calculate the quantity, especially without relevant construction experience.
So, for concreting you will need:
- waterproofing film;
- insulation (if necessary);
- primer;
- reinforcing mesh;
- slats for beacons (preferably T-shaped);
- small crushed stone;
- sand;
- cement.
It is recommended to choose a mesh for reinforcement with a cell size of 100x100 mm or 150x150 mm, and the thickness of the rod must be at least 5 mm.
Reinforcing mesh
Use only fresh cement, otherwise the concrete surface will crumble or crack. There should be no foreign impurities in the crushed stone and sand - clay, silt, grass or leaves, or other debris. All this negatively affects the quality of concrete and reduces its uniformity. You can calculate the approximate amount of sand, crushed stone and cement using the table.
Composition of concrete mixture per 1 m3 of concrete
To find out the volume of concrete for the floor, the area of the base must be multiplied by the estimated thickness of the screed. Waterproofing material should be taken with such a reserve that its strips can be overlapped by 10-15 cm and the edges can be placed on the walls by at least 10 cm around the entire perimeter of the room.
Waterproofing film
Waterproofing
Before you prepare the solution for pouring the floor, you must complete the main step - installing a waterproofing layer. This is especially true for premises in private households, when flowing groundwater is very close. Waterproofing will prevent water from getting from the soil into the poured solution, which can cause oversaturation with moisture and uneven drying. The same applies to the rapid release of water from the fill into the lower floors and rooms. If this layer is not completed before the concrete floor is installed, this will negatively affect the drying process of the solution, the final quality and reliability of the surface of the future floor.
The technology of floor screeding in an apartment involves the use of a certain set of materials for the waterproofing layer. These include:
- Roll waterproofing. The most common of them is roofing felt. But it has a vulnerable area, which is the joint of the sheets. This means that they should not be joined, but should have an overlap of at least 15 cm. Some commercially available rolls have a special fastening element along the edge that allows individual sections to be fully and reliably connected to each other.
- Liquid waterproofing. Bitumen mastic is one of the most expensive. But in the end, they provide an excellent result that almost nothing can compare with. Ideal for rooms with high humidity, such as bathrooms.
- Film for waterproofing. It is not uncommon to use conventional polymer film. It only needs to have a certain thickness in order to meet all the qualities of the layer being arranged.
The choice of a specific option will depend on the size of the wallet, the desired items, as well as the specific case and condition of the room as a whole.
Display of beacons
Certain floor screed methods require additional measures to level the base using cement-sand mortar. This includes beacons for filling the floor. There are a huge number of options: profiles, concrete embankments, self-tapping screws, tensioned threads, etc.
In this case, it is worth paying attention to the fact that they are firmly and reliably fixed to the base before pouring, and can also successfully withstand the load of the volume of mortar on the site.
If the beacon for pouring the floor is made from a beacon profile, then it is fixed on the surface, on an embankment of concrete mortar. Beacons must be located in exact accordance with the marked horizontal lines relative to the floor level, and also depending on the height and thickness of the poured area. It will be necessary to run a rule or other tool along the top of the exposed beacons to level the cement mixture.
DIY cement screed
Before cementing the floor, it is necessary to carefully study all stages of the work. First of all, the base needs to be prepared for pouring, and then just lay the screed. All stages are important, so each one needs to be given enough attention.
Preparatory work
First you need to mark the future screed, determining the layer height and evenness. To do this, it is best to use a laser or ordinary construction level. Laser helps to correctly install beacons, which will ensure faster leveling of the mixture and a high-quality result.
The laser level is placed on the base, the beam is projected, and the horizon line is determined. Then, 30 centimeters from the wall and with the same step, a parallel line is further marked, portions of the solution are laid out along it, with a profile on top. You can use special beacons on the clamps. The poured mixture is then equalized using the beacons or profile. But before that, a number of important works need to be completed.
Stages of foundation preparation:
- Removing the old screed.
- Cleaning the surface from dirt, debris, dust.
- Apply an adhesion primer using a roller/brush.
- Filling with a layer of expanded clay and sand (if necessary, thermal insulation is laid), the thickness of which is up to 10 centimeters. Compaction of the layer with moisture.
- Design, installation of pipes, wires and other communications that are planned to be laid in the screed.
If there are too serious irregularities (which exceed the planned thickness of the screed), it is necessary to eliminate them: fill cracks, fill potholes, cut off bumps, etc.
Preparing the mixture
Before concreting the floor, prepare the solution needed for the screed. There are several ways to obtain a cement-sand mixture: purchasing ready-made dry mixture and mixing it on site, ordering the required volume of liquid mortar from the factory (this service is available both in Moscow and in the regions), independently determining the proportions of the components and preparing concrete.
If you choose the option of preparing the mixture yourself, then take cement and sand in a ratio of 1:3, fill it with water until the desired consistency is obtained. Next, the solution is poured onto the floor, leveled along the beacons, and allowed to harden.
The process of preparing semi-dry screed:
- Lay polyethylene film on the ground, pour cement and sand on top of it, mix with a shovel in the direction from bottom to top, trying not to disturb the shape of the cone.
- Make a hole in the center of the cone, pour water into it and mix everything.
- Without stopping mixing the components, pour the dry mixture around the edges, trying not to break the integrity.
- When the mass becomes thick, it is ready for installation; it must be used within 20 minutes.
- Leveling the screed within 1.5 hours.
To create a wet cement-sand mixture, high grade cement is used. Take a third of a bag of cement onto a bag of sand and fill it with water (about the same amount as the binder taken). The easiest way to do the mixing is in a container with a volume of 25-30 liters.
During the preparation of the mixture, you need to control the color of the solution - it should be gray: too dark indicates an excess of cement, red indicates too much sand.
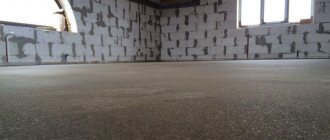
Fill
Before pouring begins, the room must be covered around the perimeter with damper tape, which will protect the screed from moisture, temperature changes, and pressure. Laying the mixture begins from the corner farthest to the door, one person pours and smoothes the solution, the second at this time prepares the next portion. It is best to fill the base with an area of 30-50 centimeters at a time (this is the step at which beacons are laid).
Adjacent zones of two pours are mixed to a depth of 10 centimeters. The strip at the doorway is done last. The screed hardens within 2-3 hours, acquiring 50% strength after 2-4 days. Full ripening depends on the thickness of the screed and the volume of water in the mixture. On average, in ordinary residential premises the screed hardens by 1 centimeter per week.
Every day the screed is sprayed with water to prevent the top layer from quickly hardening while the bottom layer is still soft. 1.5 hours after pouring, the surface can be leveled by sliding on wedges; the bumps that appear later are knocked down manually.
Rub the solution with a mixture of cement and sand in equal proportions with the addition of water. During grouting, the surface should be sprayed generously with water.
Reinforcement
The construction of a screed in an apartment cannot be done without a reinforcing layer. It allows you to create a strong structure that can withstand maximum loads. But here it is worth paying attention to the choice of specific material for work. Most often, a steel mesh is used, which fits into the thickness of the future screed layer.
A large amount of reinforcing substance in the solution can lead to increased load on floor slabs or other base materials. This is especially true for old buildings. There are acceptable load standards that should be adhered to.
When choosing the thickness of the floor, as well as the quantitative composition of the reinforcement layer, it is worth taking a closer look at the old screed. When it is destroyed and dismantled, the layer, the reinforcement material used and other points are approximately calculated. But these are only indicative figures.
To ensure that the installation for pouring the floor along with the reinforcement is durable and at the same time suitable for use in accordance with building codes, together with metal elements (rods, mesh), a more modern material is used - fiberglass. It gives the solution plasticity and better qualities during the drying process. You can practically forget about the process of shrinkage of the fill and the appearance of even microcracks. Fiber can eliminate these defects and at the same time create an excellent reinforcing layer. There are several options and types of this material. When choosing each of them, the amount (mass) in work per square meter of room area will depend. But in any case, the cost of fiber fiber will be slightly lower than purchasing steel mesh or other metal products.
If it comes to metal structures as a reinforcing layer, then they should not be located immediately on the base. This will not bring any effect. The mesh or rods must be fixed using special elements at some distance from the lower section in order to be located in the middle part of the future concrete floor. This is all provided by the technology of pouring floor screed in an apartment.
It doesn’t matter what mortar you use to screed the floor, the main thing is to correctly apply the reinforcement layer. It will give the whole “pie” reliability and increased service life.
↑ The law of meanness or does the old coating have a chance
What is the law of meanness and what does it have to do with cement screed? Everything is very simple! You remove the floor covering and... Oh, horror! Underneath you find an old floor, worn out by constant mechanical stress, which fell into disrepair about ten years ago. It is precisely at this moment that the notorious law of meanness comes into play. You wanted to remove the old linoleum and lay a new one in its place, but no, that was not the case. You will have to remove the old screed and fill in a new one.
The best option is a cement screed, which will allow you to create, if not a perfectly flat surface, but at least as close to it as possible, and with the right level of experience, this process will go smoothly, as they say, “without a hitch.”
To remove the old screed, you will have to use a hammer drill or jackhammer. By the way, the second one is much more convenient, because its power is several times greater than that of a classic hammer drill.
Having destroyed the “remnants of former luxury,” you need to carefully remove everything, leaving not a trace, and only after that move on to the next stage.
Removing old screed. Of course, there is a lot of garbage, but everything will be perfect
Yes, the old coating has a chance if it has a more or less smooth surface on which there are no (or almost no) cracks and chips. Such a screed can simply be filled with a self-leveling liquid, which will give the floor ideal smoothness, or the holes can be “patched” with a solution.
Solution components
Many people probably know how to make a floor screed solution. But still, this should be done efficiently and the proportions for the floor screed should be observed. The filling must evenly combine all the components used, as well as possible impurities and additives. Only this will ultimately bring the desired result and the strength of the entire layer of concrete floor.
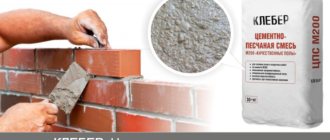
Floor screed mortar has certain requirements. The binding elements in it are cement, and sand acts as a filler. The basis of everything is water. It is for this reason that it is required to take it clean, not contaminated (without acid and oil impurities).
There should be no other rocks in the sand. The same applies to clay, which will only bring negativity into the future solution being prepared. The brand of floor screed mortar will depend on the brand of cement used. It is recommended to use it at least M400 for the best strength. When choosing cement, you should pay attention to its production and shelf life. It is not uncommon for bags of cement that was purchased a long time ago to be laid out on the shelves. After all, it has the ability to cake, losing its properties and qualities. The brand of floor screed must match.
When preparing a solution for pouring a floor, proportions play a significant role. The best option would be 1 proportion of cement to 3 proportions of sand. Water is added in the required quantity. The solution should not be too liquid or too thick. All this will create problems when installing a concrete floor.
When mixing particularly large volumes of mortar, it is best to use a concrete mixer. It allows you to mix all the components evenly without unnecessary labor. Various additives can be added to the floor screed solution to give it certain properties. In the same way, you can change the color of the solution if necessary.
When preparing cement mortar for floor screed, the proportions of each component must comply with the requirements and established standards. Much will depend on the cement used and its brand.
Manufacturers of ready-mixes
Dry formulations are purchased from well-known and reliable manufacturers who care about the quality of the product and do not violate technology. Such brands include Knauf, Lafarge, Cemex. Plastic compositions are easy to install, reliable and durable.
Ceresit, Thomsit, Bergauf are popular . Manufacturers carefully select and weigh components; there is operational control at each stage of production. Plasticizers and hardening accelerators are added to the composition. There are frost-resistant and water-resistant mixtures.
Eurocement Group, Hercules, and Novoroscement have shown themselves on the domestic market. Manufacturers do not lag behind foreign competitors in quality.
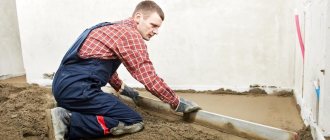
Fill rules
After the solution for pouring the floor has been prepared, you can begin directly pouring the future subfloor. All work begins from the far (opposite) corner from the entrance to the room. The finished mixture is poured and then leveled using special means. This may be a common rule.
It is worth paying attention so that the cement mortar for floor screed is not overexposed. The usual time during which it retains 100 percent of its qualities is only 20 minutes. Subsequently, the cement solution for floor screed begins to gradually lose its properties.
Installation of a concrete floor should be done immediately after the mixture is prepared. Only in this case will the filling technology be followed and the desired result will be obtained. After the entire area in the room is filled with the solution, without missing a single crack, it must be given time to harden. This usually occurs within the first 12-18 hours. Next, you can smooth out all possible defects, rub them, remove the beacons, filling the voids with the prepared mixture.
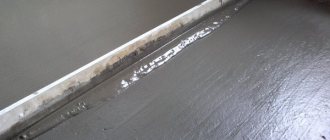
Types of expansion joints
During the operation of buildings, it shrinks due to temperature fluctuations, different thicknesses of the concrete floor and other operational errors. The same applies to a poured concrete floor, which may also begin to crack during the drying process. To avoid all this on a concrete floor, expansion joints must be present. Although this is not provided for or stated in the building codes and regulations.
The following types of expansion joints in concrete floors are distinguished:
- Insulating. They are performed along walls, possible decorative elements in the room (columns), around foundation protrusions for equipment. These seams are designed to prevent the transfer of deformations to the screed from the structure itself.
- Structural. They are issued in those places where the day's work of pouring the solution has been completed.
- Installation of shrinkage joints for concrete floors. Allows you to avoid the appearance of chaotic cracks on the screed during the drying process. If cracks appear, they appear only in a given direction. This is achieved by creating straight planes of slack.
Construction of deformation layers