Why is the combination of gypsum board and wallpaper so common in the decoration of modern interiors? The reasons for this, without a doubt, are the constructive versatility of the first, as well as the practicality of the second and the huge variety of options for their design. The key to the reliability and durability of the finish made with wallpaper on plasterboard is the high-quality preparation of the surface of the latter for pasting. Therefore, if you have finally come close to the “finish” interior design, it’s time to master the technology of wallpapering gypsum boards. By the way, it is not at all complicated, but depending on the type of canvas it has a number of features.
High-quality wallpapering: how to avoid mistakes?
The most important thing when covering walls, ceilings or other layout details with wallpaper is the consistency of the texture and pattern on adjacent sections of the canvas. In practice, a small (about 0.5-1 mm) error is allowed. Ideally, the joints between the canvases should not be visible either from a distance or from a close-up view, for which the direction of natural light must be taken into account.
Adjusting the pattern on adjacent canvases when joining
When gluing, you should pay attention to the quality of wallpaper laying:
- on the lines of skirting boards and platbands;
- at the borders with other types of finishing;
- at the locations of sockets, switches, etc.
The greatest difficulties when wallpapering arise with:
- Adjusting joints
It should be carried out, as well as the design of baseboards, trim, switches, etc., taking into account the shrinkage of the wallpaper after drying.
Butt wallpapering
- Corner finishing
You cannot cover the corners with a whole thick layer - when it dries, it will shrink, which can result in a tear.
Wallpapering interior corners
- Selecting glue
For each type of wallpaper, a separate adhesive composition is used, which can ensure the reliability and quality of installation of the canvas.
Types of wallpaper glue
Wallpaper must be laid so as to ensure 100% area contact with the surface of the drywall. The presence of omissions, peeling, wrinkles, distortions, tears and air bubbles is not allowed.
Smoothing wallpaper with a plastic spatula
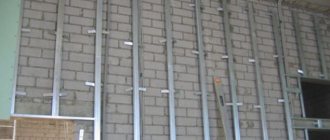
The optimal temperature for working with wallpaper is 18-25°C. If the air in the room is too hot or cold, damp or, conversely, dry, this will most negatively affect the properties of the adhesive solution and the quality of its adhesion. The surface to be glued must be cleaned of dust, but first it must be puttied and the attachment points to the profile frame and the joint line between the sheets should be aligned.
Before gluing, gypsum boards need to be primed. The quality of surface preparation for wallpapering can be checked using adhesive tape - it should reliably stick to the plasterboard, incl. on putty areas.
Calculator
To understand how much putty you need to buy, we have provided a simple calculator. It is necessary to select the desired brand of putty, determine the surface area to be treated and the thickness of the mixture layer.
Calculate the surface area using the well-known formula a*b=S ,
- where a is the length of the surface,
- b – width (height).
If you need to calculate the area of an entire room, use the formula to determine the S of each wall and sum up all the values. If there are window and door openings, you also need to find out their area and subtract it from the area of the wall.
Plasterboard putty: highlights
The main advantage of gypsum plasterboard is its almost perfectly flat surface for finishing. Why almost? Obviously, due to the heads of the screws that attach the sheets to the profile, as well as the joints between them. As for the mounting points, the screws must be adjusted flush to the gypsum board plane. Using a spatula, a medium-density putty mixture is applied to them, which must be leveled immediately.
Plasterboard putty for wallpapering in the photo
The joints between the sheets can be original or non-original (with a cut edge) . In the first case, a primer should be applied along the joint line at a width of about 10-15 cm, after which has dried, you can begin to putty the seam with the obligatory laying of sickle tape along it.
Puttying original joints using sickle tape
Non-original joints are puttied slightly differently. They must be cut at an angle of 30-40° using a construction knife, then cleaned of gypsum dust and cardboard residues and primed. Puttying of cut joints is carried out without serpyanka tape.
Joining non-factory joints before puttying
All external plasterboard corners require the installation of a perforated corner. The latter is set strictly to the level and is completely hidden under a layer of putty. Internal corners are made using the corner rule.
The joints of drywall sheets are treated with putty twice. This is necessary in order to prevent subsidence or melting of the mixture. The latter dries completely within a day, after which you can begin the final leveling and grouting of the joints.
Incorrect putty of a non-factory seam
Puttying the entire surface of gypsum boards is a controversial issue. Its main disadvantage is additional labor costs and material consumption. However, it is worth it if you plan to change the situation in the future: old wallpaper comes off much easier from a plastered base, whereas when dismantling the canvas from “bare” drywall, you risk damaging its outer layer.
Recent Entries
Soldering or crimping electrical wires Why is there humidity in the apartment and what to do Chopped at home: technical features and advantages
Applying a thin layer of putty to the gypsum board for finishing with wallpaper
Gluing without the use of strengthening mixtures
The walls must be dry, the primer must dry for at least 24 hours. Wet spots are darker areas against a light background. Under no circumstances should you glue wallpaper to wet walls ; these places will come off later or become moldy and blackened.
Also, when sticking wallpaper you must follow simple rules:
The wall should be clean , without various points and debris; you can carefully go over it with your palm or with a lamp. The tape should be the same color as the drywall, for which you can add a little light dye to the primer to give the surface one tone.
For glue, you need to use clean dishes that have not been used for priming, free of dust and dirt; they need to be rinsed well before use. Dust and debris will become limp and subsequently the wallpaper will not hold up as well.
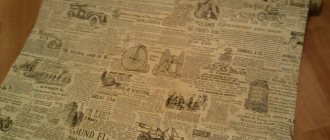
as much as possible or remove all black pencil marks, name, drywall logo and the like. For thick wallpaper this is not a problem, but if there is thin, light wallpaper, then everything will show through.
Before gluing wallpaper onto drywall without using putty, seal the cracks with reinforced self-adhesive tape , and over it with joining tape. This will help minimize the lack of putty in the walls . It is highly advisable to treat the walls with a primer before wallpapering.
A special emphasis can be placed on the wall along which the light will slide. You don’t have to pay much attention to walls that don’t have direct sunlight; minor imperfections won’t be visible on them. But if a lamp hangs on the wall, then all the defects and even the debris that was in the adhesive mass will be clearly visible under it.
If a 2-3 mm gap appeared between the wallpaper during the sticking process, which we noticed too late, it is better not to touch it, and not to try to forcefully pull the wallpaper and hide it. The next day the gap will appear again. correct and carefully inspect the wallpaper , before the glue has yet hardened .
Return to content
What is needed for wallpapering on gypsum board?
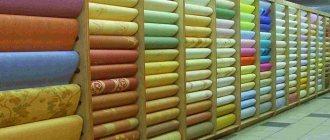
First of all, the material itself. The type, color and texture of wallpaper, as well as the amount of wallpaper required to decorate a particular room, should be chosen based on your own aesthetic preferences and the size of the areas to be covered.
To work you will need a set of tools:
- narrow and wide spatulas;
- construction knife with a set of interchangeable blades;
- roller and brushes for glue;
- corner roller;
- container for preparing putty mixture;
- container for glue;
- screwdriver;
- mixer;
- holder for sanding mesh;
- metal scissors;
- ladder;
- overalls, work gloves and a respirator.
Tools for puttying gypsum boards
The list of materials required to prepare gypsum boards for wallpapering includes:
- reinforcing tape;
- grinding mesh;
- primer;
- perforated corner;
- starting and finishing putty mixture;
- wallpaper glue.
Important points in preparing and covering gypsum boards with wallpaper:
- Drywall under wallpaper cannot be puttied with cement-based mixtures.
Cement-based putty - Puttying can be started only after installation work has been completed and the room has been cleaned. Putty is applied in two layers with mandatory rubbing.
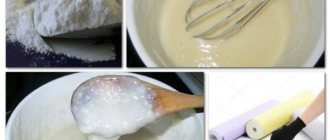
Grinding putty - The putty mixture should be mixed in small portions.
Mixing the putty solution - After each kneading, the tools and working container must be thoroughly washed.
- For the convenience of working from a stepladder, you need to provide a stand for tools and containers with prepared putty.
Construction sawhorses: an indispensable item for repairs - A universal primer is suitable for preparing gypsum boards for wallpapering. It must be applied with a roller over the entire surface, trying to avoid drips and splashing.
Primer for plastered drywall
Before you start gluing wallpaper, you need to cut it correctly. In addition, it would not hurt to make markings on the surface to be finished, which will help to stick the canvas more accurately. In order for the glue to set and dry evenly in the room, it is necessary to maintain a stable temperature for at least 24 hours.
Required Tools
When starting to glue drywall, you should prepare the necessary tools. To work you will need:
- gypsum putty;
- serpyanka, which has a width of at least 10 cm;
- acrylic primer and wallpaper composition;
- plaster corner;
- ladder or stepladder;
- spatulas of various sizes;
- drill;
- chisel;
- mixer for preparing the working solution;
- roller;
- brushes;
- sandpaper.
Wallpapering technique
Once you've finished puttingtying, grouting and priming the drywall, don't forget to wet clean the room. This greatly simplifies the work with glue and wallpaper, as it eliminates contamination of the materials and ensures reliable gluing.
The length of the canvas is taken with a margin of 50-70 mm. After cutting, it is folded into a fan with a 2-3 cm shift with the front surface down. You should not fold more than 10 pieces, because even if you work together, it will not be easy to cope with so much material and glue. By the way, when choosing the latter, you need to pay attention not only to its technical compliance with the wallpaper, but also to moisture resistance, oiliness and antiseptic properties. Correct assessment of these characteristics will ensure the durability and beauty of the interior, which is especially important for rooms such as the kitchen, nursery and hallway.
Calculation and cutting of wallpaper in the photo
When preparing the glue, you must follow the mass ratio of the mixture and water specified in the manufacturer's instructions. Particular attention should be paid to the hardening time - it is usually indicated on the packaging, but the standard is no more than 8-12 minutes. The mass must be homogeneous and have an optimal viscosity for work. Using a roller or brush, apply the glue evenly to the inner surface of the canvas and, if necessary, to the area to be pasted. Afterwards you need to wait for setting, which begins after 1-3 minutes and is expressed in a change in the consistency of the composition - it becomes more viscous and loses adhesion.
It is important not to overexpose wallpaper, especially paper wallpaper, as it may lose its mechanical strength, i.e. simply crawl away either right in your hands, or under its own weight already on the wall, which is unpleasant due to the increased consumption of material and unnecessary labor costs.
Step-by-step instruction
The order in which the work is performed directly depends on the type of coating chosen. Non-woven wallpaper is glued in the following sequence:
- the foundation is being prepared;
- a layer of primer, putty and primer is applied successively so that the base does not show through the decorative base;
- glue designed specifically for non-woven wallpaper is purchased and prepared according to the instructions;
- The strips are glued according to the manufacturer's instructions.
Vinyl wallpaper is glued in almost the same way:
- prepare the base;
- cut to the size of the wallpaper;
- apply the adhesive composition to the floors and wall surfaces;
- fix the decorative material on the surface of the base.
Attention! For high-quality work, you should use an adhesive composition recommended for vinyl wallpaper. The universal one should be resorted to only in cases of extreme necessity.
Wallpaper for painting is glued to a pre-primed base. The canvases are placed end-to-end. This assumes that the base is perfectly level to begin with.
Paper wallpaper can be glued directly to the base, having previously sealed the joints and fastening points with paper tape or sickle tape. If this is not done, characteristic defects will appear on the surface when smoothing the canvas. In this case, there are no special requirements for the composition of the glue.
To obtain the best result, it is better to glue paper wallpaper onto a primed base. this will reduce the intensity of moisture absorption from the adhesive composition. The canvas will be securely fixed to the surface of the walls. Paper ones are placed end-to-end and overlapping. The procedure depends on the type of finishing material chosen and the manufacturer’s recommendations.
If you decide to decorate a wall with photo wallpaper, you should first select a finishing material, and then carefully prepare the base. The procedure will depend on the type being mounted. There is a model with a 3D effect that forms an LED coating. The detailed instructions for each variety describe the procedure.
In the most general case:
- the base is reinforced, primed, puttied, and carefully leveled. The presence of even minor defects is unacceptable, as they will clearly show through the decorative coating. In some cases, the perception of the photographic image will change;
- the glue recommended by the manufacturer is selected and diluted according to the instructions;
- When installing LED wallpaper, electrical wiring is carried out according to the electrical diagram;
- Direct gluing of photo wallpaper to drywall is carried out.
We invite you to watch a video describing the technology for performing the work:
How to do everything the first time?
Despite the technical simplicity of decorating rooms with plasterboard wallpaper, lack of experience can negatively affect the quality of the result. In order to hang wallpaper correctly - evenly, reliably and beautifully, you need to take into account several important points:
- Glue
You should not allow the mixture to be saved, or the finished glue applied to the canvas to become uneven or dry. Wallpaper can be pasted either end-to-end or overlapping. But in both cases, you need to ensure that the front surface of the adjacent segment has minimal contact with the glue. When smoothing the fabric, it will protrude along the edges, which can be easily corrected with a clean, soft, dry cloth.
Preparing wallpaper glue
- Canvas
It is better to glue the wallpaper together - one will put the upper part of the canvas against the wall and hold it while the second one does the leveling and smoothing. If you manage to tear the wallpaper while sticking it, don’t rush to upset it and, especially, throw away the damaged piece. It is quite possible that it will be suitable for another area, where a neatly joined gap will not be so noticeable.
Resuscitation of torn or peeling wallpaper
- Precision and accuracy
Wallpaper can be hung efficiently and evenly only if the walls are marked correctly. It must be done using a vertical plumb line, trying to hit the line as accurately as possible. The canvas is smoothed with arcuate movements in the direction from the center to the edges to ensure 100% absence of air in the contact plane and uniformity of the adhesive layer.
Direction for smoothing wallpaper with a rubber or plastic spatula
After pasting the entire wall, the wallpaper, especially in the joining areas, must be wiped again with a dry, clean cloth, insuring against drips, stains and loss of the dirt-repellent properties of the front surface of the wallpaper.
Final wiping of wallpaper
Both during work and after its completion, temperature and humidity fluctuations in the room should not be allowed. Some types of wallpaper after pasting require additional drying or smoothing due to high absorption rates and shrinkage during drying. If you did everything correctly, all that remains is to cut off or hide the excess fabric under the baseboards, after which you can proceed to the next phase of the repair or consider it complete.
Before starting work
If there is old wallpaper , it can be easily removed using special wallpaper removal solutions. Mix it with water, apply it evenly to the surface with a spray bottle, wait about 5-10 minutes until the solution is absorbed. After that, use a spatula to pry up the corner, and the wallpaper can be easily removed and remains intact. There may be glue and small pieces of wallpaper left in places; you can get rid of them with a spatula.
Defective putty on drywall (with cracks, irregularities, and questionable places) is removed with a special construction scraper with a replaceable blade or spatula. After removal, the wall must be treated with a primer , even without putty, this will ensure reliable adhesion of the glue to the wallpaper.
After priming, inspect the wall around the perimeter where it adjoins the floor ; here it is especially important that the plane is level; skirting boards and baguettes will highlight the slightest irregularities; they will be immediately visible. To do this, you need to measure the wall, find and cover up any irregularities. As a rule, it is necessary to grind about 15 centimeters of the upper adjacent space. After which we perform a similar operation with the upper junction, capturing 15 centimeters of the wall from the corner.
itself does not need to be treated , as many workers do - after all, thick wallpaper can hide all the unevenness, but it is undesirable to do this, since it is possible for them to break through at the joints of the sheets.
Return to content
Photo gallery
Vladislav
Successful examples and options
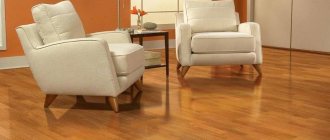
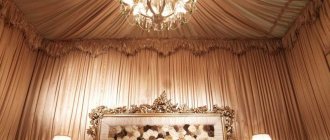
Partitions look impressive in interior design. With their help, it is easy to divide the room into functional zones, place bright accents, and add more creativity to the atmosphere. Gypsum plasterboard structures can have rectilinear and shaped shapes, sometimes they are made in the form of niches and shelves. To prevent the presence of partitions from burdening the interior, plasterboard partitions can be finished with light wallpaper in beige, cream, and pastel colors.
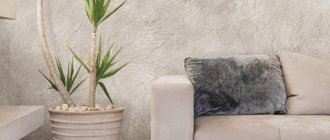
If you need to create a spectacular room design, gypsum board sheets are covered with wallpaper that contrasts with the color scheme of the other surfaces. It is allowed to combine fabrics of different textures. To visually raise the ceiling, wallpaper with a vertical pattern is pasted. If you need to visually expand the boundaries of the room, the canvases can be placed horizontally. The effect of continuous space and positive dynamics is created by stripes with diagonal patterns.
Another interesting option is choosing wallpaper of the same color palette. In this case, the walls are covered with canvases of a calm, neutral shade, and canvases of a more saturated color are glued to the partition. A light partition will beautifully highlight dark furniture, and vice versa. There are a lot of options to diversify and decorate the interior, but all elements of the composition must be combined with each other.
Important! Wallpaper for drywall is chosen in the same price category as wallpaper glued to the walls and ceiling. Then the decoration will look relevant and unobtrusive.
Plasterboard partitions, false panels, and shaped structures give the room design a complete look. They can be beautifully decorated with wallpaper and later painted. It is important to follow the technology for preparing and gluing surfaces made from gypsum board sheets.
Wallpapering on drywall (2 videos)
Wallpapering on drywall (24 photos)
Conclusion
Even the most complex process turns out to be simple if you break it down into many small steps, you don’t need to understand the technology like a specialist, you just need to follow the action by action to get the job done well. The video in this article will clearly show some important points and allow you to understand the topic even better. If you have questions, write them in the comments below, we will analyze all the nuances regarding wallpapering.
Did you like the article? Subscribe to our Yandex.Zen channel
October 30, 2016
Plasterboard systems, Wallpaper, Finishing materials
If you want to express gratitude, add a clarification or objection, or ask the author something, add a comment or say thank you!
Applying primer
In order for the putty to better adhere to the surface, the drywall is treated with a primer. In addition, such treatment eliminates the risk of mold or fungi that negatively affect human health. Application is carried out with a wide primer brush or roller. After applying the first layer, you need to wait 30 minutes for it to dry. After this, apply a second coat. To seal small cracks, use a serpyanka. This material is a fiberglass mesh tape. For better fixation, you can use PVA glue.