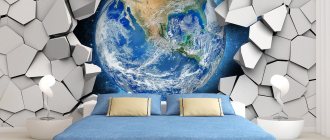
Among interior finishing works, the most common and popular is wallpapering walls. To achieve an original design, you can hang the wallpaper horizontally. In this case, the interior of the room stands out either due to the alternation of the pattern, or the color scheme of the canvases, or simply due to the alternation of the sheets themselves.
The advantage of horizontal wallpapering is that repairs performed in this way give the room a unique design.
In what cases is wallpaper glued horizontally and how to do it correctly
Wallpaper can be hung not only vertically, but also horizontally. The latter method is also popular.
However, horizontal pasting has a number of nuances and subtleties. It is important to perform this procedure correctly.
How to do this will be discussed in today's article.
In what cases are the canvases glued horizontally?
Typically, the longitudinal arrangement of wallpaper is resorted to in the following situations:
1) When combining materials of different colors and composition. This technology has become widespread today. Most often it is used when combining vinyl and paper wallpaper.
Note! An important point: horizontal pasting is recommended only to the level of the window or window sill.
2) If you need to glue the border. The border is a dense strip that is usually glued to the center of the wall in a horizontal direction.
This element emphasizes the individual design features of the room.
3) To maintain the realism of the idea. In stores you can find rolls that imitate logs
In this case, when pasting, it is better to place them horizontally. There are also many other design ideas.
Techniques for combining wallpaper
In the process of selecting wallpaper combinations, you need to remember about some similar element, which may be the same style of pattern or ornament, similar pattern geometry, shades of the same color, etc.
Plain wallpaper of the same color, having different shades
This technique is suitable for those who love monotony in the interior. This approach involves covering one or more walls with wallpaper in a rich shade. Quite often there is a combination of blue, beige, gray colors and their shades.
Plain wallpaper of different shades combined both with each other and with patterned wallpaper.
We combine patterned wallpapers with plain ones
If your hands are itching to cover the walls with a large panel, then it will be much better if the other walls in the room are covered with plain wallpaper. Exactly the same method is used when there is a pattern on the wallpaper with large flowers or patterns, or geometric shapes.
Patterned wallpaper combined with plain ones.
Combining wallpaper with different patterns
It has been a long-standing tradition to use a combination of wallpaper with vertical stripes and wallpaper with floral patterns. True, all of them must be correctly combined with wallpaper in similar color shades. A similar floral pattern can be perfectly combined with wood-themed patterns. Cubes, stripes and various geometric shapes go well with abstract drawings. True, this method is considered dangerous, so it must be used with extreme caution and try to select patterns more carefully.
A combination of wallpapers with different patterns and different colors.
Combination of wallpaper with different colors
Here we must remember that neutral colors must be combined with more active ones. Although, if you create a bright and youthful interior, then here you can experiment with color contrast. Using this technique will be very suitable when dividing a room into zones.
A combination of white wallpaper with patterns and striped wallpaper.
How to glue correctly. Step-by-step instruction
1) Mark the first strip. We measure the width of the roll. Next, we display the same distance over the entire surface of the wall in the direction from bottom to top.
Important! The ceiling or side walls are often uneven. If necessary, they will need to be aligned.
However, minor irregularities may not be corrected. Subsequently, they will be covered with plinth.
2) Application of adhesive composition. It is important to ensure uniform application of the glue. Before completing the task, it would not hurt to eliminate defects in the walls: clean the surface from dust, prime and putty if necessary.
3) Pasting and subsequent leveling of wallpaper. We apply the first strip along the marks that need to be made in advance using a building level.
It is important that the bottom edge of the material completely coincides with the mark.
Then the canvas is smoothed with a roller in a horizontal plane. Excess glue can be removed with a damp cloth.
4) Installation of the remaining strips. The procedure for gluing subsequent strips is similar to the first.
Thus, the wall is pasted from top to bottom. Don't forget about joining the panels.
5) Special attention should be paid to gluing the last sheet. It is important that this piece fits onto the baseboard.
In this case, the amount of overlap should not exceed 2 cm. Next, the strip must be pressed against the wall and smoothed using a roller. The excess is trimmed off with a spatula.
Additional Information! During the gluing process, it is better to use a notched trowel.
The use of this tool will significantly reduce the time of repair work.
Thus, the article presented the basic rules for horizontal wallpapering.
Are you ready to listen to the recommendations that were outlined today? Share your opinion in the comments.
Source
How to join wallpaper horizontally. horizontal division of walls
Combining wall decoration horizontally is very common. This technique is used in interiors of almost all styles. Wooden and cork panels are often combined with wallpaper and painting. However, horizontal division of walls using only wallpaper is no less common. It is also possible to combine wallpaper of similar shades or, conversely, contrasting ones. You can combine wallpaper with different textures: for example, cover the bottom of the wall with vinyl wallpaper that imitates plaster, and the top with textile wallpaper.
When dividing walls horizontally by combining wallpaper, it is necessary to use a border to design the joints. A paper border, a polyurethane molding, a wooden batten, or a ceiling plinth will be suitable - the choice, as a rule, depends on the style of the interior and the thickness of the wallpaper. So, if the wallpaper is the same thickness, you can get by with a paper border. But if the thickness of the wallpaper is different, the paper border may lie unevenly.
How to properly divide a wall horizontally? At what height from the floor should I join wallpaper? This also depends on the height of the ceiling. On average, the height of the lower half is 1 meter - this is optimal if the room is low. In a high room, you can make the border between the wallpaper much higher - 1.5 or even 2 meters from the floor.
First, the top sheets are glued, but the bottom of the sheet is not glued. A reserve is left. Then the bottom wallpaper is glued, the top of which is also not glued a little. The allowance must also be left. If you paste wallpaper end-to-end, immediately cutting off the seam allowance, the wallpaper may shrink when drying, causing the joint to increase in size. When both wallpapers are dry, you will need to carefully cut off the excess and glue the wallpaper end-to-end.
Another important point: the junction of the wallpaper should be measured according to the level of the floor, not the ceiling. Otherwise, when the furniture is placed, the unevenness of the joint in relation to the floor may be noticeable - this will ruin the whole look.
Advantages and disadvantages of horizontal pasting
The question “is it possible to glue wallpaper horizontally?” is asked by many developers. It turns out that this is quite possible, and this method of finishing has its pros and cons.
The main advantage is that this renovation option allows you to create an unusual design that has no limits to your imagination.
Unfortunately, this finish also has certain disadvantages, including the following:
But if you need to get an original design, and horizontal wallpapering of walls outweighs other complex work, then you can take a risk.
Repairing a wall
Let us remind you that gluing can only be done on a flat surface. In this regard, preparatory work is necessary if there is old covering material on the wall.
Wallpaper is removed after pre-wetting it. Once swollen, they are easily separated with a steel spatula. The painted surface is washed by adding soap or baking soda to hot water.
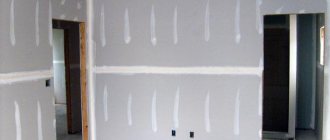
Partition structures made of plasterboard, plywood sheets and other materials also require preparatory measures. The joining areas are cleaned with sandpaper, sealed with putty mixture, and covered with oil paint. Self-tapping screws and nails are buried as deep as possible into the wall material, coated with drying oil or paint, then puttied and then cleaned.
Uneven and defective areas are filled with putty solution. As soon as the mixture dries, the treated areas are cleaned and the entire surface of the wall is covered with putty mixture, applying it in an even layer.
The base remains to be treated twice with a primer to increase adhesion between the wallpaper and the wall.
The result of the preparatory work is a flat, dry and smooth wall surface.
Preparatory activities
To complete this step you will need a simple set of tools consisting of:
Before starting work, you need to decide how much wallpaper material is needed. For this purpose, we find out the area of the room by multiplying the width of the wall surface by its height (it is measured from the baseboard to the baguette). After this, we prepare a sketch to take into account the location of the opening areas for windows and doors, the heating system and the source of thermal energy. Next, we decide which corner to start from and how to glue the wallpaper in order to finish it neatly.
Today, paying tribute to fashion, developers install built-in wardrobes in rooms and decorate the space with fireplaces.
If the wallpaper you choose has a pattern, then in order for it to match, it is recommended to start working from one of the specified interior elements.
Combining the pattern is simple - unroll a couple of rolls, join the pattern transversely or diagonally. Probably, when gluing wallpaper, you will have to change direction through the strip, for convenience, marking the upper part of the canvas with a pencil.
To evenly glue horizontal wallpaper for walls, set aside 1 - 1.2 cm from the baseboard of the floor covering and draw a horizontal line along the level. The wallpaper panel is set according to this mark. After making the marking, attach a roll of wallpaper to it, unfolded horizontally, determine how to combine the pattern, to do this, move the canvas alternately to the left and right sides, choosing a successful match.
Having aligned the pattern, we apply marks on each side along which the trimming is performed. If the wall surface is uneven, the panels are trimmed along the joining area of the wallpaper.
Interior decoration with striped wallpaper
The main problem with decorative wall coverings is noticeable joints, which striped wallpaper successfully hides.
This is not the only or even the main advantage of striped wallpaper, but there are certain conditions that are important to meet in order for the striped decor to be effective and non-irritating.
Striped interiors
Stripes are one of the classic trends of modern interior fashion, which does not mean that they are appropriate only in classic interiors.
Modern wallpapers for walls are incredibly diverse, which allows them to be used in both baroque and minimalist modern styles, replete with details.
When choosing wallpaper for walls in any room, it is important to consider two main points:
- the emotional state created by striped wallpaper in the interior;
- transformation of volume, size, height and other parameters of the room;
Correctly selected stripes are appropriate in any room in the house. With their help, you can create a calm or unusually dynamic interior.
Emotionally, striped wallpaper in the interior can be tiring when the contrast is pronounced. But this is the key to a spectacular, unforgettable interior.
We cannot display this gallery A thin contrast strip causes anxiety and irritation and does not allow you to relax, so it is best to use it in moderation.
You can make the right choice if you have a good idea of what you want from a particular interior.
If the owners of the house work a lot and live under stress, then too sharp a contrast and too bright colors can interfere with relaxation at home.
Those who lack the energy and strength to make their old dreams come true should, on the contrary, choose contrast and bright, energetic colors.
When it comes to transforming a space, there are few prints that can have such an impact.
Using a contrasting stripe you can add depth, especially to complex and cramped spaces.
It is believed that wallpaper with vertical stripes visually makes the room taller (however, this is mainly true for rooms with ceilings of 2.5 m), while vertical stripes expand the space.
However, everything is not as simple and straightforward as it might seem. Using these effects incorrectly can negatively impact the appearance of the room.
Rules for gluing
To decorate the walls you will need wallpaper material and the appropriate adhesive composition, brushes, and rollers.
To get a good result after repair, make sure that the glue has not expired. Please note that the adhesive mixture is selected taking into account the type of wallpaper, or a universal one is used. A good solution would be a composition that contains antiseptic components that prevent the formation of mold.
The adhesive mixture is diluted in accordance with the manufacturer's recommendations. You will have to mix thoroughly so that there are no lumps left. The dry powder is poured into cool water in a thin stream in portions, with constant stirring.
To eliminate lumps, it is recommended to strain the adhesive mixture.
In our work we follow the following algorithm of actions:
Here are a few examples of how horizontal patterns are used in interior design:
This option is recommended for small rooms to visually expand the space and eliminate the “pressure” of a low ceiling.
Developers' opinion
This method of wall finishing is chosen with certain doubts, because some inconveniences are expected during the work.
Increased consumption of wallpaper material is guaranteed. Vertical pasting leaves a surplus that does not exceed two and a half meters, while with the horizontal finishing option there will be many times more unnecessary pieces.
Difficulties arise when leveling the wallpaper. With the standard gluing option, the strip is aligned under the influence of gravity, from the top edge to the bottom, and all we have to do is guide it in place and press it. Horizontal gluing implies a longer and more careful adjustment along the joint.
The adhesive mixture is leaking. The next time you press on the canvas, glue appears from under it, smudges of which fall on the strip located below.
The joining areas remain visible and cannot be hidden. The main reason for this is the side light entering the windows.
Despite the obvious difficulties of repair, many people like this option of pasting. They claim that the ability to combine two different-colored materials allows you to get an unusual design.
In addition, there are wallpapers with a pattern that imitates lining, the gluing of which requires a horizontal position.
Source
Horizontal wallpaper - nuances of use for decoration
Have you decided to wallpaper your walls, but can’t decide how to do it correctly? Today we’ll figure out whether horizontal wallpaper is common. You will have another gluing option, which is quite suitable for renovating an apartment.
Content
Advantages and disadvantages of horizontal pasting
The question “is it possible to glue wallpaper horizontally?” is asked by many developers. It turns out that this is quite possible, and this method of finishing has its pros and cons.
The main advantage is that this renovation option allows you to create an unusual design that has no limits to your imagination.
Unfortunately, this finish also has certain disadvantages, including the following:
- the complexity of the finishing process, which cannot be done by yourself - you will need a partner;
- wallpapering horizontally implies careful leveling of the wall surface, because any defect will be noticeable;
- there is a possibility of damage to thin or paper wallpaper with a roller when smoothing it - you will have to act carefully;
- Vertically glued strips form an almost imperceptible joint, and the boundaries of horizontally located stripes are very noticeable, especially under a source of artificial light.
But if you need to get an original design, and horizontal wallpapering of walls outweighs other complex work, then you can take a risk.
Repairing a wall
Let us remind you that gluing can only be done on a flat surface. In this regard, preparatory work is necessary if there is old covering material on the wall.
Wallpaper is removed after pre-wetting it. Once swollen, they are easily separated with a steel spatula. The painted surface is washed by adding soap or baking soda to hot water.
Partition structures made of plasterboard, plywood sheets and other materials also require preparatory measures. The joining areas are cleaned with sandpaper, sealed with putty mixture, and covered with oil paint. Self-tapping screws and nails are buried as deep as possible into the wall material, coated with drying oil or paint, then puttied and then cleaned.
Uneven and defective areas are filled with putty solution. As soon as the mixture dries, the treated areas are cleaned and the entire surface of the wall is covered with putty mixture, applying it in an even layer.
The base remains to be treated twice with a primer to increase adhesion between the wallpaper and the wall.
The result of the preparatory work is a flat, dry and smooth wall surface.
Preparatory activities
To complete this step you will need a simple set of tools consisting of:
- roulette;
- pencil;
- construction level.
Before starting work, you need to decide how much wallpaper material is needed. For this purpose, we find out the area of the room by multiplying the width of the wall surface by its height (it is measured from the baseboard to the baguette). After this, we prepare a sketch to take into account the location of the opening areas for windows and doors, the heating system and the source of thermal energy. Next, we decide which corner to start from and how to glue the wallpaper in order to finish it neatly.
Today, paying tribute to fashion, developers install built-in wardrobes in rooms and decorate the space with fireplaces.
If the wallpaper you choose has a pattern, then in order for it to match, it is recommended to start working from one of the specified interior elements.
Combining the pattern is simple - unroll a couple of rolls, join the pattern transversely or diagonally. Probably, when gluing wallpaper, you will have to change direction through the strip, for convenience, marking the upper part of the canvas with a pencil.
To evenly glue horizontal wallpaper for walls, set aside 1 - 1.2 cm from the baseboard of the floor covering and draw a horizontal line along the level. The wallpaper panel is set according to this mark. After making the marking, attach a roll of wallpaper to it, unfolded horizontally, determine how to combine the pattern, to do this, move the canvas alternately to the left and right sides, choosing a successful match.
Having aligned the pattern, we apply marks on each side along which the trimming is performed. If the wall surface is uneven, the panels are trimmed along the joining area of the wallpaper.
Rules for gluing
To decorate the walls you will need wallpaper material and the appropriate adhesive composition, brushes, and rollers.
To get a good result after repair, make sure that the glue has not expired. Please note that the adhesive mixture is selected taking into account the type of wallpaper, or a universal one is used. A good solution would be a composition that contains antiseptic components that prevent the formation of mold.
The adhesive mixture is diluted in accordance with the manufacturer's recommendations. You will have to mix thoroughly so that there are no lumps left. The dry powder is poured into cool water in a thin stream in portions, with constant stirring.
To eliminate lumps, it is recommended to strain the adhesive mixture.
In our work we follow the following algorithm of actions:
- Apply the adhesive mixture in an even layer over the prepared wall surface;
- apply the first strip of wallpaper, align its edge according to the markings applied to the baseboard, and spread the panel in the sideways-up direction;
- We glue the remaining strips in the same way, immediately removing excess glue protruding at the joining areas.
Here are a few examples of how horizontal patterns are used in interior design:
- We alternate stripes that are different but similar in color. Thus, horizontally placed wallpaper visually increases the free space;
- We arrange a wide border line along the central part of the wall surface. A longitudinally glued strip divides the walls into two components, the remaining areas are covered with vertically arranged canvases;
- alternate contrasting fabrics. Pasting is done with light and dark stripes, arranged alternately. For visual correction, this finishing option is considered effective, especially if it is complemented by monochromatic inserts located vertically.
This option is recommended for small rooms to visually expand the space and eliminate the “pressure” of a low ceiling.
- The previously described technique is used for one wall surface. For long walls, a plain light material is chosen, small walls are covered with longitudinal dark canvases;
- In order to visually “stretch” the narrow wall, we trim the long side sections with light material and use horizontal photo wallpaper.
Developers' opinion
This method of wall finishing is chosen with certain doubts, because some inconveniences are expected during the work.
Increased consumption of wallpaper material is guaranteed. Vertical pasting leaves a surplus that does not exceed two and a half meters, while with the horizontal finishing option there will be many times more unnecessary pieces.
Difficulties arise when leveling the wallpaper. With the standard gluing option, the strip is aligned under the influence of gravity, from the top edge to the bottom, and all we have to do is guide it in place and press it. Horizontal gluing implies a longer and more careful adjustment along the joint.
The adhesive mixture is leaking. The next time you press on the canvas, glue appears from under it, smudges of which fall on the strip located below.
The joining areas remain visible and cannot be hidden. The main reason for this is the side light entering the windows.
Despite the obvious difficulties of repair, many people like this option of pasting. They claim that the ability to combine two different-colored materials allows you to get an unusual design.
In addition, there are wallpapers with a pattern that imitates lining, the gluing of which requires a horizontal position.
How to glue horizontal wallpaper: doing apartment renovations correctly
The main reason for gluing wallpaper along the wall rather than across it is the special placement of the pattern.
Are you planning to decorate your walls with wallpaper, but don’t know how to stick them lengthwise or crosswise? It doesn’t matter, because I’ll tell you whether it’s possible to glue wallpaper horizontally, and if so, how to do it correctly with your own hands. As a result, you will be able to choose the appropriate gluing method and apply it during renovations in your apartment.
Horizontal gluing technique
- It's no secret that the vertical method of gluing wallpaper for decoration is traditionally more popular. But is it possible to glue wallpaper horizontally? It turns out that it is possible and professionals use this method quite widely; it is well suited for combining transverse stripes. In other words, you don’t need to look for a transverse pattern; you can take traditional vertical wallpaper and glue it across.
- This approach also became relevant with the advent of 1m wide canvases. 3 strips are enough to cover the entire wall. In addition, when gluing horizontally, the joints between the tapes will be less noticeable, since the light from the window will go parallel to the combined sheets.
- As with vertical wallpapering, before wallpapering horizontally, you should carefully prepare the base. It is advisable to dismantle the floor plinths; if this is not possible, then a small overlap is made on the plinth, which is later cut off.
Joining of canvases along the horizon.
Important: it is better to orient yourself according to the floor level, so that furniture and other interior items will be in the same horizontal plane with the pattern on the canvas.
- Walls must be clean and smooth, without potholes, cracks or other defects. Initially, it is better to cover them with primer; it is convenient to use the same glue as for wallpaper as a primer.
- It is important to glue the first strip evenly, based on it, the remaining strips will be much easier to stick. To do this, before starting work, you need to clearly draw a transverse strip along the level. It should be equal to the width of the roll; if the floors are not perfectly flat and trimming is required, then the strip can be measured a little narrower.
- As a rule, it is glued to doors, but it can also be applied to windows. It is unlikely that you will be able to paste the wallpaper across with your own hands alone, so it is better to get an assistant.
- The ribbons are long and after applying glue to them, so that the composition does not dry out, it is better to fold the canvas like a book, so the material will be well saturated and will not dry out. Instructions may vary depending on the type of wallpaper; there are 2 methods of applying the composition. Only on the canvas or on the canvas and on the wall. So read the manufacturers' recommendations carefully.
- Next, focusing on the previously allocated strip, the first tape is glued and the air is carefully expelled using a soft roller or rag. The remaining tapes are mounted end-to-end. It is better to carefully roll the joints with a special narrow roller. Upon completion of the work, the excess fabric is trimmed, baseboards are installed and, if necessary, borders are glued.
Thin stripe in the interior.
Pasting along the wall: pros and cons
The photo shows examples of the use of “striped” wallpaper in the interior of residential premises; as you can see, the lines can be directed both along and across
Wallpaper is traditionally glued vertically, that is, from top to bottom. This arrangement of finishing materials is recommended by the manufacturer, and this is no coincidence. But in some cases, you can neglect the traditional method of gluing in favor of a horizontal arrangement.
The pattern located across the strip of wallpaper is a significant reason for gluing horizontally
Arguments against longitudinal gluing:
The photo shows a hallway that has been visually lengthened by alternating longitudinal dark and light lines
Arguments for a longitudinal arrangement:
How to glue correctly
| Illustrations | Step by step instructions |
| First lane marking . From the bottom of the baguette along the entire length of the wall, measure down a distance equal to the width of the wallpaper roll. |
We check the location of the marks using the measurements taken with a spirit level. The fact is that the ceiling and the bottom edge of the baguette may not be perfectly smooth, while the bottom edge of the wallpaper needs to be leveled horizontally.
If the ceiling is uneven, the top edge can later be trimmed along the edge of the baguette.
Visual correction of the room
The diagram shows how horizontal lines affect the visual perception of a wall in a room; the same pattern is relevant when decorating walls with wallpaper
It's no secret that rooms in standard apartments do not always correspond to the preferences of the owners. For example, the room may be cramped and, it would seem, in this case all that remains is to put up with the inconvenience.
But there is an effective solution - horizontal lines, thanks to which you can visually “stretch” this or that part of the room.
| Apply glue . The mounting surface must be free of dust and dirt before applying the adhesive. If the plaster falls off the walls, the surface needs to be primed. Apply the glue in a continuous, even layer. | |
| Apply and align the wallpaper . The first strip is applied and aligned with the bottom edge along the previously made marks. The blade is accelerated with a squeegee in the direction of the side and upward. The glued canvas is pressed against the baguette. Excess material at the junction with the baguette is cut off using a spatula. | |
Gluing subsequent strips. Similar to gluing the first strip, subsequent pieces are glued.
| |
| Gluing the last strip . The last bottom piece of wallpaper is applied overlapping onto the baseboard, smoothed, and then pressed and cut using a spatula. |
| Illustrations | Examples of using horizontal patterns in the interior |
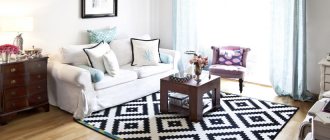
| Alternation of different, but similar in shade, stripes . The interior shown in the photo is a typical example of how a horizontal strip visually expands the boundaries of a room, making it more spacious. By the way, in this example you can see how the wall decoration goes well with other elements of the surroundings, including furniture and lampshade. | |
| Wide border in the center of the wall . This photo shows a combination of vertical plain wallpaper and an intermediate longitudinal strip. The strip, like a border, runs along the perimeter of the entire room, dividing it into two halves, thus diluting the boring gray interior. | |
| Alternating contrasting stripes. The combination of sequentially alternating light and dark longitudinal stripes in the interior is an effective way to visually correct a room, complemented by plain vertical inserts. As a result, on the one hand, the room turned out to be visually stretched, and on the other hand, the ceiling does not visually press. I can recommend this method when arranging cramped rooms with low ceilings. | |
| Alternating contrasting stripes on one wall. This method is ideal for visual correction of long and narrow rooms. Long walls are made plain and light, while materials with narrow longitudinal stripes are glued to a short wall. As a result, the narrow part of the room will visually expand, and long walls will appear shorter. | |
| Narrow horizontal photo wallpaper on a narrow wall . Although the price of such materials is still high, this solution is the only effective way to “stretch” a narrow wall relative to the side light walls. |
Combination rules: how and why
Wallpaper is necessary not only for decorating a room. With their help, space is adjusted in a positive direction. Very often a print is used for this. An active pattern perfectly hides imperfections, distracting attention from them, so this technique of combining wallpaper is often used in niches, ledges, and disproportionate trapezoid-type rooms.
By using a print in the kitchen, you can disguise the kitchen set. In small bedrooms at night it will not stand out, but in the morning, on the contrary, it will “invigorate” it with its ornament.
Advice! If you are in doubt about your choice, place the selected fragment at the head of the bed. The room will be decorated with a combination of two types, and at the same time the pattern will not be striking.
Make sure that the interior elements are in harmony with each other. In this case, the furniture should emphasize the chosen color, or, on the contrary, act as a contrasting solution.
The size of the pattern may vary, since a large ornament on one wall along with the rest of the light wallpaper goes equally well in large and small rooms.
Also, combinations are available not only with prints, but also simply with contrasting colors or textures.
Another popular effect is the “duet”, when all the walls are decorated with various ornaments, but you need to take this choice seriously so that both color and pattern are combined.
Is it possible to glue wallpaper on walls horizontally?
Among interior finishing works, the most common and popular is wallpapering walls. To achieve an original design, you can hang the wallpaper horizontally. In this case, the interior of the room stands out either due to the alternation of the pattern, or the color scheme of the canvases, or simply due to the alternation of the sheets themselves.
The advantage of horizontal wallpapering is that repairs performed in this way give the room a unique design.
Advantages and disadvantages
When planning to renovate an apartment, many people wonder whether it is possible to hang wallpaper horizontally rather than vertically. Yes, they can be glued horizontally. This gluing option has its advantages and disadvantages. The advantage is that repairs performed in this way give the room a unique design. At the same time, there is no limit to the flight of imagination.
The disadvantages of wallpapering horizontally include the following:
If the originality of the interior, which will be obtained in the room after wallpapering the walls horizontally, outweighs all the difficulties during the renovation, then you can begin to transform the house.
The many faces of striped wallpaper: how to make a room spacious
Striped wallpaper in the interior: the very first candidate for the title of ideal wallpaper
Still, what properties should an ideal wallpaper have?
Let's find out:
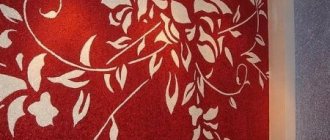
- Firstly, the wallpaper should be beautiful: the main purpose of wallpapering is precisely the desire to make the room more attractive in appearance. For example, wallpapers with patterns or designs are the most popular.
- It is desirable that the wallpaper be made of high-quality materials and be waterproof or grease-repellent. The required set of wallpaper properties depends on the specific purpose of the room: the kitchen and the bedroom need slightly different wallpapers in functional terms.
- And finally, the last property that probably worries everyone who reads this article is the expansion of space in small rooms. It is the color of the wallpaper and its design that influences our perception of the space in the room. If you choose the right wallpaper, you can hide many of the shortcomings of apartments - too small rooms.
The best news is that now you no longer need to look for these “miracle wallpapers” that have all the properties mentioned above: moreover, they have existed for a very long time, and knowledgeable people have been taking full advantage of their advantages for a long time. So, the most versatile and ideal wallpaper for the home is striped or checkered wallpaper: these two types of wallpaper have the same space-expanding properties. Surely, many short people have heard advice from friends that they need to dress in clothes with vertical stripes: this will make them appear taller and slimmer; or if someone wants to appear shorter and stockier, then they are recommended to wear horizontal stripes or wide checks. If we transfer this experience to interior design, we can conclude that the room can be made taller or wider: the main thing is to have the necessary information.
Horizontal striped wallpaper for walls: how to expand a room
The very first problem in the interior of most people is that the area of the rooms is too small. You can make the room wider with horizontal striped wallpaper. The human brain is very easy to deceive: if you put up the “correct” wallpaper, it will seem to him that the room has become several square meters wider. Now there is a huge assortment of different striped or checkered wallpapers: they all differ from each other in price and quality. It should be said that the most important role in the formation of space is played by the strip: it lengthens or, on the contrary, shortens the room. That is, if you only want to enlarge the room, then it is not necessary to purchase the most expensive striped wallpaper: you can find economical options that can perform the functions assigned to them.
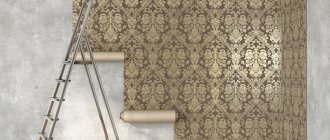
Preparing the walls
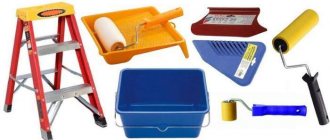
Materials and tools for preparing walls for wallpapering.
Is it possible to glue wallpaper on an unprepared wall surface? In no case, first it must be carefully prepared. If there are old wallpapers left on the surface, they need to be removed. To do this, use a spray bottle to spray not too hot water on them and leave them to soak for a while. After this, they are easily removed using a metal spatula. If the walls are painted with oil paint, they are washed with hot water with the addition of soap or soda.
To apply wallpaper to oil paint, use flour or starch pastes. To do this, paint is applied in strips about 5 cm wide to the surface of the walls from above, below near the baseboards, around window and door openings. It is best to leave everything until completely dry after painting the first layer, then paint it with a second layer and dry it. Next, the strips are wiped with a rag soaked in hot water and sanded using sandpaper. At the end, all areas and corners of the room painted with oil paint are coated with paste.
Preparing walls for wallpapering.
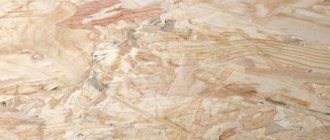
If the room has interior partitions made using dry plaster, plywood, plasterboard, etc. then they need to be prepared first. To do this, the joints of sheets or slabs are cleaned, puttied, and painted with oil paint. Or the seams are sealed with gauze, which is puttied, cleaned and painted with oil-based paint. The heads of screws or nails, for example, on plywood, need to be deepened further so that they are immersed in the sheet. Then these places are lubricated with drying oil, oil paint, putty and cleaned.
All irregularities, holes and cracks are sealed with putty. To do this, the first step is to fill the cracks and voids using a small spatula. After the treated areas have dried, the entire surface of the wall is leveled with putty. At this stage of work it is necessary to use a building level. Next, a primer is applied to the dry wall in 1-2 layers using a brush and roller, which is necessary for better adhesion of the surface and wallpaper. The prepared wall should be flat, smooth and dry.
Where to start wallpapering?
Many answer this question with the truism that was popular in the last century - you need to start from the window or door. In fact, this method of gluing wallpaper is fundamentally incorrect, since such a starting point is not a constant at all. Door frames and window openings very often “mow”, so starting the first strip of wallpaper from this point, you run the risk of gluing all the wallpaper with a curvature, which will be especially noticeable in the corners.
The ideal method for evenly marking the perimeter of the walls is a plumb line. Use it, and then all worries about uneven walls and vertical curvature of wallpaper will fade into the background.
Now let's look at three ways to easily and simply put wallpaper in the corners, even if the evenness of the wall surface leaves much to be desired.
Method No. 1
Cut a strip from a roll of wallpaper, the width of which is 10-12 cm. Spread it generously with adhesive and place it in the corner so that the equal width of each edge goes to the adjacent walls (5 cm on one wall, 5 on the other). Such a “backing” will become a safety net in the event that the wallpaper begins to diverge.
Glue standard-width wallpaper strips over the strip; it is advisable to do this end-to-end. Don't forget to coat the material with additional glue and go around the corners with a rubber roller or plastic spatula.
Method No. 2
Instead of a narrow strip of wallpaper (as in the first method), stick a paint mesh in the uneven corners. It compensates for differences in the surface of the walls and hides defects. When the mesh is dry, glue a strip of wallpaper over it, positioning it so that the main part remains on one wall, and the edge 5-10 cm wide extends onto the adjacent wall. After this, cut another strip of wallpaper and glue it overlapping the narrow part, almost flush to the corner.
Preparatory stage
Marking symbols on wallpaper.
Before you start gluing wallpaper on the wall, you need to calculate its quantity. To do this, determine the area of the room by multiplying the height of the wall by the width. In this case, the height of the room is measured from the floor skirting boards to the ceiling moldings. Then a sketch is made, which takes into account all the nuances around window and door openings, as well as around pipes and heating devices. After this, a decision is made on where it is better to start and how to hang the wallpaper so that everything turns out beautifully and neatly.
Nowadays, many rooms have built-in wardrobes and fireplaces. If the wallpaper has a pattern, then in order for it to match, you need to start gluing the wallpaper on exactly one side of the cabinet or fireplace. To combine the pattern on the canvas, two rolls are unrolled, and the pattern is combined either transversely, or diagonally, or it does not need to be combined. If alignment is necessary, when gluing the strips, you need to change their direction, and in order not to get confused, the top of each canvas is marked with a simple pencil.
In order for the wallpaper to be glued horizontally evenly, mark the distance from the lower plinth at a height of 10-12 mm and draw a horizontal line using a level or level. It is along this line that the side of the panel will be placed. Then the roll is applied to the wall in a horizontal position and the best match of the pattern is selected. To do this, first move it to one side, then to the other, until the optimal result is obtained.
To mark the canvas before cutting, the roll is applied horizontally to the wall, to the drawn line or to the upper edge of the glued piece. Next, combining the pattern, mark lines on both sides for cutting. If the walls are uneven, the wallpaper is trimmed slightly at the joints, and the cutting location is marked on the canvas with a pencil.
Wallpapering walls
You will need:
Universal adhesive is suitable for any type of wallpaper, while special adhesive is used only for a certain type of wallpaper.
- wallpaper;
- wallpaper glue;
- brush;
- roller;
- plastic roller.
In order to hang wallpaper on the wall, you will need glue. If it is of poor quality or expired, then over time stains appear on the wallpaper, and specific odors may appear that are very harmful to health. This universal adhesive is suitable for gluing any type of wallpaper. A special type of it is used for certain wallpapers. There is wallpaper glue that already contains antifungal substances that prevent the appearance of mold on the walls. It must be diluted following the recommendations on the package. It is important to prevent lumps from forming. To do this, the powder is poured into cold water gradually and in a thin stream. Then everything is mixed for five minutes using a construction mixer. If lumps form in the mixture, strain them through a colander.
After this, the prepared canvas is laid out pattern down.
To glue wallpaper without the formation of bubbles, the glue must be applied evenly with a roller or brush, starting from the center and moving to the edges.
To glue the wallpaper evenly, you need to use a level or level to draw a horizontal line at a height of 10-12 mm from the lower plinth.
Then the canvas is folded and left to soak for about five minutes. It is necessary to paste wallpaper horizontally only with an assistant, since this work simply cannot be done alone. To do this, the glue-coated canvas is raised to the desired height and its middle is glued. Next, using a roller or a dry soft cloth, the air is accelerated to the edges so as to avoid swelling. Smoothing the wallpaper from the center to the edges should be continued until all the bulges with glue and air are removed.
The next horizontal row is joined to the upper edge of the previous glued sheet, matching the pattern if necessary. By analogy, all subsequent strips are glued. The seams must be rolled using a special roller made of plastic. Using such a roller, the seams are carefully rolled along their entire length so that they become invisible in the future. The air is expelled from under the wallpaper carefully, without damaging it. After wallpapering the entire surface, the glue should dry. During this process, under no circumstances should windows be opened for several days to prevent drafts. At the end, the remains of wallpaper near window openings and in the corners of the room are cut off.
https://moyagostinaya.ru/youtu.be/f1RlnNDy7z8
It is not difficult to glue wallpaper on walls horizontally, doing the work with a partner. And the result can exceed all expectations both in its originality and in the unusualness and beauty of the interior.