Many people are familiar with how to glue wallpaper on ordinary walls. Previously, wallpapering was the only option for decorating a room, after whitewashing and painting. And if previously walls were made of clay, brick, concrete, today the list of materials has expanded. The question of how to hang wallpaper on an OSB board has become relevant. After all, this material has its own characteristics that should be taken into account. Knowing all the subtleties and additional tips, everyone will be able to do this work on their own.
Types and characteristics of OSB boards
Before hanging wallpaper on OSB, it is important to understand the material itself. At their core, the boards consist of wood chip materials that are pressed under high temperature. The result is a solid slab that is protected from moisture and has excellent characteristics.
The peculiarity of the material is that its strength, stability and rigidity are better than those of plywood, hardboard, chipboard and plasterboard. The products are lightweight, easy to work with, and they hold fasteners well. The main advantage is that OSB boards can be finished with putty, painted, varnished, and tiles laid. Is it possible to glue wallpaper on OSB? Yes! But before you do this, it is important to choose the right product option, because there are several types of products. They are indicated by numbers. The higher the number, the better the strength and moisture protection. Here is the list:
- OSB 1. They are not suitable for cladding work. Sheet thickness is maximum 12 mm. Area of use: creating packaging containers, assembling temporary mock-ups.
- OSB 2. Maximum thickness 25 mm. Operating conditions: temperature 5–45 degrees above zero. With high humidity, the OSB panel deteriorates, so it is not suitable for wallpapering. The scope of use is limited to cladding dry rooms that are heated all year round.
- OSB 3. The best option for finishing rooms and for wallpaper. The slabs have good thickness and are protected from moisture. Scope of use: finishing both indoors and outdoors. In terms of price-quality ratio, OSB 3 is the best option and is used for wallpapering.
- OSB 4. Absolutely moisture-protected material that has increased strength. This product is not intended for private construction; most often it is used to create removable formwork for a massive foundation. The point is the high cost of the panels. Therefore, it would be irrational to use them for wallpaper.
Important! When choosing a material for interior decoration, it is important to pay attention to the environmental friendliness of the products. Safety stoves are designated “Eco”. If we talk about the environmental safety class, then option E0 or E1 is allowed.
Drawing a conclusion, it can be noted that the only correct solution would be to use OSB 3 boards for finishing. This is a guarantee that the wallpaper will not fall off, will last a long time and the wall material itself will not swell. But how to apply wallpaper on OSB?
Simple method
Pasting wallpaper onto OSB boards with minimal investment is quite simple. This method is most often used by people who are far from construction technologies, since the procedure for work in this situation is simplified as much as possible. However, there are some nuances here that will be revealed a little further.
It should be taken into account that oriented strand boards are installed while maintaining technological gaps designed to ensure the movement of material as a result of its expansion or contraction. These seams must be closed. If this condition is not met during the first year of operation, folds will form in this place, therefore, to avoid their appearance, it is advisable to treat the damper seams with white acrylic or silicone sealant.
In addition, when gluing wallpaper on an OSB board without putty is carried out in the so-called economy version, you should take into account what type of finishing coating will be applied to the surface in the future. Since the sheets are not as smooth as chipboard or fiberboard when using inexpensive paper material, roughness will significantly damage the appearance, so the surface must be thoroughly sanded before gluing. Only after this can the gluing procedure begin.
The most convenient way to perform grinding is to use a grinder attachment or a special grinder.
Preparatory work before gluing
As with conventional walls, it is important to ensure thorough surface preparation before the process. Otherwise, all efforts will be in vain. What is included in the preparatory stage? The process is like this:
- The base is leveled. This is especially true in cases where there was already some kind of finishing on the surface of the walls. A protective layer is removed from the surface, which will interfere with the application of primer. After which the OSB board is sanded using a grinding machine or sandpaper. The second option requires more effort and time.
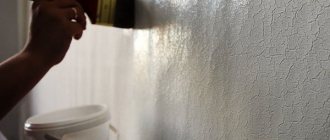
- The first layer of primer is applied. The primer fills all the pores and creates a protective film on the surface. In addition, it improves adhesion, so the putty will be held more firmly on the slab. For the best effect, apply two layers with breaks for drying. Then the slab will not swell from the adhesive. Acrylic or latex primer is better.
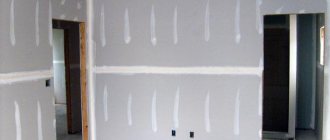
- When the slab has dried, it is important to treat the places where the slabs are fixed to the wall and the seams. They will be visible and become a weak point after gluing the wallpaper onto OSB. The seams create a gap of 2 or 3 mm. To remove it, just use silicone sealant, polyurethane foam or putty with sickle tape (as when working with drywall). It is important to treat the heads of screws or nails with paint so that the metal does not rust in the future.
- The main feature of the preparation is the installation of a fixing mesh or fiberglass sheet. Thanks to it, the putty will not fall off the slab and will not crack. A stapler is needed for fixation. The mesh should not sag, but should not be too tight. The installation process begins from the slope. Instead of a stapler, it is allowed to use fiberglass glue.
- The next stage is puttying. A layer of putty will protect the OSB boards and make the surface smooth and ideal for gluing wallpaper. In addition, if they are thin or light, then dark stains from the slab will not show through and spoil the appearance. There is a special putty for sale on wooden surfaces. When the layer is dry, the surface is rubbed with sandpaper or a grater.
- Secondary priming. On top of the putty layer you need two layers of primer. It will improve adhesion to the wallpaper itself.
It is important to carry out each of the stages carefully and carefully, so that before gluing wallpaper onto an OSB board, you do not have to think about whether the surface will withstand the weight of the canvases or not. Such events will make the walls ideal for gluing. All that remains is to do the standard wallpapering.
Method No. 2 - using putty
This method is more labor-intensive and expensive, but will provide the desired result.
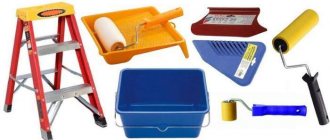
Tools you will need:
- Set of spatulas;
- Mixer and drill;
- Container for mixing putty;
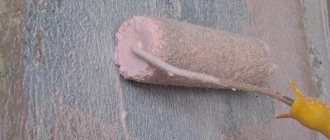
- Fur roller with a long handle for applying primer;
- Construction stapler and staples;
- Painting corners;
- Serpyanka mesh;
- Sanding mesh and plastic grater with clamps for the mesh.
Now, more about OSB surface treatment process
- Similarly to the first method, we seal the seams between the slabs and prime the surface. There is no need to sand the slabs;
- Now we will mask the screw heads and re-seal the seams. For these purposes we need plaster. Rotband plaster from Knauf is suitable;
- Using a small spatula, you need to seal all the places, as when sealing joints on drywall;
- As soon as you process the first joint, glue a sickle mesh over the uncured solution;
- After you have processed all the joints, you need to secure the mesh to the free areas of the slabs. Use a stapler to secure. The smaller the step between staples, the better. Attach with a maximum interval of 10-15 cm;
- Begin laying the mesh from external and internal corners, door and window slopes. Be careful - the mesh at the corner should be a single piece, and not consist of two pieces laid overlapping;
- After this, secure the painting corners on all the corners you need in the same way, using a stapler on top of the mesh;
- After this, prime the entire surface again;
- Mix a small amount of putty and apply the first, not too thick rough coat and let it dry;
- Clean the uneven surfaces with a wide metal spatula, sand the surface with a plaster mesh, clean off dust and apply primer again;
- Apply a finishing coat of putty. Let it dry, clean and sand the surface and prime again. By and large, this is already enough. But for better results, it is recommended to apply a third layer of finishing putty;
- After it dries, the surface is carefully sanded and primed. After this, you can safely start gluing wallpaper.
Choosing wallpaper for work
It is equally important to choose the right canvas. Moreover, the construction market offers a lot of options to consumers. Products can be divided according to the following classification:
- Simple - paper options. They can only be cleaned with a dry cloth. Dampness and moisture are your worst enemy. The cheapest option.
- Waterproof wallpaper. They can be washed with a sponge and gentle detergents. The best option for gluing to OSB.
- Fading under the influence of UV rays. The label indicates whether the fabrics fade or not. This will affect further operation, especially if the room is on the sunny side.
- With customization of the pattern. The image on the wallpaper can be selected or not. The second option is simpler, since there will be less waste and gluing will take less time.
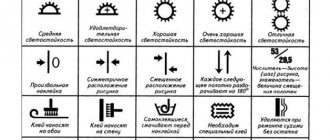
Each roll contains instructions with basic characteristics: is the wallpaper washable, what material is it made of, is it UV resistant, how many layers, is joining required, what glue should be used, etc. Having chosen the wallpaper, you can start gluing it on OSB.
Surface preparation
Forming the desired base for wallpaper includes the following steps:
- Sanding and leveling slabs.
- Primary primer.
- Processing panel joints and recesses at fastening points.
- Installation of fiberglass reinforcing mesh.
- Applying a layer of plaster or putty.
- Secondary primer of the leveled surface.
Wallpapering
How to glue wallpaper on OSB? If the preparation work was carried out correctly, then the further process will not seem difficult. The main thing is to be careful and follow the instructions. And it is as follows:
- Before gluing the canvases, you need to prepare the glue. This is easy to do as there are instructions on the package. As an option, make your own paste from starch or flour.
- Next you need to measure the distance from the floor to the ceiling. This will be the required size of the wallpaper strip. But, as a reserve, it is better to add 5–10 cm to the resulting number. It is better to cut off the excess than not to add a piece. If a drawing requires selection, then it is immediately selected at the joints.
- Now we glue the wallpaper. To do this, apply an adhesive substance to the back side of the finished strip with a roller. In order for the canvas to become saturated, it needs to be folded in half and left for a few minutes. During this time, you can treat the wall with glue.
- To ensure that the first strip is glued perfectly even, it is recommended to tap a vertical line along a plumb line. Further, according to the markings, the wallpaper can be glued onto OSB boards. Ideally, these works should be performed with an assistant who will hold the strip. One holds it, the other carefully glues it to the wall. This prevents wrinkles from forming.
- Using a rubber roller, remove excess air and glue residues from under the wallpaper. It is important to immediately wipe off any excess glue that has leaked from the joints with a rag or sponge. Particular attention is paid to joints.
When the first strip is pasted, you can proceed to the second. The algorithm of actions is the same. When the entire room is finished, it is important to prevent drafts while the glue dries. This usually takes two days. The room must be maintained at a stable temperature. This completes the work.
Adviсe
Before you start gluing OSB, you should read the tips from the experts to avoid mistakes.
- We must adhere to the rule - the joints of the OSB do not coincide with the joints of the wallpaper.
- Be sure to re-prime the putty surface. If there is no primer, you can dilute the glue to a liquid state. It is able to close small pores in the putty and protect the surface from absorption of the main layer of glue.
- After applying glue to paper wallpaper, you need to glue it as quickly as possible, because it gets wet and begins to tear and swell.
- In the corner, the strip of wallpaper should overlap the adjacent wall. The second stripe covers the first.
- After taping with trellises, the room should be draft-free and closed for 24 hours. Temperature fluctuations are also unacceptable.
If you adhere to the above rules, wallpapering will not be difficult and will last for about 5 years.
It is necessary to putty OSB boards before gluing wallpaper.
This will protect the material from deformation and moisture, and also guarantee a beautiful appearance.
Without putty, only liquid wallpaper is applied, which will not let the released resins onto the surface.
Is it possible to do gluing without putty?
Is it allowed to glue wallpaper on OSB without prior puttying? Yes, this can be done by gluing special paper to the slabs in advance. However, this method has negative consequences, which experts warn about. They are:
- After wallpapering, the surface may show all the joints, irregularities and places of fixing elements.
- After some time, spots will appear on the trellises. This will begin to release glue and resin from the OSB.
- Primer and glue without treatment will not adhere well to the surface, adhesion will deteriorate.
- If the slab is processed poorly, moisture will cause the chips to swell over time.
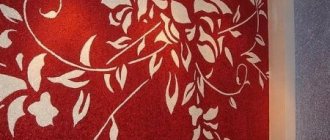
However, there are some types of wallpaper that do not require preparation for gluing. We are talking about liquid wallpaper and textured trellises. Liquid wallpaper is like putty. They are sold dry and after preparation are applied to the walls like putty. The result is a beautiful monolithic surface.
If you paste wallpaper on OSB without putty, then in a dry place the finish will last a maximum of 3 years, after which it will begin to fall off in stripes. In a damp room, the service life will be at most 2 years. Therefore, before gluing wallpaper on OSB, it is important to treat it, then the canvas will last more than 5 years. The process itself is not difficult; it requires patience, following instructions and perseverance. Then the finish will please you and all your efforts will not be in vain.
Types of primer for OSB panels
Based on their composition, three classes of soil compositions can be distinguished that are suitable for solving the task:
- Acrylic
- Alkyd
- Adhesive
Acrylic primers are the most common. An hour after application, the composition becomes absolutely safe for humans. Working with acrylic primers is very easy. They are diluted with ordinary water and dry quickly enough. Acrylic compounds are available with various additives that improve their properties. For example, compositions that penetrate deeply into the base, with antiseptic additives or with the addition of paint. The latter option itself can serve as a basis for wallpapering. There is only one drawback of this type of primer: you cannot work with it at temperatures below zero degrees.
Alkyd primer is used when the surface is planned to be painted with alkyd paint or varnished. The soil significantly strengthens the OSB panel, has high resistance to weathering, is resistant to chemicals and has an antiseptic effect. Due to its harmful effects, this type of primer is intended mainly for outdoor use and inside well-ventilated areas. This primer is not recommended for use in living rooms.
Adhesive primer helps to create a surface on which the putty will better adhere. It contains fine quartz chips. The grain size of quartz filler can be varied depending on the task. The plastered wall will serve as the basis for wallpapering.
More details about choosing a primer and its application can be found in a separate article: OSB primer.
So is it possible to glue wallpaper on OSBP?
Actually, it’s possible, but you still won’t be able to properly hang wallpaper without first preparing the surface. Without this, there simply will not be a quality result. Well, the preparation itself is not so difficult.
The preparatory work is as follows:
- All connecting joints between the plates must be evenly sealed with sickle tape and puttied;
- Then the surface of the slab needs to be primed - this step cannot be skipped; priming is a multifunctional process, which, among other things, will improve the adhesion of surfaces;
- Then the surface is puttied again, the solution is applied with a trowel from top to bottom.
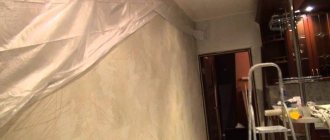
Before pasting the wallpaper, it is necessary to carry out the preparation stage
It is not recommended to skip the last step; it practically guarantees that the wallpaper, even the thinnest and most fragile, will adhere well. If you still decide to do without putty, you will have to prime the surface of the slab several more times. And only dense wallpaper is used in this case. If you putty, be sure to prime the walls again after putty.
What tools will you need?
Regardless of whether putty will be used for OSB boards for painting, before gluing wallpaper or finishing in another way, prepare:
- sandpaper of different grain sizes;
- serpyanka;
- rubber spatula;
- wide spatula;
- roller, brush;
- roulette;
- container for mixing components (if dry mass is purchased);
- construction mixer.
When it is necessary?
Putting OSB is necessary for all types of decorative finishing that require a smooth and uniform base: painting, plastering, wallpapering. Puttying can be neglected only if it is planned to cover it with clapboard, laminate or panels. In other cases, this is to achieve the following goals:
- protection of wood-fiber material from direct sunlight and fumes;
- prevention of mechanical and chemical damage during the operation of the material, the influence of moisture;
- eliminating the risk of formation of resinous stains and pigmentation of the decorative finish;
- masking of installation and construction defects, cracks, chips, crevices, seams;
- creating a mono-textured and monochromatic base, hiding the texture of wood chips;
- increasing adhesion and resistance to paints, finishing and decorative materials.
If there is no plan to hide the material, for example, when varnishing, then it is not necessary to putty the OSB. However, when preparing the surface for painting or wallpaper, this is necessary. It is recommended to putty the boards for exterior work when using OSB-3, 4, in rooms with high humidity.
Important
In the production of OSB, formaldehyde-containing binder resins with high emissions are used. Puttying will also reduce the penetration of formaldehyde fumes into the room.