The base of floors is almost never ideal. You can always find various kinds of cracks and depressions, pits and sagging. In order to level the floor surface with the subsequent laying of any covering on it, special landmarks are needed. They are the ones who determine the height of the screed that is going to be made in the room.
Leveling the floor according to beacons
With the help of beacons it is easy to create such a plane, thanks to which the thickness of the fill will be controlled in any place. They help the master to direct the rule in the right direction and correctly distribute the backfill or poured mixture. In many ways, the installation of beacons depends on the quality and properties of the base and leveling materials, on the expected thickness and professional qualities of the work performer. In order to begin installing the beacons, you need to prepare the work surface.
It is ready if:
- all significant gaps are filled with mortar;
- no dust;
- priming has been carried out;
- peelings have been cleaned;
- Waterproofing and sound insulation have been completed.
Surface preparation
After preparing the base, work begins on placing beacons to level the surface.
Calculation of the number of beacons
To purchase the required number of beacons, you need to calculate the required number for the floor. The calculations are easy to do.
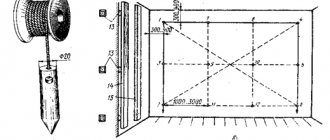
Installation of beacons is carried out from the door to the opposite side of the room, guides are placed parallel to each other. The floor screed along the beacons is done with a certain step; it should be 10 centimeters less in length than the rule used. If the length of the room is 6.4 meters, and the rule is 1.5 meters long.
Then the calculations will look like this:
- 6.4-(1.3 * 2)= 3.8. 0.8 is the length of the rule minus the part of its length that goes to the adjacent section when aligned;
- 3.8 / 1.3 = 2.9, the result is the number of beacons that are needed for installation without taking into account the outer guides taking up 0.3 m;
- (6-0.6)/5= 1.08 m. At this distance, parallel profiles will have to be installed, placed after the first guides installed from the wall in increments of 30 centimeters. The number five means the required number of all beacons, including guides.
Installation of beacons is carried out from the door to the opposite side of the room, guides are placed parallel to each other.
Leveling a concrete floor with tile adhesive according to a simplified scheme
This method is excellent for ceramic tiles; the work time is significantly reduced, and the quality completely satisfies tilers. Leveling the floor while laying tiles by changing the thickness of the adhesive is quite difficult; only highly professional tilers can do this. And even then, most of them prefer to level the concrete base themselves and lay tiles on the finished surface, especially if this is done if the height difference is 1 cm or more. The end result is time savings.
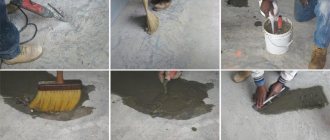
Step 1. Cut down large mounds, remove the surface from construction dust and debris. If the concrete is very dry, it is recommended to moisten it generously with water. Water should not be immediately drawn out of the glue; it is needed for optimal chemical reactions. The absence of the required amount of liquid critically reduces the strength of the leveling adhesive layer.
Step 2. Prepare tile adhesive. There is a nuance here; the glue should be a little thinner than the manufacturer recommends. It will be difficult to work with thick material; in addition, in places with a small thickness, water is quickly absorbed by concrete, which causes a decrease in physical strength. We have already mentioned this. The consistency of the solution should resemble ordinary sour cream or heavy cream and spread slightly over the surface.
Step 3. Pour the glue onto the floor surface in portions and usually pull off the excess. The raised areas of concrete serve as beacons; the glue fills only the depressions.
During such leveling, professional builders make a few additional diagonal or circular movements as a rule after the first screed. The pressing force is minimal; the quality of alignment largely depends on practical experience.
If after the first pass the differences in height are still large, then draw the rule in a perpendicular direction to the first pass. We warn you again: on the second pass, reduce the pressing force. You do not need to achieve ideal results; differences in height within ±5 mm for laying tiles are not a problem.
Checking the levelness of the floor
Floor after leveling
In order to improve the adhesion of the adhesive to the concrete, after pouring it is recommended to thoroughly rub it into the floor using a spatula or trowel. Depressions discovered after pulling the rules must be immediately filled with glue and re-leveled. The work does not take much time, the only drawback is that the tiles can only be laid the next day. But a professional builder does not waste time; there is always a small amount of previously postponed or preparatory work on site.
Preparing the floor for installation of beacons
Pouring floors on lighthouses with your own hands begins with preparatory work. First, the condition of the floor covering is assessed. If there is an old screed on the floor, it should be removed. The old coating can ruin the new one over time.
If the floors of the house are made of concrete material, then all holes and joints are covered and covered with a cement composition. A good option for this purpose would be to use tile adhesive, whose adhesion to different materials is high.
It is necessary to get rid of any flaws, all cracks are sealed. And also skirting boards and other structures that may interfere with the floor screed are removed. Next, the surface is cleaned from all types of contaminants. If necessary, insulation and reinforcement of the surface can be carried out.
For better adhesion, the floor surface should be coated with a primer layer.
For better adhesion, the floor surface should be coated with a primer layer.
How to find the highest point on the surface of the base?
The normal level breaks through the horizontal. Markers are made on the walls of the room at a suitable height. A noticeable line is drawn along the points. You can use regular dyeing thread for this. Then there is the lowest and highest point of the genital surface. It's easy enough to do. From the marked horizontal line with a level and a tape measure, you need to measure the distance to the floor in many places. In the place where it is smallest there is the highest point, so here the thickness of the screed should be minimal (3 cm). Using methodical measurements, the required level of screed is determined.
The normal level breaks through the horizontal
The highest current point can also be located in the central part of the floor of the room. This can be checked just as easily using a paint cord. It is enough to stretch it across the width of the room and view it along the length of the stretch. If a new maximum high place is found, another zero level is drawn. If the area of the detected point is small, it is better to simply remove the protruding area. A hammer drill will be just right here.
In order for the floor to become as level as possible, beacons are necessary for anyone who is involved in leveling work, regardless of whether an experienced master takes up the task or an amateur.
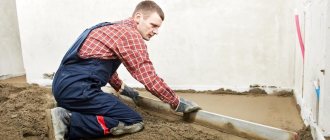
We place beacons
Set to the zero level, they guide the rule and serve as a kind of guideline. Such work may seem tedious and drawn-out, but the final result will depend on the correctness of its implementation.
Installation of beacons
Installation of beacons
Even the most knowledgeable craftsman, in order to obtain a surface without flaws, requires pointers, which are actually guides set at the initial (0) level. By advancing the rule along these peculiar signs, you can level the entire solution to an ideal surface.
It is much more convenient to move the rule according to beacons
Required tools and materials
To carry out the work you will need a number of tools and materials, in order to successfully cope with this task you need to prepare:
- The solution with which the coating will be poured;
- Construction level or laser;
- Rule;
- Graters, graters;
- Drill with mixing attachment;
- Knife;
- Chalk or pencil;
- Roulette and ruler;
- Containers for mixing the solution.
To carry out the work you will need a number of tools and materials.
Benchmarks
These are professional-type pin beacons that are used when installing self-leveling floors. They are small structures with three “legs” and a metal rod in the center. Thus, they resemble a tripod. The height of the central pin can be adjusted as needed.
Benchmark
Installation of such beacons is carried out in 1 m increments in a checkerboard pattern. They are not as easy to use as they seem and are professional type equipment. They are recommended for use only by experienced craftsmen. As a rule, such beacons are removed as soon as the base has been leveled to the desired level.
The benchmark is considered an original and professional beacon, which is used under self-leveling floors
Construction thread can serve well when installing benchmarks. It is stretched along the wall - this creates a special guideline that will help set the desired height of the beacons. The thread will help to achieve a perfectly even finished base, since it will not cause errors caused by micro-irregularities of the rough base, because it is in a suspended state.
Selection and installation of beacons for semi-dry and wet screeds
To fill the floor screed using beacons, you can choose several types of these products. Beacons can use those used for drywall. They are laid with the sides facing down and secured with the applied mortar.
Special metal profiles are also attached to the solution itself; it is convenient to cut them into the required sizes. It is better to choose gypsum as a solution; it dries much faster than the cement-lime composition. Also, profiles can be attached to self-tapping screws; their level can be easily adjusted by screwing in and out. They are twisted into dowels, which are installed at intervals of 20-30 centimeters.
You can combine two methods: several self-tapping screws are screwed in, and a mortar composition is carefully applied between them. The self-tapping screws should be screwed in at a distance of about a meter; their caps will indicate how high the mortar fixer should be.
Beacons can be made from the mortar itself, then a rope is pulled along the measured level under the screed onto self-tapping screws. Cement is laid along its height in the form of a lighthouse. The distance between such profiles is also approximately 100-120 cm. With a semi-dry screed, the mixture is poured out in two places and evenly distributed along the pouring level. The room is divided into small zones in order to gradually cover these areas with the mixture.
The step of the platforms is no longer than the rule.
Special metal profiles are also attached to the solution itself; it is convenient to cut them into the required sizes.
Self-tapping screws as beacons
When creating a self-leveling floor, self-tapping screws can be used instead of guides. The technology consists of screwing screws into the base, they are connected using a thread and serve as a guide when pouring the self-leveling solution. When the work is completely completed, the screws are simply unscrewed from the base.
When creating a self-leveling floor, self-tapping screws can be used instead of guides.
Stages of preparatory work
Leveling the rough base assumes the absence of any floor covering. After dismantling work, various types of damage, lesions, differences in plane and level are revealed. If such defects persist, the subsequent leveling layer will correct the situation only for a short time. Therefore, the preparatory stage is not limited to just removing the finishing material and remaining debris.
Preparatory stage
Before installing beacons for floor screed, you need to correctly assess the situation regarding the level and evenness of the base along the plane. This is only possible after all loose materials and weak areas have been removed. The latter must either be dismantled or secured in the case of floorboards.
All damaged areas must be prepared for restoration. These include cracks in concrete. They need to be embroidered, dusted, and treated with a primer. Finally, fill with repair compound. To prevent further expansion of concrete, recesses are formed across the seam for reinforcing rods.
Reinforcement of cracksSource www.ivd.ru
The best option would be blanks with applied threads. In order not to look for them on sale, you can take galvanized self-tapping screws, from which the caps are then bitten off.
On a wooden floor, you need to dry the splits, prepare a chip that is as identical in nature and size as possible, and insert it into the gap. For reliable fixation, you can use wood glue or construction/universal PVA glue.
Grease and oil stains must be removed with alcohol-containing solvents or special construction degreasers. Protruding areas are ground with coarse abrasive. If iron fittings stand out, it is recommended that after removing the rust, apply an anti-corrosion compound to the metal.
Often, regardless of the nature of the subfloor, after the finishing is removed, pockets of biological damage are identified. Before installing beacons on the screed floor, such a “disease” must be “cured”. Here you need to use two types of means: destroyers, protection. Some manufacturers offer to purchase both products at once, so as not to look for them separately.
Products in convenient containersSource stroyleto.ru
The first ones are applied to the affected area, wait for the time recommended by the manufacturer, and mechanically clean the base. If necessary, repeat the procedure. Finally, preventive treatment of the enlarged area is carried out with protective antiseptic compounds.
Next, the rough base is completely covered with a primer in order to strengthen, remove dust from the surface and reduce the absorbency of the floor if necessary. After the treatment has dried, waterproofing is installed. For dry screed, a technical film with a thickness of 150-200 microns is sufficient.
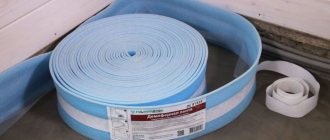
In a damp room, during any leveling, a layer of a coating-type hydrobarrier is applied. Additionally, polyethylene can be laid under the solution, extending onto the walls at a height equal to the thickness of the screed. The seams between the canvases are formed with an overlap of 20 cm; they must be sealed by gluing with plumber’s tape or universal double-sided tape (the most reliable is bitumen-based). A damper tape is laid around the perimeter.
Ready base for levelingSource vbud.in.ua
Zero level
Before setting up the beacons for screeding a heated floor, in addition to preparing the base, you need to set a horizontal reference point. The zero point means the highest section of the floor relative to the level. To determine it, it is easier to use a laser, or a hydraulic one. The reference unit is usually 1 meter. First, it is measured along the entire perimeter, reflecting the results on the walls. A solid line is drawn along the highest mark. It monitors the presence of protrusions throughout the floor. If they are not there, then the final landmark is applied below.
Here, in addition to the relief of the rough foundation, it is necessary to take into account the height of the leveling compound. For example, a dry expanded clay screed can be 40 cm, and a cement mortar only 3 cm. That is, the final result for installing beacons will be higher than the guideline for the height of the leveler.
Determining flatness with a laser levelSource interpol16.ru
How to fill the screed with beacons yourself
Before pouring the floor screed along the beacons, you need to prepare the solution itself, and only then proceed to introducing it onto the surface.
Preparing the solution manually
This process includes the following steps:
- First, cement and sand are mixed in the selected proportions; it is difficult to do this mixing manually; you need to ensure that the components are thoroughly mixed. You can use a drill or mixer for this purpose.
- In another container, the plasticizer is mixed with water, in the instructions for the plasticizer you can see the required ratio, you can add reinforcing fiber there.
- The dry mixture is added to the liquid components and they are gradually mixed together. Water cannot be added directly to the dry mixture.
The dry mixture is added to the liquid components and they are gradually mixed together.
Pouring technology
You need to start pouring the screed from the corner opposite the door. The solution is poured between the beacons, the filling is done just above them, the rule is kept at a slight slope, moving in a zigzag manner, leveling is done, and the excess is removed. A solution is added to the existing unevenness. This works over the entire surface.
The screed must be carried out in one room of the apartment in one day, then the formation of cracks and joints can be avoided.
You need to start pouring the screed from the corner opposite the door.
Using self-leveling mixtures
For minor differences in height, a leveling method using special mixtures is ideal. Surface preparation is carried out as standard: remove coating, dust, debris, seal gaps and cracks in the floor. Prime the base thoroughly and allow it to dry completely.
Using self-leveling mixtures
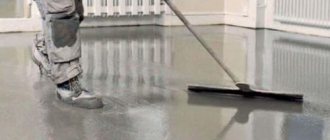
The finished mixture is poured onto the floor and immediately rolled out with a special roller. You can also use a regular or notched wide spatula. Since such a solution dries quickly enough, the leveling process cannot be interrupted or delayed. If the working area is too large, you should divide it into longitudinal sections and fill it one by one.
Floor screed care
On average, it takes 4 weeks for the surface to dry completely. The surface should be covered with film for about 7 days. For the first 4-5 days, it is necessary to moisten the screed, but you should not add too much water.
After a week, the surface should dry naturally, the temperature should not be lower than +5 degrees.
You can walk on the floor after 24 hours, but the weight is above 100 kg. can create a load only after 5 days.
On average, it takes 4 weeks for the surface to dry completely.
Carrying out this type of work is suitable for beginners as well. It is important to carefully prepare the solution and monitor the level so that the surface is smooth. If the beacons are installed correctly, then filling will be easy.
Steel pipes
To equip a floor where it is necessary to install powerful concrete screeds, pipes of various sections are used. Pipes can be used round or rectangular, they are durable and do not deform. In spacious rooms it is more convenient to make beacons for the floor of this type: the zero level of the future floor is set;
a cord, thread or fishing line is pulled, you should be guided by it when making a screed; mounds of mortar are laid out; pipes are installed on them and slightly pressed in; the horizontal is checked using a rule and level, the correct placement of the guides among themselves; the height of the future floor is adjusted by pressing, or by placing mortar there where there is not enough mixture. It is easier to set up screed beacons using square pipes.