In floor construction, screed can perform many functions. This is not only about preparing the surface for installation of a decorative coating. Arranging the necessary slopes, creating additional heat and sound insulation, hidden placement of heating systems and other infrastructure networks - all this is ensured with the help of screeds. There are several dozen design schemes and technologies for creating a multilayer floor “pie”. In this review we will talk about the most common types of screeds.
Typology
The most important characteristics by which designers and builders choose the type of screed are the structural design of the multilayer floor pie and the technology of execution.
According to the design, the type of connection with the base and walls is distinguished:
- Bonded screeds form a rigid adhesion to durable (concrete, brick, etc.) adjacent surfaces.
- Screeds on a separating layer - separated from a solid base by a layer of hydro-, noise-, or thermal insulation, but connected to the walls.
- Floating screeds are located on the dividing layer and do not have rigid contact with the walls.
Rice.
1. Laying damper tape for a floating screed Among the installation technologies, the following screeds are most widely used:
- Wet - a solution of high plasticity is applied to the entire plane and leveled manually or using mechanized means (pneumatic spreaders, vibrating plates, vibrating rules, trowels).
- Dry (prefabricated) - a combination of a filling bottom layer of bulk material (for example, expanded clay) with gypsum fiber boards/sheets (GVL) of a special series laid on top.
- Semi-dry - made from a solution of minimal plasticity (the proportion of water is sufficient to hydrate the cement with a small margin). More often than other methods, it requires mechanization.
- Self-leveling screeds and self-leveling floors are solutions of increased plasticity intended for final leveling.
Rice.
2. Distribution of solutions of wet, dry, semi-dry screeds and self-leveling floors. The components of the mixtures used are standardized according to the proportions of the cement-sand mixture, as well as the granulometric composition of the sand, modifiers and other additives. One floor pie can have from 1 to 3 ties. Sometimes it is necessary to perform the first (lower) leveling of the surface before laying a vapor barrier.
Each technique involves working with certain solutions. However, sometimes when discussing types of screeds, the emphasis is not on technology, but on the composition of the mixture:
- Cement-sand.
- Concrete (in addition to sand and cement, the composition includes crushed stone).
- Lime - not recommended, but sometimes used in economy-class construction.
- Gypsum is less durable than cement-sand, but dries faster.
- Expanded clay.
- Arbolite (with organic filler, for example, sawdust) - are outdated due to the availability of slab insulation for floors such as high-density polypropylene polypropylene.
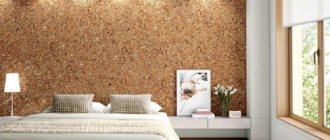
Filling the floor with expanded clay
Innovative technologies again and again invade our lives, in all its spheres, including construction. But, despite this, good old expanded clay is still very often chosen as the choice of material for filling the floor. It is very easy to carry out this filling yourself.
Expanded clay has such advantages as resistance to temperature changes, low weight combined with excellent strength, thermal and sound insulation, and, of course, high environmental friendliness.
Types of adhesion of screeds to base surfaces
The floor screed does not serve as an interfloor floor, so it should not bend. The only strength characteristic important for this structural layer is contact strength (or specific pressure resistance). It is measured in kg/cm2.
In popular language: the material should not be pressed, cracked or crumbled under standard load (furniture and people for residential premises, cars for garages, etc.) And since no bending load is applied, there is no need to rigidly close the element along the plane or perimeter. In addition, the lack of contact between the screed and the wall means that these 2 surfaces do not transmit acoustic vibrations to each other. Thus, the gap around the perimeter is a unique (and quite significant) factor in sound insulation.
Another reason to separate the wall surface from the horizontal leveling layer is to relieve stress to prevent cracking. In connected screeds, such gaps are called wall expansion joints.
Rice. 3. Separation of the leveling layer and the base
The separation of the leveling layer and the base is a consequence of the use of release films with zero adhesion to all types of mortars. For example, if there is an elastic or bulk material (sand, insulation) under the screed, then the presence of the film is determined not only structurally, but also technologically. For example, to prevent water from going into the sand before the cement hydration is completed, to prevent the solution from drying out faster than is permissible, etc.
We list the features of floating screeds and options with a separating layer:
- On an elastic base - it is an element of heat- and noise-insulated floors. Requires reinforcement with reinforcing mesh in the lower zone.
- On a rigid base - usually a vapor barrier serves as a separating layer. When reinforcing, the mesh can be replaced with fiber.
Wet/solid screed
Traditional and still the most common screed technology for private houses and apartments. Why? Because it is very simple and does not require special specialization of craftsmen. Beacons are installed, a plastic cement-sand mortar is prepared and the entire floor area is poured, after which the workers have enough time to slowly level the surface.
The method allows:
- Arrange both tied and floating screeds.
- Level floors in both residential and industrial premises.
- Pour thick layers of mortar sufficient for hidden laying of various communications on the floor and leveling significant differences in the base in height (in the latter case, reinforcement with metal mesh is necessary).
- Use ready-made mixtures, or prepare them locally, approximately maintaining the selected proportions.
- Work with both hand tools and special equipment. The difference here is only in the speed of the process, the level of quality does not depend on this.
Rice.
4. Laying a wet screed over a hydraulic heated floor In addition, pouring a wet screed is cheaper than other leveling options. The disadvantages of the traditional method are:
- Increased shrinkage, leading to the formation of subsidence between the beacons (in the center of screed arrays) and a relatively high probability of crack formation.
- Without additional leveling with self-leveling floors or mechanically, a wet screed is only suitable for laying ceramic tiles over it.
- The use of self-leveling floors deprives the technology of its price advantage.
- The significant drying time for the layer before it is possible to begin laying the decorative floor is several weeks (the period depends on the composition of the mixture, the thickness of the screed and the type of floor covering).
How to fill the floors in an apartment yourself
What to do and how to do it correctly if you decide to fill the floors in your apartment? Here are some general tips on this issue:
- If you don't know what to do first, calm down. No, this is not a joke, you need to have patience and mental strength so that the result pleases you and your loved ones to the fullest
- Be very responsible when choosing materials. Expensive products are not always high-quality, and exactly the opposite, cheap products can greatly disappoint you after working directly with them.
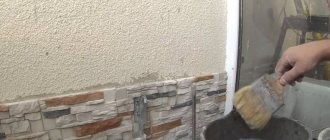
- Prepare the surface thoroughly before work. It is necessary to thoroughly clean the rough floor covering on which the future floor will be poured. Remove all decorations, baseboards and borders. For your own savings, that is, saving material, it is better to putty all the unevenness and roughness.
- Take the time to prime the floor. To increase the level of adhesion of materials, the primer should be applied in at least two layers and each one should be thoroughly dried.
- Don’t sit idle and, while the preparatory work is going on, use a professional level to make marks that will help in orienting the floor pouring level.
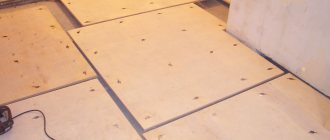
Dry/prefabricated screed
The developer of the technology is the world's leading manufacturer of building mixtures and board materials, Knauf Gips KG. Prefabricated screed based on loose aggregate and gypsum fiber board began to be actively used in the late 90s - early 2000s. Occupying initially the premium segment, today dry screed using the Knauf method has become much more accessible, but still remains more expensive than wet and semi-dry.
The process of spreading expanded clay sand and laying sheets moves very quickly. The impeccable quality of the resulting surface and the speed of work are the main advantages of the technique.
Let's list all the pros and cons of the technology. Advantages of dry screed:
- Significant reduction in construction time.
- The installation speed is practically independent of the thickness of the backfill layer.
- Cleanliness of the process.
- Without additional leveling, it is suitable for laying any types of decorative coatings.
- Lightweight leveling layer.
The combination of the first three advantages makes dry screed preferable for large rental premises with finished walls and ceilings. For example, after shutting down an existing commercial facility for several days, it is necessary to change the flooring. In this case, thermal insulation, laying communications, bringing the floor to one level and laying a new covering (or restoring the old one) can be carried out.
Another important area for this technology is leveling floors on floors with limited load-bearing capacity.
Rice. 5. The process of spreading expanded clay sand
Flaws:
- High price. The dry process is more expensive than the semi-dry process and even the sum of “wet screed + self-leveling floor”.
- All types of construction work associated with wet processes must be completed before the installation of dry screed begins. This reduces site planning flexibility.
- Dry screed cannot be installed on a hydraulic heated floor.
- Poor sound insulation (“drum effect” - increasing the volume of walking sounds).
- Restrictions on temperature and humidity - installation cannot be carried out if the room at floor level is colder than + 10 ° C, and the relative air humidity is above 60%.
- Specific pressure restrictions - not suitable for industrial and commercial facilities where heavy equipment installation or traffic is expected.
Advantages and disadvantages
Each type of screed has its own advantages and disadvantages. Their identification allows us to draw the first conclusions: which is better - a semi-dry floor screed or a regular one.
Dry screeds
Home craftsmen and specialists like the following points about dry screed technology:
- installation work can be carried out at any temperature in winter and summer;
- there is no need to use small mechanization;
- simple filling technology;
- insignificant load on the floor, but only if the layer thickness is small;
- there are no even minimal risks of water leaking down;
- you can lay the floor immediately - no need to wait for the hydration process to complete;
- the screed becomes a good insulator, however, with a backfill layer of at least 5 cm;
- Expanded clay granules dampen sound waves well. Therefore, there is no need to carry out additional soundproofing work.
Among the weaknesses:
- there are restrictions on use in wet rooms: bathroom, shower, basement, basement due to the increased hygroscopicity of the granules;
- increased requirements for waterproofing work;
- large thickness of the floor pie: waterproofing, flooring and the floor itself are added to the expanded clay layer, which is at least 4 cm;
- low resistance to dynamic loads (shocks) and vibration;
- significant cost of materials;
- unsuitability for flexible flooring materials.
Semi-dry
Semi-dry technology also has its advantages:
- after hydration is complete, the surface of the screed is smooth, thanks to grouting;
- the ability to walk on the screed immediately after pouring it is one of the important features of the semi-dry method technology;
- good strength and hardness indicators;
- no shrinkage;
- water cannot flow down - there is simply no excess moisture;
- the technology is clean - there are no traces of dirt on the floor or walls;
- high speed of work;
- flooring installation work can be completed within 72 hours;
- there are no restrictions on the base of the floor - it can be a concrete floor, soil or a wooden subfloor;
- communications can be hidden in the screed layer;
- compatible with heated floors.
Several significant disadvantages hinder the spread of the method:
- To carry out the work, it is advisable to hire professional builders, since a lack of experience, small-scale mechanization and assistants can lead to problems. If the concrete mixer and trowel (small mechanization) can also be replaced by manual work, then the remaining conditions are mandatory;
- the slightest error in the amount of water in any direction negatively affects the reduction in strength - in both cases the process of obtaining cement stone is disrupted;
- continuity of the technological process - it will not be possible to complete the work the next day, as in a wet screed, just as it will not be possible to stop the work for lunch;
- the height of the room decreases;
- strict requirements for sand: you need sifted quarry sand.
Attention: more detailed information about the technology here.
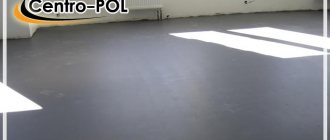
"Wet" screed
The “wet” technology for leveling the subfloor has its advantages:
- high strength and hardness of the screed;
- resistance to various vibrations;
- there are no restrictions on the scope of application;
- minimally steals the volume of the room;
- technology available for implementation on your own;
- durability - service life is estimated at several tens of years if the technology is followed;
- cheap DSP components create an insignificant burden on the family budget;
- you can change the grade of concrete by decreasing or increasing the amount of cement in the solution.
Minuses:
- long hydration period - up to 70% strength gain is achieved in a week, 28-30 days are needed for complete setting;
- significant specific gravity - 1800 kg/m3;
- shrinkage and cracking of the surface upon drying;
- the presence of unbound water, which, firstly, can flow down, and secondly, leaves caverns (cavities) in the concrete when evaporating, reducing the strength characteristics of the screed;
- dirt associated with work;
- the need to refine the poured concrete to obtain a smooth surface.
The data provided is not sufficient for an unambiguous assessment of each method of leveling the subfloor. Therefore, we will conduct a comparative analysis.
Semi-dry screed
The strength and durability of the floor pie depends on the quality of the screed. The formation of cracks and delamination in the leveling layer lead to the accumulation of moisture under the finishing coat, swelling and damage to expensive decorative materials. In addition, the flatness of the floor is lost, and even without visible damage, the aesthetics of the room deteriorate - the floor requires major repairs.
The semi-dry screed technology was developed to, while maintaining the advantages of the traditional method, improve the quality of the floor and reduce construction time. There are many specific methods for preventing cracking - micro-reinforcement using fiber introduced into the solution, reinforcement with metal mesh, applying the solution in thin layers, etc. All this is important, but the main factor ensuring solidity and durability is the low water-cement ratio of the mixture.
For hydration, a mass of water equal to 5% of the mass of cement is sufficient. Excess moisture remaining in the solution after the end of the reaction leads to the formation of primary cracks. The more water rushes upward when concrete dries, the more pores and voids are formed in it. Slowing down drying using films and wetting the surface only partially solves the quality problem.
However, as the water-cement ratio decreases, the plasticity of the mixture decreases and it becomes difficult to work with. To overcome this drawback, plasticizing additives are added to the composition.
Rice. 6. Machine grouting of semi-dry screed
Advantages of semi-dry screeds:
- They are universal - suitable for leveling floors in all types of premises with any microclimate and level of specific pressure.
- Provide a surface quality sufficient for laying any finishing coatings without additional leveling with self-leveling floors.
- They reduce construction time for any planning of work (2 types of sequence - plastering walls after screed or before it).
- Economically beneficial.
Flaws:
- Not suitable for individual work (the speed of the hydration reaction requires coordinated work of a team of several people).
- They require specialization of craftsmen in this technology - not every region has enough teams working on semi-dry screeds.
How to fill the floors in an apartment with expanded clay yourself?
Expanded clay is usually used as a leveling and insulating layer. In addition to the main component - expanded clay, various chemical compounds are added to the leveling solution, which together provide a strong and reliable filling . If you want to start filling the floor with expanded clay, the work algorithm below is especially for you:
- The standard procedure is to prepare the subfloor. Dismantling and removal of debris, as well as large irregularities
- Making marks for future filling
- Laying the expanded clay layer on the subfloor. It is recommended to lay a layer of waterproofing under the expanded clay layer if the humidity level in the room is higher than normal.
- Carefully compact the expanded clay layer.
- What follows is the usual procedure for pouring the floor, already described above. That is: pouring the floor from the end of the room, leveling the coating using a needle roller.
- A short wait and subsequent enjoyment of the result!
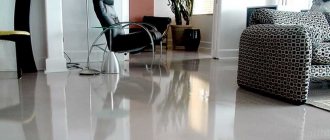
Self-leveling screed
Despite the name, self-leveling and self-leveling floors, applied to the surface in liquid form, require some mechanical action for quick, uniform distribution throughout the room. For this, special rollers are used.
The main difference between the subspecies of this group is the maximum permissible layer thickness. Self-leveling floors are suitable for pouring to a height of no more than 30 mm (some brands - up to 60 mm). A self-leveling mortar can be used to cast a full-fledged screed up to 100 mm thick.
Due to the high cost of these compositions and not the highest strength characteristics, their main area of application is finishing leveling for linoleum, polymer tiles, parquet and 3D floors.
Although these mixtures are easier to work with than wet screeds, it is inconvenient to cast screeds from them alone.
Technology requires a certain sequence and speed of action. Therefore, a minimum of 2, and preferably 3 people are required. It is recommended to use this technique independently without loss of quality in areas of no more than 3 – 5 m2. You can find out which floor screed is best for certain rooms here.
General floor pouring process
So, all the preparations are over and you need to start pouring. There are a lot of videos on the Internet about how to fill floors in an apartment. They can be used as a visual aid. In principle, you don’t have to reinvent the wheel, since the filling process has long been streamlined and laid out from start to finish:
- It's better not to do the repairs alone - call a company to ensure a continuous process.
- Prepare the material for use according to the instructions
- Stir the solution you received using an electric drill and a special attachment to the desired consistency.
- Start pouring from the wall that is located opposite to the exit from the room.
- Do not pour out the entire solution at once, but gradually, covering a small area. Immediately roll the area with a needle roller to remove bubbles and ensure an even coat.
- Throw away the solution remaining after pouring immediately - it is not suitable for further use.
- Be patient - depending on the manufacturer and type, the self-leveling floor takes different times to dry. Try to ensure that the coating is not exposed to sunlight and strong temperature changes.
- Voila! You are the owner of a wonderful and durable floor covering, poured with your own hands, which will become a remarkable part of your apartment.