Indoors, high humidity becomes a source of dampness and cold. You can cope with this if you insulate the room from the inside. The craftsmen explain in detail how to insulate a bathtub, how to choose building materials and carry out work related to insulating the floor and walls.
Features of dismantling in the bathroom
These works do not require professionalism.
They must be carried out according to certain rules. When dismantling you should not break anything. Everything must be carefully disassembled. The point is not about preservation for further use and not about sale. The main problem is security. If work is carried out incorrectly, you can not only damage the structure, but also cause injury to yourself. Removing a bathtub from a bathroom
Removal of old coatings and dismantling of finishing is carried out in a certain sequence. No matter how this process may look from the outside, it must occur according to a strictly proven scheme. To protect yourself, you need to decide in advance what and how to properly beat or cut off.
If you are planning a major bathroom renovation, where to start dismantling work? Carry out the following sequence of actions:
- Remove all old fixtures and furniture from the bathroom.
- Remove old tiles and paint from wall, ceiling and floor surfaces.
- Dismantle walls if necessary for the project.
Please note that walls are cleaned down to concrete or brick, and floors and ceilings are cleaned down to floor slabs. Otherwise, your repair will not be of high quality and durable.
But the greatest attention must be paid to the surfaces of the walls
It is important that they are perfectly even. If a deep notch or a hole from a punch remains, sooner or later the finish will begin to deteriorate
If a deep notch or hole from a punch remains, sooner or later the finish will begin to deteriorate.
If you want to make a major renovation in your bathtub, the photos in our gallery will suggest a suitable solution. When carrying out major repairs, both the internal electrical wiring and the water pipes with risers should be changed. Regarding electrical wiring issues during a major overhaul, a new input will be required.
Old wiring, as a rule, cannot cope with the load imposed by modern electrical appliances. Previously, only lighting was used in the bathroom, which consumed no more than 200 W. At the moment, not only more powerful lighting is being installed in this room, but also a washing machine and a tank for heating water. The total energy consumption is usually at least 4.5 kW.
Increased capacity also dictates new safety rules that apply to both electricity and water supply. Among the basic safety rules are the following:
- High-quality grounding device.
- Availability of RCDs and circuit breakers.
- The presence of an “anti-flood” type system, which is mounted directly on the risers.
To decide where to start renovating your bathroom, the photos on our website will help you solve this problem.
Common mistakes at the initial stage of repair
Errors arise for two reasons: great haste when making the final decision and lack of practical experience in performing such work.
Be sure to redo old sewer and water pipes. The fact is that they have a guaranteed service life; in such buildings it is at its limit. Worn pipes may develop leaks several months after major repairs. It takes a lot of money and time to fix problems. It is much more profitable to anticipate the occurrence of force majeure situations than to eliminate them later. sewer pipes
The electrical circuit in the bathroom must be thought out before starting work. At the same time, install sockets not only for the existing equipment, but also for the future. Increase the number of sockets, select the cable cross-section taking into account the possible increase in the total power of electricity consumers.
Install the bathtub in such a position that its dimensions allow you to place a maximum of household appliances in the room, do not interfere with the connection of the sink, etc. It is better to have one piece of free space next to the bathtub with a fairly large area than several small ones. The bathtub should not divide the room into several zones.
When decorating walls with ceramic tiles, it is not recommended to get carried away with a large number of decorative elements: borders, special internal and external corners. Such elements are very expensive. In terms of area, they occupy no more than 10–15% of the walls, and in cost they can exceed the price of the rest of the tiles. In addition, decorative elements often have various convexities, which create difficulties during the installation of plumbing fixtures - the fixation planes of sinks and toilets are flat and must be mounted on the same flat walls.
The dimensions of the doorway must match the dimensions of the doors. There are times when it is necessary to install non-standard doors, but the opening has already been made and the walls are tiled. To expand the opening, you have to not only saw off part of the partition, but also the tiles
As a result of such actions, it cracks and a complete replacement of the adjacent row is required.
Pay special attention to the position of the partition on which the door will be installed. Theoretically, the tiles can be laid on a sloping wall, although it is better to avoid this
And installing a door on a slanting wall is even theoretically impossible. There will always be a gap between the wall and the platband; it will not be possible to make it invisible.
Consider ways to install inspection hatches. The use of cheap plastic models is currently not recommended even for budget bathroom options. Modern hatches with magnetic covers look much better. Installing them is not a problem; you just need to plan the specific placement at the stage of marking the tiles.
Bathroom ventilation must be reliable and efficient, with an air exchange rate of at least 7. In order to save thermal energy, it is recommended to install an electric fan in the room and turn it on only during water procedures. Just keep in mind that connecting such fans to existing general house systems is strictly prohibited; issues should be resolved with specialists.
It’s not difficult to follow the recommendations; don’t be lazy to think and weigh your decisions. Remember that it is always much easier and cheaper to do quality work than to eliminate defects later.
Preparing for cleaning
Before you start cleaning, you need to prepare the room:
- remove bottles with cosmetics, hygiene products and household chemicals from shelves and put them in drawers;
- take out the rug and shower curtain;
- remove robes and towels from hooks;
- clear the bathtub, the surface of the washing machine and the floor;
- check the availability of household chemicals for cleaning surfaces (depending on the cleaning plan);
- Prepare rags, sponges and brushes.
To save time, you can put towels and bathrobes in the washing machine, and soak the mat and shower curtain in a solution of vinegar or disinfectant.
Insulation materials
Penoplex is in wide demand in the building materials market. Among its advantages are good thermal insulation characteristics, long service life and ease of installation. We’ll look further at how to insulate bathroom walls with penoplex.
Table of contents:
- Wall insulation with penoplex: advantages and features of the material
- Insulation of walls with penoplex - technology and types of material
- Insulation of walls from the inside with penoplex in the bathroom
- Insulation of walls with penoplex under siding: insulation installation technology
Wall insulation with penoplex: advantages and features of the material
Penoplex is classified as a material that performs the function of protecting a room from heat loss. Its installation can significantly reduce the thermal conductivity of the area of the building on which it is installed.
Penoplex is produced as slabs, which are extruded polystyrene foam. In appearance and structure, this material is often confused with polystyrene foam. However, penoplex has a higher level of rigidity and strength.
In addition, this material has the following advantages:
- low level of thermal conductivity, thanks to which the material is able to retain heat in the room;
- high level of strength both before bending and compression;
- resistance to moisture is ensured by the low moisture absorption of the material, this advantage reduces the level of development of mold and mildew on the insulation and increases its service life;
- low level of vapor permeability;
- duration of operation, which is more than 50 years;
- resistance to fire and high level of fire safety;
- environmental safety, absence of substances harmful to human health;
- Possibility of operation at temperatures from -40 to +70.
In addition, installing penoplex does not require special skills or special equipment. One day is enough to complete the work. The cost of the material, compared to other types of insulation, is average, therefore, by comparing the quality and price of penoplex, it is possible to obtain high-quality insulation for a moderate amount of money.
However, the use of penoplex for external insulation of a building, and in particular for facade systems, leads to its gradual delamination. This is due to the fact that the material has a high density, which does not allow it to absorb glue, therefore, some time after installing the penoplex, under the influence of moisture and other external factors, it peels off from the surface and the appearance of the facade deteriorates.
Therefore, to prevent this unpleasant factor, you should use special fasteners - fungi. It is also possible to replace penoplex with polystyrene foam, which is more practical for external insulation.
Insulation of walls with penoplex - technology and types of material
There are several types of penoplex, which differ in relation to density and scope of application. The slabs have a standard size, but if necessary they can be easily cut and installed on the surface. Depending on the thickness of the penoplex for wall insulation, penoplex from 2 to 10 cm is distinguished.
In addition, there are the following types of penoplex:
1. Used for wall insulation - allows you to insulate the walls of a building both inside and outside. In addition, it helps insulate the basement and interior partitions. The material is suitable for constructing walls using the well masonry method.
If the walls are insulated from the outside with penoplex, then siding is laid on top of the heat-insulating material, the tiles or the wall are plastered.
2. Penoplex for foundation insulation. Used in the process of building basements. This material has zero moisture absorption and increased density.
3. Roof insulation is also possible using penoplex. It is used to insulate roofs of both flat and pitched types. The material has excellent thermal insulation characteristics and, due to its lightness, does not load the structure.
4. Insulation of roads and runways - even in such cases, the use of penoplex is mandatory.
5. Another version of penoplex is intended for internal insulation of a house or apartment. With its help, it is possible to insulate the walls, floor and ceiling of any room.
To insulate walls using penoplex, follow these steps:
1. Preparing the base.
This stage involves preparing the surface for attaching insulation to it. The surface, regardless of its type, must be clean, dry, free of finishes and paint. Use plaster to level the walls. Next comes the process of treating the surface with a primer with an antiseptic effect.
2. Installation of slabs using glue.
In order to glue the slab, we recommend using a special glue that comes with the insulation or is recommended by its manufacturer. The glue is applied directly to the surface of the slab.
3. Mechanical installation method.
After gluing the slab to the surface, the process of its mechanical fixation follows. This is necessary so that the plate, when peeled off, will still stick to the surface. For one square meter of slab, the installation of four dowels will be required. If the slab is installed near a window, door or in a corner, then the number of fasteners must be increased.
4. Fixing the insulation with plaster mortar.
In order for the insulation to adhere better to the plaster, we recommend using a carriage brush, which will help make its texture more rough. On the first layer of reinforcement, a polymer mesh is embedded with a reinforcing effect. Then the plaster solution is applied a second time and further finishing of the walls is carried out.
5. Installation of insulation indoors.
It is possible to use penoplex to insulate external walls; it is also used indoors. We recommend, if possible, installing penoplex outside. However, when installing internal insulation, after installing the insulation, install a foil-coated polyethylene film on it. It will provide proper vapor barrier. Next, the drywall is installed and finishing work is carried out. To install the frame for installing drywall, use dowels, which, after passing through the foam, will reach the wall and fix the profile on it.
Insulation of walls from the inside with penoplex in the bathroom
The bathroom is a place with a high level of humidity, and proper insulation will prevent the formation of condensation, which has a detrimental effect on the finishing of the room. There are several options for insulation that are used in the bathroom, among them the following are noted:
- cork is a material in roll form, which is easy to use and can be easily installed on the surface of walls and in a heated floor system; among its advantages, it is noted that it is not susceptible to rotting, is resistant to moisture and has a long service life;
- mineral wool is more popular than the previous option, however, it is hygroscopic and unstable to moisture, therefore, during its use, proper waterproofing must be ensured;
- although polystyrene foam is cheap, it also absorbs moisture due to its porosity; after its installation, it is necessary to install plywood or drywall with moisture-repellent properties;
- penoplex has low thermal conductivity, but at the same time has a high density; it is used to insulate both screeds and bathroom walls.
Insulation of walls using plaster materials
“Warm plaster” is excellent for thermal insulation. A distinctive feature of this material is that it has a high level of vapor permeability, as well as a low level of thermal conductivity. A high level of vapor permeability is formed due to the cement base. A low level of thermal conductivity is achieved thanks to certain additives in the overall composition.
Plaster materials are divided into several types:
Might be interesting
- vermiculite;
- sawdust;
- polystyrene foam.
The main advantage of “warm” plasters is that you can get a uniform coating that will not allow the cold air ceiling to pass through. There is no need to level the surface of the bathroom walls. Also, thanks to excellent adhesion, plaster materials can be safely applied to absolutely any surface. The main disadvantage of this material is that it applies a thick layer to the surface of the walls, which can visually significantly reduce the area of the bathroom.
It is necessary to pay attention to the sealing of seams in the bathroom. To seal the seams you need to use foam
Seams and joints should be sealed correctly. Be careful when sealing.
Costings
The estimate for installing the system includes the following costs:
- materials - basic and heat-insulating: damper tapes, films, adhesive tape and others;
- components: sensors, thermostats, fasteners, hardware and others;
- screed solutions, glue, etc.;
- surface preparation;
- installation work, installation of wiring, sensor, thermostat;
- screed and cladding.
This is a very approximate list, rather a rough diagram, since the list is individual for different types of sex. This will be discussed in more detail below. It is difficult to name exact costs, since the price of different types of materials fluctuates significantly. And the cost of installation depends on many factors. We can say that the entire set can cost 2–5 thousand rubles per “square”. Laying can cost about one and a half thousand rubles per square. Consultants on our website polaremont.ru will help you choose the appropriate option and outline its cost.
The harm from electromagnetic radiation from heating mats is greatly exaggerated
How to insulate a floor
A cold floor always creates inconvenience, especially a bathroom floor on which you have to walk barefoot.
Therefore, its insulation is very important for the overall thermal insulation of the room. This can be done by laying a thermal insulation layer or installing a heated floor system
Extruded polystyrene foam, which is characterized by rigidity and vapor permeability, can be used as a thermal insulation material. It should be noted that to ensure proper thermal insulation, the layer of this insulation must be over 5 cm. A more practical material is polyurethane foam, the thermal insulation properties of which make it possible to reduce the layer to 2 cm.
The heated floor system uses electrical elements, the distance between which is filled with special mixtures. Such a heating system has a high heating capacity even at a relatively low heating temperature.
Thus, by carefully considering the insulation system for a bathroom in a private house, you can independently make the room comfortable for your stay.
Notes and additions for craftsmen
To reduce humidity in the bathroom, it is allowed to install a low-power suction fan on the ventilation grid.
The installation of wall cladding with ceramic tiles of various types is not always one of the types of its insulation due to the small layer covering the walls and the inappropriate properties of the facing materials.
Perhaps a sufficient condition for a comfortable temperature in the bathroom will be the installation of water-type heated floors; sometimes, to increase the temperature, it is enough to add heating radiators.
In the upper floors it is rare, but still sometimes it is necessary to use ceiling insulation. The technology and materials for ceiling work are the same, but the work is somewhat more complicated.
And most importantly: doing insulation work yourself is not a very labor-intensive and complex process; you just need to choose high-quality, convenient material and tools.
Warmth and absence of condensation in the bathroom are the key to comfort
Greetings dear readers of this blog. Today I’ll tell you about how to insulate a bathroom in an apartment or country house.
It would seem, why do we need additional insulation? It turns out that there are several reasons, including ensuring the comfort of the room, preventing heat loss and, as a result, saving on heating.
In addition, high-quality insulation helps prevent condensation on the walls and ceiling. As a result, there will be no mold in the corners and you will not have to make cosmetic repairs year after year.
Walls
The main difficulty with a limited budget for renovation is the choice of finishing material for the walls. Russian or Chinese-made tiles that can withstand sudden temperature changes and mechanical damage have become widespread.
Please note that additionally, before installing the tiles, you will need to prepare the entire wall area - removing the previous coating, leveling (if necessary), eliminating detected defects and treating with fungicides.
Other inexpensive materials intended for wall decoration:
- paint and varnish compositions,
- Wall panels,
- self-adhesive PVC film.
Laying tiles yourself is not difficult. However, if you don’t have free time or you doubt that you can handle it, then invite a specialist. Please note that his services will be included in the cost of the bathroom renovation.
To significantly save on wall decoration, use ceramic tiles only for tiling the areas adjacent to the bathtub and sink (the so-called “apron”). Apply paint or wallpaper to the remaining areas.
Bathroom in a private house from scratch
Repairing a bathroom and toilet with your own hands is not an easy task. And if the bath is made from scratch in a new room, it’s even more difficult. We have just such an option. Living in a private house has many advantages, one of them is that you can plan any premises yourself in the right place, guided by various motives. We used to make a bathroom combined with a toilet from scratch, but elsewhere in the house it wasn’t as beautiful. We decided to change its location because we wanted to create an even more comfortable kitchen in the house.
I will tell you how to make a bathroom and toilet in a private house with your own hands using our example and show you a photo.
We started by building a light, durable partition. I won’t repeat myself, read the article “Redevelopment, making a partition with your own hands.”
Cat checking the sinkSince the house is his own, and the sewerage system was previously laid from another room, the husband had to hollow out the foundation, dig a trench along the outside wall and lay a new pipe into the septic tank on a sand bed of 20 cm with a slope of 2 cm per meter (according to standards). Experienced plumbers always follow the rule of not making 90 degree turns. All turns and drains are assembled from two 135 degree angles! It’s good that they told us how to do it right.
Bathroom wall decoration
They brought a sewer pipe into the room, installed a tee: drain from the toilet, drain from the bathtub and sink, and ventilation vertically upward, which was led into a pipe on the roof. If ventilation is not done, the smell from the septic tank will be present in the room.
Then they laid a layer of expanded clay and filled the floor with a cement-sand mixture using a building level. It is advisable to make the floor under the bathtub and sink a little higher so that the water flows to the center of the room without stagnating. It is necessary to check how smooth the walls are and, if necessary, level them with moisture-resistant plasterboard or cement-sand plaster. Gypsum plaster is not suitable for wet areas.
Then you need to install cold and hot water pipes for the sink, bathtub and toilet flush. It is advisable to install polypropylene pipes on welded polypropylene fittings. I had to buy a welding machine for polypropylene.
Pipes behind the bathroom, tap connections
The work is not difficult, but you need to work carefully, strictly according to the instructions, so that the pipe does not overheat and the diameter of the passage hole does not decrease.
Our water pipes are mounted behind the suspended ceiling and run down the wall to the bathtub. They are attached to special fastening clips. It is advisable to insulate exposed cold water supply pipes to prevent condensation from dripping.
Ventilation and heated towel rail
Next we do the electrical work. This is a very individual matter. We have 2 sockets installed, leads for mirror lighting and niche lighting, wiring for ceiling lamps. Electricity must be done by a specialist! It’s good that my husband is an electrical engineer.
Ventilation of the bathroom and toilet in a private house is mandatory! However, as in residential premises. My husband previously punched a hole in the ceiling for the ventilation pipe and installed a plastic sewer pipe into it. You can use a metal pipe. If the attic is cold, the ventilation pipe must be insulated. When the ceiling was ready, I installed an adjustable ventilation valve. Our ventilation is natural.
Creation of a polyurethane foam thermal insulation layer
When insulating a floor with polyurethane foam, there is no need to lay vapor and waterproofing layers, since the insulation itself is a vapor-permeable, moisture-repellent material.
When insulating a floor with polyurethane foam, there is no need to lay vapor and waterproofing layers, since the insulation itself is a vapor-permeable, moisture-repellent material. The liquid thermal insulator is sprayed directly onto the existing base; the high adhesion of the material ensures reliable adhesion of the polyurethane foam to the insulated surface. As a result of spraying a liquid thermal insulator, a monolithic thermal insulation layer is obtained that has no seams or joints.
Due to the low thermal conductivity coefficient, the thickness of the insulation layer is minimal and allows you to save the usable area of the room. After the liquid thermal insulator has hardened, a concrete screed is applied on top of it and the floor covering is laid. Polyurethane foam is highly durable, therefore, there is no need for additional reinforcement of the thermal insulation layer.
The only difficulty when installing a polyurethane foam thermal insulation layer is the need for special spraying equipment, so thermal insulation work cannot be carried out independently. It is best to seek help from specialized companies whose specialists have the necessary skills in working with polyurethane foam.
Insulation with polyurethane foam: advantages of use, application technology
Achieving optimal energy efficiency in a bathroom will be achieved by using liquid polyurethane foam thermal insulation as insulation.
Achieving optimal energy efficiency in a bathroom will be achieved by using liquid polyurethane foam thermal insulation as insulation. The advantages of the material include high strength, vapor permeability, heat and sound insulation, fire resistance, and moisture resistance. Polyurethane foam is low weight, so it does not place additional load on the ceiling and walls of the bathroom. The properties of the material allow polyurethane foam to adhere perfectly to any materials. Thanks to the structure of the insulation, free circulation of air masses in the heat-insulating layer is ensured, therefore, there is no need to lay hydro- and vapor barrier films.
The low thermal conductivity coefficient of the thermal insulator allows you to apply polyurethane foam in a thin layer. The result is a monolithic, uniform coating that completely eliminates the formation of cold bridges and the accumulation of condensation under the heat-insulating layer.
Polyurethane foam is sprayed onto insulated surfaces using special equipment, and the technology of its application makes it possible to insulate even rooms with a complex configuration.
Polyurethane foam is sprayed onto insulated surfaces using special equipment, and the technology for its application allows. The biological and chemical resistance of polyurethane foam prevents the destruction of the thermal insulation layer, as well as the formation of fungus and mold.
The polyurethane foam layer is sheathed with moisture-resistant finishing materials, for the fastening of which a frame is constructed. The small thickness of the thermal insulation layer allows you to save the usable area of the bathroom, and you can begin finishing the insulated surfaces within 30 minutes after applying the thermal insulator.
The polyurethane foam thermal insulation layer does not lose its characteristics under the influence of high temperatures, therefore, there is no need to additionally shield the places of its contact with heating equipment.
Video about how polyurethane foam is sprayed from Ecotermix:
Bathroom renovation with plastic panels
Finishing a bathroom with plastic panels has several undeniable advantages:
- Ideal for the room in question as it has excellent insulating properties. Plastic is not afraid of exposure to moisture; it retains its original characteristics for a long time.
- Plastic panels are inexpensive. They are ideal if the budget is very limited.
- Working with plastic panels is very simple. There are surfaces to which they can even be secured with a construction stapler. A person without experience and skills can easily cope with repairs, even if he has to act alone.
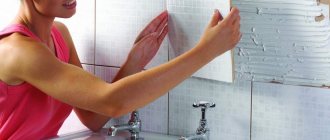
Repair of walls with PVC panels. Step-by-step instruction
Modern PVC panels are virtually a universal material. It can be used anywhere, including the bathroom. Plastic does not react to moisture at all; it can be quickly washed and put in order. But first you need to read the instructions for installing such material on the walls:
- Old finishing is removed. The walls are leveled and primed. To complete the primer faster, you can use a roller. It is dipped into a primer and then applied to the wall. It is better to do 2-3 layers so that the waterproofing is really high quality.
- Wooden sticks for the frame are treated with antiseptics. Then the bars are cut to the required length.
- The frame is assembled on the wall. You can make large cells, the main thing is that each panel is fixed in at least 2 places.
- When the PVC panels themselves are cut out, a small gap should be left between the ceiling and the panel. Subsequently, the panel will be straightened and smoothed, and space is left for this.
- The panels are secured to the frame with self-tapping screws. You can use special dowels for this, which will be invisible on the surface.
- After installing all the panels, the moldings are cut. These are special decorative corners that hide the unevenness of the panels and create an attractive appearance in the room.
- The last step is to install the ceiling plinth. The floor plinth is installed after the finishing of the floor is completed. Therefore, until work on the floor has begun, the lower plinth is not installed.
In addition to the proposed method, you can also use the direct gluing method. To do this, you need to level the wall, then apply glue to the back of the tile, and then press the panel against the wall. After a few seconds it is fixed. Then take the next panel and proceed in the same way until all the walls are filled.
Ceiling repair with PVC panels. Step-by-step instruction
PVC panels are reported to be a universal finishing material. It can be used to decorate not only walls, but also ceilings. The panels are light enough, so one person can handle the ceiling repair. And the work is roughly similar to decorating walls.
It is inconvenient to work with the frame on the ceiling. Therefore, you can use the frameless installation method. For this:
- Pre-finishing work is carried out with special care. The surface must be perfectly leveled, checking the level each time. To do this, you can use a special composition that is sold ready-to-use.
- Buy tile adhesive and mix it according to the instructions. The panels must first be cut so that they are ready for installation after mixing the glue.
- The first panel is taken and glue is applied to the reverse side. It is better to cut the panels not too large so that you can press them tightly to the ceiling surface with both hands while standing on a stepladder. Then the product is well fixed. If the panel is long, it is physically impossible to secure it well.
- The next panel is taken and the procedure is repeated.
Attention: when fixing the panels, you must leave a little space from the wall (1-2 cm) to eliminate the possibility of deformation
It is also extremely important to start working on the ceiling first and then move on to the walls. This approach is always used, regardless of the characteristics and purpose of the room with which work is being carried out.
This approach is always used, regardless of the characteristics and purpose of the room with which work is being carried out.
It is also extremely important to start working on the ceiling first and then move on to the walls. This approach is always used, regardless of the characteristics and purpose of the room with which work is being carried out.
Waterproofing and insulation of floors under tiles
One of the ways to waterproof a floor when laying tiles
This option is suitable for thermal insulation of a bathroom on the first floor in the presence of durable wooden floors. This method involves insulating the lower part of the floor structure at the location of the beams.
- All wooden elements are treated with an antiseptic. Next, waterproofing of the base is carried out. To do this, a waterproofing film is spread on the joists, and then insulation boards are laid in the spaces between the beams. A layer of vapor barrier is laid on top and a counter-lattice is installed on which the boards are laid.
- Dust and dirt are removed from the subfloor. This is necessary to ensure good adhesion of the material to the wood.
- Next, internal waterproofing is carried out using a self-adhesive bitumen-polymer film. First, a concrete primer, which is a water-soluble emulsion, is applied with a roller to the entire surface of the floor. It is also necessary to grab the lower part of the wall to a height of approximately 20 cm.
- The composition dries very quickly, at room temperature it takes no more than half an hour. Waterproofing should be done immediately after the primer has dried.
- A piece of the required length is cut from the roll, rolled, and placed on the floor. Carefully removing the protective film, unwind the material in the opposite direction, gluing it to the base and immediately removing any air bubbles that have formed with a brush.
- The next canvas is laid with an overlap, the joints are coated with bitumen emulsion.
- After laying the waterproofing on the floor, the material is applied to the pre-treated wall. It is necessary to cut strips 30 cm wide, of which 20 cm go to the wall, and 10 cm are glued to the floor, previously lubricated with mastic.
- A reinforced concrete screed is poured over the film, and then, after the solution has completely dried, ceramic floor tiles are laid on waterproof glue.
Vibroplast
The material absorbs vibration well and consists of a layer of embossed aluminum foil and a sticky polymer layer covered with anti-adhesive paper. Easily sticks to uneven surfaces without additional heating. Vibroplast does not absorb moisture and has the properties of a sealant. Suitable for use in the temperature range from -45 to +100°C. Good noise and heat insulator.
- a piece of the required size is cut from vibroplast
- remove the protective paper
- Place it on the surface of the bath and level it
- roll with a roller
Advantages of vibroplast:
- non-toxic
- low price
- withstands a wide temperature range
- moisture resistant
How to properly carry out insulation: practical aspects
The principles of electric and water heated floors are largely similar. The only difference is that communications are connected to different energy sources.
This type of work refers to capital transformations. You need to be prepared from the very beginning that the long-awaited comfort will be preceded by a rather long period of installation and launch of the system. The installation of a heated floor is carried out as follows:
- carry out a complex of preparatory work - remove tiles, old screed, clean and level the surface;
- prepare channels for laying communications in the walls;
- putty, prime the base of the floor, treat with a fungicidal composition;
- lay a thermal insulation layer;
- lay reinforcing mesh;
- the cable or underfloor heating pipes are laid on the mesh according to a pre-planned scheme - there is no need to provide communications under the bathroom, in places where other plumbing fixtures, a washing machine or furniture are located;
- connect and check the functionality of the system.
- a damper tape is installed around the perimeter of the bathroom - it will “control” the change in the size of the screed, which expands when heated and will rest against the walls if a buffer is not provided;
- perform floor screed;
- carry out coating waterproofing work if roll work was not carried out at the stage after preparing the working surface;
- After the screeds have completely dried, the final coating is laid - a warm floor exhibits its properties best when combined with ceramic tiles.
Sectional view of the structure of the bathroom floor - such a room will always be truly comfortable
Schedule and cleaning
Separation of tasks allows you to constantly maintain the required level of cleanliness, spending 15-20 minutes on it for daily cleaning and 2-3 hours for monthly and general cleaning. The regularity of cleaning a particular surface depends on the frequency of its use and hygienic requirements.
Daily cleanliness
What tasks need to be performed daily:
- remove splashes from mirrors and faucets;
- clean metal mesh on drains;
- wipe switches and door handles with a disinfectant or soap solution;
- dry bathrobes and towels;
- wash children's toys after bathing;
- clean up the shelf above the sink where frequently used cosmetics are stored;
- wipe the toilet rim;
- Clean the surface of the sink and bathtub with a soft sponge without soap or with a small amount of gel.
Once every 1-2 days it is necessary to wet clean the floor. If there is a cat litter box in the bathroom with bentonite, wood or silica gel filler, then you need to sweep the area around it 1-2 times a day.
Keeping things clean on a daily basis can make spring cleaning easier and save time on the weekends.
Weekly treatments
The list of weekly procedures includes the following procedures:
Cleaning tiles in the most used areas. There is no need to wash the walls throughout the entire room every week, but it is recommended to wipe with soap those areas that are located near the sink, toilet and above the bathtub. They become exposed to the maximum amount of splashes, bacteria and traces of detergents, which gradually turn into plaque. Cleaning the bathtub, sink, shower head and stall. Soap and cosmetic deposits are removed using soft gels and a sponge. The use of powders and aggressive chemicals increases cleaning efficiency, but can damage the coating. Cleaning rugs, washing shower curtains, rags, brushes and sponges. Even with regular drying, rugs, curtains and household items are breeding grounds for bacteria. When cleaning, microbes from the pores and microcracks of the material spread throughout the room. For disinfection, you can use solutions of bleach or white vinegar. Microfiber cloths and napkins can be cleaned in the washing machine. It is recommended to wash towels 2 times a week. Thorough cleaning of the floor. For daily wet cleaning, you can get by with only warm water, but once a week you need to wash the flooring with a chemical - Synergetic, Mr. Proper, Sano, Grass Floor Wash, Bagi, etc.
Particular attention should be paid to seams, corners and places where the tiles meet the walls. Disinfection of bath toys. Despite the fact that they often come into contact with soap solutions, they need to be regularly treated with antiseptics
If the child is less than 3 years old, it is recommended to repeat disinfection once a week, if more - 1-2 times a month. Treating mirrors and faucets with special products. Daily wiping removes splashes, but does not completely remove traces of hard water, paste and soap. Reflective surfaces are wiped with liquid glass spray, and metal surfaces with creamy products. Cleaning glass shelves and countertops. Smooth elements near the sink quickly become covered with a coating of soap solution, dust and other contaminants. If you do not wash them regularly, you will need to use abrasives after a few months.
Along with other activities, once a week you need to wipe dust from lampshades and doors, wash thresholds, towel hooks and lamp stands.
Cleaning once a month
The following tasks should be performed at least once a month:
- Clean the siphon under the sink.
- Flush pipes with liquid or powder to remove blockages.
- Wipe bare metal surfaces from rust.
- Clean wood and chipboard cabinets.
- Treat seams and joints against mold.
- Clean the washing machine drum.
- Sort bottles and check expiration dates.
General (more than a month)
General cleaning of the bathroom is carried out every 3-6 months.
Just a few tasks are added to the activities described above:
- Cleaning ventilation from cobwebs and dust.
- Washing all bottles in the bathroom.
- Cleaning the floor and walls behind the washing machine and cabinets.
- Washing the inner surface of the tank.
- Change of bathroom curtains and rubber mats.
- Removing dust and other contaminants due to hidden pipes, radiators, etc.
- Cleaning lampshades.
If you have a boiler, general cleaning can be combined with appliance maintenance. It is recommended to disassemble the heater, wash the tank and check the condition of the heating element and electrode once every 6-9 months.
Instructions on how to properly foam a steel hot tub?
Typically, this method is used to insulate and soundproof steel bowls, but it can also be used for acrylic bathtubs.
Be sure to read articles about other methods of insulating and soundproofing bathtubs.
STEP 1: Place the bathtub upside down on the floor. Don’t forget to first place pieces of cardboard underneath it so as not to scratch the enamel surface.
STEP 2. Be sure to thoroughly wipe off dust from the surface on which you are going to apply foam. Then you need to degrease it; for this you can use a universal degreaser, alcohol or dishwashing detergent.
STEP 3. Before use, it is better to prepare the balloon. It needs to be shaken well and heated a little by placing it under running warm water for 5 minutes. It would be enough.
Under no circumstances should you heat the cylinder in a kettle or boiler, as many resources advise. Due to a significant increase in pressure, it can explode.
STEP 4. Spray the bath generously with water using a spray bottle. This way the foam will stick to the surface much better. If the bowl dries out during application, repeat the procedure.
STEP 5. Place the can on the gun and get to work. It is better to apply the foam in dense layers using a snake. Start with flat surfaces and gradually work your way up. There are no special recommendations for the sequence of surface coating
It is important not to leave any spaces
Sometimes the drain needs to be replaced, so it's best to leave a little space around the hole.
STEP 6. Now you need to leave the font until completely dry for 5-6 hours. After the foam has completely dried, cut off any excess foam at the leg attachment points using a knife.
Drawing up a plan and procedure
Once you have decided on all these issues, have chosen plumbing and finishing materials, begin to draw up a plan. After all the old finishing has been removed, the dimensions of the room are measured to the nearest centimeter and the dimensions are transferred to the plan. On this plan, all communications are drawn, the distances to all their exit points are indicated, and plumbing fixtures and furniture are drawn to scale. After all, the location of the water supply and sewerage outlets depends on the position of the plumbing and its size. The following is the work plan:
- Dismantling of equipment: bathtub, washbasin, electrical appliances.
- Removing old finishes from walls, floors, ceilings.
- Replacement of water supply and sewerage systems, installation of new shut-off valves. When replacing the water supply, if necessary, you can install filters; sewer check valves are often installed on the sewerage system in apartments to prevent the appearance of an unpleasant odor.
- Electrical wiring. The wires are mounted in the walls, grooves are made under them, into which corrugated hoses or plastic cable channels are laid.
- Wall decoration. Here, the sequence of renovations in the bathroom depends on the type of finish chosen and the original condition of the walls. For tiles, the walls need to be leveled with plaster; for painting and wallpaper, finishing leveling is also required using putty. When laying tiles, they are laid starting from the bottom, but not from the first, but from the second row. The first row from the floor is laid later, after the floor is made.
- Ceiling and lighting installation. In most cases, built-in lamps are used; for the bathroom they must be in a special sealed housing.
- Floor finishing. If there are large differences in height, a leveling screed is poured before finishing work begins (after laying the electrical wiring). While all other work is going on, the concrete is gaining strength. At this stage, the selected finishing material is laid on a pre-leveled base. Afterwards the first row of tiles is laid (with trimming as necessary).
- Installation of washbasin, bathtub, and other plumbing fixtures.
- Installation of furniture.
This is a step by step bathroom renovation plan. There is only one nuance: when to install the doors. Usually the door frame is installed after the walls are prepared for finishing. In this case, the wall decoration will fit close to the box
This is important if platbands are not provided from the inside. The door leaf can be hung later - after finishing all the “dirty” work or immediately, but protect it with thick plastic film. Otherwise, it is advisable to follow the sequence of renovations in the bathroom without changes.
Otherwise, it is advisable to follow the sequence of renovations in the bathroom without changes.
Some nuances of bath insulation
I added this section at the request of my wife, who knows firsthand that if you do not insulate a metal bathtub, there can be no talk of any comfort and coziness when taking water procedures.
Steel bath insulated with foam.
I’ll tell you how to insulate a steel bathtub:
- the plumbing fixture is turned over and installed on cardboard, foam rubber or other lining that will prevent scratches on the enamel layer;
- the legs are glued or otherwise secured to the bathtub;
- a layer of polyurethane foam is applied to the surface of the product, which then hardens;
- in the same way, you need to apply several layers of insulation (the more, the more effective the insulation);
- if necessary, the foam can be reinforced with fiberglass mesh.
Selecting a thermal insulator
To insulate the bathroom ceiling, non-hygroscopic, moisture-repellent materials should be used.
To insulate the bathroom ceiling, non-hygroscopic, moisture-repellent materials should be used. See tips for choosing thermal insulation materials here. The insulation must be safe for human health and maintain its thermal insulation properties in conditions of high humidity and significant temperature changes.
To insulate the bathroom ceiling, it is not recommended to use cotton wool insulators due to their high hygroscopicity and the need to additionally install a supporting frame. It is best to give preference to extruded polystyrene foam, polystyrene foam or polyurethane foam.
Materials for thermal insulation of rooms with high humidity
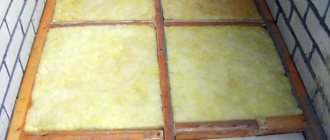
Laying mineral wool on a metal frame
First of all, let's focus on the choice of materials.
Since the bathroom is a room with high humidity, the materials for cladding must have certain technical characteristics:
- Low water permeability;
- Strength and durability;
- The finish should be easy to clean with any, even aggressive detergents;
- The vapor permeability of the finish should ensure free circulation of air under the skin;
- The lining in the bathrooms, as required by the instructions, is made from materials that are not susceptible to fungus and mold.
Preparation
To properly insulate a steel washing container with your own hands, you need to carefully prepare the bathtub for use. If you apply polyurethane foam or glue thermal insulation material to an unprepared surface, you will not be able to achieve the optimal result. Before performing insulation, perform the following operations:
- You need to put cardboard, soft material or wooden blocks on the floor of the bathroom to place the washing container on them.
- Disconnect the font from the drainage system, disconnect the siphon and overflow.
- Turn the bowl upside down, and then lower it onto the prepared bars.
- Clean the outer surface of the bowl from dust or dirt.
- To degrease steel baths, use gasoline, alcohol or solvent.
Materials for thermal insulation
An experienced craftsman has a wide selection of materials with which to insulate thin-walled steel bathtubs with his own hands. They differ in thermal conductivity coefficient, price and method of application. If the thermal insulation of the washing container is carried out before installation, you can use almost any material that suits you in terms of price and quality ratio. The most popular means of insulating steel products are:
- Polyurethane foam sealant. A sealant based on polyurethane foam, popularly known as polyurethane foam, is the optimal material for thermal insulation of a bathtub. It has a low thermal conductivity coefficient and high resistance to moisture, is easy to apply and dries quickly. Many craftsmen choose polyurethane foam for insulating bathtubs because of its affordable price.
- Sheet foil polyurethane foam. Another material that effectively maintains the temperature of water in steel containers is polyurethane foam in the form of self-adhesive sheets. The layer of foil with which the polyurethane foam is supplied additionally reflects heat into the bowl. This material is used to cover the outer surface of the bathtub using a self-adhesive layer or glue.
Insulation of a bathroom in a panel house
The choice of insulation depends on your preferences and financial capabilities. If the bathroom wall faces the entrance, then you can get by with inexpensive roll insulation: penofol, isolon, etc. In this case, you will lose a minimum of living space. When using penoplex under plaster or concrete floors, you will lose about 5 cm of space.
In the case of installing sheathing for laying mineral wool or foam plastic, installing heated floors over joists with insulation, or installing Knauf floors, the loss of space can already be significant - up to 7-10 centimeters. But at the same time, the quality of insulation of a bathroom in a brick house will be higher, which is suitable for those apartments in which the walls freeze very much in winter and there is a high risk of mold.
Insulation of bathroom floors from the inside
Bathroom floor insulation using joists
Before insulating the floor, it is necessary to waterproof the surface with roll or bitumen materials
If you have concrete floors, then pay attention to Penetron penetrating waterproofing. The molecules of this waterproofing penetrate deeply into the cement base and reliably protect the floor structure from moisture penetration
If the floor in the bathroom is cold, then you can install electric floor heating. To do this, foam plastic is laid on the prepared surface so as not to heat the floors between floors. Mats for a warm electric floor are laid on top, connected to the network and filled with cement mortar or a self-leveling mixture.
After the solution has hardened, tiles or any other floor covering can be laid on the floor. The system operates from the network, and the installed thermostat will automatically maintain the optimal floor temperature in the bathroom in a brick house
It is important that the installation of heated floors is carried out by professionals
Insulation of walls in the bathroom from the inside
Insulation of bathroom walls in an apartment
To insulate walls from the inside, it is better to use foam and penoplex boards under plaster. In this case, insulating a bathroom in a brick house from the inside will take up a minimum of space, and the walls will be protected from mechanical damage by a layer of plaster. Before gluing the insulation to the walls, they should be leveled and primed with antiseptics.
The prepared adhesive mass is applied to the thermal insulation boards with a notched trowel. Afterwards, the slabs are carefully installed in place from bottom to top, covering the joints between the slabs with the next row. When the wall is insulated, you can start covering it with paint mesh and puttying the wall. After the walls have dried, you can paint or lay tiles.
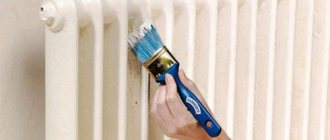
Warm plaster for finishing the bathroom
Cement-based insulation “warm” has recently appeared on the Russian market of finishing materials. Serves to reduce the thermal conductivity of the surface being treated; various crumbs are added to the plaster instead of sand: sawdust, cellulose, expanded vermiculite or polystyrene foam granules. The optimal thickness should be no more than 2 cm, otherwise the plaster may crack.
Finishing with “warm” plaster is inexpensive, since the composition does not require preliminary leveling of the walls. “Warm” plaster has excellent adhesion and does not form “cold bridges”, but requires additional finishing, since it is not a finishing coating. The work carried out will allow you to stay in the bathroom with maximum comfort. For detailed instructions, see the video below.
Work order
To insulate a bathtub you need to take only three steps, which are shown in the diagram below.
Stages of insulating a bathroom.
And now about each of them in more detail.
Stage 1 - Surface Preparation
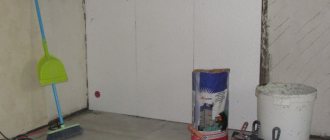
As you understand, we will insulate the walls and ceiling. But first you need to prepare these surfaces for work. The sequence of actions is as follows:
- I empty the bathroom of furniture and plumbing fixtures. This is precisely one of the disadvantages of internal insulation technology. To install polystyrene foam on the walls, you need to remove the bathtub, sink, washing machine, and so on from the room. Therefore, thermal insulation measures are usually timed to coincide with general repairs in the plumbing unit.
First of all, you need to dismantle the plumbing fixtures.
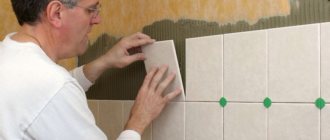
- I remove decorative trim from the walls. In my case, all surfaces were tiled. So I knocked down all the parts using a hammer drill with a chisel attached to it. Moreover, you need to get rid of not only the tile itself, but also the remaining glue to get as smooth a surface as possible. In the case of other materials, you can proceed as follows:
- The wallpaper is simply torn off the walls, after which the surfaces are protected with a spatula from remnants of the backing and glue.
- You don’t have to remove all the paint, but get rid of only those areas that are already swollen or crumbling. The rest of the layer will not interfere with the work.
The ceramic tile or other trim is then removed.
- I carry out repairs to wall and floor surfaces. Before laying the insulation, you must make sure that the surfaces do not have cracks, potholes and bumps that could interfere with the adhesion of the foam or cause moisture to penetrate into the thickness of the insulating layer:
- Small and shallow cracks need to be slightly widened with a grinder with a diamond disc installed on it, and then filled with polyurethane foam. After hardening, the latter is cut flush with the wall or floor.
- Large recesses are cleaned with a chisel to get rid of crumbling areas, and then filled with cement repair mortar. If reinforcement is visible in the recess, then before repair it must be cleaned with sandpaper and coated with a rust converter.
Cracks and defects in concrete walls and floor slabs need to be repaired.
- I clean the surface from dust. It is best to do this with a vacuum cleaner, which will remove even the smallest particles of dust and mineral chips.
A vacuum cleaner is best for cleaning concrete.
- I prime the walls and floor. The composition I have chosen not only improves adhesion, removes dust from concrete slabs and gives them antiseptic properties, but also kills all microorganisms that already live on the surface of the slabs. Priming is carried out according to the following scheme:
- First, using a roller (or, to speed up the process, a sprayer), the walls are coated with a primer in one layer.
- After this, you need to give the composition time to dry. This usually takes about 4 hours.
- Then the walls of the room are coated with primer again. After the second layer has dried, you can proceed to gluing the foam.
The walls and floor need to be primed in two layers.
- I'm laying out the electrical wiring. If you need to lay electrical cables and install sockets in the bathroom, you need to do it now. For installation, polyvinyl chloride cable channels are used, which in the event of a short circuit will prevent the insulating layer from igniting. And the polystyrene foam itself is easy to process, so you can then hollow out recesses in it to mask these cable channels.
You need to worry about the wiring in the bathroom in advance.
Stage 2 - Installation of thermal insulation on the walls
Let's start insulating the walls. I’ll say right away that although the gluing process seems simple, it contains many small nuances on which the quality of the work performed ultimately depends.
The technology is as follows:
- I hit the zero mark. To do this, you need to mark a mark at a height of about 52-55 cm from the floor, following which, using a water or laser level, draw a strictly horizontal line over the entire surface of the walls in the bathroom, which will serve as a guide for gluing the foam sheets.
The zero mark can be marked using a laser level.
- If necessary, I carry out marking and cutting of foam sheets. The material is easily cut using a utility knife, a hacksaw with sharp teeth or hot metal wire. Let me point out a few nuances:
- When cutting, maintain the dimensions very precisely so that when gluing, the seams between the individual sheets are minimal.
- To ensure a tighter fit of the sheets, after sawing off the part, you need to process its end using a foam grater.
Operating principle of cutting wire for foam plastic.
- I am preparing a reinforcing composition for polystyrene foam. For this, a dry construction mixture is used, to which water is added, after which everything is stirred and brought to homogeneity using a mixer connected to a drill. In this matter, it is important to pay attention to several points:
- After mixing, it is necessary to leave the glue for 5-7 minutes so that the additives and plasticizers included in its composition are activated. After this, the solution should be mixed again.
- Prepare only the amount of glue that you can use in about 40 minutes. After this time, the performance properties of the solution deteriorate.
- To prepare a new portion, you need to use a clean container (or wash the old one well). Otherwise, frozen lumps from the previous batch can spoil the glue and interfere with the correct alignment of the foam boards.
The solution is mixed using an electric mixer.
- I spread glue on the first sheet of foam. The glue application pattern will be the same for all sheets, but it has several features that are important to know:
- If the wall is smooth and there is no need to level it with polystyrene foam, then glue is applied to the entire surface of the foam plastic, after which it is spread with a notched trowel.
- If you need to level the wall, then apply the glue with a roller along the edge (at a distance of 5 cm from it with small gaps for air to escape), after which several lumps are placed in the middle so that at least 40% of the area of the material is covered with the composition.
- Polyurethane glue from a balloon is applied in the form of separate lumps (about 6-8 pieces), distributed over the entire surface of the insulation.
- If the foam sheets are joined at an angle of 90 degrees, then the area that is adjacent to another part of the insulation does not need to be coated with glue.
- During work, you should carefully ensure that the cement-based adhesive does not get into the seams between the sheets of expanded polystyrene.
Applying glue to foam sheets.
- I secure the first sheet of foam. You need to start work from the corner above the zero level line (drawn in advance on the walls). The system is like this:
- You need to fix the part on the wall, and then align it vertically, controlling the location using a water level.
- After this, further strengthen it with four umbrella dowels. You need to drill a hole in the wall directly through the foam, then insert the dowel, but do not hammer in the core, but only insert it all the way, otherwise you can knock down the level of the foam sheet.
To make work easier, you can install the support rail at the zero mark.
- I glue the remaining sheets on top from the zero mark. When applying glue and leveling, you need to act as indicated in the previous two paragraphs, as for the remaining nuances:
- When joining two adjacent sheets of the same row, it is necessary to ensure that the parts fit as tightly as possible to each other. If necessary, you can use a polystyrene foam grater.
- When installing the top row on the bottom, you need to make sure that the seams of the material run apart, that is, the seam of the top is separated from the seam of the bottom row of foam at a distance of at least 20 cm.
- In the corners, the foam should be connected according to the principle of a ladder. That is, first a sheet comes from one wall, then from the other, and so on in steps to the very top.
- If the wall has too much vertical difference, a polystyrene foam pad of suitable thickness can be glued under the bottom of the foam sheet.
- All sheets of foam plastic are also additionally reinforced with four dowels, the cores of which are not hammered in completely until the glue has completely dried.
- To glue sheets to a cold wall that protects the bathtub from the street, you need to use polyurethane glue if the work is carried out in the cold season.
Installation of expanded polystyrene sheets on the wall.
- I glue the sheets from below the zero line. It is important to secure them correctly, for which pads are used under the lower part of the part. If necessary, trim the insulation using a knife or saw.
- I fill the foam seams with polyurethane glue. You need to pour the foam so that it fills the entire space between the foam sheets, and not just at the top of the seam.
- I secure the insulation sheets with dowels. This must be done after all the glue has dried. First, the cores of those parts that were already inserted during gluing are completely hammered. Then the number of dowels increases to 6-8 per sheet. It is also advisable to drive fasteners into the seams between the sheets to strengthen them too. The dowel must be hammered in so that its head is submerged and does not rise above the surface of the polystyrene foam.
Scheme of fastening foam plastic with dowels.
- I perform final cleaning of the foam surface. To do this, use a polystyrene foam grater. With its help, it is necessary to especially carefully process the foam seams (if there are small differences in height) and outer corners (if any).
A grater for cleaning foam plastic.
- I reinforce the outer corners of foam plastic. In the bathroom where I was renovating, the wall has a complex shape, so the foam insulation formed two outer corners. They need to be reinforced using a corner with a mesh. This is done like this:
- A small layer of reinforcing compound (glue that was used to glue the insulation) is applied to both sides of the corner.
- A corner is applied, after which, using a plaster float, it is pressed inside the insulation.
- Then a little more solution is applied on top with a spatula, which is distributed in the direction from the corner outward.
Part for reinforcing corners and method of its installation.
- I reinforce the surface of the foam with mesh. A pre-purchased fiberglass alkali-resistant mesh is used:
- A reinforcing compound is applied to the surface of the insulating layer.
- A mesh is glued onto it, after which it is pressed into the solution with a grater.
- A little more composition is applied on top, which is then carefully leveled.
- At the junction of individual sheets and in the corners of the room, the mesh should be overlapped.
- When leveling, use the blunt side of a plastering float to avoid tearing the reinforcing layer.
Polystyrene reinforcement with mesh.
- I complete the final plastering of the wall surface with cement mortar. Further technology depends on the chosen finishing material. If you are going to glue tiles, then you do not need to bring the surface to perfection, but for painting and wallpaper you will have to carefully plaster, putty and sand everything.
The last stage of wall insulation is their decorative finishing.
Stage 3 - Floor insulation
To insulate the floor, instead of polystyrene foam, I took extruded polystyrene foam from the Penoplex brand. This material has a high density, so it better tolerates mechanical loads exerted on the insulated surface.
I will describe the work scheme briefly so as not to abuse your attention:
- A polyethylene film is laid on the prepared floor. It plays the role of a waterproofing membrane and is used to prevent penoplex from getting wet.
- Sheets of thermal insulation material are laid. You can lay one layer 5 cm thick or two layers 10 cm thick. In my case, 5 is enough, since below there is also a living space and there is no need to protect yourself from the severe winter cold. The styling features are:
- The material is simply laid out on the floor without fastening. There will be a cement screed on top that will firmly hold the insulation sheets in place.
- The ends of the penoplex are designed in the form of a step, which allows you to tightly connect the parts and avoid the appearance of cold bridges.
- When laying the material in two layers, you need to ensure that the seams of the bottom row are at intervals with the joints of the top row.
Laying penoplex on the floor.
- Reinforcing mesh is installed. What is needed here is not fiberglass, but a metal mesh made of steel wire with a mesh size of 10 cm. The laying technique is as follows:
- Individual sheets of mesh are laid out on polystyrene foam in such a way that they overlap each other at a distance of one cell.
- Plastic legs are placed under the mesh, which will hold it at a height of 2-3 cm above the level of the insulating material.
- The sheets of the reinforcing layer are connected to each other using steel wire.
Reinforcement of penoplex with mesh (photo from another object).
- Beacons are being installed. For this purpose, special aluminum parts and brackets are used. The beacons need to be leveled using a water or laser level in order to achieve a perfectly flat floor in the end.
- The screed is being poured. A solution is prepared, poured into the space between the beacons and leveled with an aluminum rule.
Performing a foam screed with simultaneous installation of a heated floor.
The principle of insulating walls and ceilings in the bathroom
The principle of insulating walls and ceilings in a bathroom directly depends on the type of insulation. So, for example, if it is foam plastic, then the sheets can be fixed directly to the wall, previously prepared and cleaned, or with the help of additional fasteners. In the first case, soil mixtures and glue are used, evenly distributed with a spatula over the surface of the insulation. In the second, dowels are used to make the structure more reliable.
Insulated surfaces of walls and ceilings can be finished with decorative plaster, but ceramic tile finishing should be excluded in this case - foam plastic will not support its weight.
If it is so important to increase the strength characteristics of the structure to expand the capabilities at the finishing stage, use lathing. It can be wooden or metal. In this case, the insulation is mounted in the cells of the sheathing, blowing out the cracks with foam
In this case, the insulation is installed in the cells of the sheathing, blowing out the cracks with foam.
As already noted, a good choice for insulating walls and ceilings in a bathroom is mineral wool. The material is more expensive than foam, but has improved properties, both in terms of resistance to moisture and temperatures, and thermal conductivity. The insulation is installed in the same way as foam sheets - on the sheathing. Lay the cotton wool in strips, additionally using a vapor barrier film.
Glass mosaic
- the most expensive option;
- reliability and durability;
- ideal moisture resistance;
- incredibly beautiful decorative effect.
A solution for those who do not count the money in their wallet. Glass mosaic is perhaps the most expensive option from a material point of view to decorate the walls in the bathroom. But how many advantages:
- you can decorate a separate fragment on the wall by selecting elements of similar color;
- easily emphasize rounded surfaces;
- an indispensable material for finishing niches and partitions.
We will not remain silent about the disadvantages. Along with the extremely high cost of such finishing, we also need to talk about complex installation, with which laying ordinary ceramic tiles seems like innocent fun. In addition, you should not place the mosaic in places open to direct contact with water: the sight of constantly flowing drops on the wet glass of the mosaic elements is not the most pleasant sight, alas.
Let's consider alternative options
The options presented above are not the only ones that are suitable for this task. Two more methods are actively used:
- Warm plasters - a special mixture is simply applied to the surface. Suitable only for thick brick or aerated concrete walls. There is no need for the construction of a frame and preliminary preparation.
- Foamed polyurethane foam. It is applied like polyurethane foam. When using it, there is no need to lay a vapor barrier material, since good adhesion to the surface is necessary. A frame is created with a large step (1-1.2 m). Polyurethane foam is sprayed into it and subsequently covered with some sheet material.
https://youtube.com/watch?v=mBbW3LfvgKo
Additional ways to keep your home warm
There are several other options to keep the room warm. Experts recommend doing the following:
- If the apartment is located on the south side, then on a sunny day try to open the curtains as much as possible. Even the seemingly cold winter sun provides a sufficient level of heat through the prism of the glass.
- You can additionally stick a thermal protective film on the windows. It does not reduce visibility. But it retains heat well in the room.
Windows with Film
If you have a fireplace or stove in your home that you are not using, be sure to block the chimney. 30% of the heat escapes through it.
But do not forget to open the chimney when using the fireplace. Otherwise, carbon monoxide will go into the room.
If it is possible to install heating in the house in addition to centralized heating, use oil radiators or ceramic panels. They are the safest and provide a large percentage of heat. If possible, abandon central heating in favor of individual heating. This way you can control the temperature in your home yourself.
And of course, just dress warmly in winter. Warm socks, knitted by the hands of a caring grandmother, will give not only warmth, but also spiritual comfort.
Having figured out how to insulate an apartment from the inside with your own hands without repairs, do everything necessary to preserve heat. And in the spring and summer, if possible, do major work on replacing windows, doors and insulating the floor.
How do you insulate yourself for the winter?
Let's reveal the secret of what is happening inside insulated walls
In the summer, while it’s warm, nothing special happens under the walls. But as soon as cold weather sets in, the air temperature inside the apartment begins to differ sharply from the outside temperature.
And here the walls insulated from the inside can show themselves in all their glory. The full force of frost and wind falls on the shoulders of the outer walls, officially called “enclosing structures.”
The main opponent of walls insulated from the inside is such harmless ordinary water. Once she freezes, she turns into a strong enemy, sometimes simply tearing apart the walls from the inside and widening the cracks at the joints.
And wet insulation ceases to perform its function of thermal insulation. And as soon as it gets warmer, harmful bacteria and fungi, for which water is life, begin to rage.
This is the unsightly picture sometimes presented by insulating walls from the inside, which, however, can be solved, but more on that later.
Perhaps it becomes unclear to someone why the outside air temperature and the humidity of insulated walls are so closely related to each other.
It turns out that water vapor condenses from the air at a certain temperature. It is called the “construction dew point”. When this temperature is reached, water droplets - condensation - form on surfaces that are well cooled.
The dew point has a floating value, which increases with increasing air humidity in the room. If the humidity reaches 100 percent, then the air temperature is equal to the dew point. However, this is slightly approximate - we will not delve into complex formulas.
According to sanitary rules for apartments and residential buildings, the air temperature in them should be between 20 and 22 degrees. And the optimal air humidity for living is 55 percent.
The dew point under such conditions is plus 10.7 degrees Celsius. Thus, if one of the layers of the insulated wall has reached such a temperature, condensation will inevitably appear on it.
Since we turn on the heating in winter, the walls warm up from the inside. Fluctuations in outside temperature cause the dew point to move inside the walls - the colder it is outside, the further it is from the facade.
Where exactly the dew point forms depends on several factors. This includes the location of the layers of the structure relative to each other and their thickness.
For example, imagine a situation where the wall is not insulated and the dew point is inside it. Then, when you turn on the thermal imager, you can see on its screen that heat rays are emanating from the wall. And no matter how much you heat a room in such a building, it will still be cold in it, since it gives off heat outside.
If the facade of the building is insulated, then the wall is completely heated, it saves precious heat. And the dew point moves closer to the facade, into the heat-insulating layer.
It is for this reason that ventilated facades were invented - after all, the insulation must be ventilated to dry. Otherwise, it will lose its properties.
If the walls are insulated from the inside, then in winter the heat-insulating layer does not allow heated air from the room to reach them. Therefore, load-bearing walls, freezing to the ground, begin to collapse faster.
As a rule, the dew point is located on the inside of the wall, moving with increasing temperature to its middle. At the same time, the condensation that appears between the heat insulator and the wall practically negates the effect of insulation.
Frozen water and the glue on which the insulation is placed destroys. And then mold blooms wildly on wet walls and fungus appears. Nothing good, in a word.
Is it possible to insulate an apartment from the inside?
Let’s immediately clarify the question of whether it is worth insulating the walls of an apartment from the inside. There are many negative judgments expressed on this score, although most of them are unfounded:
- the thermal insulation layer inside the room prevents the wall from warming up, which causes condensation and mold to form on it;
- the same layer takes away the living space of the rooms;
- inconveniences associated with the work. They are expressed in the rearrangement of furniture and even the temporary eviction of residents.
You can only agree with point 3, and even then not completely. Why resettle people when you need to insulate one or two walls of an apartment from the inside? As for condensation, the culprit is not thermal insulation, but poor ventilation. The fact is that panel houses are assembled from expanded clay concrete slabs, whose heat transfer resistance is quite high. With good heating, the dew point is always located within the thickness of the wall panel, and not outside it.
If in practice this is not the case, then there are problems with the heating or ventilation of the panel house and insulation of apartments may not give the full effect
It doesn’t matter whether it is external or internal
There is nothing to talk about reducing living space; modern thermal insulation materials have excellent thermal resistance indicators with a small thickness. Examples of these include extruded polystyrene foam, penoplex, and polyurethane foam.
Pipe laying
According to SP 30.13330.2016, internal sewage systems should be made of pipes and connecting parts with an estimated service life of at least 25 years. Sewer pipes should be laid with a constant (over the entire horizontal section) slope in the direction of the riser, which is at least 1/D, where D is the diameter of the pipe in millimeters (that is, for a 50 mm pipe, the slope must be at least 2%).
In practice, both polyethylene pipes with welded joints and products made of polypropylene and polyvinyl chloride with detachable socket joints are used. Since the required thickness of the masking screed also increases with the length of the pipe, it is advisable to locate the equipment as close to the riser as possible.
Water pipes (except metal ones with threaded connections) in insulating sleeves made of elastic foam can also be cast into a screed, ensuring a rise towards the water fittings of at least 0.3%. But for water supply it is easier to make horizontal grooves in the partitions.
Ideally, the floor in the bathroom should be 2–4 cm lower than in the adjacent room, but this is very difficult to achieve, therefore, as a rule, a waterproof threshold is made of monolithic concrete, followed by tiling.