- How to paint bathroom walls
- Step 1 - select a tool
- Step 2 - clean the wall
- Step 3 - paint the walls in the bathroom
- Summarize
Benefits of paint
Why choose this option and how inferior is it to tiles on the walls or stretched fabrics? Paint has many advantages.
- Small expense. Very often, no more than one can of the composition is required to treat surfaces.
- Simplicity. To coat with a coloring composition it is not necessary to have special skills. Just read the instructions and get to work.
- Large range of colors. In the store you can find a wide selection of paints of any color. With them you can bring any idea to life and choose any color.
In order not to make a mistake with your choice and not be disappointed with the result, purchase formulations only in specialized stores. Check out the products in catalogs and read reviews.
Pexels
Very often, buyers react to the bright packaging of foreign brands, while domestically produced products remain off the shelves. Although Russian materials are often not inferior in quality to their foreign counterparts, they sometimes cost significantly less. If you are purchasing multiple cans, check the lot numbers on the cans.
Painting the bathroom
Once the bathroom painting design is determined, the painting technology becomes clearer. The lesson of a single-color coating is easier than applying different colors; the following steps are performed:
- The paint mixes well.
- If necessary, color is introduced.
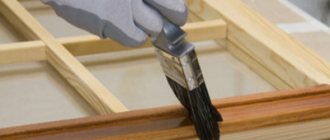
- First, paint the joints in the corners and hard-to-reach areas using a narrow brush.
- Afterwards, the main areas are painted with a roller or wide brush.
- When the first layer dries well, apply the second. The number of layers is determined based on the obtained quality of wall painting.
When the first layer dries well, apply the second.
Types of coatings
When choosing what and how to paint the bathroom, pay special attention to the base of the finishing material. The bathroom always has high humidity and a large amount of condensation, so it is necessary that the surfaces retain a neat appearance for a long time and are easy to clean. There are several types of solutions on the market today.
By base type
Water-based
Such solutions do not have any strong odors, are safe to use, and are easy to apply, but they have one significant drawback - they do not withstand moisture and are easily washed off with water. Therefore, in the bathroom it would only be appropriate on the ceiling. Dirt from such a coating must be carefully removed with a soft cloth or sponge.
Acrylic
This mixture has many positive qualities, such as an abundance of colors, water- and dirt-repellent properties, washability, and the presence of components that prevent the formation of mold. In addition, it forms a perfectly smooth surface without cracks or irregularities. This coating will not fade, will not crack and will last a very long time.
Silicate
It has good moisture resistance, but it is applied in a very thin layer that cannot cover all the unevenness. Therefore, it is necessary to carefully prepare the foundation for such a composition.
Silicone
They withstand temperature changes well and cover cracks up to two millimeters wide.
Of all the paints listed, this paint is best suited for the bathroom. However, we must take into account that it has a fairly high price.
By finishing coating
Among all the proposed options, three types of textures can be distinguished:
- glossy
- semi-gloss
- semi-matte
- matte
We advise you to choose the composition based on how smooth your walls are. To see all surface imperfections, turn off the lights in the room and shine a flashlight on it. You will see all the defects and choose the texture that suits you. Thus, a glossy sheen will highlight any unevenness, while the matte version, on the contrary, will hide finishing flaws.
However, the glossy effect has the ability to reflect light, which visually expands the room. Consider this when choosing material for a small bathroom.
Advantages and disadvantages
Let's consider the advantages and disadvantages of this wall decoration:
| pros | Minuses |
| Inexpensive. Even expensive paint is cheaper than budget tiles. This also applies to consumables and specialist services. | The surface to be painted must be flat. If it is far from ideal, and you do not have the appropriate skills, you cannot do without a professional team. |
| Easy to apply. You can paint the walls in the bathroom yourself if the surface for painting has already been properly prepared. | Preliminary work requires a lot of time. The wall needs to be leveled, puttyed and primed. Each layer must dry completely. |
| The possibilities for creativity are endless. | The paint is easily damaged and this coating will not last long. |
| The paint can be combined with other finishing materials, making, for example, a tile apron near the sink. | If the water is hard, a coating will appear on the paint, which means the walls will require special care. |
Preparation for finishing
Before renewing the surface coating, you need to prepare it well, since the final result depends on their condition. Also make sure you have all the necessary tools.
Required Tools
- Roller
- Brushes
- putty
- Putty knife
- Protective mask and goggles
Preparation
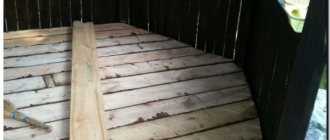
First, you need to remove all the furniture from the bathroom and remove existing decorative elements from the walls. This applies to all holders, towel hooks, curtains, rugs and other small items. Then the walls and ceiling must be freed of all old coatings. If you want to get rid of old tiles, then feel free to tear them off the walls. Next you will need to level the surface, making it perfectly flat using plaster.
Unsplash
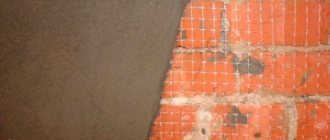
If the walls have been painted, the coating can be removed with a scraper or sharp spatula. The resulting cracks must be filled with moisture-resistant putty. If there are wooden surfaces in the room, they must be sanded and dirt removed. This way the new layer will stick better.
Don't forget to remove mold and mildew if present. A chlorine solution or a special mixture, which can be bought at any hardware store, can effectively cope with this. We recommend carrying out this procedure a few days before painting so that the surfaces have time to dry. And to get rid of grease stains, it is better to use a detergent designed specifically for these stains.
After leveling and removing the old coating, all surfaces must be washed to get rid of dust and small chips.
Cover all plumbing fixtures with thick polyethylene. It is better to wrap the toilet and washbasin with shockproof material so as not to break these fragile products during repairs. We recommend removing switches and sockets. Cover those areas that you do not plan to treat with dyes with masking tape. Your premises is ready for use.
- Ceiling
How to paint a ceiling correctly: the whole process from preparing the base to finishing
Preparatory work
Do-it-yourself wall painting begins with preparing the base.
Dismantling the old coating
First of all, you need to clean the walls of old cladding material.
Peel off paint is removed with a spatula or wire brush. If the coating is too durable, sand it with sandpaper and leave it.
Applying putty
Elimination of unevenness is an intermediate stage of processing walls for painting. To do this, use putty that can withstand high air humidity. Water-dispersed compositions with a latex binder component are suitable. The product is applied to the walls in a thin layer using a wide spatula. It is recommended to distribute the solution from bottom to top. The most pronounced defects are covered first.
Base primer
The primer, like putty, must have water-repellent properties. Most of these compositions are universal, so the choice depends on the preferences of the home owner. The primer is applied using a roller or wide brush and left for 24 hours.
How to paint the walls in the bathroom with your own hands
After the preparation has been completed, we proceed to the most important stage. Let's give some tips on how to paint bathroom surfaces beautifully and neatly.
Unsplash
The paint is usually applied in several layers, depending on the degree of coverage. Before use, read the instructions, as some formulations must be diluted with special solutions. For application it is better to use a roller (as in the photo). This tool will ensure a thin and uniform distribution, which will greatly save product consumption.
Hard-to-reach places and corners are painted over first, and only then the base layer is applied. To do this, use a small brush.
Be sure to remove excess paint in a paint bath. Do not neglect this, otherwise there will be smudges.
Each subsequent layer is applied after the previous one has completely dried. To ensure that the composition dries evenly, provide it with the desired temperature, which is indicated on the package. Also try to avoid drafts.
Which color should I choose?
It is better to paint a small bathroom or a combined bathroom in light colors. This is a well-known trick that will help visually expand the space. These shades look good in combination with traditional white sanitary ware. In a spacious bathroom you can embody any ideas - contrasting shapes, geometry, ornaments, different types of finishes.
Important: on walls painted dark, splash marks are more visible.
Matte paint will better hide small imperfections on the wall, but it is impossible to remove dirt from it without leaving traces. If you settle on it, dark shades are preferable.
Glossy, on the contrary, will highlight all the imperfections of the surface; it should be perfectly smooth and clean. But walls painted with it are easy to clean and you are not limited in your choice of color.
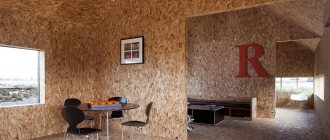
The interior style of your bathroom also dictates some rules in choosing the color of the walls. In a modern high-tech bathroom, cool gray glossy walls and all shades of blue will look good. Neutral pastel colors - powdery pink, sand, light green - will fit well into Provence.
The photo shows a high-tech bathroom with painted walls
Bright accents and geometry are suitable for pop art and art deco.
These are just general rules and you have the right to do everything your own way.
How to paint a bathroom ceiling
Pixabay
To process it, use a roller with medium-length pile. We recommend squeezing it well in the bath so that the solution does not turn into drops. If you are a beginner, use a roller with a short handle. It will not be pulled to the side, and you will feel the instrument better.
You need to overlap the paint to smooth out the transitions. Five centimeters will be enough.
The ceiling must be treated in several layers. In this case, after the first layer has dried, the second layer is applied in a perpendicular direction.
- Ceiling
How to properly paint a ceiling with water-based paint
Which method should I choose?
Walls are painted in three ways:
- A brush has the highest paint consumption, plus the paint can streak. But a brush is indispensable for painting corners.
- Applying paint with a roller provides a more even finish. But it is important to consider the condition of the wall. For example, for uneven walls with minor defects, it is better to choose a roller with long pile. Choose the width of the roller based on the surface area.
- The spray gun sprays paint onto the wall, making the coating thin and even. In addition, the process will go much faster with it. It is important to rinse it thoroughly and wear a respirator and goggles for protection.
The photo shows painting a corner of a wall with a spray gun.
Advice! Try to use paint from well-known manufacturers to avoid problems with the quality of the coating in the future.