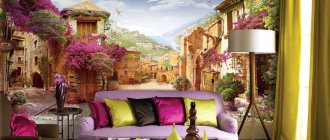
If you want to create a unique interior, look at the walls and show your imagination. Geometric designs brought coolness back to wallpaper, adding endless possibilities for tile, wood and masonry.
The optically ghostly style is full of movement and depth. This is the cure for bare walls that beg you to make them unique. A geometric wall pattern is sure to brighten up your boring walls.
To ensure that the final product does not disappoint you, you must have an idea about the future wall design. To do this, you first need to sketch out a geometric design on paper, measure the height and width of the wall. After these manipulations, you should already know where and what sizes the figures will be.
We make patterns and drawings on the walls ourselves!
When renovating an apartment or a separate room, the issue of wall covering is very important, because this will serve as the basis for the design of the entire room.
In this article we will focus on painting walls yourself. But here we will look at a more interesting method - applying patterns on the walls of the apartment with our own hands. Using paint, you can create drawings or abstract patterns on the walls of an apartment or room that will reflect your style and create homeliness.
Decorative paint techniques
Paint a wall evenly in one color? For lovers of everything new and unusual, this is too boring. A variety of design solutions allows you to choose an unusual and interesting painting technique. You can create an unusual pattern on the wall using familiar materials - a roller and a brush, or using other improvised means. In this article we will look at interesting methods of decorative painting.
Preparatory work
You cannot do without preparatory work; the final result largely depends on this stage. Do not neglect mandatory procedures.
- Protecting surfaces from accidental drops of paint - we don’t want to clean window frames, doors and heating elements after painting. For this reason, all elements that cannot be painted must be covered with plastic film. The seams are sealed with masking tape. You can also use masking tape to seal individual interior elements. Masking tape is designed for different periods of use, so you need to consider how long it will be on the wall. Over time, the adhesive is absorbed into the base, so when you remove the tape, the bottom layer of paint may come off.
- Cleaning - before starting work, the wall or ceiling must be cleaned of dust and dirt, grease and smudges must be removed.
- Primer – a new wall must be primed, this will increase the adhesion (adhesion) of the paint composition to the surface. The primer layer must be applied to any type of surface (plasterboard, cement-sand plaster, etc.)
Removing old wallpaper is easier when the surface is wet. Check the old base - if this is not the first painting procedure for the wall, then you must check the strength of the base. If thick layers of paint easily come off the wall, they must be removed, then the wall is coated with primers.
You can evaluate the reliability of the base using masking tape. If some of the old paint comes off during gluing, then you need to get rid of it. You should not apply paints of different compositions to each other, for example, acrylic to oil.
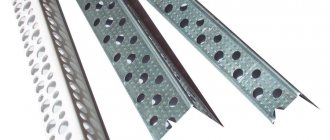
- Repairing cracks and potholes - often it is not only the old coat of paint that needs repair, but also the rough base itself. Over time, cracks and other defects could form on the rough finish. Such places are repaired using plaster or putty. Reinforcing tape can be applied to small cracks or seams.
Many people planning to paint a room think that a decorative finish will hide imperfections in the base. Often you can achieve the opposite effect and in some places old flaws will come out for everyone to see, so it is better to spend more time leveling the rough surface so as not to experience such problems in the future.
- Biological protection - when traces of mold and other biological contamination are detected on the wall. It is necessary to thoroughly treat the surface with antiseptic agents. Deep penetration of fungi requires more serious cleaning, which involves removing the top layer of the rough coating; work with fungicides must be carried out by a person with special training.
The appearance of traces of fungal infections indicates a violation of construction technology. Often this indicates improper waterproofing or vapor barrier, so even if harmful microorganisms were removed, there is no guarantee that they will not appear again.
Stencils – painting according to samples
A stencil is a great way to diversify your painting with designs, patterns and ornaments. This method allows you to get a clear border of the design; such precision is difficult to achieve when painting by hand, even for a skilled artist, and the stencil allows even a beginner to apply the design.
Light drawings on a dark background look very impressive
Stencils can take the form of both small single drawings and entire large-scale paintings, depending on the wishes of the owner. To get the result you will need at least two colors. The colors should be contrasting enough so that the pattern does not get lost. The first layer of paint is the background, the second is applied through a stencil.
Contrasting combinations of background and pattern are the most effective; they immediately attract the viewer’s attention.
The paint used to make patterns must have a thick consistency, and the composition must match the composition of the base (acrylic paint on an acrylic base). The stencil itself can be made with your own hands or purchased ready-made. The material with a self-adhesive base is easy to apply.
Patterns can occupy a small part of the wall space or completely fill the entire free area
The paint can be applied using a roller, brush or spray gun. Using a spray gun you can get an interesting effect if you do not lean the stencil close to the wall. In this case, the edges of the image appear blurry.
In some cases, the stencil is not a pattern cut out in cardboard, but the design itself, which is pasted onto the wall. Then the paint will be located around it, and after removing the sample, an unpainted silhouette will appear on the wall. To paint over simple shapes (rectangles, stripes, geometric shapes, etc.), you can make a stencil from masking tape.
Patterns and other elements that can be applied using a stencil are appropriate in a variety of interior styles: modern, constructivism, classicism. Read more about choosing colors for different design trends in the article: “Choosing paint for different styles.”
Texturing – ordered chaos
Applying textures to walls is one of the most common decorative painting methods. This technique is based on the glazing method (glizal), when another translucent layer of paint is applied on top of the main layer of paint. There can be as many layers as you like, but the main thing is not to overdo it. By layering one color on top of another, you can create unusual combinations. In this case, the base must be dry.
Glaze allows you to achieve rich color combinations
Renaissance artists used the glaze technique when painting canvases. In particular, it is known that Leonardo da Vinci used glaze when creating his paintings.
To apply the glaze layer, you can use special compounds or highly diluted paint. At the same time, it is important not to forget about the rule that the base should not differ in composition from subsequent layers. There are a huge number of glazing methods; the flight of fancy is unlimited. In this case, it is not necessary to have a specialized tool at hand: improvised means (sponges, bags, cellophane, paper, rags, etc.) are enough.
- A textured roller is one of the methods of applying a glaze layer, in which a material is fixed to the roller, leaving an interesting texture. There are varieties on sale that already have a complex structure, relief patterns, etc. However, nothing prevents you from making your own textured roller; to do this, you can wrap ropes, unnecessary rags, sponges, pieces of cellophane, etc. around the old tool.
Textured rollers with a pattern allow you to create an imitation of wallpaper. The pattern is usually made of silicone or rubber and applied to the spool.
DIY texture roller Textured roller for quickly applying patterns
- Brush - allows you to get a wide variety of textures on the wall. The character depends on the size and shape of the instrument. The brush should not be very wet, as this will apply the paint evenly, and dry bristles will leave interesting textured marks.
Using a brush to create a striped texture
- Sponging is a method of painting using a sponge (from the English “sponge” - sponge). Sea sponges are used for painting, as they have an interesting, unique texture. If you don’t have a marine one, you can make a suitable “tool” from a synthetic sponge. Sponging allows you to get an unusual, vibrant texture. Unlike stenciling, where there are not so many variations of applying the same design, one sponge allows you to get a huge number of different patterns. The sponging technique can be reproduced using any materials whose structure seems interesting.
For the sponge painting technique, you can use different colors, but you can get by with paint of the same color. By mixing colors with paint in different proportions, you can get paint of different saturations. The best choice would be a water-based composition. Do not thin the paint too much to prevent it from flowing.
The sea sponge is one of the best sponging tools. Each touch of the sponge produces its own unique pattern.
With the help of sponging, you can get not only abstract patterns on the walls, but also a very real vault of heaven on the ceiling; read more about this in the article “Drawing the sky on the walls and ceiling.”
- Painting like marble - this will require several colors close to natural rock. The second layer is applied with a wide brush, without waiting for the base to dry. The strokes should replicate the texture of real marble; for this, a wide brush is used; in some places the paints will mix and give a variety of shades. Finally, the texture of the stone is applied to the surfaces in a dark color.
Creating a marble texture on a wall
Some techniques are quite complex for beginners; before starting work, you need to evaluate your strength. To implement a complex pattern, it is better to turn to professionals. You can make simpler patterns yourself.
After this, individual areas can be treated with a sponge, this allows you to blur the boundaries. You can enhance the effect with wax and a stiff brush. Fabric is used to create the effect of folds.
- Aging of surfaces is a method that has become widespread in some areas of interior design (country, Provence, classic styles). The technology is not complicated; a more transparent layer of paint is applied over the base, then the paint is wiped off in some places using a cloth. Thanks to this, you can create the illusion of several layers of old paint, and elements of stucco can be painted to resemble worn gold jewelry.
Sprayed - no problem
Splashes of paint can also be used as a decorative element. The technique is not one of the simplest, but with its help you can get not only an interesting drawing, but also an unusual texture on the wall. The density of paint drops and smudges depends on the final design. Technology provides great opportunities for creativity. In the spraying technique, you can use not only colors that are similar in tone, but also contrasting combinations.
The spraying technique in painting is called dripping (from the English “drip” - to drip). The artist Jackson Pollock is considered one of the founders of this technique. To create a more interesting texture, Pollock added crushed glass and sand to the paint.
Pollock You can look for inspiration for interior design using the dripping technique by looking at the expressive abstract paintings of Jackson Pollock
Water-based paint is good for spraying; before painting, it is recommended to experiment on unnecessary surfaces. This will allow you to choose the consistency of the composition. The paint should not be very thick, but it should not flow onto the floor, forming puddles. A brush is suitable for application, but you don’t need to touch the wall. Having dipped the tip, you need to splash the paint onto the surface with an energetic movement; you can hit the brush on a hard object, for example, on a ruler.
Decorative paints for the lazy
Sometimes when carrying out renovations there is no time for creative experiments, but you want to get an interesting color for the wall. Especially for these cases, special decorative compositions have been developed that do not require special skills and tools.
- Chameleon paints have a pearlescent tint; with different lighting, the color of the room changes. Some varieties create the illusion that the wall is lined with silk.
- Paints with solid fillers - sand and crushed sea shells are added to some compositions. The texture of a wall painted with this paint seems voluminous and textured. With the help of such additives, velor, velvet, etc. are imitated.
- Granite paint allows you to create a mosaic surface structure. The composition includes acrylic bubbles, which create a unique appearance of the surface.
Imitating velvet using paint Mosaic paint
Conclusion
Decorative painting techniques not only allow you to decorate a room in an original style and achieve interesting effects, they also give everyone the opportunity to feel like a real interior designer. Many of them are quite simple and can be used even by people without extensive painting experience.
Technology for creating drawings on the wall
When painting walls, there are several main questions that need to be answered:
What paint is suitable?
Of course, you choose the color as you wish, this is your personal design decision. But the type of paint will determine its resistance to water, heat and, in general, how long it will last. We recommend using water-based paints; they tolerate heat and humidity well, do not peel off, the surface covered with them can be washed, and are suitable for all rooms in the apartment.
What do we paint with: a brush or a roller?
Before application, you need to make a plain background.
TIP: When painting walls, it is convenient to use a brush in the corners, as an addition to a roller; it is also useful when working with stencils.
How to properly prepare a wall? What surface can I paint on?
ATTENTION: The exception is special wallpaper for painting; paint applies to it easily and evenly, as that is what they are intended for.
Using masking tape
The essence of the method is that special masking tape is glued to the wall (just lines or combinations thereof), then paint is applied, and when the tape is removed (without leaving marks on the wall), a geometric pattern is formed.
ATTENTION: When painting, it is important that the paint does not get under the tape. Here we will work with a roller, each time picking up paint, make sure there is not too much of it
Master class: Stepped forms
Here we will create patterns on the walls - steps. To apply the tape evenly and evenly, use a cardboard stencil.
Tools:
Drawing technique:
The result should look like in the picture:
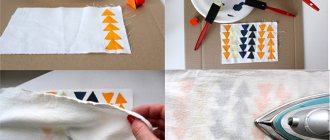
Master class: Triangles on walls in ombre style
Triangles, the color of which changes from the base to the top from bright to increasingly lighter shades, will make the room elegant and modernist.
You will need the following materials:
Execution instructions:
Master class: Optical patterns
This painting method will require a little more calculations and preparatory steps than the previous ones. But the resulting drawing with a 3D effect is worth it.
You will need the following materials:
Stages of creating a drawing:
In this way, you can paint both the entire wall and part of it, then there will be a 3D effect of the painting.
Master class: Geometric shapes on the wall
Triangles, squares, circles and other geometric shapes scattered on the wall will create an original composition.
Materials:
Progress:
Another work option
- First, paint the entire surface one color.
- We draw marking lines according to the plan.
- Adhesive tape. This is done so that a layer of tape covers the stripes of both the base and third colors.
- Then paint it with a second color and remove the tape.
- After waiting for it to dry, you need to apply tape again to the freshly painted strips.
- The final stage is to paint the remaining surface with paint of the third shade. After this, immediately remove the tape.
Using masking tape, you can create not only simple stripes in one direction, but also various patterns, depending on your imagination and plan. To do this, paint the wall surface in a base shade. Then apply masking tape according to the plan of your pattern. After this, use a roller to paint the surface again in a different color. Now remove the tape and the pattern is ready. You can do this in the form of squares and diamonds.
Using stencils
The stencil method allows you to decorate walls with designs of varying complexity, regardless of artistic abilities. You can create even a very complex pattern just by purchasing the appropriate stencil.
And it will take much less time to create a drawing using a stencil than with hand painting. The range of drawings obtained by this method is very wide: flowers, trees, animals, insects, abstraction, and the list goes on.
Roller with patterns
This painting method allows you to quickly create patterns on the wall, requiring a minimum of effort. Its essence is that initially you apply background paint to the wall with a regular roller, and then use a special roller with patterns to paint the wall with a different color.
Of course, colors need to be selected so that everything together looks stylish and harmonious.
Working with such a special roller is the same as with a regular one:
If you don’t want to bother too much, but also want something more original than the usual plain wall color, this method is exactly what you need.
Source
Idea 5. Painting with chalk on a slate wall
By decorating one or two walls with chalk wallpaper or slate paint, you will have the opportunity to change the pictures on the wall every day, write down foreign words, to-do and grocery lists, instructions for household members, motivating or just funny phrases. A chalk wall looks especially cool in the interior of a children's room and kitchen.
- If you want to keep your chalk painting forever, you just need to coat it with matte varnish.
- You can (and should!) draw on a slate surface not only with crayons, but also with chalk pencils, markers and paints.
- Lettering (the so-called painted words) looks especially impressive on a dark wall. True, if you are not a professional font designer or an artist, then it is unlikely that you will be able to write words beautifully, but you can do this with the help of a homemade stencil. The main thing is to find a suitable blank on the Internet.
How to Create a Geometric Pattern on Bookmark Walls
Wall decor with a pattern is always an interesting solution that allows you to add creativity to the room. You can make a pattern on the wall with your own hands even without special knowledge of repairs; even a child can handle it under the supervision of parents. And we will give detailed instructions on how to make geometric patterns on the walls cheaply and quickly.
To create geometric patterns on the walls you will need:
This is a super easy project that doesn't require any special skills or knowledge of aesthetic design, but it looks great right out of the box. The example in the article is the implementation of a project in a boy’s nursery.
Surface preparation
Before applying patterns to the walls, you need to clean the surface of the old finish, and then level the surface, since any flaw will be visible on the painted wall. To do this, use sandpaper and simply sand the surface with it. If there are cracks on the surface, you will need to putty them, and after the work has been done, level the base.
After preparing the surface, you need to remove dust, dirt and apply a primer. It is recommended to apply the mixture in a couple of layers. Next, it will be possible to decorate the room and for this, different methods are used to apply patterns, all of them are presented in the table:
| № | Application method | Result |
| 1 | Masking tape. | You can make different geometric shapes. |
| 2 | Through a stencil. | It turns out to draw flowers, ornaments and other designs. |
| 3 | Using a special roller. | There are rollers on sale that already have a ready-made pattern. To work, just dip it in paint and run it along the wall. |
Knowing the different options for applying ornaments to walls, you need to study each method separately, especially if the work will be done with your own hands.
How to apply masking tape evenly?
Tip for getting straight lines: Let the tape guide you. Don't pull it too tight to try and get straight lines. Keep it a little loose and just smooth it with your hand when sticking it on the wall.
Once you're happy with the geometric pattern on the wall, use a plastic scraper or credit card (and similar tools like a wallpaper putty knife) and trace along each of your painter's tape lines. You need to press confidently enough. This is the key to getting clean lines and avoiding paint bleeding underneath them.
Then take a roller and paint the wall with the second color. Two layers will be enough. Between layers, you need to leave the paint to dry for at least 4 hours (more details on the packaging). Final coverage... and we're almost there.
How to paint furniture in an original way: 7 decor ideas
Creating a unique piece of furniture with your own hands is as easy as shelling pears! All you have to do is take the old one and paint it. There are many ways to decorate furniture, but painting is one of the simplest, cheapest and most effective. Don't know how to get started or what to do? This material was written especially for you: “How to paint furniture: detailed instructions.”
Painting furniture one color may work in some cases, but more often than not it looks flat and boring, although it hides imperfections in the surface. Most often, this is just a base for more interesting options, which we will talk about now.
Colorful details
If one color is boring, why not make several? Paint cabinet sections different colors, make different colored stool legs, or even try a surprising solution: the ends of the legs are one color, the top is another. A beautiful combination of colors and a pleasant balance with the surrounding space will make multi-colored furniture an excellent interior accent.
Caption for the picturePerky stripes and zigzags
Another way to add color to furniture is to paint stripes on it. These may be fashionable zigzags, but the execution will be a little more difficult. You can't do without masking tape here: paint the item a base color, then stick the tape with the desired pattern and put another color on top. When you peel off the tape, your furniture will be striped. Remember to let the paint dry completely before each step.
Complex geometry
If stripes seem primitive to you, try more complex geometric patterns. For example, an ornament of triangles or rhombuses. It is best implemented on large flat surfaces such as cabinet doors and countertops. In order to draw such a pattern you will need school knowledge of geometry, a ruler and a triangle. Master class here.
Stencils
If you want to transfer any image to furniture, but you definitely won’t be able to draw it exactly, use a stencil. You can make it yourself from cardboard or plastic, or order it printed on self-adhesive paper.
Lace ornament
There is nothing better than lace for romantic and elegant interiors. But did you know that they can also be used as ornaments on furniture? This is an interesting version of the stencil technique. You will need a lace napkin or unnecessary tulle (after such creativity, you will have to throw them away). You paint the item a base color, then secure the piece of lace with tape so it doesn’t move accidentally, and spray paint over it from a can. Remove the fabric and the pattern is ready. Instead of spraying, you can try painting with a sponge, but the result will be more blurry. The lace pattern looks great on chests of drawers, cabinets, chair seats and various tabletops.
Paint with non-standard properties
What may be non-standard is not the ornament or the method of painting, but the material itself. Chalkboard paint, marker board paint, if they also have magnetic particles, will make the furniture original and functional. For example, a cabinet door can be used as a presentation board, and a tabletop for quick notes and a game of tic-tac-toe.
Aging with sandpaper
For vintage interiors, where furniture with obvious signs of venerable age is valued, aging techniques are indispensable. The simplest of them requires only two colors of paint and sandpaper: paint one color, then another, and then lightly rub it with fine sandpaper. If the furniture has a protruding ornament, you can complement it with a dry brush technique. Read more about aging techniques in our article.
Show yourself
After all, why not show your personality by painting furniture? You can paint a whole picture, you can artistically splatter furniture with paint, or try your hand at expressionism. It’s a very nice idea to ask friends and family to leave their mark on the history of your home: let them write wishes and draw something so that every glance at a piece of furniture gives you a little of their love and warmth.
DIY drawings and patterns on the walls in the apartment: 10 master classes
When renovating an apartment or a separate room, the issue of wall covering is very important, because this will serve as the basis for the design of the entire room. In this article we will focus on painting walls yourself. But here we will look at a more interesting method - applying patterns on the walls of the apartment with our own hands.
Using paint, you can create drawings or abstract patterns on the walls of an apartment or room that will reflect your style and create homeliness.
In the hall
Immediately crossing the threshold of the house, guests find themselves in the hallway, based on this, the first impression is created for the owners. Therefore, due attention must be paid to the design of the corridor. Artistic painting on the walls or ceilings of the hallway should be done with the highest possible quality. To do this, it is best to invite an artist who will be able to present the room in the best light with his work. In order to decorate the room yourself, it is recommended to choose simple designs.
Technology for creating drawings on the wall
When painting walls, there are several main questions that need to be answered:
What paint is suitable?
Of course, you choose the color as you wish, this is your personal design decision. But the type of paint will determine its resistance to water, heat and, in general, how long it will last. We recommend using water-based paints; they tolerate heat and humidity well, do not peel off, the surface covered with them can be washed, and are suitable for all rooms in the apartment.
What do we paint with: a brush or a roller?
Before application, you need to make a plain background.
TIP: When painting walls, it is convenient to use a brush in the corners, as an addition to a roller; it is also useful when working with stencils.
Using masking tape
The essence of the method is that special masking tape is glued to the wall (just lines or combinations thereof), then paint is applied, and when the tape is removed (without leaving marks on the wall), a geometric pattern is formed.
ATTENTION: When painting, it is important that the paint does not get under the tape. Here we will work with a roller, each time picking up paint, make sure there is not too much of it
Master class: Stepped forms
Here we will create patterns on the walls - steps. To apply the tape evenly and evenly, use a cardboard stencil.
Tools:
Drawing technique:
The result should look like in the picture:
Master class: Triangles on walls in ombre style
Triangles, the color of which changes from the base to the top from bright to increasingly lighter shades, will make the room elegant and modernist.
You will need the following materials:
Execution instructions:
Master class: Optical patterns
This painting method will require a little more calculations and preparatory steps than the previous ones. But the resulting drawing with a 3D effect is worth it.
You will need the following materials:
Stages of creating a drawing:
In this way, you can paint both the entire wall and part of it, then there will be a 3D effect of the painting.
Master class: Geometric shapes on the wall
Triangles, squares, circles and other geometric shapes scattered on the wall will create an original composition.
Create a plan
Painting walls is divided into several stages. The first stage is creating a general plan. At this point, you need to choose how the stripes will be located, their width and color scheme. It must be remembered that colors that are too different from each other will make the room too bright and uncomfortable for the eyes, so only shades are used. Another option is to use two types of paints (alternate glossy with matte, but there can be only one color).
To ensure that there are the same number of stripes on each wall, you need to measure the length of the wall and then divide by the width of the strips themselves. If the quantity does not match, the width can be changed slightly or the most inconspicuous one, located in the corner, can be made a little wider or narrower than the rest.
Speaking of the width of the stripes, now they most often make wider stripes (10 - 30 centimeters). It happens that they are deliberately made of different widths.
Using stencils
The stencil method allows you to decorate walls with designs of varying complexity, regardless of artistic abilities. You can create even a very complex pattern just by purchasing the appropriate stencil.
And it will take much less time to create a drawing using a stencil than with hand painting. The range of drawings obtained by this method is very wide: flowers, trees, animals, insects, abstraction, and the list goes on.
For inspiration with this painting method, we offer a master class on creating a floral ornament.
Master class: Floral print
To somehow diversify the walls and not leave them just white, decorate them with a contrasting floral pattern created using stencils.
To do this you will need the following materials:
Important: When painting, carefully watch your free hand so as not to leave fingerprints with paint on the white wall.
Stage one: planning
First you need to choose the width, color and location of the stripes. It should be borne in mind that multi-colored stripes will make the room colorful and bright.
To avoid this, you can make stripes of the same color, but in different shades: for example, blue and cyan, purple and lilac, etc.
You can take one color, but use different paints: matte and glossy.
These single-color options are suitable for both classic and modern monochrome interiors.
The stripes can be two colors or three, or maybe even more.
If multi-colored stripes alternate with a stripe of the same color (base), then everything is done at once. It’s just that each stripe is immediately painted in its own color. If stripes of different colors are adjacent not only to the base one, but also to each other, then additional painting steps will be required (more on this below).
It is necessary to measure the lengths of the walls that will be painted and divide them by the desired width of the stripes. Will there be an integer number of stripes for each wall? If not, you can change the planned width of the stripes (for example, 10 cm was originally planned, but for an equal number of stripes they can be made 10.25 cm each) or make one of the stripes in the most inconspicuous corner a little larger or smaller than the others.
If desired, the width of the stripes can be made different: for example, cream stripes are wide, and red stripes are narrower.
Today, wide striped walls are in fashion. Its width ranges from approximately 10 to 30 cm.
On a piece of paper, you can make a plan for the future location of the strips on the wall, so as not to get confused later.