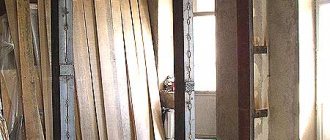
What is needed to level the opening
The photo above shows an opening that needs to be leveled. To align the corners of the opening you will need:
- Gypsum plaster.
- Metal corners for plaster (4 pcs).
- Deep impregnation primer.
The corners look like in the photo below.
Corners for plaster
The corners can also be plastic, they can also be used. The main thing is not to choose very cheap corners made of soft metal, which wrinkle almost like foil.
The corners are produced 3 meters long, so they need to be delivered by some fairly long transport, or carefully cut in half, which will somewhat complicate further work. It is worth paying close attention to the evenness of the corners, both when purchasing and during transportation; they must be transported carefully so that they do not become wrinkled. Any bending of the corners may affect the quality of the finish.
Tools you will need:
- Bubble level and rule, or rule with bubble level.
- Spatulas: It is convenient to use a trowel and a spatula, or a larger spatula and a small spatula.
Trowel and spatula
- Metal scissors for cutting corners.
- Container (bucket) for mixing the solution.
Preparing the opening
Let's prepare our opening. For this purpose, all protruding parts that will interfere with the opening. If the dimensions of the opening are strictly defined, you will need to adjust it to the size required, otherwise (+/- 1-2 cm is not a problem).
Adjusting the opening to size
You can adjust the size of the opening using plaster or sheets of drywall - this is if you need to make the opening narrower and lower. If you need to make it wider and higher, then you need to cut off part of the opening along the edges and at the top. Usually this is not required, but if you are making a double opening from a standard opening, then yes.
I recommend: How to level floor formwork
Please note that such work will require permission, or rather approval, if the opening in the partition (wall) expands significantly (from single to one-and-a-half or double).
Let's first find out how to reduce the opening in the wall
To reduce the opening, it is enough to cut pieces of drywall or foam block of the required size and thickness and glue them to the plaster while simultaneously aligning the ends of the opening with a bubble level. Before work, the surfaces are primed with deep impregnation soil.
The photo above shows ways to reduce the doorway.
Enlarging the doorway
The opening in the wall can be enlarged. To do this, you will need a grinder with a stone disc and a hammer (small sledgehammer) or perforator. We mark the places on the opening (we make marks according to the level) that we want to cut off and use an angle grinder to saw through the recesses on both sides (or on one side if you have an angle grinder with a disc of 180 mm or more). Then we work with a hammer or punch, knocking down unnecessary parts. Keep in mind that you may encounter reinforcement or wood, depending on the material of your partition.
There will be a lot of dust, especially from the grinder, keep this in mind when working. It’s more convenient, of course, to work with a wall chaser with a connected vacuum cleaner, but this is not a tool from a household set.
This method is only suitable for partitions, and load-bearing walls cannot be sawed off without the appropriate permission.
Holes with a puncher, expanding the doorway
You can make holes with a hammer drill along the contour of the future opening, rather than with a grinder, this will result in less dust, but also more work.
We enlarged or reduced the opening in the wall, or left it as is. Let's move on to further actions.
We remove dust and prime the ends of the opening
Everything that interferes with our future opening needs to be knocked down, namely some protruding parts that will prevent us from aligning the opening.
Next, you need to prime the ends of the opening and the distance on the sides of it by 10-20 cm. If you have wallpaper there, then they should be peeled off to the required distance and secured with masking tape so that they do not interfere or get dirty; later they can be used glue back if this is part of your repair plan.
Let the primer dry, usually 1-2 hours is enough.
Doorway in the wall that needs to be leveled
Our opening is ready, we can begin to level it, make an even rectangle, subject to subsequent finishing and the construction of a beautiful rectangular arch.
Wing arch repair
In this case, the plastic linings were removed, but we don’t need the holes from the pistons.
And under the plastic, the arch did not look very attractive.
I ask those who are nervous and have heart problems to leave...
Source for work, wing arch Galant ea. Surprisingly, it didn’t rot into trash under the plastic :)
We remove the caps, wash the surface from the anticorrosion agent, wow, what disgusting stuff:
There wasn’t much time or desire to carry out the whole process correctly, so we didn’t lay out the plane and in general everything was done only with 2-component fiberglass putty in three passes.
The first one was to push the foundation because... It’s not possible to crawl up from the back and put something in:
Rubbed the surface and put on the second layer:
We removed the tape again, rubbed it locally, and now, without tape, carefully laid down the last layer of putty; according to my mind, it should be applied with finishing putty (that’s what smart people told me, but I sculpted from what I had).
Apply the putty, preferably not to the holes:
At the first stage, I did not begin to restore beauty, because... I didn’t have a spray can to match the color.
I taped the repair area with masking tape and newspapers (how could I do without them), blew out several layers of soil, followed by wiping:
I put a base of some gray color and covered it with varnish:
So we drove for about 2 weeks until the factory Mitsubishi paint ordered according to the original arrived.
But now you can bring beauty to the studio.
Using Scotch Brite (this is an abrasive sponge, similar to a homemade dishwashing sponge), we wipe away the remaining sealant, anti-corrosion agent, and old primer.
To avoid unnecessary rubbing, I wiped the edges of the paint with anti-silicone, and then rubbed it with sandpaper:
We cover the body so that the paint goes only where it is needed:
Prime the first layer:
Prime the second layer:
And the third layer followed by removing the tape:
I lightly sanded the edges and applied the first coat of paint:
Second and third coats of paint:
And several layers of varnish:
I advise you not to be lazy and glue all the places where the base and varnish can settle, then wash it longer, especially if you are doing everything outside.
Please do not judge strictly, this is the first experience, and besides, everything was done outside during breaks between bad weather
And, finally, this repair is not a major one, it’s just a way to cover up the shame for a short time.
We level the opening with plaster and metal corners with our own hands
Let's finally look at how to level an opening with plaster and met. corners.
I recommend: How to make a plasterboard arch with your own hands
Mix a small portion of the solution for one long corner (along the edge of the opening). Next, measure and cut the corner according to the height of the opening using metal scissors. You need to cut carefully so that there are no protruding pieces of metal; if they form, bend them slightly inside the corner or make the corner even.
Having prepared a solution with the consistency of sour cream, apply the solution to the trowel with a small spatula, and from the trowel apply it to the corner, the one on which we are going to glue the corner.
Apply the solution to the corner
Having applied the solution along the entire length of the corner, glue the corner onto it, pressing it into the solution, pressing it closer to the opening. We set the corner exactly, without deviations along the axis and vertical. We check the vertical with a rule, pressing the corner with it. We also check that there are no gaps between the rule and the angle along the length of the angle. We set the corner, correcting it with your hands; work with gloves.
Setting up the corners
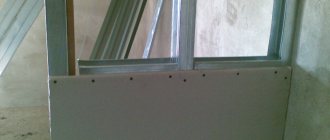
Remove the “extra” solution with a spatula. We place the second corner on the other side of the wall on the same side of the opening. We fill the gap between them with a solution. We position the corners as close to the wall surface as possible, especially on the wall side. Next, we reduce the surface of the walls with the corners with the same plaster so that they do not protrude beyond its plane.
Align the corners to the plane of the wall
For better alignment, take a construction square and check with it whether the opening is formed evenly.
Let's check with a square whether the corners are aligned correctly.
If necessary, we will adjust the corners. Fill the holes in the corners as completely as possible with plaster - this is best done when the solution has set a little.
We do the same with the other sides of the opening. As a result, we get an even rectangular opening.
Forming the upper edge of the opening
The opening is leveled and ready for further finishing
We leveled the opening with our own hands, wait until the plaster dries and begin finishing it. I will tell you the simplest and most inexpensive method, but you can choose another one to suit your taste.
How to plaster doorways
Plastering a doorway or window is a rather labor-intensive process. For those who do not have the necessary knowledge and skills, in this case it is better to invite specialists. And for those who want to do everything themselves, this article will tell you how to do it.
What is slope plaster
A slope is a part of a door or window opening that frames the door or window on the sides and top.
Plaster, in this case:
- Ideally levels surfaces.
- Reliably protects them from destruction.
- Makes the room much warmer.
After installing plastic windows or replacing the door frame, preparation and then leveling (see Leveling walls with plaster according to all the rules) and preliminary finishing of the walls, the question arises - how to plaster a doorway or window? The main method of plastering slopes is “under the rule”.
With this traditional method of surface leveling, special dry mixtures are used to help give the interior a complete and aesthetic look. In each specific case, different solutions and technologies are used.
Their choice is influenced by:
- Technical characteristics of the object.
- How will it be used in the future?
- The price of the work.
Different designs and quality of installation of a double-glazed window or door affect the size of the gaps that appear between the wall and the frame.
If their size is more than five centimeters, which can often be found in old houses, plaster is applied to window slopes in two mandatory stages:
- Insulation.
- Soundproofing.
The space formed between the box and the wall is filled with materials for thermal insulation. Typically, the surfaces are slightly moistened with gypsum mortar, and then compacted along the entire perimeter of the door, leaving up to three centimeters, which are filled with the main mixture. If, after installing the structure, sounds are strongly audible from the street, the gaps are filled with additional soundproofing materials.
Correct installation of windows and doors virtually eliminates gaps, and existing ones are filled with polyurethane foam. After the foam has dried, the door slopes are plastered and further finished (see How to finish the front door slopes).
How to prepare for work
Tip: In order for more light to penetrate into the room, the slopes should be plastered at a slight angle, which is measured with a special square.
The instructions for preparing slopes for work suggest the following procedure:
- The surface is thoroughly cleaned of dirt and dust.
- Bitumen and grease stains, salts that protrude on the surfaces are removed.
- Particular attention should be paid to preparing the corners.
- Existing concrete deposits are removed.
- The masonry seams are cleared to a depth of one centimeter, which will ensure good adhesion of the material to the main surface, and the plastered corners of the walls will become durable.
- The walls are primed with a special primer solution (see Types of construction primers and their scope).
Tip: When plastering walls with sand-cement mortar, their surfaces must be moistened with water using household sprayers, rollers or brushes.
- Galvanized plaster profiles are attached to MP-75 or Rotband mortar.
- Profiles must be aligned in two planes:
- relative to the wall;
- without shifting the selected position relative to the slope.
- If there are several doorways on one wall, you need to simultaneously install the profiles on the outer slopes, and after the solution has hardened, install the intermediate elements, aligning them with respect to the previously installed ones. Aluminum slats are used for this. In this case, the outer profiles will protect the corners from damage and act as plaster beacons.
After preparing the surfaces, you can plaster the doorways.
To do this you will need to purchase:
- Ironing iron.
- Spatulas.
Tip: For high-quality plastering of surfaces, you need to make a template. To do this, you can use available material, for example, a piece of plastic. The main thing is to ensure that the working part of this structure is sufficiently smooth and sharp.
How to plaster slopes
Before plastering the window openings, a video viewing will tell you all the nuances of the work. The “as a rule” method is considered the most popular and simple, which is suitable both for performing complete repairs and for improving only window or door openings after replacing the load-bearing structures with them.
The procedure for applying plaster is as follows:
- A special beacon is installed in the corner of the slope, which will serve to level the surface.
- The solution is poured.
- The beacon is pressed to the required depth using a level.
- The rule of suitable length is placed vertically on the slope so that the wall does not protrude beyond its edge. The element is firmly attached to the wall with dowels and its vertical position is checked with a level.
- The excess mortar, which has slightly dried out and released excess moisture, is cut off with a polisher or a regular lath.
Advice: To carry out the process correctly, you must carefully read the instructions for using the solution, how to plaster the slope with this mixture.
- After leveling, when the composition dries a little, for about 15 minutes, the rule is carefully removed by moving it along the wall to the side, but not towards itself. This will make it possible to maintain the corners of the required shape.
- After the edge has dried, the remaining area is grouted with a mixture.
- The remaining slopes are finished in the same way.
Advice: To speed up the hardening of the composition, especially when plastering the upper slope, you should use a dry alabaster mixture.
The video in this article will show you more clearly how to plaster a doorway.
How to finish door slopes
Plastering of doorways is required:
- If there is no door in the opening.
- The door being installed requires a rectangular opening of certain dimensions . This is done during installation:
- accordion doors;
- glass door;
- metal door.
Features of the work:
- Plastering door slopes is performed using two rules.
- Application of the mixture is carried out similarly to the finishing of slopes for windows described above.
- When preparing a doorway, there is no need to carry out insulation and sound insulation; all gaps are filled with foam for installation.
- It is very important to maintain the correct installation of the canvas - parallel to the floor, which will allow you to get a beautiful slope with the correct geometry.
- To prevent chipping on the outer corners of the door slope during operation of the opening, its edging should be covered with a special reinforcing strip and covered with mortar.
When plastering door slopes, sometimes a small problem arises that should be prevented in advance. Cracks may occur in areas where the door frame meets the plaster.
To avoid this:
- Problem areas should be sealed with acrylic or similar sealant, which can then be painted.
- At the junction, a sufficiently sharp knife is used to cut a groove several millimeters deep, strictly at an angle of 45°.
- The groove surfaces are carefully primed.
- A strip of masking tape is glued to the door frame so that the sealant lies in a thin and even strip in the slot. It must be applied with a special gun and leveled with a small rubber spatula.
- After removing the masking tape, the joint will be smooth and even, it will not crack and will have an aesthetic appearance for a long time.
How to level and plaster the corners of an opening
All opening angles are divided into:
- Husks are internal corners, between two walls or when they join the ceiling.
- Usenki are external corners formed at the junction of two adjacent walls.
The internal corners are plastered after the mixture has completely dried, which greatly simplifies the technological process. In this case, the composition will not “reach” for the grater. Finishing is done on a slightly moistened surface.
- A small amount of the mixture is filled with the corner grooves.
- The solution is leveled in the same plane with the previously prepared base.
- In corners where there is not enough mortar, it is applied with a trowel, carefully leveled and compacted with a trowel.
To create a corner, you can use a special spatula.
- Using a wooden strip or rule, protruding corners are leveled.
- Plastering the corners is done using the method described above.
- Before applying the final coating, the surface is well leveled. It should not have depressions or protrusions.
- The surface is primed in an even layer.
- Covered with a finishing layer of putty, no more than two millimeters thick.
- Leveling the corners with the plaster solution is carried out using a shaped rod or a trowel, which moves with slight pressure from bottom to top. In this case, even cuttings and husks are formed.
- When the solution dries, chamfers about one centimeter wide are made on the outer corners. The chamfer can be rounded to the same diameter.
High-quality and beautifully plastered doorways will add coziness to the interior of any room.