Cladding the outside of a wooden house allows you not only to transform not the most attractive buildings, but also to protect them from adverse influences. In addition, this type of work allows you to increase the service life of the building. But it is important to use suitable materials that will provide optimal conditions for the wood and will not cause moisture accumulation and the formation of fungus. For those who do not know what is the best way to cover the outside of a wooden house, reviews will help you understand the pros and cons of different solutions, so they are also worth studying.
Planken
Planken is a board planed on four sides. Its long edge can be straight (with or without a tongue-and-groove system) or beveled at an angle of 35-70º. This type of cladding board is used both inside and outside. It can be mounted vertically, horizontally or diagonally.
The raw material for the production of planken is pine, spruce, linden, beech, oak, etc. wood. The most durable board is made from larch, but this species is quite hard and therefore difficult to process. In addition, it is by no means cheap.
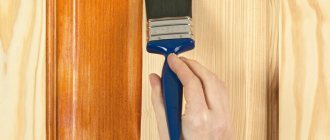
By the way, planken, in principle, costs more than conventional lining, mainly due to the high labor intensity of production. But these costs are recouped (at least partially) due to the fact that the board does not require mechanical post-processing. After covering, the front surface must be covered with a protective preparation (paint, oil wax or tinted antiseptic) and, in fact, that’s all.
Planken with a locking system is not suitable for cladding facades. Under the influence of atmospheric moisture, wood inevitably swells, and the tenons simply tear the grooves
The width of a standard lamella can be from 7 to 14 cm, and the maximum length reaches 6 m. As for thickness, there are only three options: 1, 1.5 or 2 cm. Obviously, the thickest board should be used for cladding facades.
Video: what is better and how to properly cladding and insulating a house from the outside
On the video, what is the best way to sheathe the outside of a wooden house:
We looked at the features of cladding the outside of a wooden house. As you have seen, there are quite a lot of options for decorating your home - you can choose either an inexpensive, practical option or a presentable, but more expensive one. It all depends on the capabilities of the buyer, his taste preferences, and the style of the building itself. Thanks to our tips, you will be able to better navigate the sea of various sheathings and choose the best option for your home.
You may also be interested in information about artificial stone for cladding a house.
Block house
This type of cladding can be recommended to those who want to give an unassuming “frame” the appearance of a real log house. The imitation is achieved thanks to the rounded shape of the front surface. When joined, such boards form a surface reminiscent of a log house wall.
One wide groove or several narrow ones can be cut on the back side of the block house. They are needed, firstly, to relieve the internal stresses of the wood, and secondly, to ventilate the space under the cladding.
The length of the board is from 1.5 to 6 m. The thickness “at the crest of the wave” varies from 2 to 4.5 cm, and the width from 9.6 to 19 cm. The impressive dimensions provide the block house with strength and durability. This type of cladding can last for decades. Of course, if it is made conscientiously.
The quality of a block house (as well as other lumber) is regulated by two standards - Russian GOST 8242-88 and European DIN 68126/86. But there is also a simplified market classification.
Grade "A"
should not have any defects other than healthy, fused knots and roughness on the underside of the lamella.
Variety "AB"
tolerates dark but well-adhering knots, as well as minor cracks and machining defects.
Grade "C"
- lumber of the lowest quality. In this case, both falling knots and deep cracks are acceptable. It is highly undesirable to use such a board for exterior decoration. In the difficult climate of central Russia, it will not last long.
Carrying out external finishing works
External work is the final stage of finishing a house, which requires special care and a thorough approach. Not only the aesthetics of the facade, but also the functionality of the previously created insulating layers will largely depend on the quality of installation of the external cladding elements.
Installation of block house and wooden lining
Installation of a block house
The process of securing wooden lining is carried out as follows.
Table No. 2. Cladding the facade with clapboard.
| Steps, illustrations | Description of actions |
| Step 1 | Having prepared and cut the boards to the required length, they are mounted on the frame. Sheathing should be done in the direction from bottom to top, from the corner of the building. |
| Step 2 | The starting board is installed and nailed (or fixed with special fasteners), with the tenon facing down. It must be positioned strictly parallel to the ground, so a level must be used to check the result. If everything is done correctly, you can proceed to the next step. Otherwise, the board must first be leveled. |
| Step 3 | The next board is inserted into the groove of the previous one. In order for the boards to fit tightly together, the top one needs to be hammered into the groove of the bottom one using a special wooden hammer. |
| Step 4 | After joining the boards, the second one is fixed to the frame in the same way as the first. |
| Step 5 | All subsequent boards are attached using a similar algorithm. |
| Step 6 | After installation is completed, you need to start decorating the corners of the building. To do this, two boards are vertically attached to them so that one overlaps the other. Window trims are designed in the same way. |
Installation of vinyl and metal siding
Additional elements for siding
A general scenario for installing vinyl siding includes:
- installation on the frame of the starting bar;
- installation of corners and H-shaped connecting strips;
- fastening and installation of siding panels;
- installation of the finishing strip and fixation of the final tier.
The starting strip is fixed around the entire perimeter of the building or that part of it that will be sheathed with vinyl. Since the plank will be covered from above by a row of panels, there are no special requirements for it: you can use connections from scraps and even a strip of a different color. The initial stage is the most important, so it is worth approaching it thoroughly, because it will be quite difficult to correct the slightest imbalance in the event of an error.
Installation diagram of the starting strip for siding
- First, a nail is driven in at the corner of the outer frame of the building below and a thread is pulled along the wall, which should be used as a guide in the future. Note that the distance from the ground to the thread should be equal to the width of the starting strip.
- Next, having secured the thread at the second corner, it is placed in the correct position using a level. The result should be a straight line strictly parallel to the ground.
- Using chalk or a pencil, draw a straight line, for which the thread is used as a guide. It will mark the place where the starting strip will be fixed.
- The plank is attached to the frame using self-tapping screws.
We draw your attention to the fact that you need to check the correct installation of the panels with a level as often as possible. It is advisable to do this before starting the installation of every third row of siding.
Vinyl siding installation
Fastening the vertical corner strips must begin before installing the main panels, since it is in them that all rows of siding are installed. When starting this stage of finishing work, you should know some of the features of this process.
- The corner bar should be located at a height of 0.5-0.7 cm from the ground. This is done so that during thermal expansion the plank does not rest against the foundation and does not become deformed.
- The corner must be secured with self-tapping screws from top to bottom. Please note that the first fastener is made at the top point of the hole, and all subsequent fasteners are made in the center. This approach makes it possible to ensure that the sheathing material expands only downwards and to the sides.
- The bottom edge of the vertical corner strip must be cut to the width of the starting strip. The goal, as in previous cases, is the same - to avoid the consequences of expansion of the material when heated.
Installation of near-window siding strips
Imitation of timber
We are talking about a board with chamfers beveled at an angle of 40º and a tongue-and-groove locking system. In fact, this is another type of lining, differing from its ancestor only in the shape of the edge and size. The thickness of the product varies from 1.8 to 4 cm, the width is 11-20 cm, and the length reaches 6 m.
Important!
For exterior decoration, you should choose the most massive imitation of timber - at least 2.5 cm thick and 15 cm wide. The length should be such that one lamella is enough for the entire wall. If the facade is long and 6 m is not enough, the joints that arise during the cladding process should be covered with wooden planks.
And this is not a matter of aesthetics. The fact is that the ends of the boards are most vulnerable to changes in temperature, humidity and other aggressive climatic phenomena. If they are not protected, the wood will quickly begin to dry out and crack. Imitation timber is made mainly from softwood boards - pine and spruce. Luxury cladding is made from larch wood
Caring for wood floors
The main enemies of wooden cladding are moisture and accompanying microorganisms (fungi, mold, etc.). In order to protect the surface, special impregnations should be used. The façade must be treated with them regularly. The period of reapplication depends on the type of cladding, but on average, experts advise updating the protection once every 5-7 years. You can also paint the surface to update the color and provide protection, but wood is so self-sufficient that you can do without it.
With proper installation and proper care, a wooden facade will delight its owner for many years. This eco-friendly type of finishing can create a unique and original exterior.
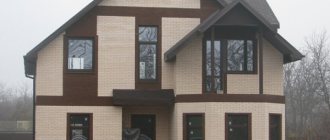
Bakelite facade plywood
It would seem that plywood is not the material that can be used to cover facades. But oddly enough, its moisture-resistant varieties are used for these purposes. Of course, this finish will not last forever. But if you use a moisture-resistant board and cover it with three layers of protective preparations (for example, primer and double painting), it will last for several years.
The main advantage of plywood is that its sheets have a large area, and this simplifies and speeds up work. This is usually how frame houses, summer kitchens and cabins are finished in regions with a temperate climate. As a rule, slabs with a thickness of 9 to 12.5 mm are used. They are optimal in terms of price, quality and reliability. Sometimes you can find cladding 15 mm thick, but this is rather an exception to the rule. Such massive panels, firstly, are quite expensive, and secondly, they have considerable weight, which can be critical for a “framework” on a shallow foundation.
Of course, thickness is not the only important factor when choosing plywood. The quality of the veneer, the type of glue and the gluing technology matter. Taking into account all these parameters, the material is designated with appropriate markings. FBS plywood has the highest strength, followed by FBS-1 and FBS-1A. FBV boards cannot boast of moisture resistance, and therefore cannot be used for facade work.
Moisture-proof plywood must be coated at the ends with bakelite varnish or special enamel. Without this protection, the sheet will quickly begin to delaminate.
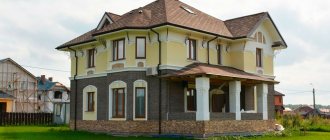
Fiber cement boards and siding
Relatively recently, a new cladding appeared on our market: fiber cement boards and siding made of the same material. They consist of wood fiber, quartz, mica, cement, and may contain chlorine and asbestos (some materials used only for exterior decoration). This mixture is formed into sheets, then dehydrated in several stages, and fired using some technologies. Then a protective and decorative coating is applied to the surface:
- acrylic - inexpensive, fade-resistant;
- hydrofilceramic - high resistance to abrasion and fading (30 years), very low percentage of water absorption, but expensive;
- photoceramic - retains color for a long time, dirt is easily washed off, price - average.
This house is also lined with fiber cement slabs
Watch the video to see how to attach fiber cement boards.
Fiber cement siding is produced using the same technology, only it is molded into long strips. They are basically standard: 3600*190*12 mm. This material is cut with a jigsaw, installed on a wooden sheathing with an overlap (like a cone) and nailed to it or screwed with self-tapping screws.
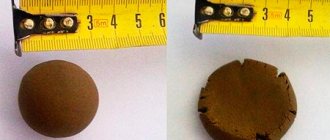
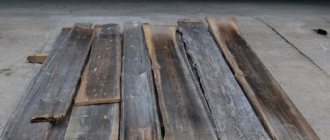
Burnt board
Having talked about the main types of cladding for facades, let's move on to technology. As mentioned above, when working outdoors, the board must be painted or coated with protective preparations. But you can do without “chemistry”. To make wood impervious to moisture, ultraviolet radiation, rot, insects, etc. need... to burn it.
Firing options
Surprisingly, a regular gas burner turns wood into an almost invulnerable material. The melted resin closes the pores like glue. Under the influence of high temperatures, the sugars contained in the juice decompose - food for harmful microorganisms. And the soot settling on the surface makes the board difficult to ignite.
Resinous woods such as cedar, pine, spruce, etc. perform best when fired. However, other breeds can be treated in a similar way. But you need to work with a gas torch or a blowtorch. On a regular open fire, the material chars too much and loses its strength.
Burnt wood does not require painting or impregnation with protective agents. Moreover, its lifespan is calculated in decades
Why is external cladding needed?
Wooden houses to this day remain the most environmentally friendly, breathable, healthy and comfortable to live in. However, wood is a short-lived material and therefore requires mandatory protection.
In addition, due to its softness and friability, the wood is attractive to rodents, bugs and other living creatures.
But protection becomes more effective if the top of the façade of a wooden house is covered with cladding - reliable, beautiful, and heat-insulating.
Wood constantly absorbs moisture, as a result of which it becomes deformed, loses strength and density, darkens over time, becomes covered with cracks, begins to rot and mold.
There are no universal rules for choosing a facing material, but preference is given to finishing that has the following characteristics:
- is a heater;
- has vapor permeability;
- easy to install;
- has a low cost;
- does not require constant painting.
Of course, wooden types of cladding win - lining, block house, planken, imitation timber. They have the same characteristics as the main building material and preserve the naturalness and environmental friendliness of the building.
To strengthen the logs, they are coated with protective chemical compounds: varnishes, paints, stains, impregnations, antiseptic solutions. To reduce flammability, treat with fire retardants
But other materials are often used that are more practical and do not require constant maintenance - for example, vinyl siding.
You should also take care when choosing insulation for your home. You can read about which material is better to give your preference in this material.
Thermowood
You can harden a board not only by firing. Factory treatment of wood with hot steam is even more effective. At high temperatures (185–205°C), the sugars contained in the juice, which we discussed above, burn out. But that is not all. The surface layers of the board become much denser, which means water absorption is reduced. Moreover, it decreases significantly – by 3–5 times. This means that such cladding will not care about rain and snow.
Heat treatment has another noticeable advantage. The board ceases to be sensitive to fluctuations in temperature and humidity. This means that it will not swell and dry out on the facades, gradually tearing out the fasteners.
However, it’s worth talking about fasteners separately. The high density of thermowood makes it prone to splitting. To prevent cracks from appearing on the board when hammering nails or screwing in self-tapping screws, preliminary drilling is necessary, and this adds hassle to the installers.
Special clamps have been developed for heat-treated wood that allow for hidden fastening
All other things being equal, thermowood costs 2-2.5 times more than simple lining. But this is not the whim of the manufacturers. The fact is that before hardening with heat and steam, the raw materials are carefully selected. Boards with knots, resin pockets, fungal infections, etc. are discarded, since all these defects will manifest themselves in the oven. This, as well as the complexity of production, explains the high price.
Is wood finishing that good?
In fact, many are already quite tired of this “concrete jungle” of urban buildings. Every year, more and more people dream of their own, albeit small, country house. Returning to the issue of finishing, and without taking as a basis the construction of a house made of wood, the natural question will be - what are the advantages of this type? There are several arguments here that do not tolerate any reservations:
- The natural look of wood is in harmony with any finishing material, stone, plaster, brick and much more - any option, in combination with wooden finishing, will look more natural and beautiful.
- The finishing is also indispensable from a practical point of view; it hides well all defects in load-bearing walls, allowing you to install hidden communications and arrange additional thermal insulation.
- And, of course, this is additional protection for load-bearing walls from weather troubles and climatic troubles in any form.
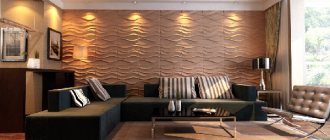
Slatted facade
A slatted façade is a system of posts and boards fixed (vertically or horizontally) at wide intervals. In essence, these are blinds that are “dressed” not on windows, but on walls.
Designs of this kind are popular mainly in countries with hot climates, that is, where reliable protection from the sun is needed. But they are also found in Europe, and recently in our country. This is a light, airy and, importantly, relatively inexpensive finish that can be an excellent home decoration.
Making a slatted facade is quite simple. It will require racks with a cross section of 5×5 or 10×10 cm (depending on the loads) and boards or bars with a thickness of at least 2 cm. They are fixed vertically, horizontally or diagonally. And if you show your imagination, you can create a complex and expressive pattern.
Theoretically, any wood can be used for a slatted facade, but pine or spruce will not last long. But larch will decorate the house for many years and even decades. The same applies to heat-treated and fired boards.
Reviews
Owners of wooden houses covered them with different materials and left their reviews about it:
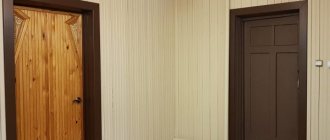
When I got my grandmother's old wooden house, I decided to move into it. But I wanted to refine it. I didn't want to change my appearance. Therefore, I used wooden lining for cladding. I have limited skills in working with wood, but I managed to install the building materials myself.
Ivan, Ekaterinburg
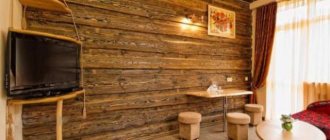
I lined my house with a block house that imitates timber. This is a type of wooden lining that is 2 centimeters thick. Therefore, the surface is not affected by hail and impacts. I like the fact that it is an environmentally friendly material that does not negatively affect health. After tiling the house, I noticed that heat loss decreased in winter. 4 years have already passed, and the block house decorates my house.
Mikhail, Ivanovo
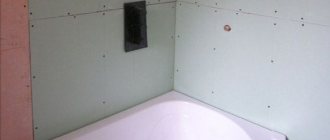
I needed to provide reliable protection for the house from negative factors, so I used metal siding. I chose a wood finish to brighten up the exterior. I turned to specialists for help who installed a ventilated façade.
Antom, Novosibirsk
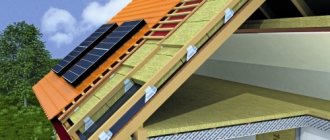
Waterproofing, thermal insulation
The thermal insulator material should be selected before the decorative material for the cladding is selected. There are several insulation options, among which you can choose the best one according to your requirements and budget.
Foam boards are one of the common options. Retains heat well and does not allow sound to pass through. It is easy to install and is not susceptible to pests. These are the advantages. But here are a few disadvantages: firstly, polystyrene foam is a material that does not allow air to pass through, and over the years this will provoke processes of rotting of wooden surfaces, secondly, it is susceptible to combustion, and thirdly, it is far from the classification of “environmentally friendly” materials.
Penoplex is another insulation material that provides resistance to fires, does not allow sound to pass through, and is resistant to bacteria and fungi. The downside is that penoplex is difficult to cut and not easy to install. In addition, just like polystyrene foam, it is vapor-proof.
Mineral wool is one of the preferred materials for thermal insulation of a wooden building. It is good in all respects except that if installed incorrectly due to moisture ingress, the insulation effect can be reduced to almost zero. It is worth choosing mineral wool in slabs - it is most convenient to install.
Thermal insulation is installed on the frame, then the waterproofing is laid. It is attached with an overlap using a stapler. Boards are nailed onto the existing frame for sheathing. This will create additional space for air circulation.