In the process of finishing country houses, special facade plaster is increasingly used.
This is a universal material that is ideal for finishing residential buildings, garages, laundry rooms and various utility rooms.
Its versatility is also based on the fact that plaster can be applied to a wide variety of surfaces - plasterboard, concrete, sand-lime brick, cement and aerated block.
The most important thing is that the surface is carefully prepared. In addition, plaster is characterized by high levels of strength, reliability and elasticity.
Next, we will look at the technology of applying plaster to the wall surface.
Types of plaster
Basically, the classification of plaster mortars is made according to the type of binder used. Four types of this material are used for finishing facades:
- cement;
- silicate , also known as liquid glass;
- acrylic;
- silicone.
Types of facade plaster Source pt.decorexpro.com
Cement plasters
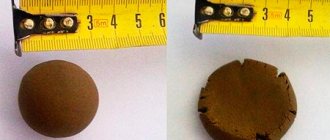
It is clear that the composition of these plaster mixtures includes Portland cement and fractionated sand. It is very important that such plaster solutions do not quickly release moisture. So that it does not go into the material from which the wall of the house is built. That is, when drying quickly, cement plaster begins to crack. Therefore, moisture-retaining substances are added to the composition.
In addition to them, additional plasticizers and modifiers are added, which increase the technical and operational characteristics of the mixture. Typically, the cement variety belongs to the category of textured plasters. Therefore, coarse fillers must be added to the composition. For example, pebbles from crushing granite are added to the “bark beetle” plaster. Their size varies between 0.5-3 mm. By the way, the fraction of the stone must be indicated in large numbers on the paper bag. It is by this parameter that the texture of the finish is chosen.
Dry mixture of cement plaster Source mdv63.ru
The process of finishing the facade of a house with bark beetle plaster is no different from ordinary mortar. It is pulled by the rule, aligned with the beacons. In this case, the pebbles roll under the tension of the tool, forming grooves that are very similar to grooves in wood eaten by a beetle.
Cement plasters have many advantages:
- high strength characteristics;
- cement mortar is a “ breathable ” material, therefore it does not have any effect on the vapor permeability indicator;
- environmentally material ;
- after drying, it is a gray finish that can be painted well with any type of paint;
- Compared to other types of plaster mixtures, cement has the lowest price ;
- easily fits on wall materials of any type; if application to a heat-insulating layer is required, then a reinforcing mesh is laid on top of the latter.
It is painting that increases the budget for using cement mortar.
It should be noted that manufacturers offer dry mixtures of this type of facade plaster. The packaging describes exactly how to prepare the solution. You cannot deviate from the manufacturers' recommendations. Otherwise, there is no guarantee of the quality of the final result.
Applying cement plaster to the facade of a house Source pinterest.com
Silicate plaster
This type of decorative plaster for the facade of a house, like the previous one, belongs to the “mineral” category. Only liquid potassium or sodium glass is used here as a binder. Everything else is exactly the same.
The only thing that must be noted is the fact that silicate plasters are sold ready-made in plastic buckets. That is, you will not find it in dry form. Therefore, manufacturers try to prepare solutions, as they say, in full combat readiness. That is, pigments are immediately added to them. Therefore, the finish turns out to be colored throughout its entire body.
Now about the benefits:
- easily tolerates high and low temperatures ;
- 100% waterproof ;
- good thermal insulation qualities;
- it is a “ breathable ” material;
- excellent adhesive properties , even applied to insulation materials without forming a reinforcing frame.
Silicate plaster Source hsbaustoffe.de
But this material also has its disadvantages:
- if moisture gets on a wall finished with silicate plaster, it will change its color , usually darkening;
- the finished solution applied to the surface of the wall hardens quickly , so when carrying out finishing work you will have to move more quickly;
- Before finishing, wall surfaces must be primed , preferably with a silicate primer;
- the price is higher than that of cement.
The technology for applying it to walls is standard: it can be done manually, or by machine. Apply the solution in a thin layer not exceeding 2 cm.
Facade wall covered with silicate bark beetle plaster Source pinterest.com
See also: Catalog of companies that specialize in finishing materials.
Decorative plasters based on acrylic
The fillers are the same. Binder is an aqueous dispersion of acrylic resins. This material is the main glue of PVC. Anyone who has encountered this type of adhesive knows well how elastic it is. The same quality is transferred to acrylic plasters. It allows façade walls to avoid cracking when temperature loads change. In this case, the solution is applied in a thin layer.
Like silicone varieties, acrylic goes on sale in finished form. Manufacturers today offer a fairly wide range of materials, the types of which can be used for finishing in different operating conditions of buildings and structures. For example, in coastal areas where humidity is high, solutions are used specifically for wet operating conditions. There are plasters for regions with a lot of sunny days, for areas where there is maximum dust formation or sudden temperature changes. That is, it is necessary to select plaster according to this principle.
Acrylic plaster “Fur coat” Source brickpark.ru
Now about the advantages:
- have high strength , easily withstand even impacts:
- the finishing does not collect dust in large quantities;
- easy to clean with water pressure;
- one hundred percent moisture resistance ;
- cheaper than silicate and silicone mixtures;
- good adhesion characteristics to almost all building materials;
- The applied plaster layer can be painted .
And the cons:
- low vapor permeability ;
- fades over time in the sun.
It should be added that manufacturers offer two types of acrylic plasters: for repairing facades and for finishing. The first is used to seal cracks, crevices and recesses. The second is for finishing. Almost all experts agree that exterior finishing of a house with this type of plaster is the best.
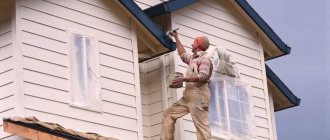
At what temperature can you plaster outdoors?
When the air temperature outside reaches a value below +5°C, then already in this case anti-frost additives , which allow it to gain strength in frost - ammonia or chlorine water, potash.
In other conditions, you can start preparing the solution and finishing the facade at an ambient temperature of +9 to +25°C.
It is not recommended to plaster the facade with cement-sand mortar if it rained the day before . The surface should be as dry as possible and have no obvious signs of moisture.
Source
Types of textures
It should be noted that all the plaster solutions presented above form the same textures on the facade walls of the house. Namely:
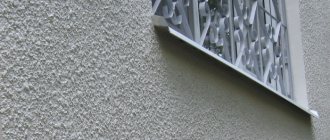
- Fur coat . This textured finish is independent of the mortar content. The method of application is important here. Therefore, to form a fur coat, they try to use plaster mixtures that contain fine fillers.
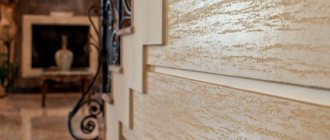
- Bark beetle . This type of finishing, on the contrary, depends on the fractionation of fillers. The larger the granules present in the material, the more clearly the texture and intensity of the relief is formed.
- Lamb . This mixture also contains fillers, but not just one fraction, but several. Therefore, a lumpy surface forms on the wall, reminiscent of curls on a sheep’s wool.
- Cereal or pebble plaster . The composition includes pebbles of the same large sizes. This plaster forms a finely lumpy surface.
- Mosaic, also known as plaster with crumbs of decorative stone . Included in the group of silicone or acrylic types. For this purpose, transparent resins and stone chips are used. Essentially, a rock ripple is formed on the wall.
Varieties of textures of facade plasters Source nashaotdelka.ru
Reinforcement and priming
After this event, a special reinforcing mesh is applied to the walls. It is necessary so that the applied plaster mixture adheres very well to the previously installed insulation.
A properly selected and installed mesh will play the role of protection and strengthening.
In the process of applying the mesh, it must first be cut into meter-long pieces . More dimensions are not used, since the plaster may simply dry out before its distribution is completed.
After gluing the mesh, it must be rubbed using special mixtures of plaster or building mixture.
NOTE!
To carry out facade work, it is necessary to use a mesh whose density is 140-160 g/sq.m . It is possible to choose a mesh of higher density.
With its help you can get a more even plaster layer. The only thing you need to pay attention to is that the denser the mesh, the more difficult it behaves when processing corners.
The walls are not only carefully reinforced, but also primed. If the wall very strongly adsorbs moisture from all applied materials, 2-3 layers of primer will be required . This is a very important process, since it is the primer that significantly increases the adhesion of the surface to the coating and will thereby help overcome the general wall uneven drying of the finishing layer.
The primer also serves as protection against various biological formations that can be caused by fungi or other pests. After this, before applying the primer, a certain technological pause is maintained. Only after this does the process of applying facade plaster with your own hands begin.
Rules for applying decorative plaster
There are no special requirements for plastering. Apply the prepared solution with a wide spatula to the wall surface in the required layer. The main thing is to do the finishing not by square meters, but by the whole wall. This way the finish will be smooth and uniform over the entire applied surface. That is, you cannot plaster part of the wall and fill the other part the next day. The junction of the two laid materials will be clearly visible.
If the walls of the house are insulated with polystyrene foam or mineral wool boards, then it is better to apply the plaster on a reinforcing mesh. Many people make the mistake of first laying the mesh and then coating it with adhesive on top. You need to do it the other way around: first glue, then the mesh, which is embedded in the composition.
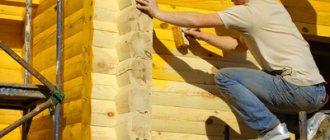
If you decide to plaster wooden walls, then first of all the wood must be protected from moisture, because it is a hygroscopic material and quickly absorbs it. And for plaster this is a guarantee of cracks.
Material selection
, its smoothness and degree of protective functions , as well as the plasticity of the plaster largely depend on the composition and quality of the materials used to prepare the cement-sand mortar
For external work, cement is used, the marking of which is M250 and higher. But sand has a special meaning in the solution, so its choice must be approached extremely responsibly:
- Sand type. The place of sand extraction is exclusively a river or a quarry. The composition should not contain clay admixtures. It is advisable that it be sifted.
- Size. The granule fraction should not be too small, but not too large. Optimally - medium size. The use of coarse sand will lead to some roughness, and small granules will create a “spider web” effect, which will lead to the appearance of microcracks.
Preparation of a mortar from cement and sand
The amount of material is calculated as follows:
- classic – 1 part cement to 3 parts sifted sand;
- if the cement grade is M400, then the ratio will be 1 to 4.
Consumption of plaster mixtures
Experienced builders definitely pay attention to this parameter. After all, the amount of material purchased depends on it. On the packaging, manufacturers must indicate the material consumption in the form of a fork of two numbers. The spread is sometimes quite large. This depends on the quality of the finished base, its evenness, and the fraction of fillers.
- Mineral – 2.5-4 kg/m².
- Acrylic – 1.5-3 kg/m².
- Silicone - 2.5-3 kg/m².
The manufacturer must indicate the material consumption on the packaging Source stroimdom.com.ua
Installation technology for “wet” facades
The plaster facade, which is called “wet”, received its name due to the fact that in its arrangement a mixture of materials based on glue and water is used. This installation technology is often called thin-layer, since the total thickness of the coating does not exceed a few millimeters. Despite this, plaster facade systems provide significant heat savings. Advantages of “wet” facades:
- allow you to perform thermal insulation with minimal cost of money and effort;
- reduce the load on the foundation through the use of lightweight insulation;
- create a comfortable internal microclimate;
- increase the level of sound insulation;
- extend the life of the building;
- allow you to create various texture and color effects.
Recipe for success
Plastering building facades is considered one of the most complex types of construction manipulations , because not only the technical characteristics of the building depend on the high-quality application of the outer plaster layer, but also its neat appearance, which is also very important. Therefore, when starting exterior finishing work, you need to strictly follow all technological standards , choose only high-quality materials, and take care of the necessary tools. Before starting work, you can watch the training video.
Mixing the solution
Cooking rules
- One serving – one hour. You need to prepare as much as you can use within an hour, otherwise the solution will dry out, becoming unusable.
- Tools and equipment are at hand and in clean form. There should be no residues of old materials or dirt on the instrument. Everything you need needs to be prepared in advance.
- Dishes (buckets) for sand and cement must be separate , otherwise the materials will deteriorate and get dirty, mixing with each other.
- Measure out the required number of buckets of sand (“without top”) and pour them onto the mortar board.
- Measure out the required amount of cement using a second bucket. Place in a heap next to the sand.
- Mix , alternately moving with a shovel from one pile to another. Mix until completely homogeneous.
- Make a depression and pour water into it.
- Using a shovel, pour the dry mixture from all the “shores” into the water.
Cooking technology
To check the density of the solution, you need to run a shovel over it , leaving a furrow. The edges of the furrow should neither crumble nor fade. The first is a sign of dryness, and the second is a sign of excessive moisture in the solution. The amount of water, sand and cement spent on preparing a successful portion of the solution must be remembered and adhered to in the future.
Machine kneading
A small concrete mixer with a motor can save time and effort. It can be rented at construction companies and specialized stores. You need to install it closer to the place of work, placing a board under the drum to collect accidentally falling material. When working with a concrete mixer, you must follow safety regulations.
Loading a concrete mixer
1. Load half a portion of sand; 2. Load half a portion of cement; 3. Turn on mixing, mix dry ingredients; 4. Add half the water and turn on stirring; 5. Gradually add sand and cement and water in parts.
Washing a concrete mixer
It is advisable to wash the concrete mixer drum after each batch . After completing the work, you need to rinse it under a powerful stream of water from a hose.
Preparatory stage of work
You can plaster the façade of a building with your own hands.
It is quite possible to plaster the façade of a building with your own hands. However, you need to understand that such work is quite extensive. Therefore, it is necessary to prepare the mortar mixture correctly, use the same components when mixing, and also take care of the tools for work. You can improve your skills before plastering a large-scale object at some outbuilding or garage.
We previously wrote about how to prepare walls for plastering and recommended bookmarking the article.